
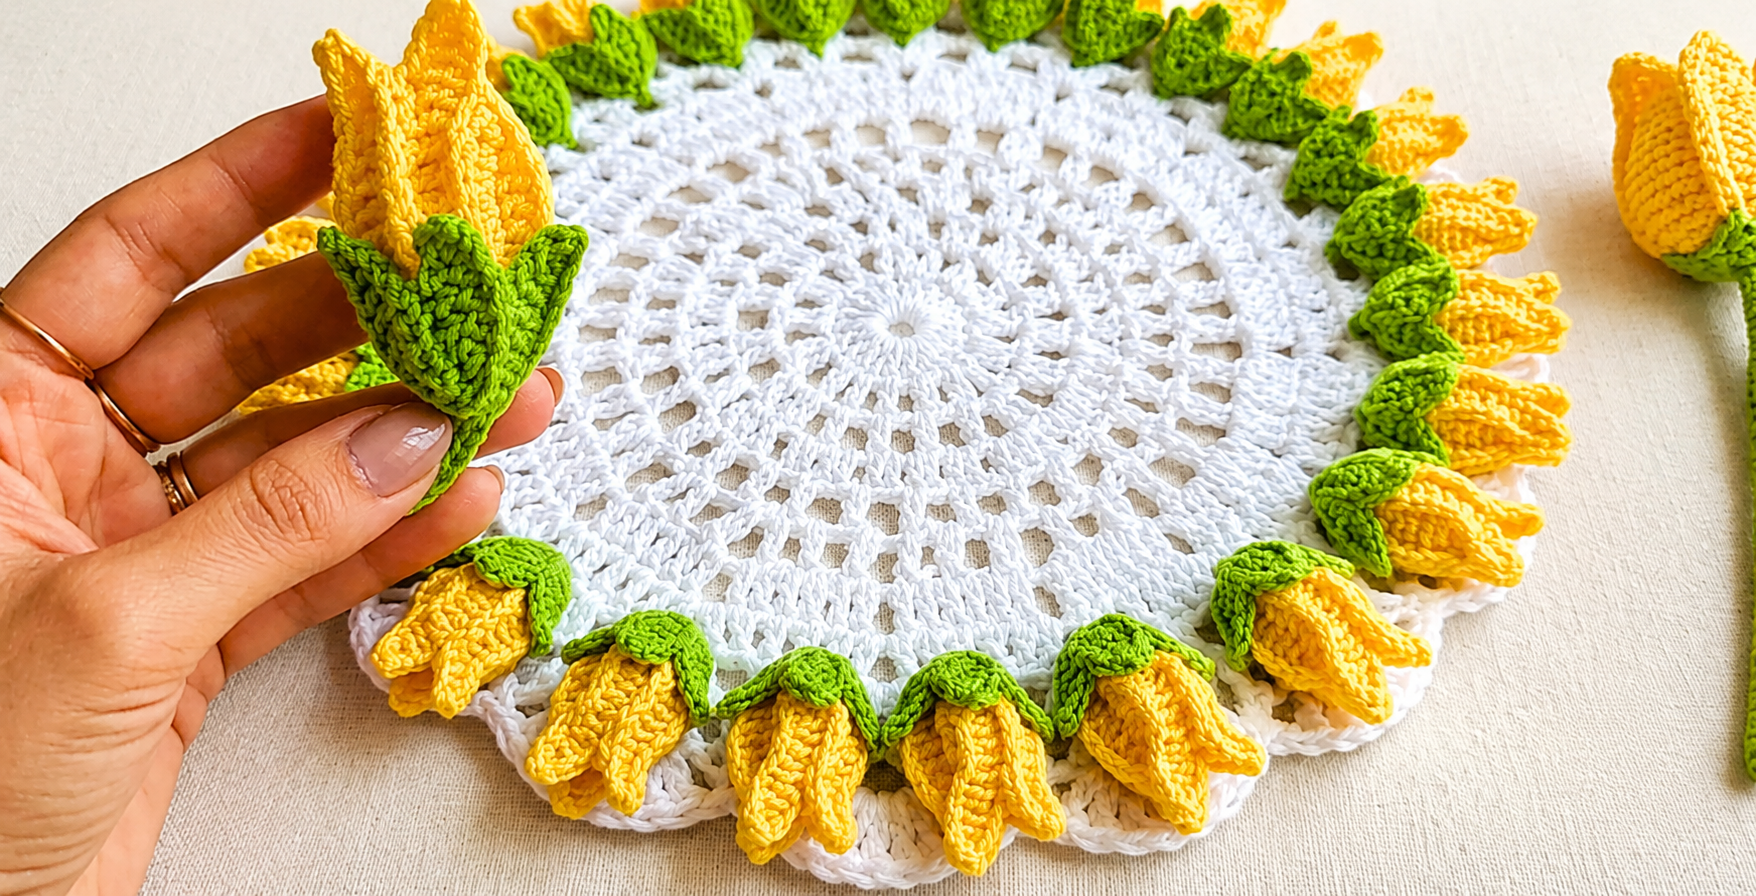
The Crochet doily with a flower motif Pattern is a charming project that combines a classic round crochet center with dimensional floral details around the edge. Inspired by traditional handmade doilies, this design uses a light-colored center and a decorative border made with green leaves and bright yellow flower buds. The combination creates a fresh, cheerful piece that can be used as a table decoration, centerpiece, dresser mat, or handmade gift. Although the finished design looks detailed, it can be completed gradually by building the project one round at a time. Understanding basic crochet stitches and learning how increases are distributed around a circle makes the process much easier. In this guide, you will learn how to recreate the overall look using clear crochet stitch abbreviations, practical construction techniques, and beginner-friendly explanations.
One of the most attractive features of this Crochet doily with a flower motif Pattern is the contrast between the flat circular base and the three-dimensional flowers. The center uses open crochet spaces to create a delicate lace appearance without making the fabric too fragile. Toward the outer rounds, the stitches become slightly denser so the base can support the decorative flower border. Each yellow flower is created separately or partially separately and then connected to a green leaf section around the edge. This gives the finished piece extra texture and makes every flower stand out from the white background. By working carefully and keeping the stitch count balanced, the doily can remain flat while still having a full decorative border.
Before beginning, become familiar with the basic terms used throughout the pattern: ch means chain, sl st means slip stitch, sc means single crochet, hdc means half double crochet, dc means double crochet, and tr means treble crochet. The abbreviation st means stitch, while sp means space and rep means repeat. You will also see instructions such as ch-sp, meaning chain space, and dc2tog, meaning double crochet two stitches together. These basic crochet keys are commonly used in written patterns and allow instructions to stay organized without becoming repetitive. For this project, a smooth cotton yarn is especially useful because it shows the lace stitches clearly and helps the flowers maintain their shape. Once the materials are ready and the abbreviations are understood, the construction becomes a relaxing sequence of circular rounds, leaves, and flower petals.
Creating the Round Center of the Crochet doily with a flower motif Pattern
Start the Crochet doily with a flower motif Pattern with white cotton yarn and a crochet hook suitable for the yarn weight. A 2.5 mm to 3.5 mm hook works well with many light or medium cotton yarns, but always check the yarn label and adjust according to your tension. Make a magic ring, or magic circle, leaving enough yarn tail to secure the center later. Round 1: Ch 3, which counts as the first dc, and work 11 dc into the ring. Pull the magic ring closed and join with a sl st into the top of the beginning ch-3. You should now have a small circular foundation with 12 stitch positions.
DISCOVER MORE FREE PATTERNS HERE!
For Round 2, begin increasing so the crochet circle expands evenly. Ch 3, work 1 dc into the same stitch, and then work 2 dc into every stitch around. Join with a sl st at the top of the beginning chain. This produces 24 dc and forms the first solid section of the doily. The important principle here is even distribution of increases. When increases are spaced consistently, the crochet circle stays flat instead of becoming bowl-shaped or developing unwanted ruffles.
In Round 3, begin introducing the openwork appearance. Ch 4, which represents 1 dc plus ch 1, and work dc, ch 1 into each stitch around. Join with a sl st into the third chain of the beginning ch-4. This creates small openings between the double crochet stitches. These chain spaces are important because they create the airy lace structure visible in a traditional crochet doily. Try not to make the chain stitches too tight, because they should provide enough room for stitches in the following round.
For Round 4, sl st into the first ch-1 space, ch 3, work 1 dc into that same space, ch 1, then work 2 dc into the next ch-1 space. Continue with 2 dc, ch 1 in every chain space around. Join with a sl st. This round begins creating small grouped sections rather than individual posts. These groups contribute to the slightly floral geometry of the center while allowing the circle to grow. If your work begins cupping, check that you have not accidentally skipped a chain space.
Continue the center with another open round. Round 5: Sl st into the space between the first two-dc groups, ch 4, work 1 dc into the same space, ch 2, then work 1 dc into the next space. Repeat dc, ch 2 around, increasing occasionally by working dc, ch 2, dc into one space every few repeats. These additional stitches provide enough circumference for the growing circle. Rather than relying only on an exact stitch number, periodically place the work on a flat surface to make sure the fabric is expanding smoothly.
For Rounds 6 through 9, continue alternating open chain spaces and groups of double crochet. A useful repeating structure is 2 dc in the next ch-sp, ch 2, followed by 3 dc in the next ch-sp, ch 2 on later rounds. Each new round should contain slightly more stitches or spaces than the round before it. This gradual increase is the key to the broad white center seen in this flower motif crochet doily. When the center reaches approximately 22 to 26 cm in diameter, you can begin preparing the outer section that will hold the leaves and flowers.
Building the Decorative Outer Foundation and Green Leaf Border
Before adding flowers, create a stronger outer foundation around the white center. Join white yarn at any chain space if you ended the previous round. Ch 3 and work 2 dc in each ch-sp, adding ch 1 between groups when necessary. The purpose of this round is to stabilize the lace so that the heavier floral motifs will not distort the center. Keep checking that the work remains flat. A decorative crochet doily should lie naturally on the table without needing to be stretched aggressively into shape.
For the next white round, work a scalloped foundation that will remain partly visible beneath the flowers. A simple repeat is sc in the next space, skip 1 st, 5 dc in the next space, skip 1 st, sc in the next space. Repeat this sequence evenly around the doily. The five-double-crochet groups form gentle shells that create a traditional lace finish. These white scallops also provide convenient points where the green leaf sections can later be attached.
Now change to green yarn to begin the crochet leaf border. Join the green yarn into the top or space of one white shell. Ch 3, then work 2 dc, ch 2, 3 dc into the same attachment point. This creates a small V-shaped green cluster. Sl st into the next suitable white space to anchor the motif. The green section should sit slightly above the edge rather than completely covering the white scallops, because the contrast between white and green contributes to the layered appearance of the finished pattern.
To turn the green cluster into a leaf shape, work back across one side using different stitch heights. Ch 1, sc in the first stitch, hdc in the next, dc in the next, and then work tr, ch 2, sl st in the second chain from the hook, tr near the tip. Complete the opposite side with dc, hdc, and sc. The taller stitches create the widest part of the leaf while the shorter stitches taper the ends. This technique is useful in many crochet flower patterns because stitch height can shape leaves without requiring complicated increases.
Repeat the leaf motif around the entire doily, keeping approximately the same distance between each green section. In the style shown here, the leaves create small cups or calyx shapes where the yellow flowers appear to emerge. If you want fuller leaves, you can make two overlapping leaf sections for every flower position. Work one leaf slightly toward the left and another toward the right, then join them at their bases. This creates a realistic floral appearance and gives the yellow bud more support.
After completing the green border, place the doily flat and count the flower positions. Consistent spacing is more important than achieving one universal number because yarn thickness and hook size can change the final circumference. For a medium-sized doily, approximately 16 to 22 flowers often creates a full border. Make sure the leaf motifs are evenly distributed before beginning the yellow flowers. Correcting spacing at this stage is much easier than removing finished dimensional flowers later.
Crocheting the Yellow Flower Motifs Step by Step
The dimensional yellow flowers are the main decorative feature of this Crochet doily with a flower motif Pattern. Begin one flower with yellow yarn by making ch 10. Starting in the second chain from the hook, work sl st in the first chain, sc in the next, hdc in the next, dc in the next four chains, hdc in the next, and sc in the final chain. This creates one elongated petal with a rounded tip and a slightly wider center. The combination of stitch heights helps imitate the long petal shape of a small tulip or flower bud.
To create the second side of the petal, rotate the foundation chain and work into the unused loops along the opposite side. Work sc, hdc, dc across the center stitches, then hdc and sc toward the tip. Join with a sl st near the beginning. This creates a firm double-sided petal. If the petal feels too narrow, work two dc into one or two of the center chains. If it feels too wide, keep one stitch per chain. The goal is to make a petal that folds gently inward rather than lying completely flat.
Create three petals for each flower. You can make them separately and sew them together, or crochet them consecutively by leaving a short chain between each petal. Three petals provide the recognizable pointed-bud effect visible in the project. Arrange the petals so the middle petal sits slightly forward and the two side petals overlap behind it. Use the yellow yarn tail and a tapestry needle to secure the petals together near their lower ends. Avoid sewing through the full length of the petals because they should remain dimensional and flexible.
Once the petals are joined, place the yellow flower inside one green leaf cup. Using green yarn or the yellow tail, sew only the bottom 1 to 2 cm of the flower to the leaf foundation. Keeping the upper part free creates the three-dimensional effect. If you prefer a completely crocheted connection, attach the flower with several sl st stitches through the petal base and the green leaf section. Be careful not to pull the stitches too tightly, because excessive tension can distort the white doily underneath.
Repeat the flower-making process around the entire border. Consistency is useful, but slight differences between handmade flowers can add natural character. Keep the petals approximately the same length and use the same hook size for all motifs. As each flower is attached, point it slightly outward from the center. This positioning creates the beautiful radiating effect that makes the flower motif Pattern so visually appealing when displayed on a round table.
When all yellow flowers have been attached, inspect the border from above. Adjust petals with your fingers so the flowers open evenly. If one bud appears too closed, gently separate the petals. If another flower spreads too widely, add a small hidden stitch near the base to bring the petals together. This final shaping step makes a noticeable difference because dimensional crochet relies not only on stitch construction but also on careful positioning.
Finishing, Blocking, Care, and Customizing the Pattern
Once the crochet work is finished, weave in every loose yarn end using a tapestry needle. Pass each yarn tail through several stitches on the wrong side of the work, change direction, and pass it through another section before trimming. This method helps prevent the ends from coming loose during washing. Pay particular attention to the attachment points of the green leaves and yellow flowers because these areas experience more movement than the flat center.
Blocking is especially important for a crochet doily because it helps reveal the open lace structure. Lightly dampen the white center and place the project on a clean blocking mat or thick towel. Gently stretch the circular base until the chain spaces and scallops appear even. Pin around the edge if necessary, but try to keep the dimensional flowers relatively dry and uncompressed. Allow the project to dry completely before removing the pins.
If cotton yarn was used, the finished doily can usually be gently hand washed in cool or lukewarm water with a mild detergent, although the yarn manufacturer’s care instructions should always take priority. Avoid twisting the piece because that can stretch the lace and damage the flowers. Instead, press out excess water between clean towels. Reshape the doily while damp and allow it to dry flat. Proper care helps preserve both the bright colors and the detailed crochet texture.
The color combination can easily be customized. White, green, and yellow create a fresh spring-inspired appearance, but the same Crochet doily with a flower motif Pattern can be made with cream and dusty rose for a romantic style. Red flowers and dark green leaves can create a festive holiday version, while lavender flowers with soft sage leaves produce a calmer look. Maintaining strong contrast between the center, leaves, and petals usually helps the three-dimensional motifs remain visually clear.
You can also customize the overall size. To make a larger doily, continue adding rounds to the white center before beginning the scalloped border. Each additional round must include enough increases to keep the work flat. As a general crochet principle, whenever the fabric begins curling upward, additional increases may be necessary. If the edge becomes excessively wavy, too many increases may have been added. Learning to read the fabric is just as valuable as following written stitch counts.
This project is also a useful way to practice several fundamental techniques in one finished piece. The pattern combines magic ring construction, double crochet increases, chain spaces, crochet shells, slip stitch joins, crochet leaves, and dimensional flower motifs. Because each technique appears in a logical stage, crocheters can develop confidence gradually. The result is not only a decorative item but also a practical learning project that introduces methods that can later be used in placemats, table runners, blankets, bags, cushions, and other crochet designs.
Frequently Asked Questions About the Crochet Doily with a Flower Motif Pattern
What yarn is best for a Crochet doily with a flower motif Pattern?
Mercerized cotton or smooth cotton yarn is an excellent choice because it provides good stitch definition and helps dimensional petals maintain their shape. Lightweight cotton also produces the delicate appearance traditionally associated with crochet doilies. Thicker cotton can be used if you want a larger and more substantial centerpiece.
What crochet hook should I use?
A hook between approximately 2.5 mm and 3.5 mm works well for many cotton yarns used for this type of pattern. However, the ideal hook depends on your yarn and personal tension. Choose a hook that produces clear stitches without making the fabric extremely stiff.
What do ch, sc, hdc, dc, tr, and sl st mean?
These are common crochet abbreviations. Ch means chain, sc means single crochet, hdc means half double crochet, dc means double crochet, tr means treble crochet, and sl st means slip stitch. Learning these crochet keys makes written patterns much easier to follow.
Why is my crochet doily curling upward?
Curling usually means the circular section does not have enough increases. A flat crochet circle needs gradually increasing stitch counts as its diameter becomes larger. Check whether you accidentally skipped spaces or omitted increases in previous rounds.
Why is my doily becoming wavy around the edge?
A strongly ruffled edge can indicate too many stitches or increases. If the center remains flat but the outer rounds become very wavy, reduce the number of increases slightly. Yarn weight, hook size, and personal tension can all affect how many stitches are required.
Can beginners make this flower motif doily?
Yes. A confident beginner who knows chain stitches, slip stitches, single crochet, and double crochet can work through the project gradually. The flowers may require a little extra patience, but making one practice flower before completing the full border can make the process much easier.
Do I have to make the flowers separately?
No. Separate flowers are convenient because they can be positioned precisely, but the motifs can also be crocheted directly into the border. Separate construction is often easier when creating dimensional petals because the flowers can be shaped before attachment.
How many flowers should I make?
The exact number depends on the diameter of your finished doily and the size of each flower. A medium-sized version may use approximately 16 to 22 flowers. The most important factor is maintaining even spacing all the way around the border.
Can I use acrylic yarn instead of cotton?
Yes, although the finished texture will be different. Acrylic yarn is generally softer and may make the flowers less structured. Cotton provides crisper stitch definition, making it especially suitable for decorative doilies and dimensional floral motifs.
How can I make the petals more three-dimensional?
Keep the attachment stitches concentrated at the bottom of each flower. Avoid sewing the entire petal flat against the green leaves. You can also overlap the petals slightly and gently curve them inward with your fingers after blocking.
Can this pattern be turned into a placemat?
Yes. Simply continue the white circular section until it reaches the desired diameter before adding the decorative border. For a placemat, consider making the flowers slightly smaller so cups and plates can sit comfortably on the center area.
How do I keep every flower the same size?
Use the same hook, yarn, foundation-chain count, and number of stitches for each petal. It also helps to maintain consistent tension. Making all the petals first and assembling the flowers afterward can make it easier to compare their sizes.
Should the flowers be blocked?
The flat doily center benefits greatly from blocking, but dimensional flowers should not be pressed completely flat. Lightly shape them by hand after the base has dried. This preserves their natural three-dimensional appearance.
What happens if my stitch count is slightly different?
Small variations are often manageable as long as the circular base lies flat and the border motifs remain evenly spaced. Crochet tension varies from person to person, so visual balance is sometimes more useful than forcing an exact count that causes curling or ruffling.
How can I adapt the flower motif for other projects?
The same yellow flower and green leaf combination can be used independently on bags, cushions, blankets, table runners, kitchen towels, wall decorations, and other handmade projects. Simply create the flowers separately and sew them securely onto the desired surface.
Conclusion
The Crochet doily with a flower motif Pattern combines traditional circular crochet with colorful three-dimensional details to create a decorative project that looks sophisticated while relying on familiar stitches. Beginning with a magic ring, the white center develops through carefully distributed increases, double crochet stitches, and chain spaces. A scalloped foundation strengthens the outer edge before green leaves are added, preparing attractive attachment points for the yellow flower buds.
Throughout the project, you also practice essential crochet keys such as ch, sl st, sc, hdc, dc, and tr, while learning how stitch height can be used to shape petals and leaves. The gradual construction makes it possible to understand how a flat circular base, lace openings, shell stitches, dimensional flowers, and finishing techniques work together in one complete design.
The final stages of weaving in ends, blocking, shaping the petals, and checking the border are just as important as crocheting the individual rounds. Taking a little extra time during finishing helps the white center stay smooth while allowing the colorful flowers to keep their three-dimensional form. You can also personalize the project with different yarn colors, flower quantities, sizes, and border arrangements.
Whether you create it as a table centerpiece, decorative mat, thoughtful handmade gift, or simply as a project for practicing new techniques, this Crochet doily with a flower motif Pattern offers many opportunities to build crochet skills while producing something beautiful and practical. If you make your own version, leave your sincere opinion about the pattern and share your suggestions. Which flower colors would you choose, and what changes would you make to personalize the design? Your ideas can inspire new combinations and creative variations of this classic floral crochet project.