
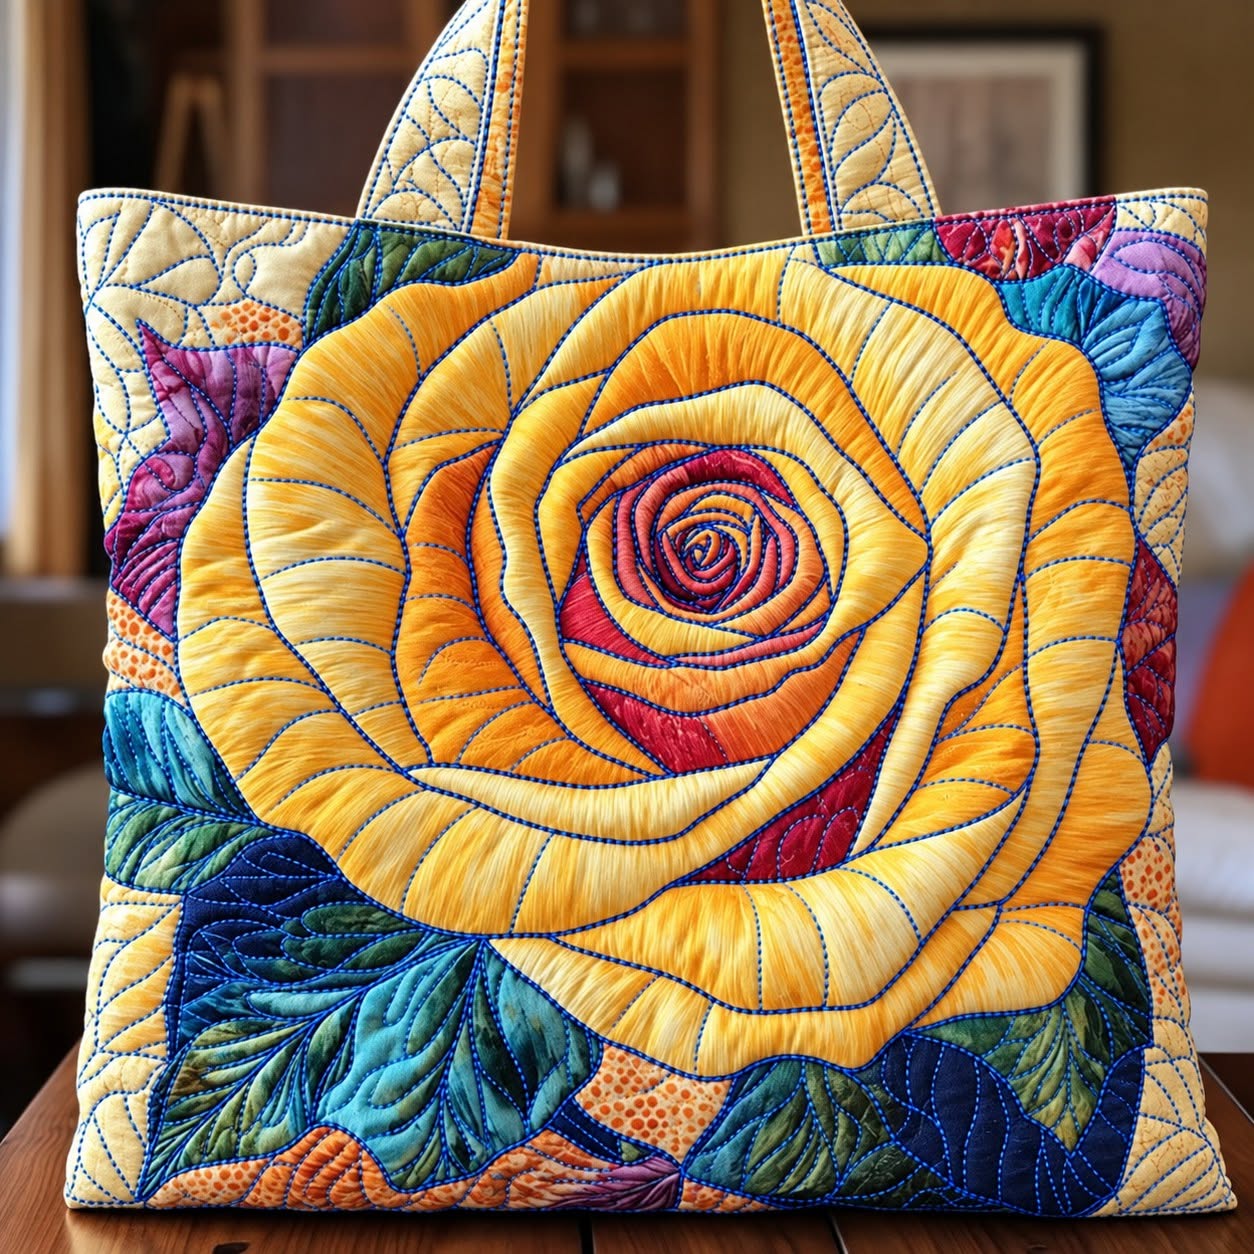
The Quilted Rose Print Tote Bag Pattern is a beautiful sewing project that combines practical bag construction with the artistic character of quilting. Inspired by the tote shown in the reference image, this design features an oversized dimensional rose surrounded by richly textured leaves and colorful patchwork details.
The most striking element is the large golden-yellow rose positioned at the center of the bag, creating a dramatic focal point that immediately catches the eye.
Instead of relying on a simple printed fabric, the project can be recreated with fabric appliqué, layered petals, decorative stitching, and carefully selected quilting cottons.
The padded surface gives the finished tote a soft yet structured appearance, while the handles make it suitable for carrying sewing supplies, books, fabric, groceries, or everyday essentials.
Another advantage of this project is that many of the pieces can be cut from fabric scraps, making it a creative way to use leftover materials from previous quilting projects.
With patience and careful stitching, the result can become a unique handmade accessory that feels both decorative and functional.
Creating a Quilted Rose Print Tote Bag Pattern also provides an opportunity to practice several important sewing techniques in one project.
You will work with patchwork, appliqué, layered fabric shapes, quilting, bag assembly, lining, handles, and topstitching.
The rose itself can look complicated at first, but it becomes much easier when the flower is divided into individual petal layers that are added gradually from the center outward.
The surrounding leaves can be made from different green, teal, blue, and dark navy fabrics to reproduce the rich garden-like appearance visible in the photograph.
Decorative quilting lines help give each petal and leaf more depth while also securing the batting and backing layers together.
Because handmade projects naturally vary, the dimensions can be adjusted according to your preferred tote size without changing the overall construction method.
For a medium-to-large version similar in proportion to the photographed bag, you can begin with two exterior panels measuring approximately 43 cm wide by 42 cm high, although these measurements may be changed according to your needs.
Prepare quilting cotton for the exterior, coordinating scraps for the petals and leaves, lining fabric, medium-weight batting, and optional fusible interfacing for additional structure.
You will also need matching thread, sewing pins or clips, fabric scissors, a rotary cutter, ruler, marking tool, iron, and sewing machine.
Two fabric handles approximately 60 cm long and 8 cm wide before folding create comfortable straps, but longer handles can be used if you prefer carrying the tote over your shoulder.
A seam allowance of approximately 1 cm works well for most of the bag construction, while appliqué pieces can be stitched close to their raw edges.
Before cutting your favorite fabrics, read through the complete process so you can plan the color placement and understand how the rose, background, quilting, lining, and final assembly work together.
Choosing Fabrics and Preparing the Quilted Tote Panels
The first step in the Quilted Rose Print Tote Bag Pattern is choosing a balanced fabric palette. The reference design uses warm golden tones for the rose, reddish and coral shades toward the center, and contrasting greens, blues, purples, and earthy colors around the flower. Using several shades within the same color family makes the finished appliqué look more dimensional than using only one solid fabric.
DISCOVER MORE FREE PATTERNS HERE!
For the main background, choose a light neutral quilting cotton such as cream, pale yellow, or soft beige. Cut two rectangles approximately 43 x 42 cm for the front and back exterior panels. Cut two matching pieces of batting and two lightweight backing pieces so each exterior panel can be quilted separately before the bag is assembled.
Layer each exterior panel with batting underneath and backing fabric at the bottom. Smooth the layers carefully and secure them with quilting pins or temporary basting. Quilt the background using gentle curves, leaf shapes, free-motion stitching, or simple parallel lines. The goal is not perfect symmetry; subtle irregular quilting can enhance the handmade appearance of the tote.
To reproduce the patchwork effect around the flower, prepare several irregular fabric pieces approximately 6 to 14 cm wide. Arrange them around the outer edges of the front panel before adding the rose. These pieces can overlap slightly, creating the impression of leaves and garden fragments surrounding the central flower.
Use raw-edge appliqué or turned-edge appliqué to secure the patchwork pieces. Raw-edge appliqué is often easier for this type of artistic quilting because the fabric pieces can be placed freely and stitched around their edges with a small straight stitch or narrow zigzag. A lightweight fusible web may also be used to temporarily hold the shapes before sewing.
Repeat a simpler version of the patchwork arrangement on the back panel if desired. The back does not need to match the front exactly. In fact, using different leaf and patchwork placements can make the handmade quilted tote bag more interesting while still maintaining the same overall color palette and quilting style.
Building the Layered Rose Appliqué Step by Step
The central flower defines the personality of the Quilted Rose Print Tote Bag Pattern, so begin by creating a small spiral-shaped rose center. Cut several narrow curved pieces from coral, rose, burgundy, or muted red fabrics. Arrange them in overlapping circles approximately 7 to 9 cm across, gradually twisting the shapes inward to imitate tightly folded rose petals.
Stitch around each central petal using matching or slightly darker thread. Decorative stitching is particularly effective here because the visible lines help define each folded shape. You can also use a free-motion quilting foot to add curved lines following the natural direction of the petals, which gives the center extra texture.
Next, cut the first layer of golden petals. Instead of creating one large flower shape, use approximately six to eight individual curved petals measuring between 8 and 15 cm. Position them around the rose center, allowing the inner edges to overlap. Pin or fuse them temporarily before sewing so the arrangement does not shift.
Continue adding progressively larger yellow and gold petals. The middle petals may measure around 15 to 22 cm, while the largest outer pieces can reach approximately 25 to 35 cm depending on your bag size. Vary the shapes slightly because natural rose petals are not perfectly identical. This irregularity is what helps the appliqué appear organic.
When all the petals are positioned, stitch close to the edges and add curved quilting lines inside each one. Follow the contour of the petal rather than sewing straight across it. These stitched contours create the shadow and movement that make the rose appear raised even though the flower is constructed primarily from flat pieces of fabric.
Finally, inspect the entire rose from a short distance. If one area seems empty, add a small secondary petal or another line of quilting. If the center looks too flat, additional curved stitching can create greater definition. Once finished, the quilted rose appliqué should dominate the center of the panel while leaving enough surrounding space for the leaves and colorful patchwork accents.
Adding Leaves, Quilting Details, Handles, and Structure
After finishing the rose, begin adding the surrounding leaves. Cut leaf shapes from several shades of green, teal, turquoise, dark blue, and olive fabric. Individual leaves can measure approximately 8 to 18 cm, depending on where they will be placed. Larger leaves look attractive near the bottom of the flower, while smaller shapes work well near the corners.
Arrange the leaves so some disappear partially behind the rose. This layering technique creates depth and makes the flower appear to sit naturally above the foliage. Stitch around each leaf and then sew a central vein from the base toward the tip. Add two or three curved secondary veins if you want a stronger quilted texture.
Now quilt any remaining open spaces on the front panel. Small curved lines, loops, leaf veins, and flowing free-motion designs can visually connect the separate fabric pieces. Avoid overcrowding the central rose with unnecessary stitching because the petal outlines should remain the main attraction of the Quilted Rose Print Tote Bag Pattern.
Prepare the handles by cutting two strips approximately 60 x 8 cm. Fold each strip lengthwise with wrong sides together and press. Open it, fold both long raw edges toward the center crease, press again, and fold the strip closed. This creates a strong four-layer handle approximately 2 cm wide.
Topstitch along both long sides of each handle. Position the handle ends approximately 10 to 12 cm apart from the center of each exterior panel, making sure both handles are aligned evenly. Baste them to the top edges with the handles pointing downward against the exterior panel during final assembly.
If you prefer an especially firm bag, fuse medium-weight interfacing to the lining or add an additional stabilizer behind the quilted exterior. However, avoid making the bag excessively stiff because part of the charm of this design is the soft padded appearance created by the batting and dense decorative quilting.
Assembling the Tote Bag and Creating a Professional Finish
Place the two finished exterior panels right sides together and align the edges carefully. Pin or clip along both sides and the bottom. Sew using approximately a 1 cm seam allowance, taking extra care where the quilted sections are thick. Reinforcing the beginning and end of each seam helps the tote withstand regular use.
For a slightly wider base, create boxed corners. At each bottom corner, pinch the side seam and bottom seam together so they align. Measure approximately 4 to 5 cm from the corner point and mark a line across the triangle. Stitch along this line, then trim the excess fabric while leaving a small seam allowance.
Construct the lining in the same way using two rectangles approximately the same size as the exterior panels. Sew both sides and the bottom, but leave an opening of approximately 12 to 15 cm along the bottom seam. This opening will later allow you to turn the completed tote right side out.
With the exterior bag right side out and the lining wrong side out, place the exterior inside the lining so the right sides are facing each other. Align the upper edges and side seams. Make sure the handles remain between the exterior and lining rather than extending into the seam area incorrectly.
Sew completely around the top edge using a 1 cm seam allowance. Carefully turn the entire bag through the opening left in the lining. Push out the corners gently, smooth the lining into the bag, and press the upper edge carefully. Close the lining opening with a narrow machine stitch or invisible hand stitching.
Finish by topstitching approximately 3 to 5 mm from the upper edge of the tote. This final seam keeps the lining from rolling outward and reinforces the handles. Press the completed project once more, shape the corners, and admire how the layered flower, leaves, patchwork fabrics, and quilting combine to create a distinctive Quilted Rose Print Tote Bag Pattern.
Frequently Asked Questions About the Quilted Rose Print Tote Bag Pattern
What fabric works best for a quilted rose tote bag?
High-quality cotton quilting fabric is one of the easiest materials to work with because it is stable, available in many colors, and responds well to appliqué and quilting. Cotton batiks can also be especially attractive for petals and leaves because their subtle variations in color help create natural-looking shading.
Can beginners make this Quilted Rose Print Tote Bag Pattern?
Yes, although it is best approached as a patient beginner-to-intermediate project. A beginner can simplify the design by using fewer petals, larger appliqué shapes, and basic straight-line quilting instead of free-motion quilting. The basic tote construction itself is quite straightforward.
Do I need a special sewing machine for this project?
No. A standard domestic sewing machine can complete the project. A walking foot can help when quilting several layers together, while a free-motion foot is useful for decorative curved stitching. Neither accessory is absolutely required if you prefer standard straight or zigzag stitches.
What is raw-edge appliqué?
Raw-edge appliqué is a technique in which fabric shapes are placed directly on top of a background and stitched near their unfinished edges. It is faster than turning every edge under and works particularly well for artistic floral designs where many overlapping pieces are involved.
How can I make the rose look three-dimensional?
Use several shades of yellow, gold, orange, coral, and red rather than a single color. Overlap the petal pieces and add curved quilting lines that follow their natural shapes. Slightly darker thread around selected petal edges can also create visual shadows and greater depth.
Can I change the size of the tote bag?
Absolutely. The suggested 43 x 42 cm panels are only a practical starting point inspired by the proportions visible in the reference image. You can reduce the measurements for a smaller handbag or enlarge them for a spacious craft, shopping, or beach tote. Scale the rose pieces proportionally to maintain a balanced design.
Should batting be used inside the bag?
Batting is highly recommended because it produces the soft quilted texture that defines this project. Cotton or low-loft polyester batting works well. If you want a more structured bag, batting can be combined with interfacing or bag stabilizer.
How many petals should the rose have?
There is no strict number. A convincing rose can be created with approximately 18 to 30 layered pieces, but fewer large petals can also work beautifully. Concentrate on creating overlapping circular layers rather than counting every individual petal.
Can fabric scraps be used for this project?
Yes, and this is one of the best projects for using scraps. Small leftover fabrics are ideal for the rose center, surrounding leaves, corner patchwork, and decorative background pieces. Coordinating scraps also give the project the rich artistic appearance associated with traditional patchwork quilting.
How can I keep the appliqué pieces from moving while sewing?
Pins, fabric glue designed for sewing, temporary spray adhesive, or lightweight fusible web can all help. Fusible web is particularly useful for the many curved rose petals because it allows you to arrange the complete flower before permanently stitching around each piece.
What quilting design works best around the flower?
Curved lines, leaf veins, echo quilting, gentle waves, and free-motion loops complement floral appliqué beautifully. Echo quilting means stitching additional lines that follow the outline of the flower or leaves, helping emphasize the shapes while filling the surrounding background.
How should the finished quilted tote be cared for?
Gentle washing is usually best, especially when the tote contains layered appliqué. Use mild detergent and cool or lukewarm water, then reshape the bag while damp. Always consider the washing recommendations for the specific fabrics, batting, and stabilizers used in your version.
Conclusion
The Quilted Rose Print Tote Bag Pattern combines practical sewing with the expressive possibilities of quilting and appliqué. Throughout this project, you learned how to choose coordinating fabrics, prepare quilted exterior panels, construct a layered rose from individual petals, add colorful leaves, create decorative quilting details, prepare reinforced handles, sew a lining, form boxed corners, and complete the tote with a clean topstitched finish.
The key to reproducing the dramatic appearance of the photographed bag is not perfect precision but thoughtful layering. Different shades of golden fabric give the rose depth, coral and burgundy tones define its center, and contrasting blue and green leaves help the flower stand out. Meanwhile, raw-edge appliqué, patchwork quilting, and contour stitching transform simple fabric pieces into a richly textured surface.
You can follow the suggested measurements for a medium-to-large tote or adapt them to create a bag that better suits your own needs. You can also personalize the project with different flower colors, printed fabrics, additional pockets, longer straps, or your favorite quilting designs. Every variation can make the finished piece more personal while preserving the basic structure of the Quilted Rose Print Tote Bag Pattern.
EASILY FIND THE PDF FOR THIS PATTERN HERE!
Most importantly, enjoy the creative process rather than worrying about making every petal identical. Handmade quilting is full of small variations, and those details often give a finished piece its character. If you try this project, leave your sincere opinion about the design and share your suggestions for colors, fabrics, quilting details, or other improvements you would love to see in a future version.