
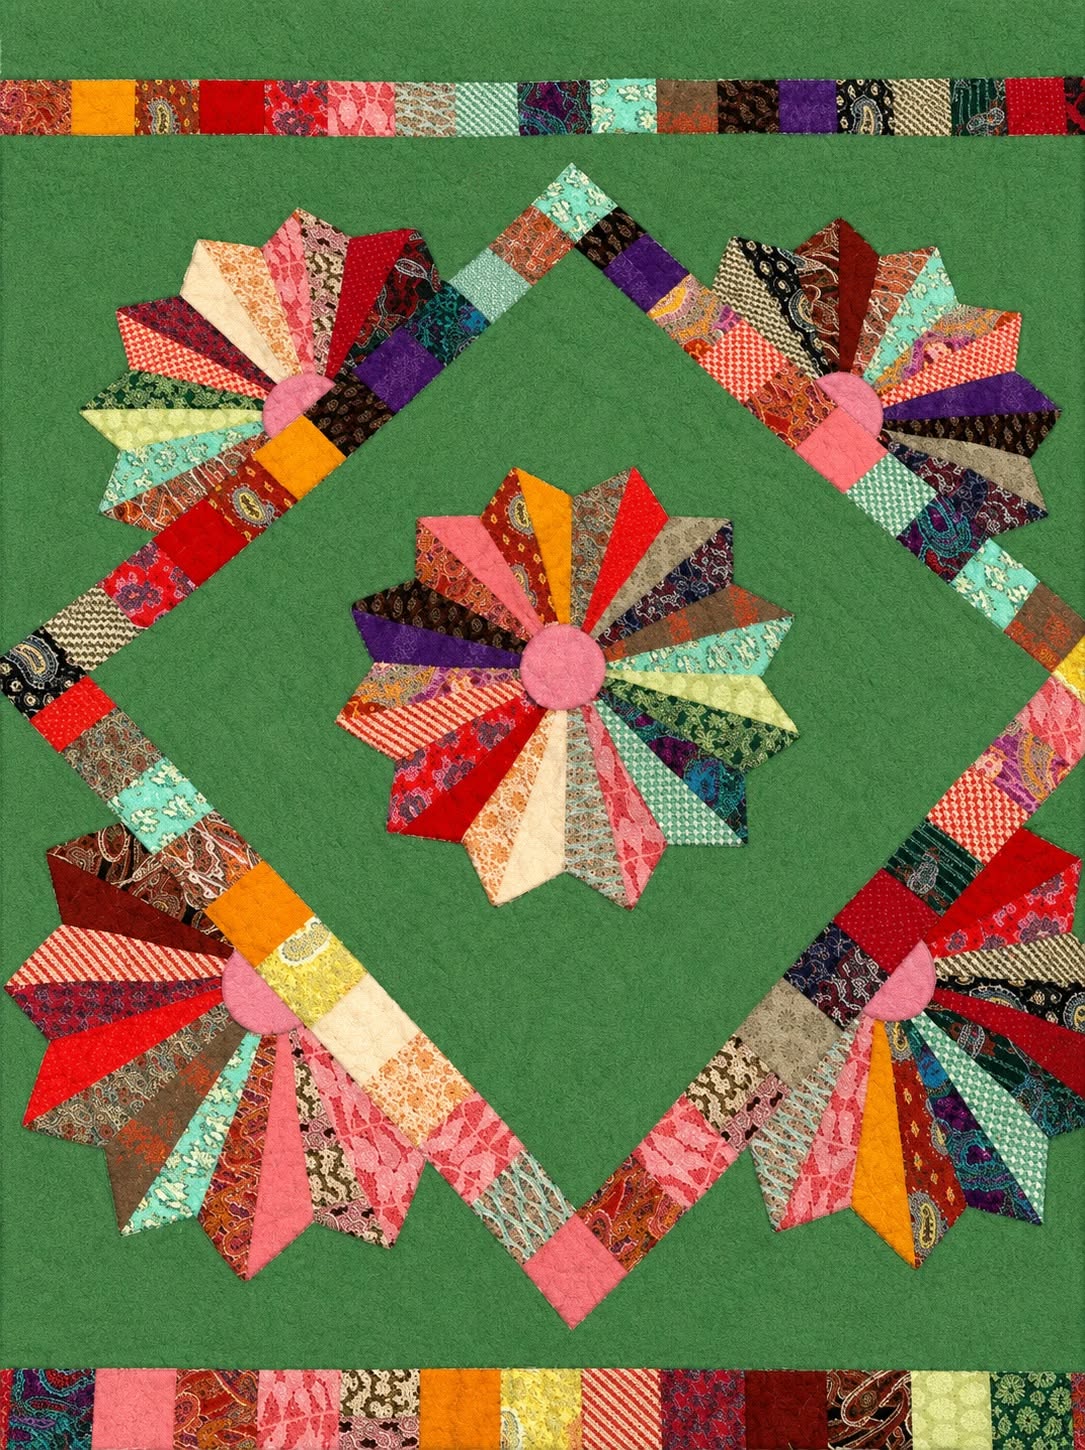
The Dresden Plate Quilt Pattern is a timeless quilting design that turns small pieces of colorful fabric into striking floral or fan-shaped motifs. In the project shown in the reference image, the classic Dresden-inspired shape is given a playful scrap-quilt appearance, with wedges in pink, red, orange, purple, aqua, cream, green, and patterned fabrics arranged over a calm gray background. The contrast makes every “petal” stand out while still allowing the overall quilt composition to feel balanced. This type of project is especially appealing because it combines traditional quilting techniques with an informal, handmade personality, making it suitable for both experienced quilters and confident beginners who want to practice accurate piecing.
Another attractive feature of the Dresden Plate Quilt Pattern is its flexibility. A Dresden plate can be made with carefully coordinated fabrics, but it can also become an excellent scrap quilt project, allowing you to use leftover strips, small printed pieces, and contrasting solids. The photographed design demonstrates this beautifully. Rather than creating identical flowers, it celebrates variation. Some wedges are bright and solid, others contain stripes, florals, dots, or abstract prints, and the circular centers provide a visual resting point. The surrounding pieced border also repeats those scraps, helping the entire quilt look intentional instead of random.
Making a project inspired by this Dresden Plate Quilt Pattern requires patience more than advanced equipment. The essential process involves choosing fabrics, cutting wedge-shaped pieces, sewing them into partial or complete circles, preparing the centers, attaching the Dresden units to background blocks, and assembling the blocks into a larger composition. Accuracy is important, but slight variations can actually contribute to the charm of a handmade quilt. Throughout this tutorial, you will learn how to organize the fabrics, construct the colorful Dresden petals, reproduce the framed block arrangement seen in the image, and finish the piece with borders and quilting that complement the design.
Choosing Fabrics and Preparing the Dresden Plate Quilt Pattern
Start by deciding on the overall personality of your Dresden Plate Quilt Pattern. The reference project has a cheerful scrap-quilt style, so you do not need to buy a perfectly matched fabric collection. Gather cotton quilting fabrics in several colors and prints. Good choices include pink fabric, red quilting cotton, orange scraps, purple prints, aqua fabric, cream pieces, muted green, and a few darker fabrics for contrast. Try to include a combination of small-scale prints and solids so that the Dresden wedges remain visually distinct.
DISCOVER MORE FREE PATTERNS HERE!
For the background, choose a fabric that gives the colorful plates room to stand out. A medium gray similar to the one in the image works especially well because it is neutral without being as bright as white. You may also use beige, pale blue, soft charcoal, or another understated tone. Whatever you choose, keep the background consistent throughout the central section so that the colorful Dresden Plate quilt blocks become the main focus.
The central motif is constructed from multiple wedge-shaped fabric pieces. You can create a reusable cardboard or template-plastic wedge for consistent cutting. A common Dresden plate contains between 16 and 20 blades, although the exact number depends on the angle of your template. For a beginner-friendly version, use a wedge designed so that all pieces together create a complete circle without gaps. The most important rule is consistency: every blade within the same plate should be cut from the same template.
Before cutting, press all fabrics carefully. Wrinkled fabric can distort the wedge shape and make accurate seams difficult. Place the template on the fabric, trace around it if necessary, and cut the pieces with a rotary cutter or fabric scissors. If you are working with scraps, do not worry about cutting every color in equal quantities. The beauty of this Dresden Plate Quilt Pattern comes from its varied appearance, so an irregular mix can actually create a more interesting result.
The project in the image also uses narrow strips and small squares around the Dresden motifs. Save the trimmings from your wedge cutting because many of these pieces can be incorporated into the decorative border. Organize scraps by approximate size instead of color. For example, keep short strips together, small rectangles together, and square pieces in another group. This makes the border-building process much faster later.
Finally, prepare your basic quilting supplies before you begin sewing. You will need quilting cotton, thread, a sewing machine, an iron, cutting tools, pins or fabric clips, and batting for the final quilt sandwich. A small seam gauge is also helpful. Most quilting projects use a ¼-inch seam allowance, and maintaining that seam consistently will help the wedges align correctly when they are joined.
Sewing the Colorful Dresden Plate Quilt Blocks
Begin constructing each plate by arranging the cut wedges on your work surface before sewing. Spread them into a rough circle and move the colors until you are satisfied with the distribution. Avoid placing too many identical colors next to one another unless you want a deliberate color cluster. In the reference project, contrasting colors sit beside one another frequently, which creates the energetic patchwork appearance that defines this particular Dresden Plate Quilt Pattern.
Take two neighboring wedges and place them right sides together. Sew along one long side using a consistent ¼-inch seam allowance. Add the next wedge in the same manner, continuing until several wedges have been joined into a fan. Press the seam allowances carefully as you work. Alternating the direction in which seams are pressed may reduce bulk, but pressing them consistently toward one side can also work if the fabrics are lightweight.
Continue joining wedges until the unit forms a full circular flower or the partial configuration required for your block. Check the plate frequently while sewing. If the pieces begin to curve excessively or refuse to lie flat, your seam allowance may have shifted. Minor distortion can sometimes be corrected with pressing, but large discrepancies are easier to fix by removing one or two seams and resewing them accurately.
The Dresden units visible in the reference design have pointed or tapered petals rather than rounded blades. To create a similar appearance, use wedge pieces that narrow sharply toward the center. The wider ends become the outer petals while the narrow ends meet toward the middle. Because all of those narrow seam allowances create bulk, do not worry if the exact center is imperfect. It will eventually be hidden by a fabric circle.
To make the center, cut a circular piece of contrasting fabric. Pink is used repeatedly in the photographed quilt, creating a consistent connection between otherwise different groups of scraps. You can make the circle with a turned-under edge using a circle template, fusible appliqué, or traditional needle-turn appliqué. Make the circle large enough to cover all raw wedge points in the center of the Dresden plate.
Place each finished Dresden plate on a gray background block. Center it carefully and pin it in position. Attach the plate using a narrow machine appliqué stitch, a small zigzag, a blanket stitch, or hand appliqué. If you want the cleanest traditional appearance, use thread that blends with the Dresden fabrics. If you prefer a more contemporary style, contrasting decorative stitching can become part of the design.
After the plate itself is secured, position the circular center over the middle and stitch around its outer edge. Press the completed block from the back using moderate heat. At this stage, you should have a complete Dresden Plate quilt block with colorful blades radiating from a neat circular center. Repeat the process until you have enough units for your planned layout.
Building the Framed Layout and Scrap-Pieced Borders
The most distinctive feature of the reference project is that the Dresden flowers are not simply placed in ordinary rows. Instead, they interact with a geometric frame made from narrow scrap-pieced strips. Recreating this feature gives the Dresden Plate Quilt Pattern a lively, modern character while preserving the traditional floral motif.
To make the pieced strips, sew small fabric rectangles and squares together into long chains. Mix colors freely, but distribute very bright fabrics throughout the strip rather than grouping them in only one section. Small pink, aqua, orange, red, cream, purple, and patterned pieces can all be used. Press every seam carefully so that the strip remains straight.
Trim the completed patchwork strips to a consistent width. Depending on the desired size of your finished project, strips approximately 2 to 3 inches wide work well visually. The exact dimensions are flexible because you are creating a quilt inspired by the design rather than reproducing a commercial template. What matters most is keeping all strips consistent so the frame looks intentional.
Arrange a large background panel and position the scrap strips diagonally or in a diamond configuration, similar to the photograph. You may construct a central gray square surrounded by patchwork strips, then add additional Dresden motifs around the outer sections. Another approach is to assemble the entire piece from individual background blocks before adding the decorative strips on top. Test the arrangement on a design wall or clean floor before sewing permanently.
As you arrange the Dresden motifs, allow some of them to appear partially intersected by the scrap-pieced frame. This gives the composition its layered appearance. The center Dresden should remain fully visible, while surrounding flowers can be positioned closer to the frame. Maintain enough background space between major elements so the design does not become visually crowded.
Once the central composition is assembled, add a wider outer background border. The photographed project uses another long row of small colorful scraps near the outside edge. You can reproduce this by creating additional patchwork strips and sewing them parallel to the quilt edges. A narrow neutral border between the central design and the colored strip can help separate the elements.
Square the entire quilt top after the borders are attached. Use a long ruler to check that opposite edges are parallel and that the corners form accurate right angles. Do not remove more fabric than necessary. The goal is simply to straighten uneven areas created during piecing. Once squared, the Dresden Plate Quilt Pattern top is ready for batting, backing, and quilting.
Quilting, Finishing, and Personalizing Your Dresden Plate Quilt Pattern
Prepare the backing fabric so that it is slightly larger than the quilt top on every side. Cut batting to approximately the same size as the backing. Place the backing wrong side up, position the batting over it, and finally place the Dresden quilt top right side up. Smooth each layer carefully to remove wrinkles and secure the quilt sandwich with safety pins, spray basting, or temporary hand stitches.
For quilting, choose a design that supports rather than overwhelms the colorful Dresden petals. Simple straight-line quilting works beautifully with the geometric scrap border. You can stitch parallel lines through the gray background while avoiding the Dresden plates, or quilt around the outline of every plate to make the motifs stand out. Echo quilting around the flowers is another attractive option because it emphasizes their shape.
If you enjoy free-motion quilting, the large gray spaces provide excellent areas for loops, swirls, leaves, or gentle meandering. Keep the quilting density relatively consistent across the entire project. Areas with extremely dense quilting may shrink more than lightly quilted sections, so balance is important. The Dresden motifs themselves can be quilted lightly along their seams to add dimension without flattening the colorful wedges.
After quilting, trim the excess batting and backing so they align with the edges of the quilt top. Prepare binding strips and join them end to end. Fold the long binding strip in half lengthwise and press it. Sew the raw edges of the binding to the front edge of the quilt, mitering the corners as you work.
Fold the binding to the back and secure it with hand stitching or machine stitching. Hand-finished binding produces a traditional appearance, while machine binding is faster and very durable. Check the corners carefully and make sure no raw edges remain exposed. Give the finished quilt a light final press without crushing the quilting texture.
You can personalize this Dresden Plate Quilt Pattern in countless ways. Create every plate in a different color family, use vintage-inspired fabrics, make the entire design from denim and cotton scraps, or replace the gray background with a deep navy or cream. You could also enlarge a single Dresden motif and turn it into a pillow cover, wall hanging, table topper, or decorative centerpiece.
The most important part of this project is allowing the fabrics to create their own rhythm. The Dresden design has survived for generations because it adapts beautifully to different styles. Whether your fabric collection is modern, rustic, floral, brightly colored, or made completely from leftovers, the same basic construction method can produce a unique finished quilt.
FAQ About the Dresden Plate Quilt Pattern
What is a Dresden Plate Quilt Pattern?
A Dresden Plate Quilt Pattern is a traditional patchwork design made from wedge-shaped pieces of fabric arranged in a circular formation. The wedges resemble flower petals, fan blades, or sun rays. A fabric circle is commonly placed over the center to cover the raw inner edges and complete the floral appearance.
Is the Dresden Plate Quilt Pattern suitable for beginners?
Yes. A Dresden plate looks complicated, but the basic construction method is repetitive and relatively easy to understand. Beginners should focus on accurate cutting, consistent seam allowances, and careful pressing. Making one practice block before beginning the full quilt can help you become comfortable with the process.
How many blades are used in a Dresden plate?
The number varies according to the wedge angle and the pattern being used. Many Dresden plates contain 16, 18, or 20 blades. The essential requirement is that the combined angle of all wedges creates the intended circular shape.
Can I make a Dresden Plate quilt with fabric scraps?
Absolutely. In fact, scrap quilting is one of the best ways to make this design. The reference project demonstrates how fabrics with different prints, colors, and textures can work together successfully. Using repeated colors such as pink or aqua can help unify an otherwise random collection of scraps.
What fabric works best for Dresden Plate quilting?
High-quality quilting cotton is the easiest fabric to cut, sew, press, and appliqué. Cotton scraps from previous quilting projects are also ideal. Fabrics of similar weight usually produce the smoothest results.
Do Dresden plates have to be appliquéd?
Most traditional versions are attached to a background using appliqué because the plate is created separately and then positioned on a block. Machine appliqué, hand appliqué, fusible appliqué, and decorative edge stitching are all possible methods.
How do I keep my Dresden plate from becoming wavy?
Accurate seam allowances are essential. Even a small variation repeated across many wedges can cause the finished circle to become wavy or cup inward. Cut each wedge from the same template, sew with a consistent ¼-inch seam, and press after every few seams.
What size should the center circle be?
The circle only needs to be large enough to cover the inner points and seam allowances completely. Larger circles create a bolder visual center, while smaller ones highlight the wedges. Always test the circle over the assembled plate before stitching it down.
Can I use different fabrics in every blade?
Yes. Using different fabrics in every blade creates a vibrant scrappy Dresden Plate appearance. If you want the quilt to remain visually balanced, repeat a few colors throughout the different plates and borders.
How should I quilt around Dresden Plate blocks?
You can stitch around the outline of each plate, quilt along the seams between wedges, use echo quilting around the motif, or fill the background with free-motion quilting. Simple quilting often works especially well when the fabrics themselves are already colorful and detailed.
Can this pattern be used for projects smaller than a quilt?
Yes. A single Dresden plate can become a cushion cover, tote bag panel, table mat, wall hanging, placemat, or decorative centerpiece. Smaller projects are also an excellent way to practice the technique before making a full-size quilt.
What makes the Dresden Plate Quilt Pattern so popular?
Its popularity comes from the combination of tradition and versatility. The basic shape is immediately recognizable, but fabric selection can completely transform its appearance. A Dresden quilt can look vintage, modern, romantic, rustic, minimalist, or highly colorful depending on the materials chosen.
Conclusion
The Dresden Plate Quilt Pattern is a wonderful example of how traditional quilting can be adapted into a colorful and creative modern project. In this tutorial, you learned how to select contrasting fabrics, prepare accurate wedge-shaped pieces, sew the blades into Dresden flowers, cover the centers with fabric circles, appliqué the motifs onto background blocks, and create decorative scrap-pieced frames inspired by the project shown in the image.
You also learned how the surrounding patchwork borders can connect the different Dresden motifs and make leftover scraps an important part of the overall design. By repeating selected colors while mixing solids and prints, you can create a quilt that feels spontaneous without losing visual balance.
The finishing process is just as important as the piecing. Careful basting, appropriate quilting, accurate trimming, and secure binding will transform the assembled quilt top into a durable handmade piece that can be displayed or used for many years.
One of the greatest advantages of the Dresden Plate Quilt Pattern is that no two projects need to look exactly alike. Change the background, adjust the number of wedges, experiment with different centers, or use fabrics collected from previous projects. Every variation adds a personal story to the quilt.
EASILY FIND THE PDF FOR THIS PATTERN HERE!
If you decide to create this project, use the tutorial as a foundation while allowing your own fabric collection and creative preferences to guide the final result. Quilting becomes especially rewarding when a traditional technique develops into something unmistakably personal. After trying this Dresden Plate Quilt Pattern, leave your sincere opinion about the project. Share what worked best for you, which colors you chose, and any suggestions or creative variations you would recommend to other quilters. Your ideas can inspire new combinations and help other makers discover even more ways to enjoy this classic quilting design.