
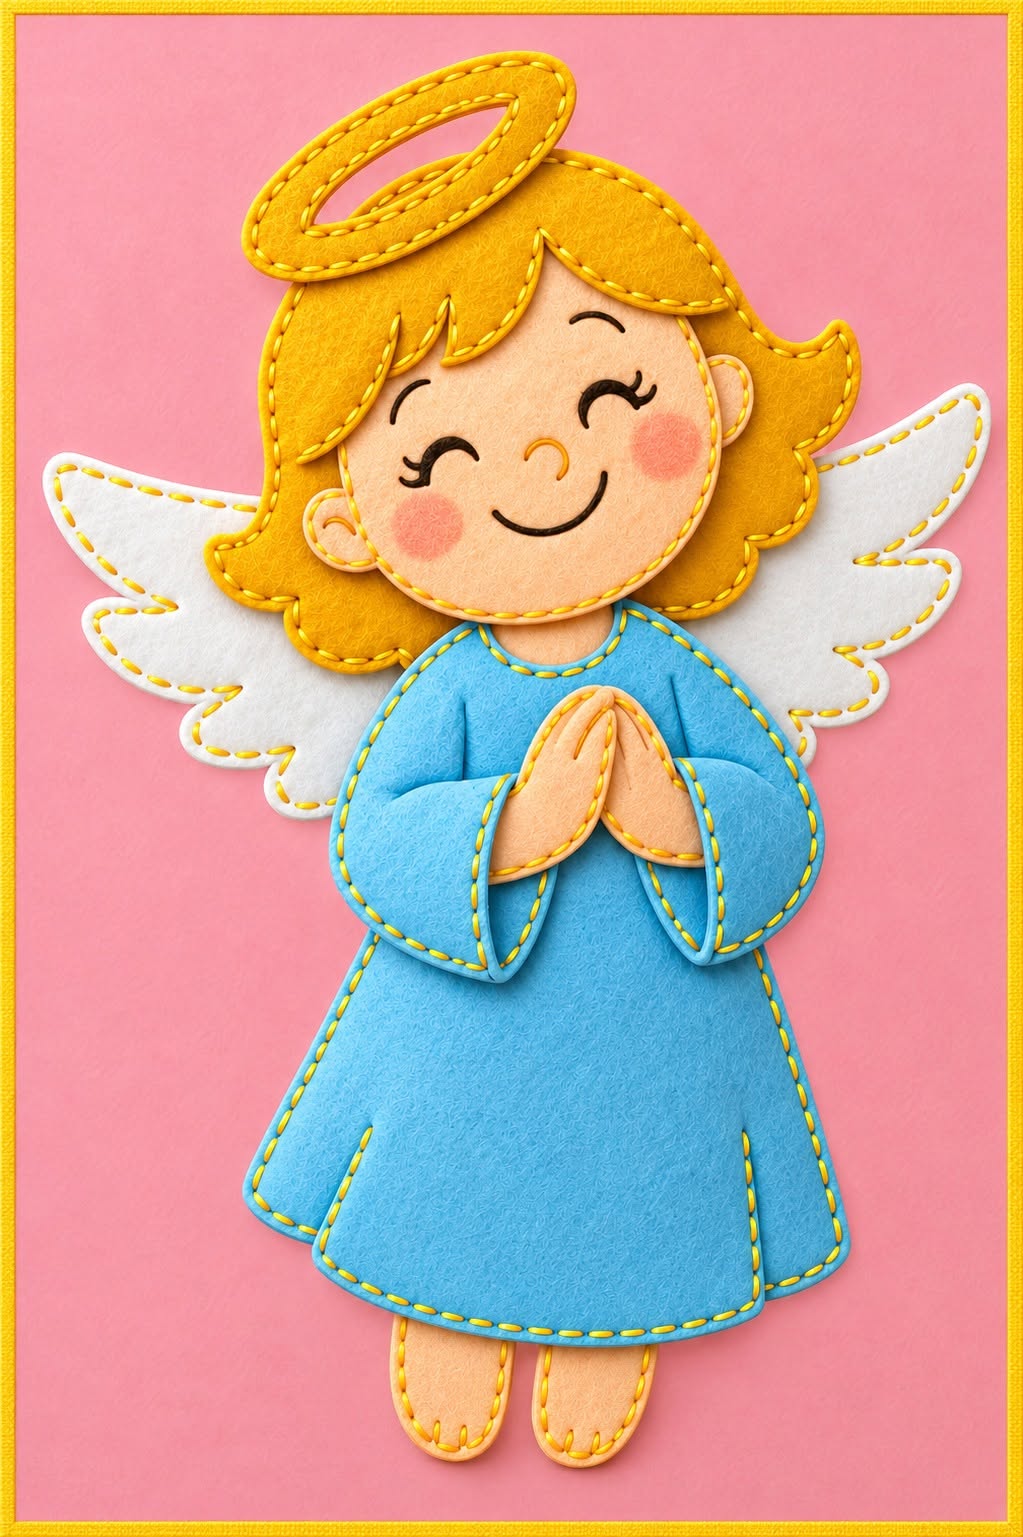
The Felt Angel Sewing Tutorial Pattern is a charming handmade project for anyone who enjoys creating decorative pieces with felt, simple stitching, and carefully layered details. Inspired by the angel shown in the reference image, this project combines a soft blue dress, white wings, golden hair, a matching halo, a smiling embroidered face, and gently folded praying hands. Although the finished angel looks detailed and polished, the construction can be divided into manageable stages, making it suitable for confident beginners as well as experienced crafters looking for a relaxing sewing project. The most important part is preparing clean pattern pieces before sewing because accurate cutting makes the final assembly much easier.
One of the reasons the Felt Angel Sewing Tutorial Pattern works so well as a handmade decoration is that felt is forgiving and does not usually require complicated seam finishing. Its edges remain neat after cutting, allowing the design to use visible blanket stitches, running stitches, or small backstitches as part of the decoration itself. The layered construction also gives the angel a soft dimensional appearance without requiring advanced sewing equipment. You can sew the entire project by hand, although a sewing machine may be used for selected areas if you prefer. Choosing good-quality felt, coordinating embroidery thread, and taking time with the facial details will significantly improve the final result.
This tutorial focuses on recreating the main visual characteristics of the photographed angel while still allowing room for personal creativity. You can enlarge or reduce the felt angel pattern, change the color of the dress, adjust the hairstyle, or create several angels for seasonal displays, nursery décor, handmade gifts, or religious celebrations. The instructions below explain how to plan the pieces, cut the felt, sew the face and body, create the wings, assemble the clothing, and add the final details. By understanding each stage rather than simply copying shapes, you will also be able to adapt the Felt Angel Sewing Tutorial Pattern for future handmade projects.
Materials, Pattern Pieces, and Preparation
Begin by gathering the basic materials needed for the Felt Angel Sewing Tutorial Pattern. You will need blue felt for the dress and sleeves, white felt for the wings, golden yellow felt for the hair and halo, peach or light skin-tone felt for the face, neck, ears, hands, and legs, plus embroidery thread in coordinating colors. Small sewing scissors, fabric scissors, pins or sewing clips, a fabric marking pen, a hand-sewing needle, paper, and a pencil are also useful. A small amount of polyester fiberfill is optional if you want the angel to have a lightly padded appearance.
DISCOVER MORE FREE PATTERNS HERE!
The pattern can be drafted from basic shapes. For the head, draw a rounded oval that is slightly wider through the cheek area. The dress can be shaped like a soft trapezoid with a rounded neckline and a gently curved lower edge. Draw two narrow rounded pieces for the legs, two sleeve pieces with curved ends, two hands, two ears, several hair sections, one large back hair section, a halo ring, and two symmetrical wings. Keeping the felt sewing pattern relatively simple will make cutting and assembly much easier.
When creating the wings, use the reference design as inspiration rather than trying to make them overly complex. Each wing can begin with a curved inner edge where it meets the body and three or four rounded feather points along the outer edge. Fold the paper in half when designing symmetrical pieces whenever possible. This method is especially useful for the wings and halo because both elements need to appear balanced when the finished angel is viewed from the front.
Transfer each paper template onto the appropriate felt color using a removable fabric marker. Cut slowly with sharp scissors so the outer edges remain smooth. Felt can stretch slightly if it is pulled while cutting, so rotate the material instead of forcing the scissors around narrow curves. Accurate cutting is especially important for the face and hair because irregular edges are more noticeable in these areas than on the larger dress pieces.
Before sewing, arrange all the pieces on a flat surface in their approximate final positions. Place the white wings behind the body, the golden back hair behind the head, the face over the hair, the dress below the neck, the sleeves along the sides, and the hands at the center. This dry arrangement helps confirm that the proportions of your angel sewing project look balanced before any permanent stitching begins.
It is also helpful to choose your stitch colors before assembly. Matching thread creates a refined and subtle result, while contrasting thread makes the handmade construction more visible. The photographed inspiration uses stitching that closely coordinates with the felt colors, creating a neat decorative outline. For a similar effect, use blue thread on the dress, white thread on the wings, golden thread on the hair and halo, and peach thread on the skin-tone pieces.
Creating the Face, Hair, Halo, and Wings
The face is the emotional center of the Felt Angel Sewing Tutorial Pattern, so work on it before permanently attaching the head to the body. Lightly mark the positions of the eyes, eyebrows, nose, and mouth with a removable pen. Keeping the facial features slightly above the vertical center of the face leaves enough room for the smile and gives the angel a gentle, cheerful expression.
For closed smiling eyes, sew two small curved lines using dark brown or black embroidery thread. Add a few tiny stitches at the outer corners to suggest eyelashes. The eyebrows can be made with short curved stitches placed a little above the eyes. Use warm brown or orange thread for a tiny curved nose and dark thread for the smiling mouth. Avoid making the stitches too long because short stitches are easier to control on felt.
To create rosy cheeks, use a small amount of fabric-safe blush, pastel chalk, or textile pigment. Apply the color gradually with a cotton swab or soft brush. The goal is a very subtle warm effect rather than a strong painted circle. Testing the pigment on a scrap of matching felt first is recommended because some products appear darker after they are applied.
The hairstyle consists of several layered pieces. Begin with the larger back hair section, which should extend around the sides of the head and form a few rounded points near the shoulders. Place the face on top and secure both layers with small stitches. Then add the front fringe or bangs across the forehead. Several separate pointed sections can be layered together to create the softly curved hairstyle visible in the inspiration.
Create the halo as an elongated felt ring rather than a solid oval. Cut an outer oval first, then carefully cut a smaller oval from its center. If you want the halo to feel more substantial, cut two identical pieces and stitch them together around both edges. Position the halo slightly above and to one side of the hair instead of perfectly centered; this gives the design a more playful handmade appearance.
The white wings should be stitched separately before being attached to the body. Use a simple running stitch or blanket stitch around the perimeter, following each feather curve. If desired, place two layers of white felt together to make each wing firmer. Once finished, position the wings behind the angel so they extend evenly to both sides, then secure them at the center where the stitches will later be hidden by the body and dress.
Sewing the Dress, Sleeves, Hands, and Body
The dress is the largest piece in the Felt Angel Sewing Tutorial Pattern, so it helps establish the overall proportions of the figure. Cut a front dress piece and, if you want a more dimensional ornament, a matching back piece. The neckline should curve gently around the neck, while the lower edge can widen toward the hem to create the soft bell-shaped silhouette shown in the reference image.
Stitch around the dress edges with evenly spaced running stitches. Decorative stitching is particularly effective on felt because it provides both structure and visual detail. If using two dress layers, leave a small opening if you intend to add fiberfill. Add only a light amount of stuffing so the dress remains relatively flat and retains its clean shape.
The sleeves can be created as rounded elongated shapes that widen slightly toward the upper arm. Position each sleeve over the sides of the dress and angle the lower ends toward the center of the body. In the reference design, the sleeves curve inward naturally, helping create the impression that the angel is holding her hands together in prayer.
Cut the hands from peach or skin-tone felt. Each hand can be a simple rounded shape with a slightly narrow wrist. Small embroidered lines near the top can suggest fingers without requiring individual finger pieces. Overlap the two hands lightly at the center of the dress and stitch them securely. Keep the stitches close to the edge for a polished finish.
For the legs, cut two narrow rounded pieces and place them beneath the lower edge of the dress. Small stitches near the bottom can suggest toes or shoes while preserving the simple felt style. Attach the legs to the back of the dress before completely closing the body. Make sure both legs extend approximately the same distance and are spaced evenly.
The head can now be joined to the body. A small neck piece placed between the head and dress helps create a smoother transition. Attach the neck first, then position the completed head over it so the lower section of the face slightly overlaps the neckline. Check that the wings, head, sleeves, hands, and legs are all centered before completing the final assembly of your handmade felt angel.
Final Assembly, Finishing Details, and Creative Variations
Once all major components are prepared, arrange the complete Felt Angel Sewing Tutorial Pattern before adding the final stitches. Place the wings at the back, followed by the hair, head, neck, body, sleeves, hands, and halo. Look at the project from a short distance instead of only working close to the table. This makes small alignment problems easier to notice.
Secure the wing section firmly to the back of the dress or upper body. Because the wings extend beyond the figure, reinforce the attachment area with several small stitches rather than one long stitch. The stitches should remain hidden beneath the dress or hair whenever possible. A strong central connection will prevent the wings from drooping over time.
Next, inspect all exposed edges. Trim away loose fibers and remove visible fabric-marking lines. If any section looks uneven, small corrective stitches can help improve the shape. Felt is very forgiving, and minor adjustments can usually be made without dismantling the entire project.
If you plan to hang the angel, sew a small loop of ribbon or cord behind the halo or upper hair section. Make sure the loop is attached to more than one felt layer so the weight of the finished decoration is supported. This transforms the felt angel sewing pattern into a Christmas ornament, wall decoration, door accessory, or handmade keepsake.
You can customize the same construction method in many ways. A white dress with golden accents can create a classic angel, while pastel pink, lavender, cream, or mint can give the project a softer decorative style. Small embroidered stars, flowers, hearts, or initials can also be added to the dress. For a more traditional holiday version, consider combining red, cream, and gold felt.
The finished project should look carefully handmade rather than mechanically perfect. Slight variations in the stitching, cheeks, hairstyle, or wing curves give each angel its own personality. Once you understand the construction process, the Felt Angel Sewing Tutorial Pattern can become the basis for an entire collection with different hairstyles, dress colors, facial expressions, and decorative details.
Frequently Asked Questions About the Felt Angel Sewing Tutorial Pattern
What type of felt works best for a Felt Angel Sewing Tutorial Pattern?
Medium-weight craft felt is suitable for most decorative angels. Wool-blend felt often provides a smoother and more durable finish, while polyester craft felt is affordable and easy to find. The most important factor is choosing felt that holds its shape without being excessively stiff.
Can beginners make this felt angel?
Yes. This project can be very beginner-friendly when the pieces are kept simple. The main skills are tracing templates, cutting felt, making basic hand stitches, layering pieces, and embroidering simple facial features. Practicing the face on a scrap of felt can help beginners feel more confident.
Do I need a sewing machine?
No. The entire Felt Angel Sewing Tutorial Pattern can be completed by hand. In fact, hand stitching often complements this type of project because the visible stitches become an intentional decorative feature.
What stitches should I use?
A small running stitch is one of the easiest choices for outlining the pieces. Blanket stitch is another popular option for felt because it creates a decorative edge. Backstitch works particularly well for embroidered facial features such as the eyes, eyebrows, and mouth.
Should I add stuffing to the angel?
Stuffing is optional. A flat felt angel works well as an appliqué or lightweight ornament, while a small amount of polyester fiberfill creates a soft three-dimensional decoration. If stuffing is used, avoid overfilling because this can distort the pattern pieces.
How can I make both wings symmetrical?
Create one paper wing template and flip it over to trace the second wing. This guarantees matching shapes. You can also fold a sheet of paper in half and draw half of a symmetrical wing design before cutting it.
How do I keep the halo firm?
Use two layers of felt stitched together or add a thin piece of lightweight interfacing between the layers. This helps the halo maintain its oval shape without making it excessively bulky.
What size should the finished angel be?
There is no required size. A small angel may measure around 15 to 20 cm tall, while a larger decorative version can be 25 to 35 cm or more. When resizing the pattern, scale all pieces proportionally so the head, wings, dress, and limbs remain balanced.
Can I use fabric instead of felt?
It is possible, but regular woven fabric usually requires additional seam finishing because the raw edges can fray. Felt is easier for this particular design because the cut edges remain stable and can be left visible.
How can I make the facial features look neat?
Draw the facial placement lightly before stitching and use short embroidery stitches. Work slowly, especially around the curves of the eyes and mouth. Keeping the design simple often produces a more expressive result than adding too many details.
Can I make several angels from the same pattern?
Absolutely. Reusing the same Felt Angel Sewing Tutorial Pattern is an excellent way to create coordinated decorations. Change the dress colors, hairstyles, halo tones, or embroidered details so each angel looks slightly different.
Is this project suitable for Christmas décor?
Yes. Felt angels are especially popular as Christmas ornaments, tree decorations, garlands, wreath accents, gift toppers, and handmade seasonal décor. However, the design can also be used throughout the year for nurseries, religious celebrations, keepsakes, and handmade gifts.
Conclusion
The Felt Angel Sewing Tutorial Pattern combines simple sewing techniques with thoughtful layering to create a sweet and expressive handmade decoration. Throughout this tutorial, you learned how to prepare the pattern pieces, select suitable felt colors, cut the head, dress, wings, hair, halo, hands, and legs, embroider the facial features, assemble the clothing, and connect every component into a balanced finished angel. The construction may appear detailed at first, but dividing the work into individual sections makes the process much more approachable.
You also learned how details such as consistent decorative stitching, subtle rosy cheeks, carefully positioned wings, layered golden hair, and a softly shaped blue dress contribute to the polished appearance of the project. These techniques are useful far beyond this individual angel and can be adapted to many other felt sewing projects, ornaments, dolls, appliqués, and handmade decorations.
EASILY FIND THE PDF FOR THIS PATTERN HERE!
Most importantly, your finished angel does not need to look identical to the reference image. Handmade sewing becomes more meaningful when personal choices are included, whether that means selecting different colors, changing the facial expression, adding embroidery, modifying the hairstyle, or turning the project into a personalized gift. If you create your own version of this Felt Angel Sewing Tutorial Pattern, leave your sincere opinion about the tutorial and share any suggestions you may have. Your ideas about colors, details, stitching techniques, or creative variations can inspire even more beautiful versions of this handmade felt angel.