
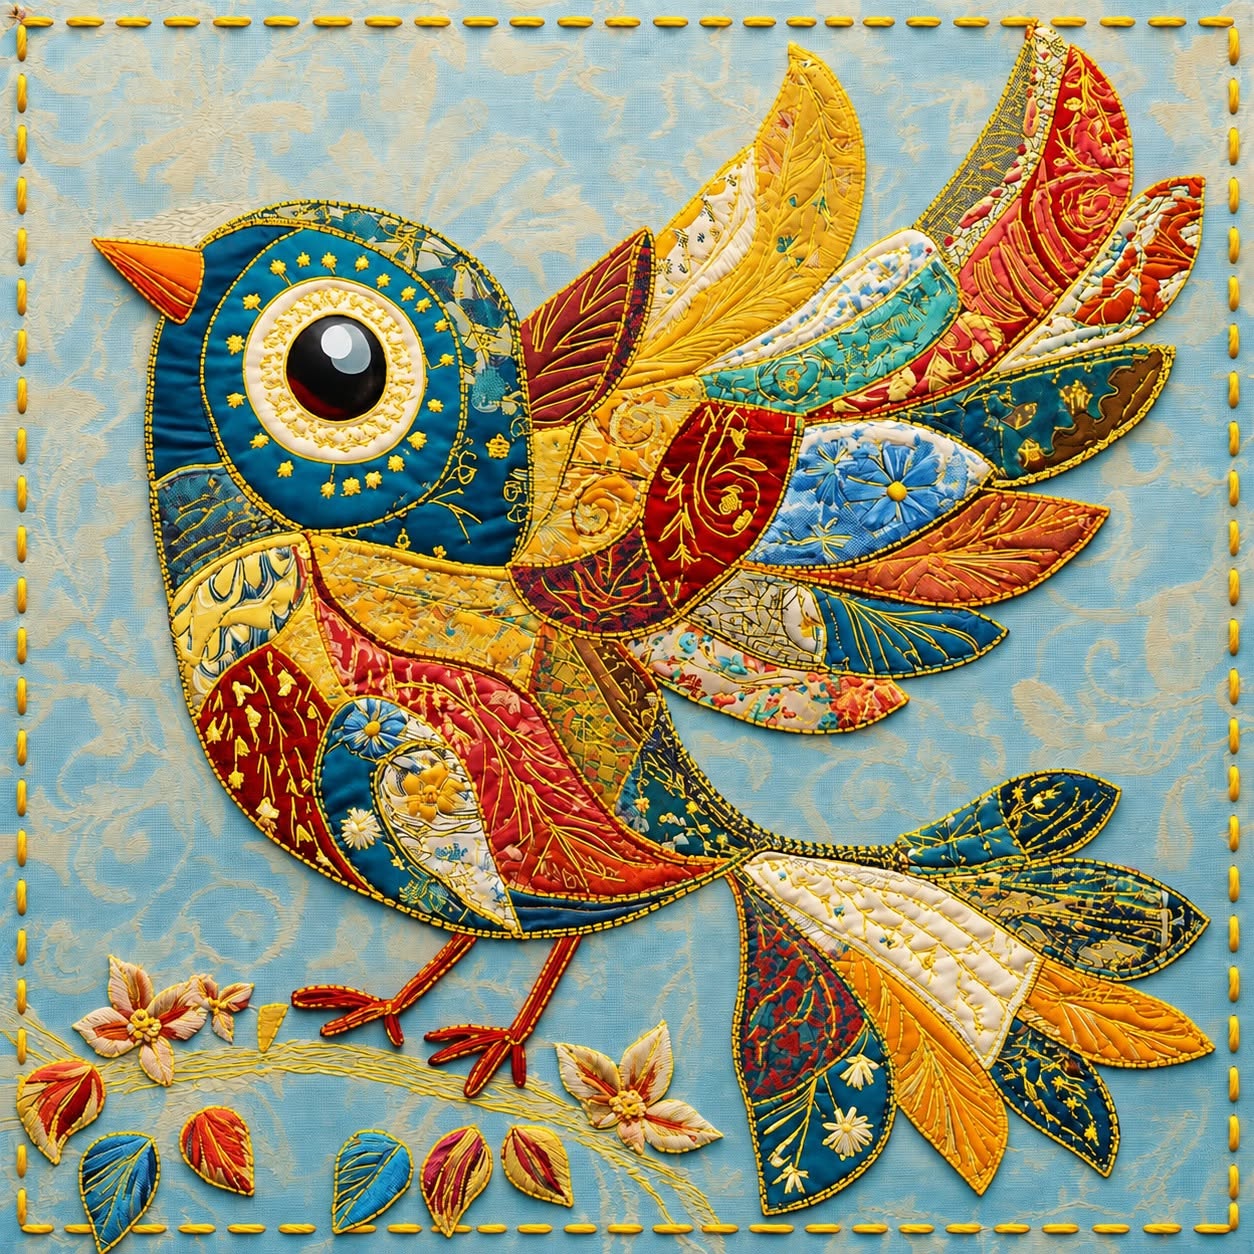
The Quilt Panel with Colorful Bird Appliqué Pattern is a cheerful textile project that combines appliqué, patchwork, decorative stitching, and creative fabric selection in one eye-catching composition. Inspired by the colorful bird shown in the reference image, this design uses many small fabric pieces to build a lively bird with layered wings, feathers, body sections, a large expressive eye, a bright beak, and delicate embroidered details. Instead of relying on one printed fabric, the project celebrates variety. Scraps in blue, yellow, red, cream, orange, turquoise, and patterned neutrals can be combined to create a completely individual bird. The result can become a quilt panel, wall hanging, decorative cushion front, framed textile artwork, or even the centerpiece of a larger quilt. Because every feather can use a different fabric, this is also an excellent scrap fabric quilting project for using treasured remnants from previous sewing projects.
One of the most appealing characteristics of a Quilt Panel with Colorful Bird Appliqué Pattern is the freedom it gives the maker. The bird does not have to look perfectly realistic because its charm comes from stylized shapes, exaggerated feathers, visible stitching, and unexpected color combinations. The reference project uses a pale blue patterned background that allows the stronger colors of the bird to stand out without creating a visually heavy composition. Several curved pieces form the body, while elongated leaf-shaped appliqués create the tail and wing feathers. Decorative quilting lines add even more texture to individual fabric sections. This technique means beginners can practice fundamental fabric appliqué techniques, while experienced quilters can experiment with free-motion quilting, embroidery, fabric layering, and more elaborate surface decoration.
Creating this colorful bird is also a wonderful lesson in textile composition because the success of the project depends on balance rather than perfect fabric matching. A deep blue fabric can sit beside mustard yellow, coral red, floral cream, and turquoise as long as similar colors appear again elsewhere in the design. Repeating several colors throughout the bird helps unify all the different prints. The large circular eye creates a strong focal point, while the long sweeping tail provides movement and balances the dramatic feathers above the bird’s back. Small embroidered flowers and leaves near the feet can connect the subject visually to the background. With careful preparation and patient stitching, the Colorful Bird Appliqué Pattern can become a richly textured handmade piece that looks complex but is actually constructed from a series of manageable shapes.
Materials, Fabric Selection, and Preparing the Bird Pattern
Before cutting anything, gather the materials for your Quilt Panel with Colorful Bird Appliqué Pattern. You will need one piece of cotton fabric for the background, assorted cotton fabric scraps, lightweight fusible web, paper or template material, fabric scissors, fine sewing thread, embroidery thread, pins or temporary fabric adhesive, batting, and backing fabric. A sewing machine is helpful for attaching the appliqué pieces and quilting the finished panel, although several details can also be completed by hand.
DISCOVER MORE FREE PATTERNS HERE!
Choose a background that provides contrast without competing with the bird. A pale blue, light cream, soft gray, muted aqua, or subtle tone-on-tone print works beautifully. For a finished decorative panel around 45 × 45 cm, begin with a background piece approximately 50 × 50 cm so that you have extra fabric around the edges for trimming. The exact dimensions can be adjusted depending on whether you plan to turn the design into a pillow, wall quilt, tote panel, or framed textile artwork.
The most important materials are the scraps used to create the bird. Select approximately 15 to 25 different fabrics in colors such as turquoise blue, navy, mustard yellow, golden orange, deep red, coral, cream, and warm brown. Floral prints, abstract prints, tiny geometric patterns, and subtle textured fabrics can all work together. Avoid choosing only very large prints because the small appliqué pieces may not show enough of the printed motif. Mixing solid and patterned fabrics usually produces the most interesting result.
Next, create the basic bird appliqué templates. Break the bird into simple sections: head, body, breast, beak, eye rings, wing pieces, upper feathers, tail feathers, legs, feet, and small decorative leaves or flowers. You do not need complicated drawing skills. The main body can be drawn as a broad curved teardrop, while most feathers can be created from elongated leaf shapes. Vary the feather sizes so the finished bird has a natural sense of movement.
Trace each shape onto the paper side of fusible web. Remember that traditional fusible appliqué reverses the shape when it is transferred to fabric, so reverse any pieces where direction matters. Leave approximately 5 to 8 mm between neighboring shapes on the fusible sheet. Rough-cut around each traced piece before fusing it to the wrong side of the selected fabrics. This makes handling multiple scraps much easier.
Arrange your paper templates before cutting the final fabrics. Photographing or sketching the arrangement can help you remember the intended placement later. This planning stage is particularly useful when making a scrap quilt bird appliqué, because the large number of colors can become confusing once the pieces are separated. Try to distribute strong colors across the entire design instead of concentrating all reds, yellows, or blues in one section.
Cutting, Layering, and Building the Colorful Bird Appliqué
Begin construction with the largest shapes because they establish the proportions of your Quilt Panel with Colorful Bird Appliqué Pattern. Fuse the templates to the wrong sides of your chosen fabrics according to the fusible web manufacturer’s directions, then cut accurately along the traced lines. Keep similarly shaped feathers grouped together until you begin arranging them. A shallow tray or labeled envelopes can prevent small pieces from disappearing while you work.
Position the large body shape approximately in the center of the background, leaving enough space above and behind it for the long wing feathers and enough room below for the legs and decorative flowers. Do not fuse anything permanently yet. Place the head slightly above the front of the body and experiment with the angle until the silhouette resembles an alert, energetic bird. The beak can extend beyond the head to create a stronger directional line.
Now build the internal body patchwork. Instead of creating the body from one solid piece, divide it visually using several curved appliqué shapes. In the reference-inspired design, sections of red, blue, yellow, cream, orange, and patterned fabrics overlap like abstract feathers. These irregular shapes are one of the defining features of the Colorful Bird Appliqué Pattern. Allow some pieces to overlap slightly because this produces cleaner edges and prevents the background fabric from appearing between adjacent appliqués.
The large upper feathers should be added next. Use long leaf-shaped fabric pieces that gradually change direction as they move from the body toward the back of the bird. Position the largest feathers near the center and smaller ones closer to the edges. Alternate contrasting colors, such as mustard beside blue or red beside cream, rather than arranging similar shades together. This contrast makes each feather easy to distinguish and gives the bird its spectacular layered appearance.
Construct the tail using the same basic principle but allow the feather shapes to sweep downward and outward. Use approximately five to eight tail feathers depending on the scale of your design. Slightly overlap their bases underneath the body so the attachment points are hidden. A mixture of dark blue, cream, orange, turquoise, and patterned fabrics works especially well. Rotate the prints in different directions so the tail appears dynamic rather than mechanically arranged.
When you are satisfied with the entire layout, carefully fuse the pieces in stages. Start with shapes that sit behind other pieces, then gradually work toward the foreground. Follow the temperature and pressing instructions recommended for your fusible web. Avoid sliding the iron because this may shift the appliqué. Press straight down, lift the iron, and move to the next area. Allow the fabric to cool completely before beginning the decorative stitching.
Stitching, Quilting, and Adding Decorative Textile Details
The stitching is what transforms flat fabric shapes into a richly textured Quilt Panel with Colorful Bird Appliqué Pattern. You can secure the appliqué edges with a narrow zigzag stitch, satin stitch, blanket stitch, or free-motion straight stitch. A slightly imperfect hand-drawn appearance can actually enhance this type of artistic quilt. If you prefer a cleaner contemporary finish, choose thread colors that coordinate closely with each fabric piece.
Start by stitching around the large body sections before working on the smaller feathers. Sew slowly around tight curves and stop with the needle in the fabric whenever you need to rotate the panel. If using contrasting thread, test the stitch on scrap fabric first. Dark navy, brown, burgundy, or muted gold thread can provide attractive definition around many different fabric colors without requiring constant thread changes.
Decorative quilting can then be added inside the appliqué shapes. Parallel lines are particularly effective on long feathers because they resemble natural feather veins. Curved lines, spirals, tiny waves, leaf veins, and simple floral motifs can be stitched inside larger body sections. These lines are not only decorative; they also help anchor the fabric securely to the panel. This process is sometimes described as thread painting when the stitching becomes a major visual element.
Create the eye using several layered circles. A larger cream or beige circle can form the outer eye area, followed by a blue or neutral ring and a dark central pupil. A tiny white highlight can be appliquéd, embroidered, or painted with suitable textile paint if desired. The oversized eye gives the bird a playful personality and becomes the strongest focal point of the design. Make sure all eye layers are securely stitched because small circular pieces can lift at the edges.
For the legs, use narrow strips of fabric, couched cord, or dense embroidery stitches in rust, red, brown, or dark orange. The feet can be stitched directly onto the background using a satin stitch or multiple passes of straight stitching. Small imperfections are perfectly acceptable because handmade line work contributes to the folk-art character of the panel. Position the feet so that the bird appears balanced naturally on the suggested branch or ground line.
Finish the decorative scene by adding small flowers, leaves, branches, or scattered fabric shapes around the bird. The reference-inspired composition uses delicate botanical details near the bottom, which soften the empty background and visually connect the bird to its environment. These details should remain secondary to the main appliqué. Use smaller pieces and softer colors so they support rather than compete with the colorful bird quilt design.
Assembling, Finishing, and Displaying the Quilt Panel
Once all appliqué pieces are secured, prepare the quilt sandwich. Place the backing fabric right side down, position the batting over it, and place the completed bird panel right side up. Smooth each layer carefully and baste using safety pins, temporary spray adhesive, or long hand-basting stitches. The batting gives the finished Quilt Panel with Colorful Bird Appliqué Pattern its characteristic softness and allows the quilting details to become more dimensional.
Quilt the background around the bird to stabilize the entire panel. You can use simple echo quilting by following the outer shape of the bird at gradually increasing distances. Another option is free-motion quilting with loops, leaves, gentle waves, or swirling lines. If your background fabric already contains a subtle botanical print, following portions of that printed design can produce a beautifully integrated result. Keep the background quilting relatively understated so the bird remains the visual focus.
Additional quilting can be added directly through the appliqué after the quilt sandwich has been assembled. This creates stronger dimension than stitching only through the top fabric. Follow the curves of individual feathers, quilt around the eye, and emphasize the divisions between body sections. The combination of appliqué stitching and final quilting creates the tactile layered surface that makes an art quilt bird panel especially appealing.
After quilting, lay the panel on a cutting mat and square the edges carefully using a ruler and rotary cutter. Trim only enough to create straight, even sides. For a wall hanging, add a traditional quilt binding around all four edges. A binding in navy, deep red, gold, turquoise, or a quiet neutral can work well. Choose a fabric that appears somewhere inside the bird so the border feels connected to the overall color palette.
If you want to make a wall hanging, add a fabric sleeve to the back before completing the final binding stitches. A narrow wooden dowel can then slide through the sleeve for easy display. The same design can also become the front of a decorative cushion. In that case, trim the quilted panel to the desired pillow size and attach an envelope or zippered backing rather than a hanging sleeve.
Finally, inspect the entire project for loose threads or edges that need additional stitching. Lightly press the panel from the back if necessary, taking care not to flatten heavily quilted areas. Your finished Quilt Panel with Colorful Bird Appliqué Pattern should showcase contrasting fabrics, dimensional stitching, and an unmistakably handmade personality. No two versions need to look identical, and that creative variation is one of the greatest advantages of this design.
Frequently Asked Questions About the Quilt Panel with Colorful Bird Appliqué Pattern
What is a Quilt Panel with Colorful Bird Appliqué Pattern?
A Quilt Panel with Colorful Bird Appliqué Pattern is a decorative quilted textile design in which fabric pieces are cut into bird components and stitched or fused onto a larger background. Different colors and prints are layered to create the body, wings, feathers, eye, beak, tail, and decorative details.
Can a beginner make this colorful bird appliqué project?
Yes. Beginners can simplify the design by using fewer fabric pieces and securing them with a standard zigzag or blanket stitch. The project becomes more advanced when free-motion quilting, detailed embroidery, or a large number of small appliqué pieces are introduced. Working gradually makes the design manageable even for someone developing their appliqué skills.
What fabrics are best for bird appliqué quilting?
Quilting cotton is one of the easiest fabrics to use because it is stable, easy to cut, and available in countless colors and prints. Cotton scraps from previous projects are ideal. Batiks can also work beautifully because their rich colors and subtle variations add visual depth to the feathers.
Do I need fusible web for appliqué?
Fusible web is not absolutely necessary, but it makes the project much easier by holding the shapes securely while they are stitched. Traditional needle-turn appliqué is another option for experienced quilters, while raw-edge appliqué with fusible web is usually faster and more accessible.
How many different fabrics should I use?
There is no strict number, but approximately 15 to 25 fabrics can create the richly varied appearance seen in this style of bird panel. You can use fewer fabrics by repeating them throughout different sections. Repetition is useful because it keeps a highly colorful composition visually connected.
How can I prevent the design from looking too busy?
Choose one quiet background and repeat several key colors across the bird. For example, if you use turquoise in the head, repeat turquoise in one wing feather and one tail feather. The same principle can be applied to red, yellow, and cream. Repeating colors creates rhythm and prevents the collection of scraps from looking random.
Can the appliqué edges be left raw?
Yes. Raw-edge appliqué is commonly used for artistic quilt panels. The edges can be secured with straight stitching, zigzag stitching, blanket stitching, or free-motion stitching. A small amount of fraying over time may add texture, although closely stitched edges generally remain more stable.
What stitch should I use around the bird feathers?
A small blanket stitch or narrow zigzag is reliable for beginners. A free-motion straight stitch is an attractive option for a more artistic appearance. Some quilters stitch around each edge two or three times to create an intentionally sketchy outline.
Can I use this bird design for something other than a wall quilt?
Absolutely. The Colorful Bird Appliqué Pattern can be adapted for cushion covers, tote bags, table runners, quilt centers, fabric book covers, decorative banners, or framed textile artwork. Simply resize the templates to suit the final item.
How do I make the feathers appear dimensional?
Layering, overlapping, quilting, and directional stitching all contribute to dimension. Place some feathers partially underneath others and quilt curved or parallel lines inside each piece. Batting beneath the appliqué also helps the shapes rise slightly from the background.
Should all the fabrics match exactly?
No. A project like this is usually more interesting when the fabrics coordinate rather than match perfectly. Mixing florals, abstract prints, solids, small geometric motifs, and textured designs creates the patchwork appearance. A limited repeating color palette will tie those different prints together.
How long does a colorful bird quilt panel take to complete?
The time varies depending on the size and amount of detail. A simplified bird might be completed over a weekend, while a heavily embellished panel with numerous feathers, embroidery, and free-motion quilting could take several days or multiple sewing sessions. It is better to enjoy each stage than to rush the decorative work.
Conclusion
The Quilt Panel with Colorful Bird Appliqué Pattern is an inspiring way to transform small pieces of fabric into a vibrant piece of textile art. Throughout this project, you learned how to select a balanced palette, prepare appliqué templates, divide the bird into manageable fabric shapes, layer colorful feathers, build an expressive eye and beak, secure appliqué edges, add decorative stitching, create embroidered details, assemble a quilt sandwich, quilt the background, and finish the panel for display.
What makes this pattern especially enjoyable is its flexibility. You can follow the general construction process while changing almost every creative detail. Your bird might feature bold jewel tones, soft pastels, vintage floral scraps, modern geometric prints, or fabrics saved from meaningful previous projects. The Quilt Panel with Colorful Bird Appliqué Pattern is not about making every feather identical to a reference image; it is about using color, texture, quilting, and personal creativity to develop a distinctive handmade bird.
EASILY FIND THE PDF FOR THIS PATTERN HERE!
Whether you turn the finished piece into a wall hanging, pillow, bag panel, or centerpiece for a larger quilt, the combination of fabric appliqué, scrap quilting, decorative stitching, and free-motion quilting offers many opportunities to build new sewing skills. Take your time arranging the fabrics before stitching, repeat important colors throughout the composition, and let the quilting lines emphasize the direction and personality of every feather. If you decide to create your own version, leave your sincere opinion about this Quilt Panel with Colorful Bird Appliqué Pattern and share your suggestions as well. It would be wonderful to know which colors, fabrics, stitches, or finishing ideas you would choose to make this colorful bird design uniquely your own.