
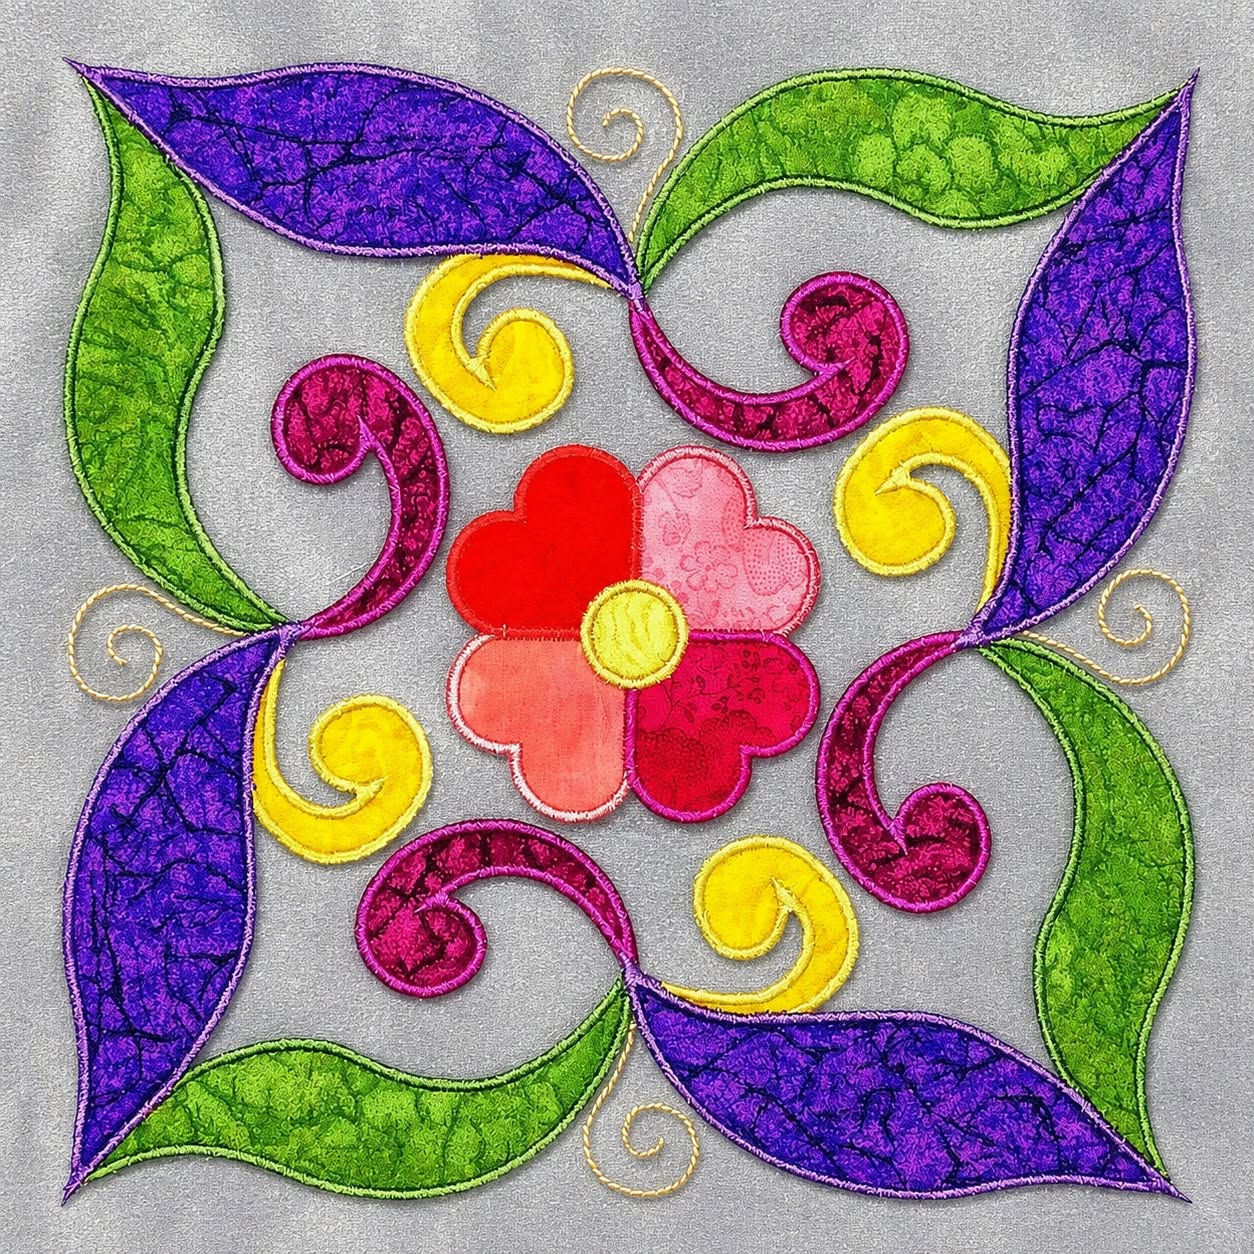
The Quilt Block with Floral Appliqué Pattern is a colorful sewing project that combines traditional quilting techniques with the freedom and personality of decorative appliqué. Inspired by the photographed design, this block features a dramatic dark background, a central layered flower, curved leaves, spiral shapes, and bright stitching that helps every detail stand out. The contrast between black fabric and vivid shades of green, purple, pink, red, and yellow creates a stained-glass-like effect that immediately attracts attention. Although the finished design looks intricate, it can be divided into manageable sections and completed gradually. That makes this project suitable for confident beginners as well as experienced quilters who enjoy adding artistic details to their work. By preparing the shapes carefully and assembling them in the correct order, you can recreate the same balanced floral composition while still giving your block a personal touch.
One of the most appealing features of this Quilt Block with Floral Appliqué Pattern is the combination of simple shapes used to create an elaborate result. Large curved leaves frame the center, smaller spiral appliqués fill the open spaces, and a cheerful flower becomes the main focal point. These shapes can be made from fabric scraps, making this project an excellent way to use leftover quilting cotton from previous projects. The appliqué pieces can be attached with a satin stitch, narrow zigzag stitch, blanket stitch, or another decorative machine stitch, depending on the finish you prefer. Using contrasting thread around each shape reproduces the outlined appearance visible in the reference image. Careful fabric selection is also important because strong contrast gives the design depth and makes every section easier to recognize.
Before beginning the Quilt Block with Floral Appliqué Pattern, remember that accuracy during preparation usually saves time during sewing. Take time to trace each shape, cut smoothly around the curves, and arrange the entire composition before permanently attaching anything. The original design has a strong sense of symmetry without being rigid, which is part of its handmade charm. You do not have to reproduce every curve exactly to achieve a beautiful result; instead, focus on maintaining similar proportions, movement, and color balance. A finished block like this can become the center of a cushion, mini quilt, wall hanging, tote bag panel, table topper, or a larger patchwork quilt. The following instructions explain the complete process from selecting supplies through finishing the appliqué and preparing the block for its final use.
Materials and Fabric Preparation for the Floral Appliqué Block
Start by selecting a square of high-quality quilting cotton for the background. A black or very dark charcoal fabric is ideal because it creates the strong contrast seen in the reference project and allows the colorful appliqué pieces to appear especially vibrant. For a practical working size, you can begin with a background square measuring approximately 35 × 35 cm, although the block can easily be resized. Cut the square slightly larger than your desired finished size so that you can trim it accurately after the appliqué and stitching are complete.
DISCOVER MORE FREE PATTERNS HERE!
For the appliqué pieces, collect small pieces of bright quilting fabric in purple, lime green, magenta, pink, red, coral, and yellow. Prints with subtle tonal patterns work especially well because they add texture without making the shapes difficult to see. The photographed design uses different fabrics inside individual petals and leaves, so do not feel that every part needs to match perfectly. Coordinating scraps often produce a richer and more handcrafted appearance than using only solid fabrics.
You will also need a lightweight fusible web for appliqué, which helps hold the pieces in position while you stitch around their edges. Choose a product suitable for quilting that remains flexible after pressing. Other useful supplies include a sharp pair of fabric scissors, small appliqué scissors for curved areas, an iron, an ironing surface, a pencil or fabric-safe tracing tool, sewing thread, pins, and a sewing machine capable of producing zigzag or decorative stitches. A pressing sheet can also help protect your iron when using fusible products.
Thread selection plays a major role in the look of this floral appliqué quilt block. In the reference design, the outlines are intentionally visible and become part of the artwork. You can use thread that closely matches each appliqué piece for a softer effect, or choose brighter contrasting thread to emphasize every curve. Yellow or gold thread is particularly effective around yellow details and decorative spirals, while purple, green, and pink threads can visually connect the larger leaves to the smaller curved motifs.
Before tracing any appliqué shapes, press all fabrics so they lie completely flat. Wrinkles can distort the templates and create inaccurate edges when cutting. If your scraps are very small, organize them by color and decide which parts of the design they will become. This simple preparation step helps you maintain good color balance throughout the block and prevents you from accidentally using all of one color too early.
Finally, prepare a full-size paper sketch of the design before cutting the fabrics. Draw the central flower first, then add four sets of sweeping leaves around it and place smaller spiral shapes between them. You can use the reference image as visual inspiration while creating your own templates. Numbering the pieces on the paper pattern is helpful, especially when several shapes overlap. This paper plan becomes your guide throughout the construction of the Quilt Block with Floral Appliqué Pattern.
Creating and Positioning the Appliqué Shapes
Begin with the central flower because it establishes the center point for the entire composition. Create a simple flower template with approximately five rounded petals surrounding a circular center. In the reference design, the petals are divided into warm shades including red, pink, coral, and deep magenta. You can cut each petal as an individual piece or create larger grouped sections if you prefer easier assembly. Trace each template onto the paper side of your fusible web, remembering to reverse directional pieces when necessary.
The next major components are the elongated curved leaves that form the outer framework of the Quilt Block with Floral Appliqué Pattern. Draw several sweeping leaf shapes with pointed tips, giving them a gentle curved or crescent-like form. Alternate purple and bright green fabrics around the block to recreate the energetic color rhythm of the original. Some leaves can curve inward toward the center while others sweep outward toward the corners, creating a circular flow around the central flower.
Create the magenta spiral shapes by drawing a thick curved stem that curls inward at one end. These elements resemble stylized vines or paisley-inspired curls and contribute significantly to the movement of the design. You will need several of these shapes placed between the larger leaves. Avoid cutting the curves too narrowly because extremely thin fabric sections can be difficult to fuse and stitch. Slightly wider spirals are easier to handle and will remain more durable over time.
The small yellow curls serve as additional accents and help distribute the brightest color throughout the composition. Create four or more compact spiral or comma-shaped templates, depending on the size of your block. Their smaller scale provides visual contrast against the large leaves. Yellow is particularly effective against the black background, so these pieces can be positioned in open spaces where the design needs extra brightness without becoming crowded.
Once all templates have been drawn, roughly cut around each fusible-web shape, leaving a small paper margin. Fuse each template to the wrong side of the corresponding fabric according to the instructions provided with your fusible material. Allow the pieces to cool completely before cutting along the traced lines. Use small, smooth cuts around tight curves rather than trying to cut an entire spiral in one movement. Clean edges will make the final stitching easier and more professional.
Do not fuse the shapes to the background immediately after cutting them. First, remove the paper backing and position every appliqué piece on the dark fabric. Begin with the flower in the center and gradually work outward, adjusting the leaves and curls until the arrangement feels balanced. Leave enough dark background visible between the shapes so that individual elements remain clearly defined. When you are satisfied with the placement, take a quick photo for reference, then fuse the pieces permanently according to the manufacturer’s pressing recommendations.
Stitching, Detailing, and Building the Quilted Texture
After the appliqué pieces are fused, begin stitching around the edges using a narrow satin stitch, zigzag stitch, or decorative appliqué stitch. Test your chosen stitch on scrap fabric first so you can adjust the width and length. For a look similar to the photographed Quilt Block with Floral Appliqué Pattern, use visible thread that coordinates with the fabric while still standing out slightly against the black background. Stitch slowly around curved sections and stop with the needle down whenever you need to pivot.
Start with the center flower and work outward. Stitch around each petal separately to emphasize the different fabric colors, then outline the circular flower center. Keeping the petal outlines distinct gives the flower more dimension. If you enjoy decorative sewing, add a second line of stitching inside selected petals or use free-motion quilting to create small swirls, veins, or abstract details. These additions are optional, but they help reproduce the textured appearance visible in the inspiration image.
Continue by stitching the magenta curls and smaller yellow spiral pieces. Tight curves can be challenging, so reduce your sewing speed and pivot frequently. Instead of forcing the fabric through a curve, guide it gently and allow the feed dogs to move the block naturally. If the background begins to pucker, consider placing a lightweight tear-away stabilizer beneath the area while completing the dense appliqué stitching. Remove the stabilizer carefully after the stitches are finished.
Next, outline all of the large purple and green leaves. You can add inner quilting lines that resemble veins or decorative crackle patterns to give the leaves additional texture. These lines do not need to be perfectly symmetrical. In fact, slightly irregular stitching reinforces the artistic character of this appliqué quilt pattern. If your fabric already has a tonal print, use the printed motifs as inspiration when deciding where to place additional decorative stitches.
The small gold or yellow spiral lines located near the outer areas of the reference block can be created without fabric appliqué. Draw the shapes lightly with a removable fabric marker and stitch directly over the lines using a decorative machine stitch or several passes of straight stitching. Another option is free-motion quilting with bright thread. These little spirals fill negative space and visually connect the center design to the outer corners without adding bulky layers of fabric.
Once all appliqué stitching is finished, place the block on a flat surface and inspect it from several angles. Trim loose threads and gently press the block from the back using appropriate heat for your fabrics and fusible product. Avoid stretching the appliqué while pressing. If the block has become slightly distorted from dense stitching, square it carefully using a quilting ruler. This final adjustment prepares your Quilt Block with Floral Appliqué Pattern for quilting and assembly.
Quilting, Finishing, and Creative Ways to Use the Pattern
To transform the appliqué top into a quilted block, create a traditional quilt sandwich using the finished appliqué square, a layer of batting, and backing fabric. Cut the batting and backing slightly larger than the top on every side. Smooth the layers carefully and baste them together with quilting pins, temporary spray adhesive, or long hand-basting stitches. Keeping the layers flat is important because the many curved appliqué pieces naturally draw attention to any puckering.
Quilt the background areas using black or matching thread if you want the quilting to remain subtle. Free-motion stippling, small loops, echo quilting, or gentle curved lines can all work well. Quilting close to the appliqué edges makes the colorful shapes appear slightly raised, creating a dimensional effect. Avoid overly dense quilting directly on top of the appliqué unless you intentionally want a flatter, heavily textured surface.
You can also use echo quilting around the major leaves and flower. Stitch one line approximately 5 to 8 mm away from an appliqué edge, then add another line outside it if desired. This approach follows the movement of the floral design and reinforces the circular composition. In open corners, repeat small spiral motifs similar to the decorative stitched curls already included in the pattern. Repeating shapes is a simple way to make the overall design feel intentional and cohesive.
After quilting, trim the block to the final required dimensions. If you plan to use it as a standalone mini quilt, attach binding around the perimeter. A black binding creates a seamless frame, while purple, green, or yellow binding adds another decorative accent. For a cushion cover, use the completed block as the front panel and add an envelope or zippered backing. Always measure the finished block after quilting before cutting additional pieces because quilting can slightly reduce its dimensions.
The Quilt Block with Floral Appliqué Pattern can also become part of a larger quilt. Consider making several blocks with the same shapes while changing the color combinations in each one. One block might feature turquoise and orange, another could combine blue and yellow, and another could use softer pastel tones. Repeating the same layout in different palettes creates variety while maintaining a consistent visual theme across the finished quilt.
Most importantly, treat the photographed design as inspiration rather than a limitation. Appliqué quilting is especially enjoyable because small creative choices can transform a familiar pattern into something personal. Change the number of petals, enlarge the leaves, simplify the spirals, add embroidered details, or experiment with fabric prints. As long as you maintain a strong central focal point and distribute the colors evenly, your own version of the Quilt Block with Floral Appliqué Pattern can remain recognizable while reflecting your individual sewing style.
FAQ – Frequently Asked Questions About the Quilt Block with Floral Appliqué Pattern
What does Quilt Block with Floral Appliqué Pattern mean?
A Quilt Block with Floral Appliqué Pattern is a quilt block decorated with flower, leaf, vine, or other botanical shapes that are cut separately and sewn onto a background fabric. Unlike traditional piecing, where fabric shapes are joined edge to edge, appliqué allows decorative pieces to sit directly on top of the background.
Is this floral appliqué quilt block suitable for beginners?
Yes, although beginners may find the tight spiral curves slightly challenging at first. The basic process of tracing, fusing, cutting, and stitching appliqué pieces is straightforward. Beginners can simplify some of the smallest curls or use a wider zigzag stitch while developing confidence with curved stitching.
What is the best fabric for appliqué quilting?
Good-quality 100% cotton quilting fabric is one of the easiest choices because it is stable, widely available, easy to press, and simple to stitch. Very stretchy or slippery fabrics can also be used, but they often require additional stabilization and may be more difficult for beginners.
Do I need fusible web to make this quilt block?
Fusible web is not absolutely required, but it makes the process considerably easier. It temporarily secures each appliqué shape to the background so the pieces do not shift during stitching. Traditional needle-turn appliqué can be used instead, although that technique creates a different appearance and requires additional preparation.
Which stitch should I use around the appliqué pieces?
A narrow zigzag stitch, satin stitch, blanket stitch, or decorative machine stitch can all produce good results. Satin stitching creates a bold outline similar to the visible edges in the reference design. Blanket stitching produces a more traditional handmade appearance, while a small zigzag can create a softer outline.
How can I prevent my fabric from puckering around the appliqué?
Use a properly prepared fusible web, avoid holding or pulling the fabric while sewing, and adjust your thread tension if necessary. A lightweight stabilizer placed behind the block can also help when using dense satin stitches. Pressing the finished block gently from the wrong side can improve its appearance.
Can I resize the Quilt Block with Floral Appliqué Pattern?
Yes. All templates can be enlarged or reduced as a group before tracing them. When resizing, maintain the same proportions between the flower, leaves, spirals, and background. Very small versions may require simplifying the narrow curves because tiny appliqué shapes are more difficult to stitch neatly.
Can I sew the appliqué by hand instead of using a sewing machine?
Absolutely. Hand appliqué gives the project a softer and more traditional finish. You can use needle-turn appliqué, blanket stitching, or small decorative embroidery stitches. Hand sewing takes longer, but many quilters enjoy the slower process and the unique character of handmade stitches.
What can I make with a completed floral appliqué block?
The finished block can be turned into a cushion cover, wall hanging, mini quilt, tote bag, table topper, placemat, or feature panel in a larger quilt. If you plan the final use before beginning, you can easily adjust the dimensions and batting thickness to suit the project.
How do I choose colors for this pattern?
Start with a strong background and select colors that clearly contrast against it. The reference block uses a dark background combined with bright green, purple, pink, yellow, and red. A helpful approach is to repeat each major color in more than one area so the viewer’s eye moves naturally around the design.
Can fabric scraps be used for the floral appliqué?
Yes, and this is an excellent scrap-friendly quilting project. The flower petals, yellow accents, and spiral shapes require only small pieces of fabric. Using scraps also allows you to introduce subtle variations in texture and print without purchasing a large amount of new material.
Should the block be quilted before or after the appliqué is attached?
For this style, attach and stitch the appliqué to the background first. After the appliqué work is complete, layer the finished top with batting and backing and then quilt the entire block. This sequence allows the final quilting to enhance the appliqué shapes and create additional dimension.
Conclusion
The Quilt Block with Floral Appliqué Pattern combines bold color, flowing botanical shapes, decorative stitching, and traditional quilting techniques in a project that can become much more than a single quilt block. Throughout this tutorial, you learned how to prepare the dark background, choose colorful fabrics, create templates for the central flower, leaves, and spirals, apply fusible web, arrange the composition, and permanently attach each element.
You also learned how visible appliqué stitching can become an important part of the design rather than simply a construction method. Choosing coordinating or contrasting threads, adding decorative lines inside the leaves and petals, and quilting the background strategically can transform simple fabric shapes into a richly textured textile artwork.
Once completed, the block can be used in many different sewing projects, from cushions and wall hangings to bags and full-size quilts. The same floral appliqué pattern can also be recreated in completely different color palettes, making it a flexible design for anyone who enjoys experimenting with fabric and color.
The most important lesson is to enjoy the creative process. Prepare your shapes carefully, test your stitches, arrange the appliqué pieces before fusing them, and allow yourself to make small design changes as you work. Handmade quilting does not need to look mechanically perfect to be beautiful; thoughtful fabric selection and careful construction are far more important.
EASILY FIND THE PDF FOR THIS PATTERN HERE!
If you create your own Quilt Block with Floral Appliqué Pattern, use the techniques explained here as a starting point and adapt the design to your own sewing style. Try different prints, change the background, experiment with decorative stitches, or combine several blocks into one larger project. What do you think about this colorful floral appliqué design? Leave your sincere opinion, tell us which color combination you would choose, and share your suggestions for future quilting and appliqué projects.