
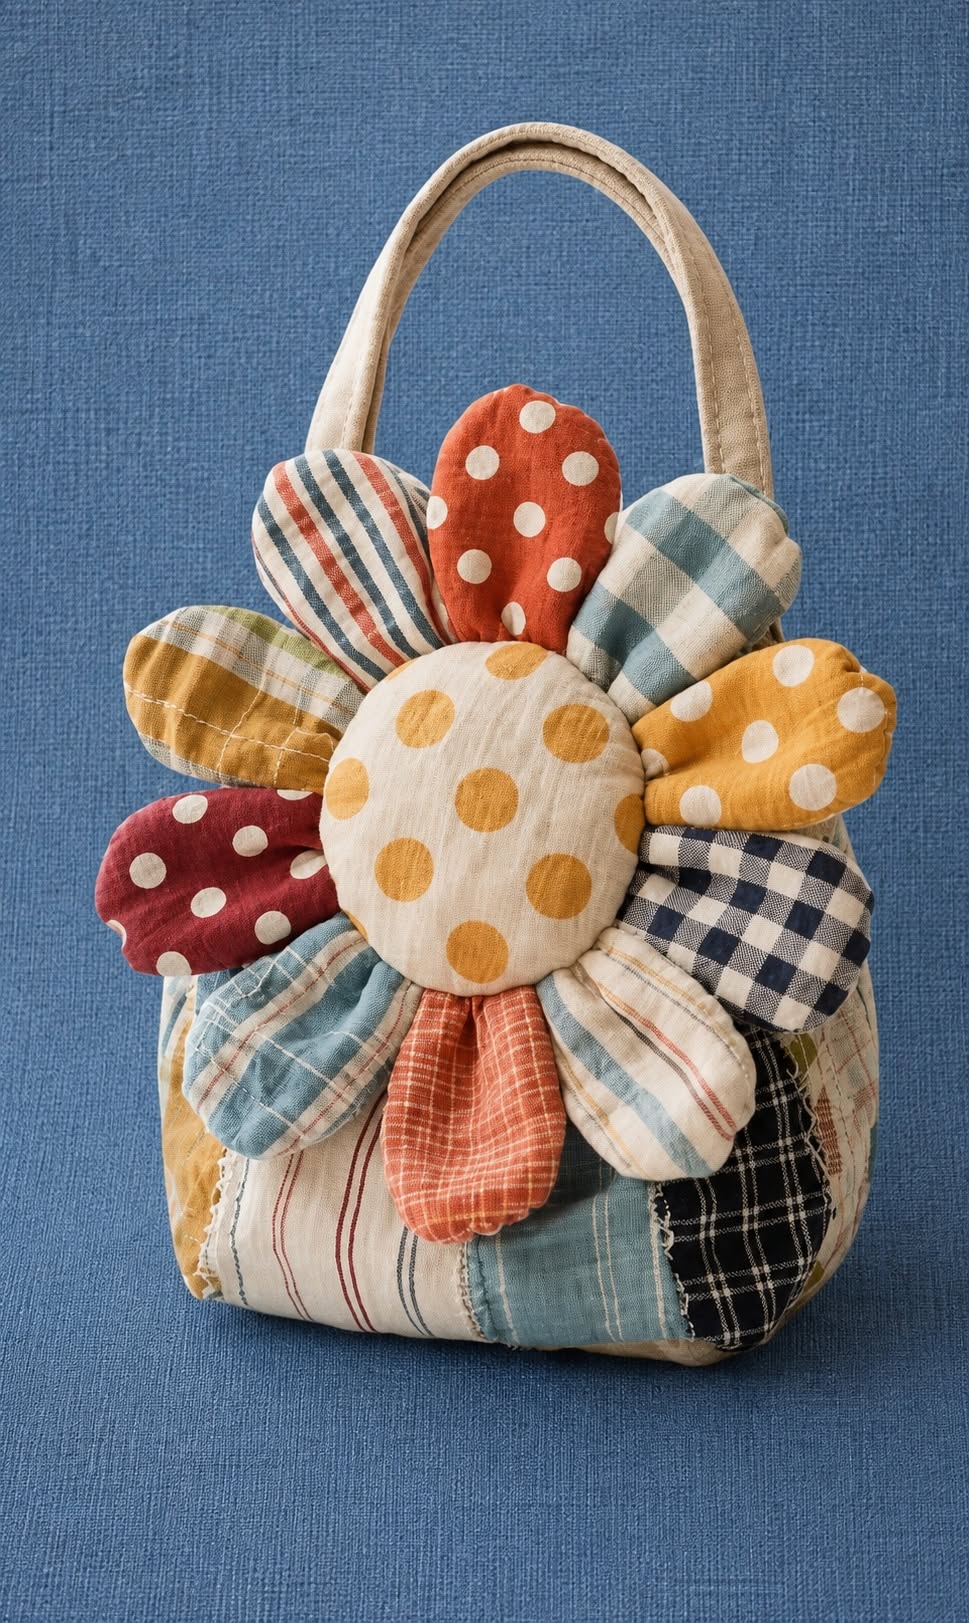
Patchwork Bag with Fabric Flowers Pattern is a charming sewing project that combines practical bag construction with the warm, handmade look of patchwork, fabric appliqué, and a large dimensional flower. The finished piece has the cozy personality of a country-style handmade accessory while still being useful enough for everyday storage, light shopping, craft supplies, or casual outings. The design shown in the reference image is especially attractive because it uses many different prints without feeling disorganized. Checks, stripes, dots, plaids, and soft vintage-inspired fabrics work together around a large flower centerpiece, giving the bag a cheerful scrappy appearance. This project is also a wonderful way to use small pieces left over from previous quilting projects instead of letting them sit unused in a fabric drawer.
The idea behind this Patchwork Bag with Fabric Flowers Pattern is to build the project in separate manageable sections. First, you create the quilted or patchwork body of the bag. Next, you prepare the handles and lining. After that, you make individual padded petals and a round flower center before attaching the entire flower arrangement to the front. Although the finished bag looks detailed, each part is based on simple sewing shapes, making the project approachable for confident beginners while still interesting for experienced quilters. The soft texture comes from the combination of cotton fabric, lightweight batting or interfacing, and gentle quilting stitches that help the bag maintain its shape without making it stiff.
Another advantage of this project is its flexibility. You do not need to reproduce every fabric exactly as shown in the photo. In fact, the beauty of a scrap fabric bag comes from choosing different prints that coordinate rather than match perfectly. Warm mustard, coral, dusty blue, cream, burgundy, navy, and pale aqua are excellent starting colors, but you can create the same design with pastels, florals, denim, Christmas fabrics, farmhouse prints, or modern geometric cottons. Throughout this tutorial, you will learn how to prepare the patchwork body, sew the bag structure, create the padded flower petals, assemble the flower, and finish the project neatly so that your handmade bag looks attractive from every angle.
Materials and Preparing the Patchwork Bag Pieces
To begin your Patchwork Bag with Fabric Flowers Pattern, gather several pieces of medium-weight cotton fabric. Quilting cotton is particularly suitable because it is easy to cut, press, and sew. You will need assorted scraps for the exterior patchwork, additional scraps for the flower petals, one larger fabric piece for the flower center, fabric for the lining, and two long strips for the handles. You should also prepare lightweight batting or fusible fleece, matching sewing thread, scissors or a rotary cutter, a ruler, sewing pins or clips, an iron, and a sewing machine.
DISCOVER MORE FREE PATTERNS HERE!
A practical finished bag size is approximately 30 cm wide by 28 cm high, excluding the handles. These measurements can be adjusted, but they create proportions similar to the project shown in the photograph. For the exterior, prepare two rectangles approximately 33 cm x 31 cm after the patchwork panels have been assembled. The extra size provides room for trimming and seam allowances. Prepare two lining rectangles in the same dimensions and two batting rectangles slightly larger than the outer panels.
For the patchwork bag body, cut fabric scraps into rectangles and strips of different widths. Pieces between approximately 6 cm and 12 cm work well. Sew the smaller pieces together with a consistent seam allowance of about 0.7 cm, creating larger patchwork sections. Press every seam as you work. Alternating the direction of the pressed seams can reduce bulk where several sections meet.
Continue joining the patchwork pieces until you have two panels that are slightly larger than the required bag measurements. There is no need to create perfectly symmetrical blocks. A slightly irregular arrangement gives the project its handmade character. Try to distribute dark, medium, and light fabrics throughout the panel rather than placing all similar shades together. This helps the scrappy patchwork design look balanced.
Place each finished patchwork panel over batting and quilt the layers together. Straight-line quilting is the easiest option and works beautifully with this rustic design. You can stitch vertical lines, horizontal lines, gentle diagonal lines, or simply sew close to some of the patchwork seams. The quilting does not need to be dense. Its main purpose is to secure the batting and add texture to the exterior of the bag.
After quilting, trim both exterior panels to approximately 31 cm x 29 cm, or to your preferred final dimensions while remembering that seam allowances will reduce the finished size. Check that the corners are square and that both panels match. At this stage, you already have the basic foundation of your handmade patchwork bag, and the remaining steps will transform these simple quilted panels into the finished design.
Sewing the Bag Body, Lining, and Handles
Place the two exterior patchwork panels right sides together. Pin or clip around the sides and bottom, leaving the top edge open. Sew around these three edges using approximately a 1 cm seam allowance. Reinforce the beginning and end of the stitching so the seams remain secure when the bag is used. Because the exterior has batting, sew slowly and keep the layers aligned.
To create a little more depth at the bottom, box the lower corners. With the bag still inside out, flatten one bottom corner so that the side seam aligns with the bottom seam. Measure approximately 4 cm to 5 cm across the corner and draw a straight line. Sew across the marked line, then trim the excess fabric while leaving a small seam allowance. Repeat on the opposite corner.
Prepare the lining in the same way by placing the two lining rectangles right sides together. Sew both sides and the bottom, but leave an opening of approximately 10 cm along the bottom seam. This opening is important because it will later allow you to turn the entire bag right side out. Box the lining corners using the same measurements used for the exterior so the lining fits neatly inside the bag.
For the handles, cut two fabric strips measuring approximately 45 cm x 8 cm. If you prefer longer shoulder handles, increase the length to around 55 cm or more. Apply lightweight interfacing or a narrow strip of batting to the wrong side for additional strength. Fold each strip in half lengthwise and press. Open it again, fold both long raw edges toward the center crease, and press once more.
Fold the handle strip in half again so all raw edges are enclosed. Topstitch along both long sides, staying close to the edges. Repeat for the second handle. This creates sturdy fabric bag handles without exposed seams. You can also quilt one or two additional lines down the center if you want the handles to coordinate visually with the quilted exterior.
Position the handles on the top edge of the outer bag. Place each end approximately 6 cm to 7 cm from the side seams, making sure the handles are not twisted. The handle ends should extend slightly beyond the raw upper edge. Baste them in place using a narrow seam allowance. Place the completed lining over the exterior bag with right sides together, matching the top edges. Sew completely around the opening. Turn the bag through the opening left in the lining, press the upper edge carefully, close the lining opening, and topstitch around the top of the bag for a clean professional finish.
Creating the Dimensional Fabric Flower
The large fabric flower appliqué is the feature that makes this project special. For a bag approximately 30 cm wide, petals measuring around 12 cm long by 6 cm wide create a nicely proportioned flower. Draw a rounded elongated petal template on paper. The shape can resemble a wide leaf with a softly rounded tip and a narrower base. Add approximately 0.7 cm seam allowance around the template if your drawing represents the finished petal size.
Cut two fabric pieces for each petal. The flower shown in the inspiration image contains roughly ten to twelve petals, but you may use fewer or more depending on the size and fullness you prefer. Select contrasting fabrics such as checks, stripes, plaid, polka dots, and small prints. Mixing patterns is encouraged because it emphasizes the playful character of the Patchwork Bag with Fabric Flowers Pattern.
Place two petal pieces right sides together and sew around the curved edge, leaving a small opening near the bottom. Clip carefully around the curves without cutting through the stitching. Turn the petal right side out and use a blunt turning tool to gently shape the rounded edge. Press lightly. If you want noticeably puffier petals, insert a thin piece of batting or a small amount of polyester filling before closing the opening.
Topstitch approximately 3 mm from the edge of each petal. This step gives the petals a finished appearance while helping them maintain their shape. You may also sew one additional line down the center of selected petals for a quilted effect. Repeat the process until all petals are finished. Lay them temporarily on the front of the bag to test the arrangement before sewing anything permanently.
For the flower center, cut two circles approximately 13 cm to 15 cm in diameter. Place the circles right sides together and sew around the edge, leaving a turning opening. Clip the curves, turn the circle right side out, and press it into shape. Add a layer of batting or light filling inside if you want a soft raised center like the one shown in the photograph. Close the opening securely.
Arrange the petals in a circle on the front bag panel, overlapping their narrow ends slightly. The petals should radiate outward evenly but do not need to be perfectly identical in spacing. Pin or hand-baste them in place. Stitch around the base of the petals securely, then position the round center over all of their inner ends. Sew around the outer edge of the center circle using matching thread. The circle hides the petal attachment seams and completes the dimensional fabric flower pattern.
Finishing, Customizing, and Caring for Your Patchwork Bag
After attaching the flower, inspect the entire bag and remove any visible basting threads. Check the points where the handles meet the bag and reinforce them if necessary. These areas receive the most stress during regular use. You can sew a small rectangular or crossed reinforcement pattern near each handle attachment while keeping the stitches discreet.
If you prefer a firmer bag, additional stabilizer can be added during construction. Fusible fleece gives a soft padded shape, while foam stabilizer creates a more structured result. For a lightweight quilted fabric bag, ordinary cotton batting is usually sufficient. The correct choice depends on whether you want a soft decorative tote or a bag that stands upright even when empty.
The Patchwork Bag with Fabric Flowers Pattern can easily be personalized. You may add a magnetic snap near the upper opening, an interior pocket, a zippered compartment, or a key holder loop inside the lining. An interior slip pocket measuring approximately 18 cm x 15 cm is particularly useful for keeping small objects easy to find.
Color selection can completely change the appearance of the project. For a farmhouse version, combine cream, muted red, mustard, navy, and faded blue. For a spring version, use mint, pale pink, yellow, lavender, and floral prints. A modern version could use black, white, gray, and a single bright accent color. The construction remains the same regardless of the fabric palette.
When washing the finished handmade fabric bag, gentle care is recommended. If all materials are washable cotton, the bag can usually be washed carefully in cool water with mild detergent. Avoid aggressive twisting, especially around the dimensional flower. Reshape the petals while damp and allow the bag to air dry so the padded sections maintain their form.
Most importantly, do not worry about making every petal or patchwork seam identical. Handmade quilting has character precisely because small variations remain visible. Straight seams, secure construction, balanced colors, and careful pressing matter more than absolute perfection. With those basic techniques, your finished Patchwork Bag with Fabric Flowers Pattern will have a polished appearance while still preserving the warmth that makes handcrafted textile projects unique.
FAQ About the Patchwork Bag with Fabric Flowers Pattern
What is a Patchwork Bag with Fabric Flowers Pattern?
A Patchwork Bag with Fabric Flowers Pattern is a sewing design that combines pieces of different fabrics to create the main bag and uses individually sewn fabric petals to form a decorative dimensional flower. The project brings together basic quilting, bag making, appliqué, and light fabric stuffing techniques.
Is this patchwork bag suitable for beginners?
Yes. A beginner who already knows how to sew straight seams, turn fabric pieces, and use a sewing machine can complete the project. The flower may look complicated, but it is created from repeated simple petal shapes. Working slowly and pressing the fabric after each stage makes the process much easier.
What fabric is best for making a patchwork bag?
Quilting cotton is one of the best choices because it is stable, easy to sew, available in many prints, and comfortable to quilt. Lightweight canvas can also be included for additional structure, while denim scraps can be used if the sewing machine is capable of handling thicker layers.
Can I make the flower using fabric scraps?
Absolutely. This is one of the best scrap fabric sewing projects because each petal requires only a relatively small piece of fabric. Even leftover pieces from quilts, cushions, table runners, or previous bags can become part of the flower.
How many petals should the fabric flower have?
Approximately ten to twelve petals create a full flower similar to the reference design. However, there is no strict rule. Eight larger petals can create a simpler flower, while twelve or fourteen narrower petals can produce a fuller appearance.
Should the petals be stuffed?
Stuffing is optional. A thin layer of batting creates a soft quilted petal without too much volume. A small amount of polyester filling gives the flower a more pronounced three-dimensional appearance. Avoid overfilling because thick petals can become difficult to attach securely.
Do I need batting inside the bag?
Batting is strongly recommended if you want the soft quilted appearance associated with a patchwork tote bag. Fusible fleece or foam stabilizer can be used instead if additional structure is desired.
How can I make the bag stronger?
Use quality cotton fabric, reinforce the handles, use interfacing or batting, and sew the main seams twice if the bag will carry heavier items. A sturdy lining fabric can also improve durability.
Can I add a zipper to this bag?
Yes. A recessed zipper panel can be added between the lining and outer bag, although this makes the construction slightly more advanced. Beginners may prefer a magnetic snap or simple fabric tie closure.
What size should I make the bag?
A finished size of approximately 30 cm wide by 28 cm high works well for a medium handbag or craft bag. You can enlarge the pattern for a tote or reduce it for a small decorative purse. Keep the flower proportional to the front panel when changing the dimensions.
Can the flower be removed or changed later?
If you attach the flower with hand stitches rather than permanent machine stitching, it may be removed later. However, permanent stitching is recommended for a bag that will be used frequently because it prevents the petals from shifting.
How do I make the patchwork look balanced?
Distribute strong colors around the entire design rather than concentrating them in one area. Mix large and small prints and place light fabrics beside medium or darker fabrics. Repeating two or three colors throughout the bag also creates visual harmony.
Can I sell bags made with this type of design?
A handmade bag created from your own measurements, fabric choices, construction work, and original interpretation can be a beautiful item for craft fairs or handmade collections. Always make sure that any commercial project follows the usage rights of specific purchased fabrics, licensed characters, or third-party patterns you may use.
Conclusion
The Patchwork Bag with Fabric Flowers Pattern combines several enjoyable sewing techniques in one creative project. You begin by joining assorted fabric scraps into quilted outer panels, then construct the body, lining, boxed corners, and reinforced handles. After the basic bag is finished, individually sewn padded petals are arranged around a soft circular center to create the large dimensional flower that gives the design its distinctive personality.
This project also demonstrates how useful leftover fabrics can become when they are combined thoughtfully. Small pieces of plaid, stripes, dots, checks, and solid cotton can be transformed into a coordinated patchwork bag, while batting and topstitching provide the soft handmade texture visible in the finished piece. Because both the dimensions and decorative details are flexible, the same basic construction method can be adapted to different colors, sizes, styles, and purposes.
EASILY FIND THE PDF FOR THIS PATTERN HERE!
Whether you are making the bag as a personal sewing project, a handmade gift, or simply looking for a creative way to use your fabric collection, this Patchwork Bag with Fabric Flowers Pattern offers plenty of room for experimentation. Take your time with the pressing, keep your seam allowances consistent, reinforce the handles carefully, and enjoy arranging the petals until the flower looks balanced. If you make your own version, leave your sincere opinion about the project and share your suggestions. It would also be wonderful to know which fabric colors, prints, or additional details you would choose for your own Patchwork Bag with Fabric Flowers Pattern.