
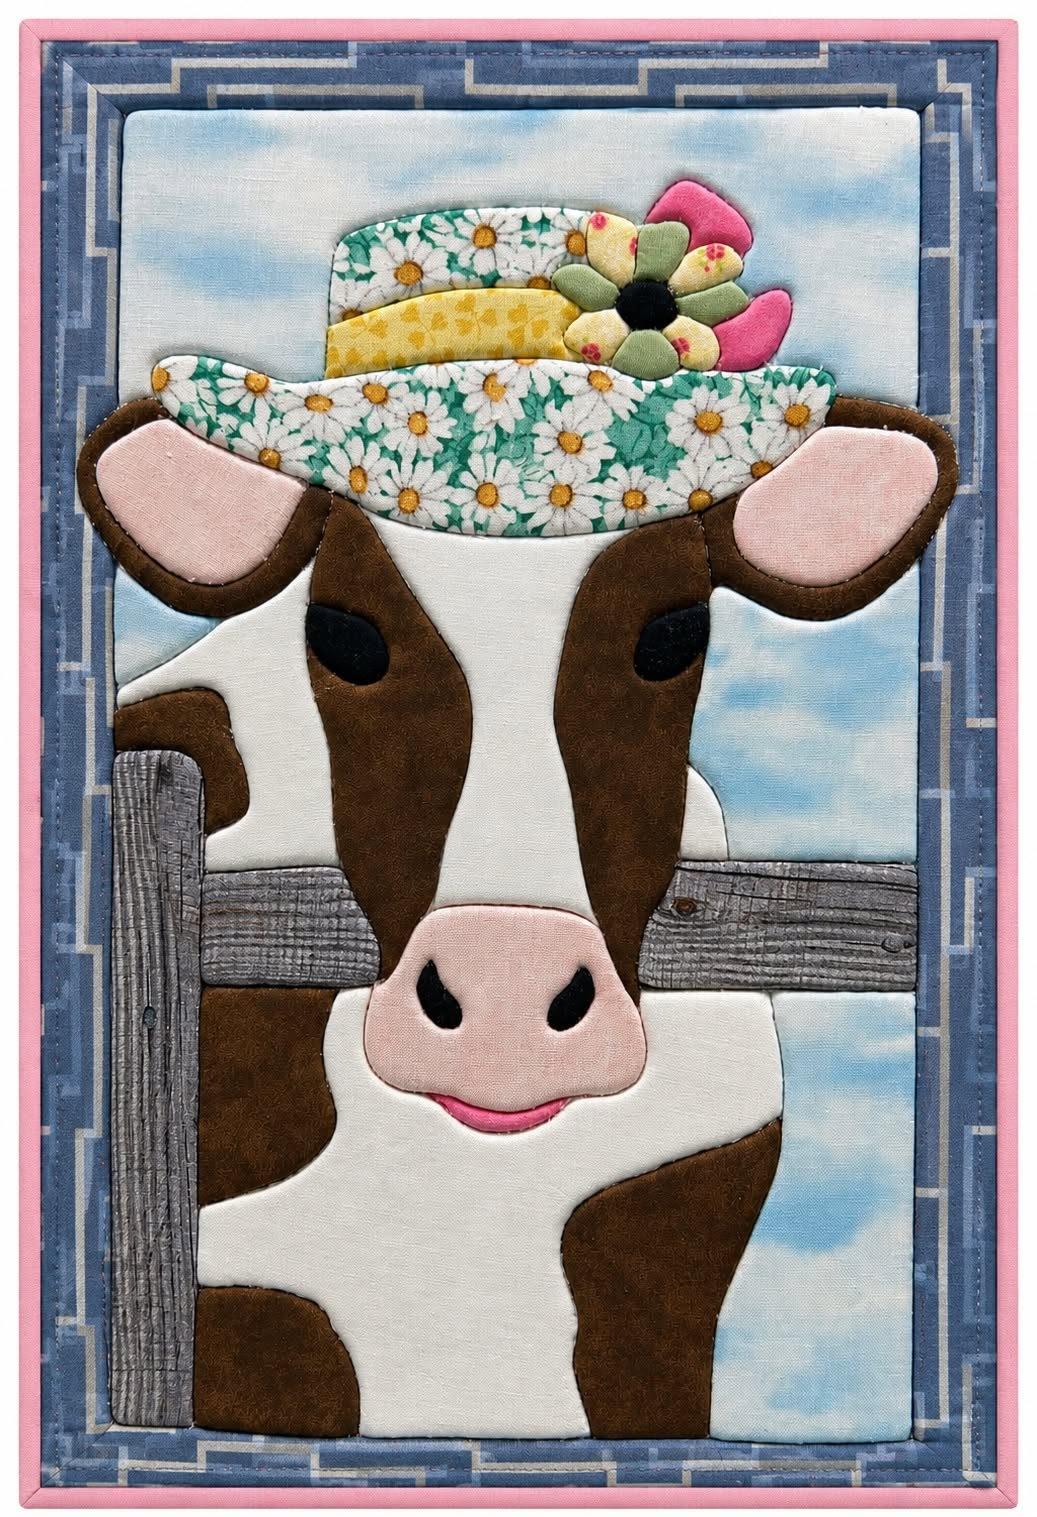
The Cow with Flower Hat Patchwork Wall Panel Pattern is a charming fabric-art project that combines traditional patchwork, appliqué, dimensional details, and country-inspired decoration in one cheerful wall hanging. The design shown in the reference image features a friendly cow looking through a rustic wooden-style fence, with soft blue sky fabrics in the background and a playful floral hat resting above the cow’s head. It is an excellent project for sewists who enjoy creating decorative pieces with personality while using a variety of cotton scraps. Although the finished panel looks detailed, it can be constructed gradually by separating the design into background, cow, fence, hat, and flower sections. This approach makes the project much easier to organize and gives you complete control over fabric placement, contrast, and finishing. With careful cutting and patient assembly, even a confident beginner can recreate the main look of this patchwork cow wall panel.
One of the most attractive qualities of the Cow with Flower Hat Patchwork Wall Panel Pattern is the opportunity to combine prints, solids, and textured fabrics without needing every piece to match perfectly. The cow can be made from creamy white cotton paired with warm brown patches, while pale pink works beautifully for the muzzle and inner ears. Black fabric creates strong definition for the eyes and nostrils, and floral cotton gives the hat a lighthearted farmhouse appearance. The blue background creates the impression of an open sky and helps the animal stand out clearly from the panel. Gray or weathered wood-look fabric can be used to create the fence, adding another layer of visual interest. Because patchwork projects naturally celebrate different fabric combinations, small variations in color and print can make your finished panel feel unique rather than incorrect.
Before starting your Cow with Flower Hat Patchwork Wall Panel Pattern, prepare your materials and decide on the approximate finished size of your wall hanging. You will need quilting cotton in white, brown, pale pink, black, light blue, yellow, green, gray, and several floral prints, plus batting, backing fabric, fusible web, coordinating sewing thread, pins or clips, scissors, an iron, and a sewing machine. A removable fabric marker is useful for tracing the shapes before cutting. It is also helpful to make paper templates for the cow’s head, ears, facial patches, muzzle, hat, petals, fence boards, and background sections. Creating the pattern pieces before cutting fabric makes the assembly more predictable and reduces fabric waste. For a decorative panel similar to the photograph, a rectangular format works particularly well because it emphasizes the cow’s long face and gives enough room for the hat and fence details.
Preparing the Background, Templates, and Fabric Pieces
Begin the Cow with Flower Hat Patchwork Wall Panel Pattern by making the main rectangular background. Choose a pale blue cotton with subtle cloud-like variations, watercolor effects, or small tonal prints. Cut the background slightly larger than the desired finished panel so you have room to trim and square the project later. Press the fabric carefully to remove wrinkles, because a smooth background makes positioning appliqué pieces much easier. If your fabric is lightweight, adding a thin stabilizer behind it can prevent distortion while stitching. Keep the background flat on your work surface as you begin arranging the larger shapes.
DISCOVER MORE FREE PATTERNS HERE!
Next, create the paper templates for the cow. The main head should have a long vertical silhouette that becomes wider toward the forehead and slightly narrower around the muzzle area. Add separate templates for the ears, brown facial patches, black eyes, pink muzzle, nostrils, lower jaw patches, and small pink mouth detail. You do not need to create complicated anatomical shapes. The appeal of this cow appliqué pattern comes from simplified, rounded pieces that overlap naturally. Label every template before cutting so you can easily identify the pieces during assembly.
Trace the templates onto the paper side of fusible web, remembering to reverse any asymmetrical shapes when necessary. Rough-cut around the traced shapes and fuse them onto the wrong side of your selected fabrics according to the fusible web manufacturer’s instructions. Once cooled, cut directly on the drawn lines. This method creates neat fabric pieces that are easier to position accurately. Leave the paper backing attached until you are ready to arrange each component on the blue background.
For the cow’s main body and face, use white quilting cotton or a soft cream fabric. Cut the forehead, central face, and lower body sections so they connect visually as one animal. Brown patches can then be placed over the white pieces to create the familiar dairy-cow appearance. Try to use an earthy chocolate or medium brown rather than an extremely dark brown, as this creates a softer handmade look. Slight variations between brown fabrics are completely acceptable and may even make the patchwork wall panel more interesting.
Prepare the ears separately using brown fabric for the outer sections and pale pink fabric for the inner sections. The ears should extend sideways near the top of the cow’s head and can overlap the background or hat slightly. Rounded shapes will produce a friendly appearance. Black oval eyes placed beneath the ears create a strong focal point. If you want additional dimension, you may lightly pad certain pieces with a small amount of batting before stitching, but flat fusible appliqué also works very well.
Finally, prepare the rustic fence elements visible in front of the cow. Cut one horizontal strip and at least one vertical post from gray, charcoal, or wood-grain fabric. These pieces should overlap the lower body of the cow, making it appear that the animal is standing behind the fence. Gray fabric with printed grain lines is particularly effective because it gives the illusion of weathered timber without complicated piecing. Set these sections aside until the main cow appliqué has been attached.
Building the Cow Face and Adding Appliqué Details
Start assembling the Cow with Flower Hat Patchwork Wall Panel Pattern by placing the largest white cow pieces onto the blue background. Position the head near the center and leave enough space at the top for the ears, hat, and flower. Arrange the lower body so it continues naturally below the muzzle. Before removing any fusible backing, place all the main components temporarily on the fabric and compare the proportions with your reference image. When you are satisfied, fuse the largest pieces in place.
Add the large brown patches over the white cow fabric. One patch can cover much of one side of the forehead, while another narrower brown shape may extend downward beside the opposite eye. Additional brown patches around the neck and body give the cow its classic spotted appearance. Avoid making the two sides perfectly symmetrical. Irregular patches are more realistic and contribute to the handcrafted character of the Cow with Flower Hat Patchwork Wall Panel Pattern.
Position the eyes next. Small black oval or teardrop-shaped pieces work well and should sit slightly above the muzzle. The facial expression depends greatly on eye placement, so experiment before fusing. Eyes placed slightly inward generally create a gentle expression. You can stitch around them with a narrow satin stitch, blanket stitch, or small straight stitch. Using matching black thread helps the appliqué edges disappear, while contrasting thread can emphasize the handmade construction.
The muzzle is one of the most recognizable features of the project. Cut a broad rounded shape from pale pink cotton and place it near the lower center of the face. Add two black nostrils, positioning them evenly but not necessarily perfectly symmetrical. A small curved strip of brighter pink fabric beneath the muzzle can suggest a smiling mouth or tongue. This tiny detail gives the fabric cow wall hanging much of its cheerful personality.
After the muzzle is secure, attach the inner ear pieces to the outer brown ears. Stitch the pink fabric first, then attach the completed ears to the background. Slightly curving or angling the ears can make the animal look more expressive. If you prefer a three-dimensional effect, leave a small portion of the outer ear edges unattached, allowing them to lift gently away from the surface. However, fully stitched edges are more durable if the panel will be handled frequently.
Once all facial components are positioned, stitch around every appliqué shape. A blanket stitch appliqué is a classic choice because it creates visible handmade definition, while a narrow zigzag produces a cleaner contemporary finish. Straight stitching close to the raw edge is another option if you enjoy a slightly frayed, rustic look. Work slowly around curves and reduce stitch length when necessary. Press the panel from the back after stitching to keep the surface smooth.
Creating the Flower Hat, Fence, and Quilted Finish
The floral hat is an important decorative element in the Cow with Flower Hat Patchwork Wall Panel Pattern because it transforms a simple cow design into a playful farmhouse artwork. Create the crown using floral printed cotton, preferably a print with small daisies or similar flowers. Cut a curved crown shape that sits directly above the cow’s forehead. Add a contrasting yellow band across the lower part of the hat. This bright strip separates the hat from the cow’s head and makes the floral print more noticeable.
Next, create the flower embellishment. Cut several rounded petals from coordinating fabrics such as pink, green, yellow, and small floral prints. Arrange the petals around a dark circular center. Some petals can be larger or more pointed than others, creating a whimsical handmade style rather than a perfectly geometric flower. Layering the petal pieces slightly will give the flower additional dimension. Fuse them carefully and stitch each petal individually for a secure finish.
Add the flower near one side of the hat, allowing a few petals to extend beyond the hat edge. This asymmetrical placement is visually appealing and matches the playful style of the panel. You can also use a small amount of batting behind the flower center if you want a softly raised effect. Machine stitching around the petals adds definition, but hand stitching can create an even more traditional country patchwork appearance.
Now place the horizontal fence rail across the lower portion of the cow. Position it approximately around the chest area so the cow appears to be looking over the fence. Add the vertical post toward one side, overlapping the horizontal rail. Sew around the fence pieces carefully and consider quilting a few irregular horizontal lines through the gray fabric to imitate wood grain. Small stitched knots or circular details can also enhance the rustic timber effect.
Once all decorative pieces are attached, layer the completed patchwork top with batting and backing fabric. Smooth all three layers and secure them with safety pins, basting spray, or temporary stitches. Quilt the panel lightly so the layers stay together without competing with the appliqué. You might outline the cow, stitch around the hat and flower, and add gentle free-motion curves through the blue background. Minimal quilting is usually enough because the appliqué already creates substantial texture.
Finish the Cow with Flower Hat Patchwork Wall Panel Pattern by trimming the panel square and adding binding around all four sides. A medium or dark blue geometric print complements the sky background beautifully and frames the entire composition. Cut binding strips, join them, attach them to the front edge, fold them around the back, and stitch securely. Add a hanging sleeve to the back if you intend to display the panel on a wall. Give the finished piece a final light press while avoiding excessive pressure on dimensional areas.
Cow with Flower Hat Patchwork Wall Panel Pattern FAQ
What is the Cow with Flower Hat Patchwork Wall Panel Pattern? The Cow with Flower Hat Patchwork Wall Panel Pattern is a decorative sewing project that combines fabric appliqué, patchwork, and quilting techniques to create a wall hanging featuring a cow wearing a floral hat. The individual pieces are layered over a fabric background and stitched into place. The project is especially suitable for farmhouse, country, rustic, and animal-themed décor.
Can beginners make this patchwork cow wall panel? Yes. A beginner who understands basic sewing machine operation can complete the project by working slowly and assembling one section at a time. The most important skills are tracing templates, cutting fabric accurately, using fusible web, and stitching around curved appliqué pieces. Beginners may want to practice blanket stitch or narrow zigzag stitching on scrap fabric before working on the final panel.
What fabrics work best for the Cow with Flower Hat Patchwork Wall Panel Pattern? Medium-weight 100% cotton quilting fabric is usually the easiest material to work with. Cotton holds its shape, accepts fusible web well, presses easily, and comes in countless prints. Use white and brown for the cow, pink for the muzzle and ears, black for facial details, blue for the sky, gray for the fence, and cheerful prints for the flower hat.
Do I need fusible web for this cow appliqué project? Fusible web is highly recommended because it holds small and curved pieces in position while you sew. Without it, appliqué pieces may shift, wrinkle, or stretch. However, experienced sewists can use traditional needle-turn appliqué, glue basting, or pinning techniques instead. The best method depends on your preferred sewing style and the finish you want to achieve.
How can I make the patchwork panel look more dimensional? Dimension can be added by placing thin batting behind selected appliqué pieces, leaving small portions of petals or ears free from stitching, and using outline quilting around the cow and hat. Fabric texture also creates visual depth. Combining smooth cotton, floral prints, wood-look fabric, and subtle tonal backgrounds makes the finished patchwork wall hanging appear layered even when most pieces are flat.
How should I display the finished cow wall hanging? A fabric sleeve sewn to the back allows the panel to hang from a small rod or dowel. You can also use quilt clips designed for fabric wall art. Avoid stretching the panel tightly because this may distort the quilting. Display it in a sewing room, kitchen, farmhouse-inspired living space, craft room, or any area where the cheerful Cow with Flower Hat Patchwork Wall Panel Pattern can become a decorative focal point.
Conclusion
Creating a Cow with Flower Hat Patchwork Wall Panel Pattern is a rewarding way to combine several enjoyable sewing techniques in one decorative project. You begin with a soft blue background, build the cow from layered white, brown, pink, and black appliqué pieces, create the expressive face, and then add the floral hat that gives the design its distinctive personality. The rustic fabric fence completes the country scene while also adding structure and depth to the composition.
The project also provides plenty of room for customization. You can change the flower colors, experiment with different cow markings, use brighter or softer fabrics, modify the fence texture, or select binding that coordinates with your home décor. Scrap fabrics can be especially useful because the flower petals, facial features, and small patches require only modest amounts of material. This makes the Cow with Flower Hat Patchwork Wall Panel Pattern both creative and practical for anyone who already has a collection of quilting remnants.
Most importantly, there is no need to rush the process. Carefully arranging the appliqué pieces before fusing them, stitching slowly around curves, pressing between stages, and checking the overall balance will help you achieve a polished result. Small differences from the original image are part of the beauty of handmade patchwork and can give your project its own character.
EASILY FIND THE PDF FOR THIS PATTERN HERE!
After completing your Cow with Flower Hat Patchwork Wall Panel Pattern, you will have a cheerful quilted decoration that combines cow appliqué, farmhouse patchwork, fabric wall art, floral appliqué, and traditional quilting techniques in a single project. It can also become a thoughtful handmade gift for someone who loves cows, country décor, sewing, or rural themes. If you make this project, leave your sincere opinion about the pattern and the sewing process. Suggestions are also welcome—share which colors, fabrics, flower combinations, or decorative details you would use to create your own version of this charming cow patchwork wall panel.