
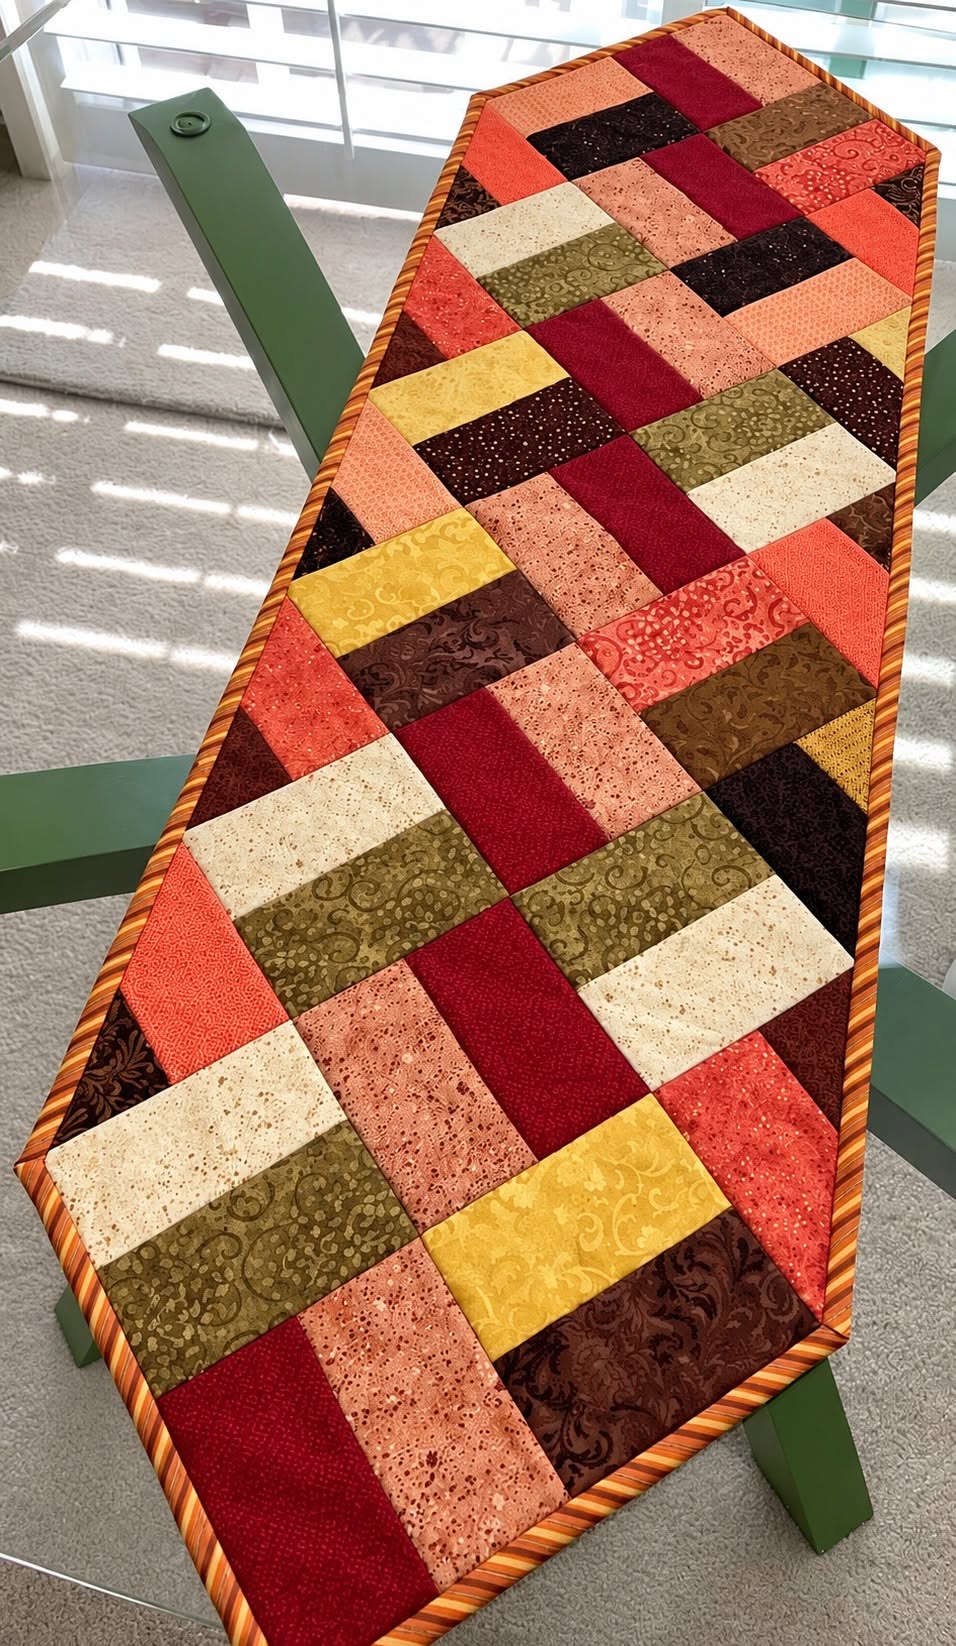
The Patchwork Quilted Table Runner with Weaving Effect Pattern is a beautiful way to transform simple fabric rectangles into a sophisticated decorative piece that looks as though strips of fabric have been carefully woven over and under one another. Inspired by the table runner shown in the photo, this project combines warm burgundy, brown, cream, gold, rust, coral, and neutral fabrics to create an inviting patchwork composition. Although the finished design may appear complicated at first glance, the construction is surprisingly approachable when it is divided into individual rectangular units and assembled systematically. The key is not actually weaving long fabric strips together, but arranging rectangular patches so that their colors and orientations visually continue across neighboring sections. This creates the illusion of interlaced fabric while allowing the entire top to be sewn using familiar patchwork quilting methods. It is an excellent project for quilters who want to practice accurate cutting, consistent seam allowances, color placement, pressing, quilting, and binding while creating something useful for everyday home decoration.
One of the most appealing characteristics of the Patchwork Quilted Table Runner with Weaving Effect Pattern is its flexibility. You do not need every fabric to come from the same collection, and the project can actually become more interesting when several prints and textures are mixed together. Small floral motifs, swirls, dots, tone-on-tone designs, subtle speckles, and solid-looking fabrics can all work successfully. The runner in the reference image uses a warm autumn-inspired palette, but the same arrangement could be made using blues and whites for a coastal look, red and green fabrics for holiday décor, soft pastels for spring, or neutral beige and gray fabrics for a modern dining room. The term weaving effect describes the visual illusion produced when neighboring rectangular pieces appear to travel underneath or across one another. Careful color distribution is therefore more important than using complicated sewing techniques, making this pattern especially useful for developing confidence in fabric composition and quilt layout.
Creating a successful Patchwork Quilted Table Runner with Weaving Effect Pattern begins with planning rather than immediately sewing pieces together. Fabric selection, cutting accuracy, block arrangement, and pressing direction all influence the final appearance. For a medium table runner, you can aim for a finished size of approximately 40–45 cm wide and 120–150 cm long, although the dimensions can easily be adjusted to suit your table. Rectangles measuring approximately 7 cm × 14 cm before sewing provide a practical starting point, and squares or partial rectangles can be added around the outside when necessary to complete the diagonal-looking design. Always remember that measurements should include your preferred seam allowance. A consistent 0.6 cm seam allowance, approximately the traditional quarter-inch quilting seam, makes joining the units easier. Before cutting all your fabric, making a small test section is useful because it lets you confirm the rectangle proportions and understand how the simulated woven arrangement works.
Choosing Fabrics and Planning the Weaving Effect
For this patchwork table runner, begin by selecting approximately eight to twelve coordinating fabrics. The reference project demonstrates how effective several shades from the same warm color family can be. Burgundy, dark chocolate brown, burnt orange, rust, tan, cream, muted gold, and dusty coral create enough contrast for the individual rectangles to remain visible without making the composition feel disconnected. You can use quilting cotton for the entire project because it is stable, easy to cut, easy to press, and suitable for both machine and hand quilting.
DISCOVER MORE FREE PATTERNS HERE!
The term patchwork refers to the technique of sewing smaller pieces of fabric together to create a larger decorative textile surface. In this project, rectangles function as the main patchwork units. Some are positioned vertically while others are positioned horizontally. Alternating these orientations is what begins to establish the characteristic basket-like or woven appearance. Repeating selected colors in different areas also helps guide the eye across the runner.
The weaving effect depends on visual continuity. Imagine that every rectangle is part of an invisible fabric strip. One dark burgundy rectangle might appear to travel vertically while a neighboring cream rectangle visually crosses it horizontally. At another point, the apparent relationship reverses. You are creating an optical pattern rather than physically weaving fabric, which means the design can remain completely flat and easy to quilt.
Before sewing, place your cut rectangles on a large table or design surface. Start near the center and alternate vertical and horizontal pieces. Avoid placing too many identical colors directly beside each other unless you intentionally want them to look like one continuous section. Stand several steps away from the layout occasionally. From a distance, you can more easily see whether the woven quilt pattern is developing evenly.
Contrast is especially important. If every fabric has approximately the same value, the rectangles may visually blend together and the weaving illusion can become difficult to recognize. Combine light fabrics such as cream and beige with medium shades such as tan, rust, and gold, then introduce darker fabrics including burgundy and chocolate brown. These differences create rhythm and definition while maintaining a harmonious palette.
Take a quick reference photo of your final arrangement before beginning to sew. Patchwork pieces are surprisingly easy to rearrange accidentally after they have been stacked or carried to the sewing machine. A visual reference allows you to reconstruct the planned layout whenever necessary and makes the assembly process considerably more relaxing.
Cutting and Sewing the Patchwork Units
Wash and press your fabrics first if you normally prewash quilting cotton. Whatever method you choose, try to treat all fabrics consistently. Press each fabric flat without stretching it, then use a rotary cutter, acrylic ruler, and cutting mat when available. Accurate rectangles are essential because small cutting differences multiply as several seams are joined together.
For a practical medium-scale design, cut rectangles around 7 cm × 14 cm. These measurements can be modified, but maintaining an approximate 1:2 proportion helps produce the attractive interlaced appearance visible in the inspiration piece. Depending on your final runner dimensions, prepare approximately 50–70 rectangles. Cutting a few additional pieces is worthwhile because they provide flexibility while arranging the colors.
Organize the rectangles into small groups according to your planned layout. Instead of attempting to sew the entire runner one piece at a time, create manageable sections. A section might contain three, four, or five rectangles that can be joined into a short row or block. Sew using a consistent 0.6 cm seam allowance, and avoid pulling or stretching the fabrics while guiding them under the presser foot.
After sewing every seam, press carefully. For most areas, pressing seam allowances toward the darker fabric helps prevent darker seam allowances from showing through light fabrics. When two sections will be joined, you can sometimes press their seams in opposite directions so the seam intersections nest together. This technique improves alignment and reduces bulky intersections.
Continue assembling small sections while repeatedly comparing them with your reference layout. The goal is to preserve the alternating orientation of the rectangles. When horizontal pieces appear to interrupt vertical pieces at regular intervals, the weaving effect pattern becomes increasingly obvious. Do not worry if some edge pieces extend beyond the planned finished shape; they can be trimmed after the patchwork top has been completed.
Once several sections are ready, sew them together to form larger panels. Check alignment before every long seam, using quilting pins or clips if needed. Sew slowly around intersections because accuracy is more important than speed. When the entire patchwork top is assembled, press it carefully from both sides and inspect the surface for puckers, open seams, or areas that may need adjustment.
Creating the Quilt Sandwich and Quilting the Runner
After completing the patchwork top, prepare the quilt sandwich. This quilting term describes the three layers used in a quilted project: the decorative patchwork top, batting in the center, and backing fabric underneath. Cut the batting and backing approximately 3–5 cm larger than the patchwork top on every side. The additional material gives you room to handle small shifts during quilting.
For a table runner, choose batting that provides structure without becoming excessively thick. Cotton batting creates a traditional appearance and handles heat reasonably well, while a cotton-polyester blend can provide additional loft and stability. Remember that a decorative runner should not automatically be treated as a heatproof surface unless every material used has been specifically designed for that purpose.
Place the backing fabric wrong side facing upward on a clean surface. Smooth it carefully, position the batting over it, and finally place the patchwork top right side facing upward. Remove wrinkles from each layer. Secure the three layers using safety pins, temporary basting methods, or another quilting technique you are comfortable using.
Straight-line quilting works particularly well for a Patchwork Quilted Table Runner with Weaving Effect Pattern because the stitching can emphasize the geometry of the rectangles. You might quilt approximately 0.5–1 cm away from selected seam lines. Another option is stitching in the ditch, where quilting stitches travel close to or directly along patchwork seam lines.
If you prefer more decorative quilting, gentle curves, loops, or free-motion motifs can contrast beautifully with the straight edges of the patchwork pieces. However, avoid making quilting so visually dominant that it hides the woven illusion. The strongest feature of this pattern is the interaction between colors and rectangular shapes, so quilting should generally support rather than compete with that design.
Begin quilting near the center of the runner and gradually work toward the outer edges whenever possible. This helps distribute the fabric evenly and reduces the risk of creating wrinkles. After quilting is finished, place the runner on a cutting mat and carefully trim excess batting and backing until all three layers are even with the patchwork top.
Binding, Finishing, and Customizing Your Table Runner
The narrow striped binding visible around the inspiration runner provides an attractive frame for the warm patchwork colors. You can reproduce a similar effect using striped quilting cotton or choose a solid fabric that coordinates with one of the darker colors in the design. A darker binding often defines the outside edge beautifully, while a lighter binding produces a softer finish.
To make traditional quilt binding, cut fabric strips approximately 6–6.5 cm wide and join enough strips to travel around the entire runner with additional length for joining the ends. Joining strips with diagonal seams helps distribute bulk. Press the long binding strip in half lengthwise with wrong sides together before attaching it.
Sew the binding to the front edge of the runner using a consistent seam allowance. When approaching a corner, use a mitered-corner method so the binding folds neatly around the angle. Continue around all four sides, then connect the beginning and ending sections of binding securely. Fold the binding over the raw quilt edge toward the back.
The back of the binding can be finished by hand for a traditional nearly invisible appearance or stitched by machine for a faster and durable result. Whichever technique you select, check that the binding completely covers the previous stitching line and that no batting remains exposed. Give the completed runner a final gentle press without flattening the quilting texture excessively.
Customization is one of the major advantages of this Patchwork Quilted Table Runner with Weaving Effect Pattern. For a longer dining table, simply extend the layout by adding additional patchwork sections before quilting. For a narrow console table, reduce the number of units across the width. The rectangle size can also be increased for a bolder contemporary design or reduced for a more detailed woven appearance.
Most importantly, do not feel that every rectangle must be perfectly coordinated. Scrap quilting is particularly effective with this pattern because repeated colors create visual connections even when individual prints differ. Leftover fabrics from previous sewing projects can therefore become part of an entirely new decorative piece. The combination of practical construction and creative freedom is what makes this patchwork quilt pattern so enjoyable.
FAQ – Frequently Asked Questions About the Patchwork Quilted Table Runner with Weaving Effect Pattern
What is a weaving effect in patchwork quilting?
A weaving effect is a visual illusion created by arranging fabric pieces so they appear to pass over and under neighboring pieces. In this project, rectangular patches are positioned horizontally and vertically to imitate woven strips. The fabrics themselves do not need to be physically woven.
Is this table runner suitable for beginners?
Yes. A confident beginner can complete this pattern because most of the construction involves straight cutting and straight seams. The main challenge is maintaining an accurate seam allowance and keeping the rectangles in the correct order. Planning the complete layout before sewing makes the process significantly easier.
What fabric is best for a patchwork table runner?
High-quality quilting cotton is one of the easiest choices. It cuts cleanly, presses well, and is available in a huge variety of prints and colors. Try to use fabrics with similar weight and construction so the completed top behaves consistently during quilting.
How many fabrics should I use?
Approximately eight to twelve different fabrics provide plenty of visual variation, although there is no strict requirement. You can create the runner with fewer fabrics by repeating them more often, or use many scraps for a more varied scrappy patchwork appearance.
What size should the rectangles be?
A useful starting size is approximately 7 cm × 14 cm before sewing, including seam allowances. The exact dimensions are flexible. What matters most is maintaining consistent dimensions throughout the project so neighboring units align properly.
How large should a finished table runner be?
A medium runner might measure approximately 40–45 cm wide and 120–150 cm long. However, table dimensions vary considerably, so measure your table before deciding on the final size. Some people prefer a runner that remains entirely on the tabletop, while others prefer it to extend slightly beyond each end.
Do I need a special quilting machine?
No. A regular domestic sewing machine can be used for piecing and quilting a table runner. A quarter-inch style presser foot can make consistent patchwork seams easier, and a walking foot can help feed multiple quilt layers evenly during straight-line quilting, but neither is absolutely required.
Should I press the seams open or to one side?
Both approaches are used in quilting. For this project, pressing seams toward the darker fabric is a practical method. At intersections, alternating pressing directions can help neighboring seams nest together. The most important factor is pressing carefully without stretching the patchwork.
Can the weaving effect be made with only two colors?
Yes. A two-color variation can create a bold graphic design, particularly when there is strong contrast between the fabrics. However, using several shades creates additional depth and makes the woven appearance more complex, similar to the warm multi-fabric example in the reference image.
Can I make matching placemats from the same pattern?
Certainly. The same Patchwork Quilted Table Runner with Weaving Effect Pattern can be adapted to smaller rectangular pieces for placemats. Simply create smaller patchwork tops, add batting and backing, quilt each piece, and finish them with matching binding. Using the same fabric collection can create a coordinated dining set.
How can I prevent the runner from becoming crooked?
Accurate cutting, consistent seams, careful pressing, and regular measurements are the best ways to prevent distortion. Build the runner in smaller sections rather than continuously adding pieces to one long edge. After completing each major section, check that it remains square before attaching the next one.
Can I use fabric scraps for this project?
Yes, and this design is an excellent way to use quilting scraps. Because the pattern depends on numerous rectangles, even relatively small leftover pieces can be useful. Sort scraps by color and contrast first, then distribute similar tones throughout the layout to create balance.
Do I have to use warm autumn colors?
Not at all. The burgundy, rust, cream, brown, coral, and gold palette creates a warm traditional appearance, but the construction works with virtually any color scheme. Navy and white can feel crisp and coastal, black and gray can look modern, and pastel fabrics can produce a softer romantic effect.
How should the finished runner be cared for?
Care instructions depend on the fabrics, batting, thread, and binding you select. Quilting cotton projects are often washable, but always follow the care recommendations for your specific materials. Gentle washing and careful drying can help maintain the shape and quilting texture for longer.
Conclusion
The Patchwork Quilted Table Runner with Weaving Effect Pattern demonstrates how relatively simple fabric rectangles can produce a striking and sophisticated quilted design. The project begins with a balanced fabric palette, continues through accurate cutting and careful arrangement, and develops its distinctive appearance by alternating horizontal and vertical rectangles. Once the patchwork top is assembled, adding backing, batting, quilting, trimming, and binding transforms those small pieces into a practical decorative runner.
Throughout this project, the most important skills are consistency and planning. Accurate measurements keep the patchwork aligned, careful color placement strengthens the weaving effect, and thoughtful pressing helps intersections lie neatly. Straight-line quilting can emphasize the geometric structure, while an attractive binding creates a polished frame around the entire design.
Another valuable lesson is that a successful patchwork table runner pattern does not require complicated templates or extremely advanced sewing techniques. Careful use of contrast and orientation can make a simple rectangular unit look far more elaborate than it really is. That makes this project both approachable and visually rewarding.
You can also use the basic construction as a starting point for many variations. Change the colors, increase or reduce the dimensions, use leftover fabric scraps, create coordinating placemats, or experiment with different quilting patterns. Once you understand how the rectangular pieces form the woven illusion, there is plenty of room for personal creativity.
EASILY FIND THE PDF FOR THIS PATTERN HERE!
The finished runner can bring warmth, texture, and handmade character to a dining table, coffee table, sideboard, or console. More importantly, creating it provides practical experience with several essential quilting techniques, including fabric selection, patchwork piecing, accurate seam allowances, quilt sandwich construction, machine quilting, and binding. If you make your own Patchwork Quilted Table Runner with Weaving Effect Pattern, leave your sincere opinion about the project and share your suggestions. It is always interesting to hear which color combinations, quilting styles, rectangle sizes, and creative adaptations other quilters would use to give this woven-inspired pattern their own personal touch.