
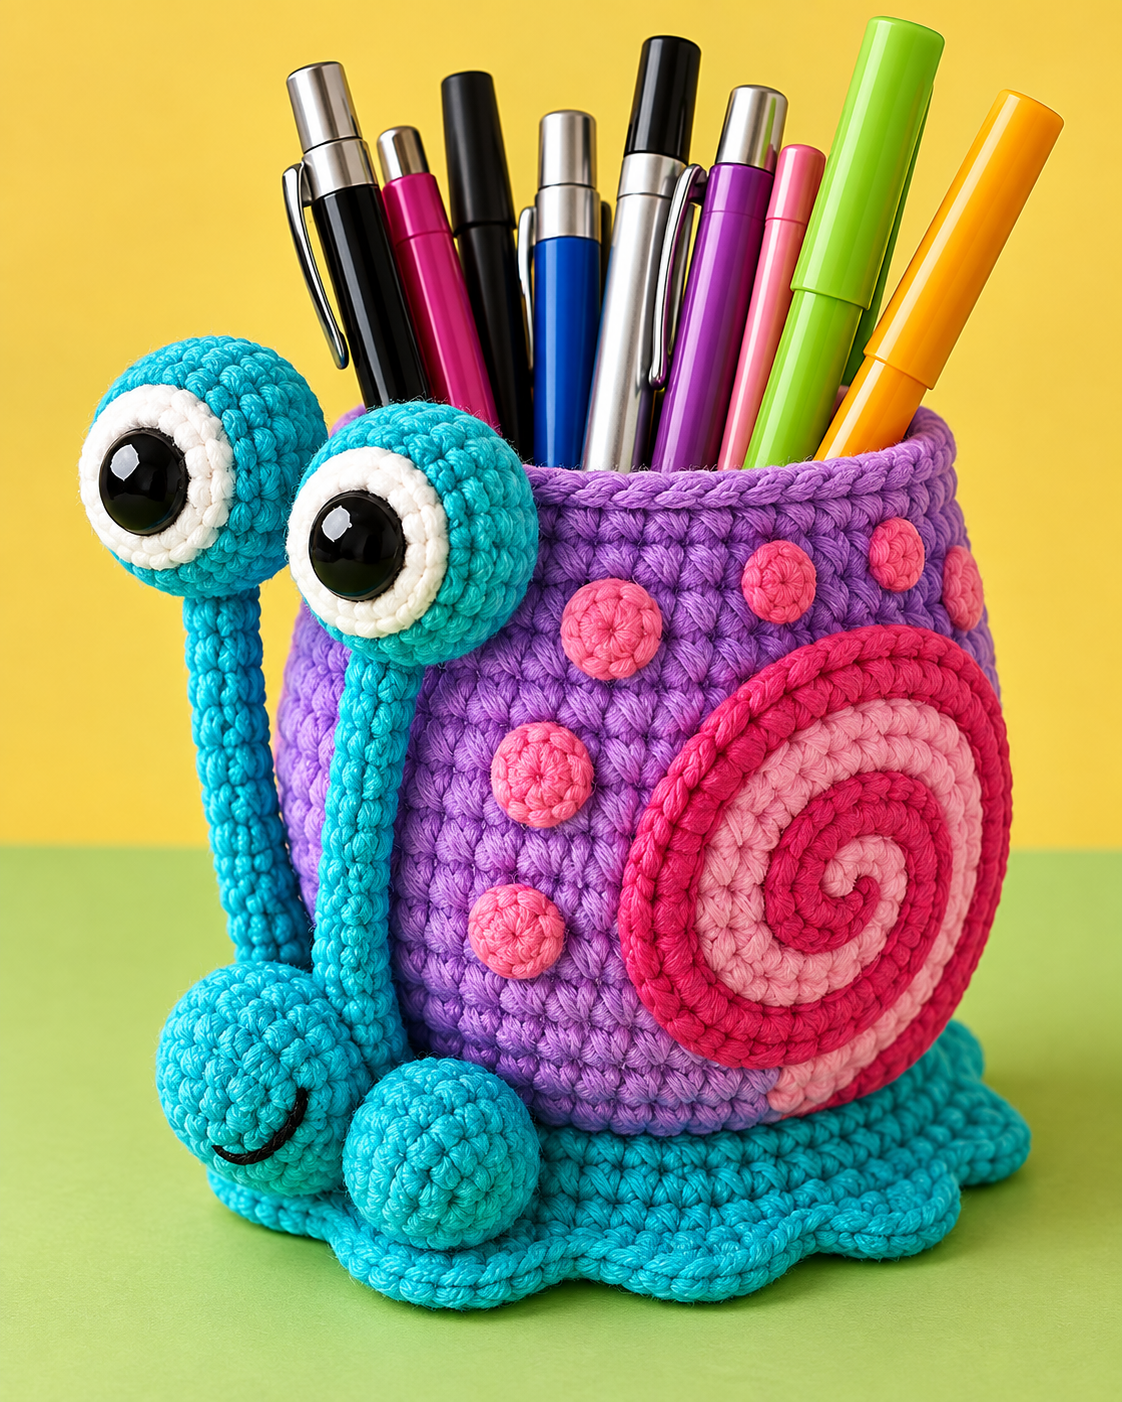
Crochet Snail Pen Holder Pattern is a cheerful and practical crochet project that combines amigurumi techniques with an everyday desk organizer. Inspired by the colorful snail-shaped holder shown in the photo, this project features a sturdy pink cylindrical body, a bright turquoise base and head, long eye stalks, oversized green eyes, purple decorative spots, and a bold red spiral shell detail. The finished piece can hold pens, pencils, crochet hooks, markers, or other lightweight craft tools while also working as handmade desk décor. Because the construction uses familiar stitches such as single crochet (sc), magic ring (MR), increase (inc), and decrease (dec), the project is approachable for crocheters who already understand basic amigurumi. The most important part is keeping the stitches tight enough to create a firm container. With careful assembly and a little patience, the snail becomes both decorative and genuinely useful.
This Crochet Snail Pen Holder Pattern is worked mainly in continuous rounds, which helps create the smooth texture visible in the finished design. The body is essentially a crocheted container that remains open at the top, while the snail features are made separately and sewn securely into position. For a holder approximately 13–16 cm tall, medium-weight cotton or cotton-blend yarn works especially well because it creates clear stitches and maintains its shape better than very soft yarn. You can use pink for the main container, turquoise or aqua for the head and base, green for the eyes, white for the eye rims, black for the pupils, purple for the spots, and red for the spiral. The exact colors are flexible, but strong contrasts make the playful snail design easier to recognize. A smaller hook than normally recommended for your yarn will also help produce the dense fabric needed for this project.
Before beginning the Crochet Snail Pen Holder Pattern, gather your yarn, crochet hook, yarn needle, stitch marker, scissors, fiberfill, and a removable internal support if you want the holder to be especially sturdy. A lightweight plastic cup or carefully cut flexible plastic insert can be placed inside the crocheted cylinder, provided all edges are smooth and completely covered. The instructions below use standard U.S. crochet terminology, and the principal abbreviations are MR = magic ring, ch = chain, sl st = slip stitch, sc = single crochet, hdc = half double crochet, inc = two single crochets in the same stitch, dec = invisible single crochet decrease, BLO = back loop only, and FO = fasten off. Numbers inside parentheses show the stitch count at the end of a round. Use a stitch marker at the beginning of every continuous round. Counting carefully will make the final construction far easier.
Materials, Crochet Abbreviations, Gauge, and Preparation
For the main body of the Crochet Snail Pen Holder Pattern, choose a medium-weight cotton or cotton-blend yarn with enough structure to hold its shape. You will need approximately 50–70 g of pink yarn, 30–40 g of turquoise yarn, and smaller amounts of red, green, white, black, and purple. A 3.0–3.5 mm crochet hook is a practical starting point, although your hook should ultimately match your yarn and tension. You will also need polyester fiberfill for the head and eyes, a tapestry needle for sewing, and stitch markers. The pen holder itself should not be heavily stuffed because its center must remain hollow.
DISCOVER MORE FREE PATTERNS HERE!
Gauge is not as critical for this project as it would be for a garment, but consistent tension is extremely important. Work several rounds of sc and check whether the fabric is dense enough that you cannot easily see through the stitches. If the fabric feels floppy, move down one hook size. If it becomes painfully difficult to insert the hook, move up slightly. A tight but comfortable gauge produces a stronger crochet pen holder and creates the rounded amigurumi texture seen in the reference design.
Throughout the pattern, work in continuous rounds unless a step specifically says otherwise. Do not join the rounds with a sl st, because joining can create a visible seam down the side of the snail. Place a marker in the first stitch and move it upward after completing every round. This simple technique is particularly useful when making the eyes and head, where missing even one increase or decrease can change the shape significantly.
The principal pattern language is straightforward. MR creates an adjustable starting circle. Sc means insert the hook into the stitch, yarn over, pull up a loop, yarn over again, and pull through both loops. Inc means work two sc stitches into one stitch, increasing the circumference. Dec means combine two stitches into one, preferably using the invisible decrease method. These four techniques form most of the Crochet Snail Pen Holder Pattern.
For the decorative spiral and purple spots, you can crochet flat appliqués separately and sew them onto the container. This method is easier than changing colors directly within the body and also produces the raised, dimensional appearance shown in the image. When sewing appliqués, use matching yarn and make small stitches close to the outer edge. Avoid pulling too tightly because excessive tension can distort the cylindrical holder.
An optional internal insert can dramatically improve stability, particularly if you plan to fill the snail with several heavy pens or markers. Measure the crocheted interior only after completing the body because individual crochet tension changes the final diameter. The insert should slide comfortably inside without stretching the stitches. Keep it slightly shorter than the crocheted container so that it remains hidden beneath the upper pink edge.
Crocheting the Snail Body and Stable Base
Begin the main pink container with an MR. Round 1: work 6 sc in MR (6). Round 2: inc around (12). Round 3: [sc 1, inc] × 6 (18). Round 4: [sc 2, inc] × 6 (24). Round 5: [sc 3, inc] × 6 (30). Round 6: [sc 4, inc] × 6 (36). Continue increasing with the same formula until your circle measures approximately 8–9 cm across. Depending on the yarn, you may finish with 42, 48, or 54 stitches.
Once the bottom circle reaches the desired diameter, work one complete round in BLO without increasing. This creates a subtle turning edge between the bottom and walls. After that, return to working through both loops and crochet sc around for approximately 20–26 rounds, or until the body measures around 9–11 cm from the bottom. Try placing a few pens inside while working to confirm that the proportions are practical.
The upper edge needs extra firmness because pens will repeatedly touch it during use. After reaching the desired body height, work one round of sl st loosely around the opening, or work an additional round of reverse single crochet if you are comfortable with that technique. Another option is to work two final rounds using a slightly smaller hook. Do not make the edge so tight that it pulls the container inward.
Next, crochet the turquoise foot or base that gives the snail its recognizable silhouette. Start with MR, 6 sc. Increase evenly until the turquoise circle is slightly wider than the pink container. Then create soft scalloped areas around the outside by alternating groups such as sc, hdc, 3 hdc in one stitch, hdc, sc. The exact number of scallops can be adjusted according to your final stitch count. This organic outline suggests the broad crawling foot of a snail.
Position the pink container on top of the turquoise base before sewing. The body should sit slightly toward the rear, leaving more turquoise visible toward the front where the head will be attached. Pin or clip the pieces temporarily and examine the project from several angles. Once satisfied, sew the container firmly to the base using matching turquoise or pink yarn. Several passes may be necessary because this seam supports the entire crochet desk organizer.
At this stage, check the body for stability. If the holder collapses inward when gently squeezed, add your prepared internal support. Another crochet-only solution is to create a second smaller cylinder and insert it inside, producing a double-layer wall. This requires more yarn but keeps the project entirely textile-based. Whichever method you choose, the finished container should remain upright when empty and should not lean excessively when holding pens.
Making the Snail Head, Eye Stalks, Eyes, and Shell Details
For the front head, use turquoise yarn. Make MR, 6 sc (6). Round 2: inc around (12). Round 3: [sc 1, inc] × 6 (18). Rounds 4–6: sc around (18). Begin stuffing lightly. Round 7: [sc 1, dec] × 6 (12). Round 8: dec around (6). FO with a long tail. You can make a second rounded section of a similar size if you want the front to have the two-lobed appearance visible in the photograph.
To form each eye stalk, chain approximately 18–24 ch in turquoise. Beginning in the second chain from the hook, work sc across. For a thicker stalk, work around both sides of the foundation chain, or make a narrow tube using 6 sc in continuous rounds. The finished stalk should measure around 7–9 cm. Make two identical pieces and leave long tails for sewing. A tightly worked tube is especially effective because it stands more upright.
The large green eyes are one of the most distinctive elements in this Crochet Snail Pen Holder Pattern. With green yarn, make MR, 6 sc. Round 2: inc around (12). Round 3: [sc 1, inc] × 6 (18). Rounds 4–5: sc around (18). Round 6: [sc 1, dec] × 6 (12). Add a small amount of fiberfill, then continue decreasing until closed. Make two green eye balls of equal size.
Crochet two flat white circles for the eye fronts. Start with MR, 6 sc, then inc around (12) and fasten off. Make two smaller black circles beginning with MR, 6 sc; one round may be sufficient depending on yarn thickness. Sew each black pupil to the center of a white circle, then attach the white circle to the front of the green eye. A tiny white embroidery stitch on the pupil can imitate the reflected highlight and give the snail a lively expression.
Attach each completed eye to the top of an eye stalk. Sew through the base of the eye several times so it cannot rotate easily. Next, sew the lower ends of the stalks behind or just above the turquoise head. Position them slightly apart rather than completely parallel. Then attach the head assembly to the front-left area of the pink container and turquoise base. Use plenty of small secure stitches because tall eye stalks create leverage on the joining seam.
For the red spiral shell decoration, crochet a long red chain of approximately 40–55 ch, then work sc or sl st back along the chain to create a thick cord. Coil the cord into a spiral, beginning tightly in the center and gradually expanding outward. Pin the spiral to the side of the pink holder and sew along its entire length. Add six to eight small purple circles using MR, 6 sc, optionally followed by one increase round, and arrange them around the spiral as decorative spots.
Assembly, Finishing, Customization, and Care
Before completing the Crochet Snail Pen Holder Pattern, inspect every sewn connection carefully. Pull gently on the eye stalks, head, spiral, and purple dots to confirm that the pieces are securely attached. Loose decorative components may catch on pens or crochet hooks during normal use. If anything moves excessively, reinforce the seam from the inside of the container whenever possible.
Shape the turquoise base with your fingers so the scalloped sections sit flat against the table. If the base curls upward, lightly dampen it and block it into shape. Cotton yarn responds particularly well to gentle blocking. Avoid soaking heavily stuffed pieces, as the fiberfill can take a long time to dry. Allow everything to dry completely before inserting the internal support or filling the organizer.
Now check the opening. The ideal crochet pen holder pattern should accommodate ordinary pencils, pens, markers, and small craft tools without allowing them to spread so widely that the container tips. If your opening is larger than expected, you can crochet one final decrease round, decreasing approximately every eighth or ninth stitch. Make only subtle adjustments because a dramatic decrease can create an unwanted gathered rim.
Color customization is one of the easiest ways to make this project personal. Instead of pink and turquoise, consider lavender with mint, yellow with blue, orange with green, or neutral beige with earthy terracotta. The snail crochet pattern also works beautifully with leftover yarn because the eyes, spiral, and dots require only small amounts. For a coordinated craft-room accessory, select colors already present in your sewing or crochet space.
You can also adapt the dimensions. To make a smaller pencil cup, stop increasing the bottom circle sooner and crochet fewer body rounds. For a larger crochet-hook organizer, continue the circle increases and add extra height. Remember that increasing the diameter significantly may require a sturdier interior support. Always maintain the same fundamental construction: flat circular base, vertical cylindrical walls, decorative snail body, head, eyes, and appliqué details.
For routine care, remove all pens and any removable insert before cleaning. Hand washing is generally the gentlest choice for an amigurumi-style organizer. Use cool or lukewarm water, mild detergent, and minimal agitation. Press excess moisture out with a towel instead of twisting. Reshape the snail while damp and allow it to air-dry thoroughly. Good maintenance helps the Crochet Snail Pen Holder Pattern remain colorful and structured for a long time.
FAQ – Frequently Asked Questions About the Crochet Snail Pen Holder Pattern
Is the Crochet Snail Pen Holder Pattern suitable for beginners?
It is best for an adventurous beginner who already understands single crochet, increases, decreases, magic rings, and basic sewing. None of the individual techniques are especially advanced, but the project contains several separate components. Taking time to count stitches and assemble each piece carefully is more important than working quickly.
What yarn is best for a crochet pen holder?
Cotton and cotton-blend yarns are excellent choices because they usually create firm, defined stitches. Acrylic yarn can also work, particularly when paired with a supportive internal liner. Very fluffy or stretchy yarn is less suitable because it may make the organizer lose its cylindrical shape.
What size crochet hook should I use?
For medium-weight yarn, a 3.0–3.5 mm hook is a useful starting range. Amigurumi is normally worked with a hook smaller than the general recommendation on the yarn label. The objective is to produce dense stitches without making crocheting uncomfortable.
How tall should the finished snail pen holder be?
A practical finished height is approximately 13–16 cm, including the eye stalks. The pink container itself can measure approximately 9–11 cm high. These measurements are flexible, so you can adapt the design to pens, crochet hooks, makeup brushes, or other lightweight tools.
How can I make the holder stand upright?
Use tight stitches and a stable base. If more support is required, add a removable plastic cup or smooth internal insert. You can also crochet a second inner cylinder to create double-thickness walls. Making the turquoise base slightly wider than the body improves balance.
Do I need safety eyes for this pattern?
No. The illustrated style can be recreated entirely with crochet by making black pupils, white eye circles, and green eye balls. Crocheted eyes are especially convenient because you can choose their exact size and position without purchasing additional components.
How do I make the red snail spiral?
Crochet a long red cord using a chain followed by sc or sl st, then coil the cord gradually into a spiral. Sew it securely to the pink body as you shape it. Another option is to embroider a thick spiral directly onto the holder, although the crocheted cord creates more texture.
Can I use this pattern to store crochet hooks instead of pens?
Yes. In fact, the Crochet Snail Pen Holder Pattern makes a charming crochet-hook organizer. If you mainly use long hooks, simply add a few extra rounds to the body. For short hooks, keep the original approximate height so they remain easy to reach.
Why is my cylindrical body becoming wider as I crochet?
The most common reason is accidentally adding stitches. Count the stitches at the end of several rounds and make sure you are not working twice into the first or last stitch. Using a stitch marker is essential when working continuous rounds because there is no visible joined seam indicating where each round begins.
Why are my eye stalks falling forward?
The stalks may be too long, too loosely crocheted, or insufficiently attached. Shorten them slightly or make them as narrow tubes rather than flat strips. You can also reinforce the bottom of each stalk by sewing a larger portion directly to the head and body.
Can the colors be changed without changing the pattern?
Absolutely. Color changes do not affect the stitch structure. You can create a pastel snail, rainbow snail, neutral snail, or use scraps from previous projects. Keeping strong contrast between the eyes, pupils, shell spiral, and main body helps preserve the visual character of the design.
How long does the Crochet Snail Pen Holder Pattern take to make?
The time varies according to crochet experience and the amount of detail added. The container itself works relatively quickly, while the eyes, stalks, decorative circles, spiral, and assembly require more patience. It is a good project to complete in several relaxed crochet sessions rather than rushing through the finishing stage.
Conclusion
The Crochet Snail Pen Holder Pattern turns basic amigurumi techniques into a useful and colorful handmade organizer. Throughout this project, you learned how to crochet a firm cylindrical container, create a wide turquoise snail base, make a dimensional head, construct tall eye stalks, crochet layered eyes, form a bold red spiral, and finish the design with decorative purple spots. The combination of single crochet, increases, decreases, magic rings, appliqué, and careful assembly makes this pattern an enjoyable way to practice several essential crochet skills in one project.
EASILY FIND THE PDF FOR THIS PATTERN HERE!
You can follow the suggested pink, turquoise, green, purple, and red palette or personalize every detail to suit your own craft room. Once complete, the snail can organize pens, pencils, markers, crochet hooks, and other lightweight tools while adding a playful handmade accent to a desk or creative space. Most importantly, take your time with the shaping and finishing, since neat seams and balanced placement make a noticeable difference in the final result. If you make your own Crochet Snail Pen Holder Pattern, leave your sincere opinion about the project and share your suggestions. It is always interesting to know which colors you would choose, what you would change, and which crochet details you would like to see added to a future version.