
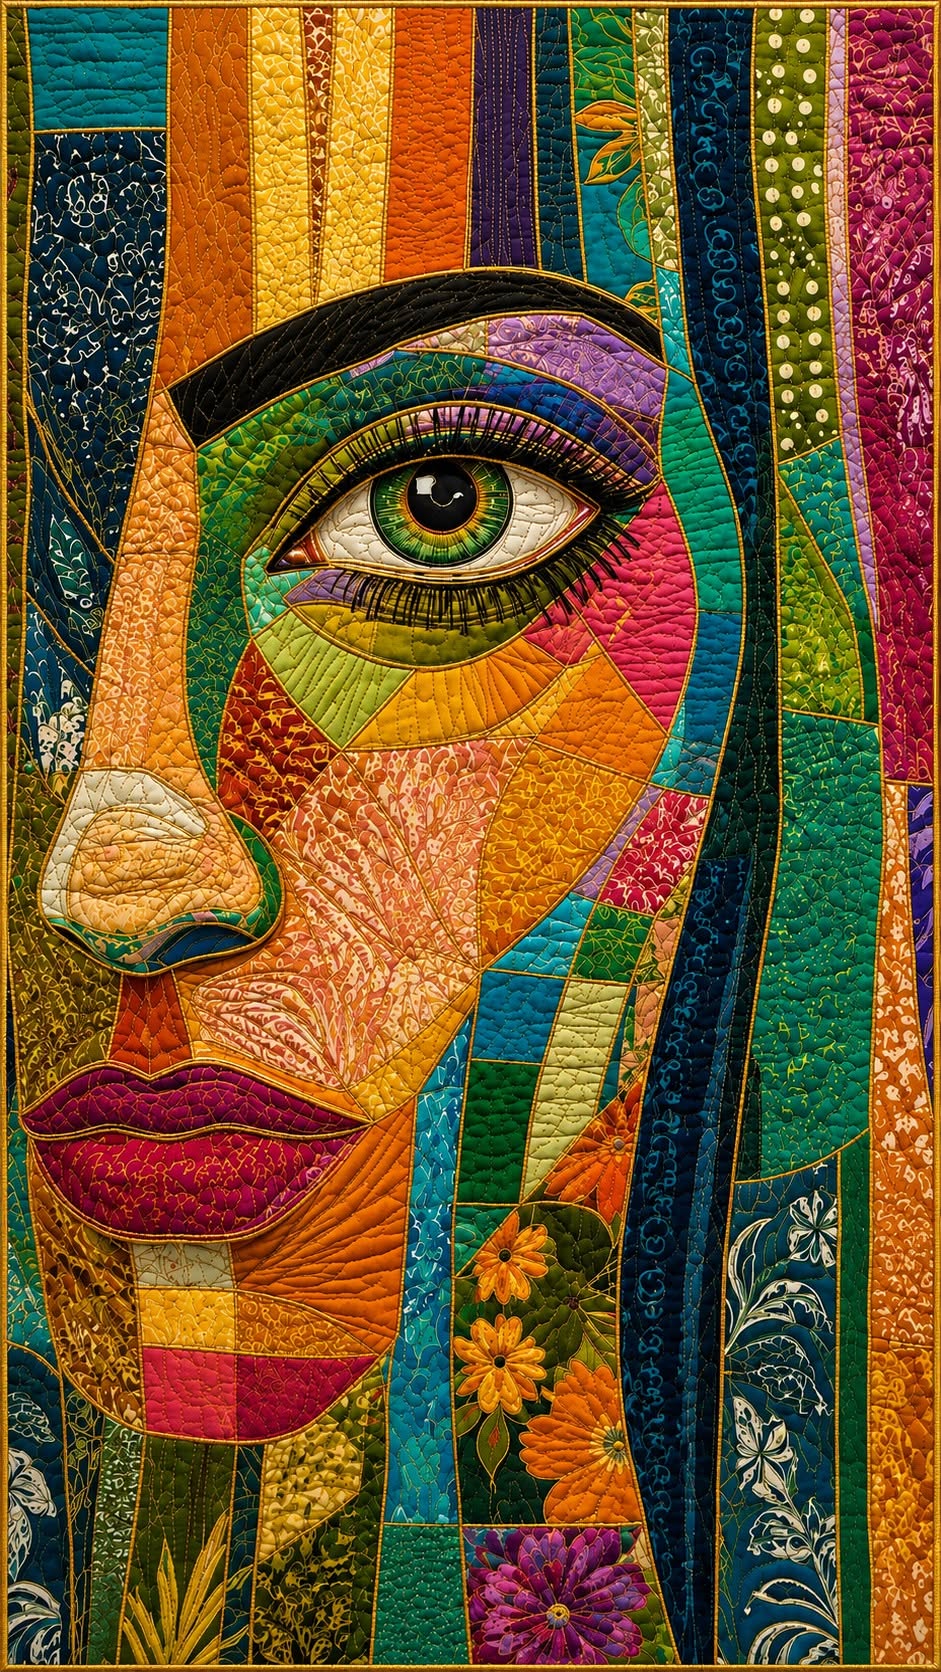
Bedspread with a colorful portrait Quilt Pattern is a striking textile project that combines portrait art, patchwork, appliqué, color theory, and decorative quilting in one expressive composition. Inspired by the image shown above, this project transforms small pieces of colorful fabric into a large stylized face filled with personality. Instead of relying on traditional square quilt blocks alone, the design uses curved shapes, narrow fabric strips, geometric sections, and carefully positioned prints to build the eye, nose, lips, hair, and surrounding background. The result can become a dramatic bedspread, wall quilt, or decorative textile panel. Although the finished piece looks complex, it becomes much easier to understand when the portrait is separated into individual construction zones and completed one section at a time.
Creating a Bedspread with a colorful portrait Quilt Pattern is also an excellent opportunity to experiment with fabrics that might normally be difficult to combine. Turquoise, emerald green, orange, yellow, magenta, violet, navy, and black can coexist beautifully when they are distributed intentionally across the portrait. Floral fabrics can appear beside abstract prints, batiks, solids, and tonal designs without making the composition feel disorganized. The key is controlling value, contrast, and repetition. Dark fabrics define important facial features, medium tones connect different sections, and bright colors attract attention to areas such as the eye, lips, cheeks, and decorative background. Repeating certain colors throughout the quilt helps all of these individual fabric pieces feel like part of one unified design.
Another important feature of this colorful portrait quilt is the quilting itself. Stitching is not only used to hold the quilt top, batting, and backing together; it becomes part of the illustration. Curved quilting can emphasize the eyebrow, eyelashes can be created with narrow stitched or appliquéd lines, and dense free-motion quilting can add texture to large background areas. Beginners can simplify these techniques with straight-line quilting and larger appliqué sections, while experienced quilters can add thread painting, raw-edge appliqué, foundation piecing, or detailed free-motion designs. The following tutorial explains how to plan the portrait, select fabrics, create the facial sections, assemble the bedspread, and finish the quilting in a practical sequence.
Planning the Portrait and Choosing Fabrics for the Quilt Pattern
Begin the Bedspread with a colorful portrait Quilt Pattern by deciding the finished size of your project. A decorative wall quilt may measure approximately 80 × 120 cm, while a larger bedspread may require a design measuring 150 × 200 cm or more. Because the portrait contains many small sections, enlarging the design usually makes construction easier. Add approximately 1 cm seam allowance around traditional pieced sections, while appliqué pieces can be prepared according to your preferred appliqué method.
DISCOVER MORE FREE PATTERNS HERE!
Create a full-size paper drawing before cutting expensive fabric. Divide the face into recognizable areas: forehead, eyebrow, upper eyelid, iris, pupil, eye white, lower eyelid, nose, cheek, lips, chin, hair, and background. You do not need to reproduce every tiny fabric shape immediately. Start with large structural areas and gradually divide them into smaller geometric pieces. Numbering each paper section makes the assembly process much easier.
The colorful portrait quilt pattern depends strongly on value contrast. Place very dark navy, charcoal, deep green, or black fabrics around the eyebrow, eyelashes, pupil, and selected hair sections. These dark values create the visual framework of the portrait. Bright yellow, orange, turquoise, lime, violet, and pink pieces can then be positioned around them, producing the vibrant stained-glass appearance that makes this style of quilt so distinctive.
A useful fabric selection for a medium-size project is approximately 20 to 35 different cotton fabrics. Small scraps are especially valuable because many portrait sections require only a narrow strip or irregular shape. Choose mostly quilting cotton because it is stable, easy to press, and suitable for detailed piecing. Batiks are particularly effective because their dense coloration and subtle patterns create visual texture without overwhelming the face.
Include a few floral fabrics, tone-on-tone prints, and directional designs to make the composition more interesting. Floral prints can be placed in the hair or background, while smaller abstract prints work beautifully across the cheek and forehead. When using directional fabrics, mark the orientation on the paper template before cutting. This prevents flowers, leaves, or stripes from appearing unintentionally upside down.
Before sewing anything, arrange fabric pieces on a large table or design wall. Photograph the arrangement so you can remember the original placement. Step several feet away and look at the portrait from a distance. If the eye disappears or the nose is difficult to recognize, increase the contrast around those features. Successful portrait quilting depends less on using realistic skin colors and more on creating clearly readable shapes.
Creating the Eye, Face, Nose, and Lips Step by Step
Start construction with the eye because it is the strongest focal point in the Bedspread with a colorful portrait Quilt Pattern. Cut the eye white from cream or very pale beige fabric and place a green, blue, brown, or multicolored iris over it. Add a dark circular pupil at the center. Fusible appliqué is convenient for these small curved pieces because it prevents distortion while positioning them.
For the iris, use several narrow fabric wedges rather than one flat circle if you want additional depth. Green, yellow-green, olive, and turquoise pieces can radiate outward from the pupil. A small white appliqué or stitched highlight near the pupil creates the appearance of reflected light. Finish the eye with a very dark outline. This strong border immediately increases definition.
Create the eyelids with curved bands of fabric. In the reference style, multiple colors can be layered above and below the eye to suggest eye shadow and facial contours. Purple, turquoise, green, blue, and pink are excellent choices. Sew these curved sections slowly and clip seam allowances when necessary so the fabric can follow the shape without puckering.
The eyebrow should be noticeably darker than most of the surrounding fabrics. You can construct it from several curved black or charcoal sections or use one appliqué shape. Decorative quilting lines following the eyebrow’s direction will create additional dimension. For eyelashes, use satin stitching, narrow appliqué strips, or dense black thread. Keep the lashes consistent enough that they support the portrait without dominating it.
Next, build the nose and cheek. These areas are excellent places to combine irregular patchwork pieces. Use warmer colors such as peach, orange, golden yellow, coral, and red near the center of the face, then blend them into cooler greens and turquoise fabrics toward the outer areas. This warm-to-cool transition gives the portrait depth while preserving the intentionally artistic color palette.
Construct the lips from several curved pieces rather than one solid shape. Deep magenta, burgundy, purple, pink, and red create attractive contrast against orange or green facial fabrics. A dark line between the upper and lower lip helps define the mouth. Once the facial elements are assembled, place them together on the foundation and check their proportions before permanently stitching the outer face sections.
Assembling the Colorful Patchwork Bedspread and Adding Quilting
Once the main facial features are complete, begin joining the larger surrounding sections. The Bedspread with a colorful portrait Quilt Pattern shown in this style can be created with vertical fabric bands around the head. Cut strips in several widths, approximately 3 to 10 cm wide, depending on the scale of your quilt. Combine narrow and wide strips instead of making every band identical.
Arrange the vertical strips by color families. Deep blues can be placed beside turquoise, green beside yellow, orange beside red, and purple beside magenta. However, avoid making every transition perfectly gradual. A few unexpected combinations create energy. Repeat important colors from the face throughout the outer strips so the background and portrait feel visually connected.
For curved areas around the face, traditional curved piecing works well, but raw-edge appliqué is a practical alternative. In raw-edge appliqué, fabric pieces are attached to a background using fusible web and then secured around the edges with machine stitching. This technique is especially useful for irregular portrait pieces. A narrow zigzag, blanket stitch, or straight stitch positioned near the edge can secure each shape.
After completing the quilt top, prepare the quilt sandwich. Place the backing fabric wrong side up on a clean flat surface. Position batting over the backing and place the quilt top right side up. Allow several centimeters of additional backing and batting around all four sides. Smooth each layer carefully and secure the sandwich with safety pins, basting spray, or temporary basting stitches.
Quilting can now become part of the artistic design. Use free-motion quilting in large fabric areas to create spirals, leaves, waves, pebbles, or abstract lines. Straight-line quilting can follow the vertical background strips, while curved stitching can follow the cheek, nose, eyelids, and lips. Varying the direction of the quilting helps distinguish neighboring fabric sections even when their colors are similar.
Do not feel that every square centimeter must contain complicated stitching. Balanced negative space is useful. Quilting approximately 1 to 3 cm apart provides substantial texture for many bedspread projects, although batting manufacturers may specify different maximum quilting distances. When the quilting is finished, trim the edges carefully, square the corners, and inspect the portrait from a distance before adding the final binding.
Finishing Details, Binding, Care, and Creative Variations
A clean binding completes the Bedspread with a colorful portrait Quilt Pattern and protects the quilt edges. Cut binding strips approximately 6 to 7 cm wide and join them diagonally to create one continuous strip. Fold the binding lengthwise with wrong sides together and press. Sew it around the front edge of the quilt, mitering each corner carefully, then fold it toward the back and secure it by machine or hand.
If your project will function primarily as a wall quilt, consider adding a hanging sleeve to the back. A sleeve allows the portrait to hang evenly without clips damaging the quilt. For a functional bedspread, choose durable backing fabric and make sure all appliqué elements are securely stitched. Washable cotton fabrics are generally practical for quilts designed for regular household use.
Thread choice can dramatically change the finished appearance. Matching thread makes the quilting blend into the fabric, while contrasting thread turns the stitching into another visible design element. Variegated thread can work beautifully across multicolored backgrounds. For the facial features, black or dark navy thread provides strong definition around the eyes, eyebrow, nose, and lips.
You can also personalize this portrait quilt pattern without changing the basic construction process. Replace floral sections with geometric prints, create an entire face using batiks, or limit the palette to four or five main colors. Another option is to use meaningful fabric scraps from previous sewing projects. These pieces can transform the quilt into a textile memory project while preserving the vibrant portrait aesthetic.
Beginners should simplify the design rather than abandon the project because it appears too detailed. Use fewer pieces in the cheek, make the eyebrow one continuous shape, construct the iris from a single fabric, and enlarge the nose and lip sections. As confidence grows, additional fabric fragments, decorative stitching, and thread-painted details can be introduced. The fundamental principle remains the same: construct large shapes first and add details afterward.
Finally, label your finished quilt. Include the project name, completion date, and any information you want to preserve about the fabrics or inspiration. A handcrafted Bedspread with a colorful portrait Quilt Pattern can require many hours of designing, cutting, stitching, pressing, layering, and quilting, so documenting the finished piece is worthwhile. More importantly, allow the finished portrait to reflect your own fabric choices rather than trying to make every detail identical to the inspiration image.
FAQ – Frequently Asked Questions About a Colorful Portrait Quilt Pattern
What is a Bedspread with a colorful portrait Quilt Pattern?
A Bedspread with a colorful portrait Quilt Pattern is a quilt design in which fabric pieces are arranged to create a recognizable human face or artistic portrait. Unlike realistic fabric portraits that attempt to reproduce natural skin tones, this style uses bright and unexpected colors. Patchwork, appliqué, curved piecing, and decorative quilting can all be combined in the same project.
Is a portrait quilt suitable for beginners?
Yes, provided the design is simplified. Beginners can start with larger appliqué pieces and avoid very small curved seams. Fusible appliqué can make positioning facial features easier because pieces can be arranged and adjusted before being permanently stitched. More advanced quilters can divide the portrait into dozens or even hundreds of smaller fabric sections.
What fabrics are best for portrait quilting?
High-quality quilting cotton is one of the easiest materials to use. Batiks, tone-on-tone fabrics, small floral prints, solids, and abstract prints all work well. Fabrics with strong value differences are especially useful because contrast helps define the eyes, nose, lips, and facial contours.
How many fabric colors are needed?
There is no fixed number. A simplified project can be created with 10 to 15 fabrics, while a highly detailed colorful portrait quilt may contain 30 or more different prints and colors. The important factor is not simply quantity but variety in light, medium, and dark values.
How can I make the eye look realistic?
Pay particular attention to contrast. Use a light fabric for the eye white, medium and bright tones for the iris, and a very dark fabric for the pupil and outline. Adding a tiny white highlight to the pupil can create depth. Dark eyelashes and a defined upper eyelid also make the eye more expressive.
Can the portrait pieces be appliquéd instead of traditionally pieced?
Absolutely. Fusible appliqué and raw-edge appliqué are excellent methods for complicated portrait shapes. Appliqué can be easier than curved piecing because the individual components are placed on top of a foundation instead of being joined through numerous curved seams.
What is free-motion quilting?
Free-motion quilting is a machine-quilting technique in which the quilter moves the fabric freely beneath the needle to create custom stitched patterns. It can produce curves, spirals, feathers, leaves, pebbles, and other decorative textures. For this project, it can enhance the fabrics and reinforce the direction of facial contours.
Do I need a special sewing machine?
A standard sewing machine can complete most of this project. Useful features include adjustable stitch length, zigzag stitching, and the ability to lower or cover the feed dogs for free-motion quilting. If your machine does not support free-motion work comfortably, straight-line quilting is a perfectly suitable alternative.
How do I stop the many colors from looking chaotic?
Repeat important colors throughout the project and maintain strong value contrast around important facial features. For example, turquoise appearing in the eye area can appear again in the hair and background. Dark navy used around the eyebrow can also repeat along the outside of the face. Repetition creates visual harmony.
Should I prewash the fabrics?
Prewashing is optional, but it can be useful when combining fabrics from different manufacturers or when strong dyes are present. If you decide to prewash, treat all fabrics consistently. This helps reduce unexpected differences in shrinkage after the quilt is completed.
How large should the seam allowance be?
For traditional patchwork, approximately 0.6 cm is common, although some sections may be easier to construct with a slightly larger allowance that can later be trimmed. For templates where an allowance is not already included, approximately 0.7 to 1 cm provides extra flexibility. Appliqué pieces require different allowances depending on the chosen technique.
Can this project be made as a wall hanging instead of a bedspread?
Yes. In fact, a smaller portrait quilt wall hanging is an excellent way to practice the technique before making a full-size bedspread. The same design process can be used, but the backing, batting, border, and binding dimensions are simply reduced.
How long does a detailed portrait quilt take to make?
The time varies according to size, experience, and complexity. A simplified wall quilt may be completed relatively quickly, while a large bedspread containing many individual fabric sections and dense decorative quilting can become a longer project. Working section by section makes the process easier to manage and allows you to concentrate on craftsmanship rather than speed.
Conclusion
The Bedspread with a colorful portrait Quilt Pattern demonstrates how traditional quilting techniques can become a powerful form of textile art. Throughout this project, you learned how to plan a full-size portrait template, divide a face into manageable sections, choose fabrics according to color and value, construct the eye and facial features, combine patchwork with appliqué, assemble colorful background strips, prepare the quilt sandwich, and use quilting stitches to add dimension and texture.
The most important lesson is that a complex portrait does not have to be constructed all at once. Begin with the largest shapes, establish the dark lines that define the face, build the eye carefully, and gradually fill the remaining spaces with colorful fabrics. By combining patchwork, appliqué, portrait quilting, free-motion quilting, and thoughtful color placement, you can develop a unique bedspread that feels artistic, vibrant, and completely personal.
EASILY FIND THE PDF FOR THIS PATTERN HERE!
Use this tutorial as a foundation rather than a rigid formula. Change the colors, prints, dimensions, quilting designs, and facial details according to your own creative style. Every fabric choice can give the portrait a different personality, which is one of the most enjoyable aspects of this type of quilting project. If you create your own Bedspread with a colorful portrait Quilt Pattern, leave your sincere opinion about the project and share your suggestions. Which colors would you choose for your portrait, and which part of the quilt would you most enjoy creating? Your ideas can inspire new combinations and new interpretations of this colorful quilting technique.