
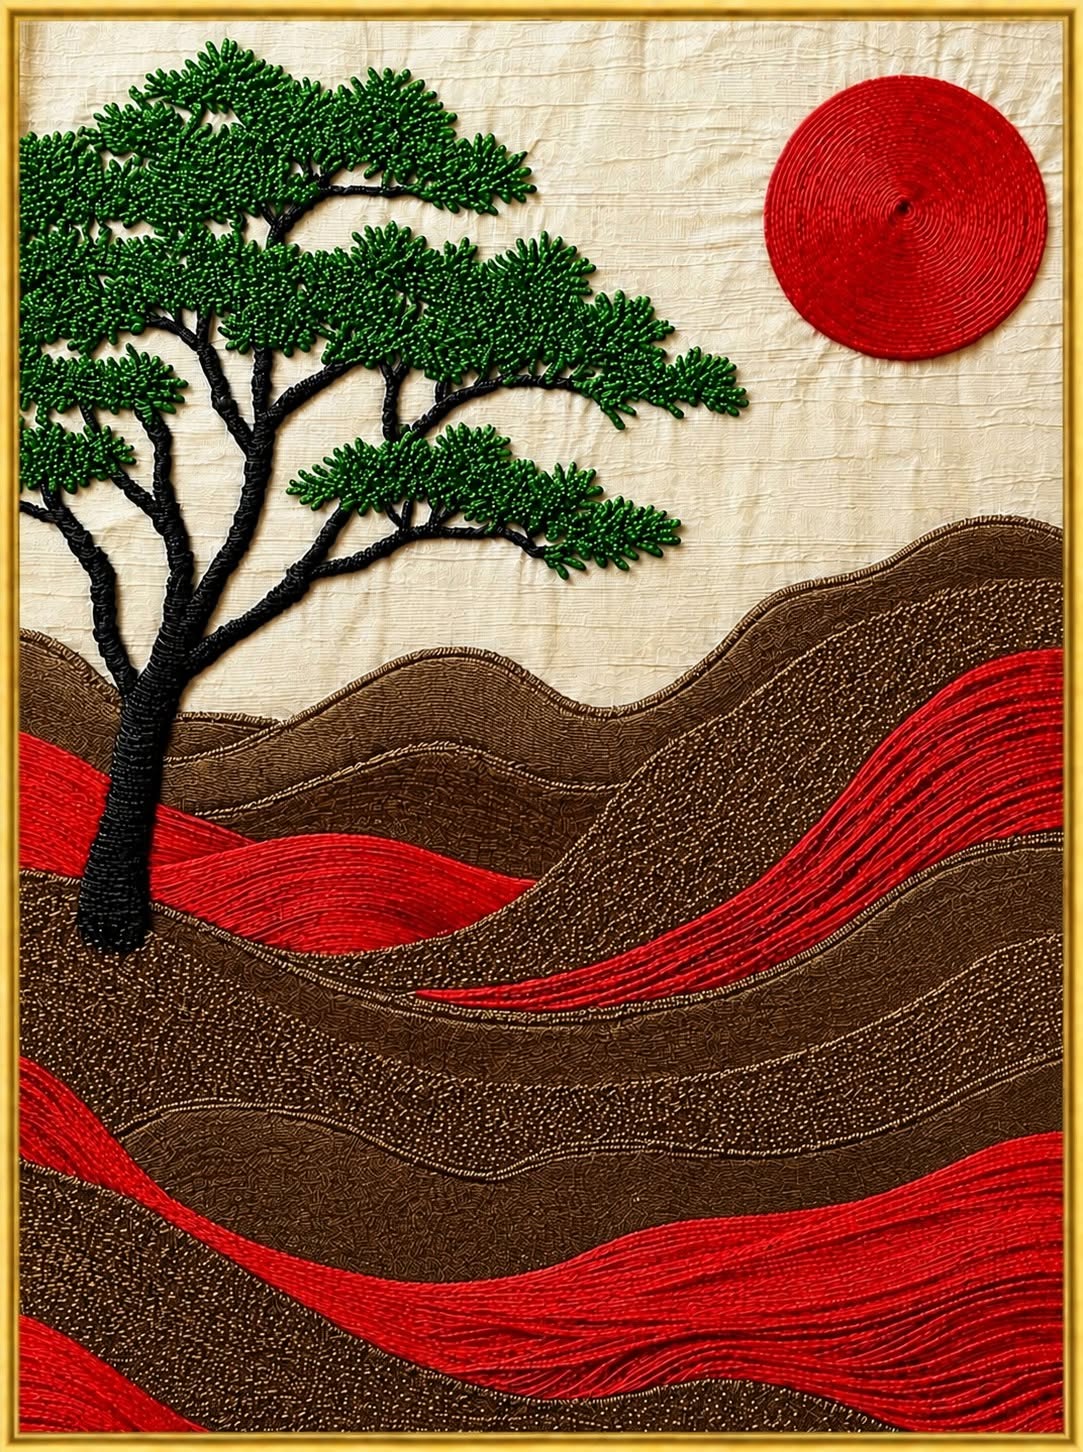
The Red Sun Landscape Patchwork Wall Panel Fabric Pattern is a striking textile-art project that combines patchwork, appliqué, layered fabric, decorative stitching, and dimensional surface work to create a dramatic landscape for wall display. Inspired by the image, the design features a bold red sun, a dark sculptural tree, rolling black hills, and flowing red bands that travel through the foreground like illuminated valleys or rivers. The limited palette gives the piece a contemporary appearance while the visible threads and raised surfaces preserve the warmth of handmade work. Although the finished panel looks complex, it can be constructed gradually, starting with a simple fabric background and adding one landscape layer at a time. This makes the project suitable for makers who want to explore landscape quilting, fabric appliqué, and textile wall art without needing an extremely complicated traditional quilt block. Careful planning, accurate cutting, and patient stitching are more important than perfect symmetry because the organic shapes are intentionally irregular.
A Red Sun Landscape Patchwork Wall Panel Fabric Pattern can also be interpreted in many personal ways because landscape textile art does not require every mountain, branch, or curved line to follow an exact template. In this project, patchwork refers to joining and layering different fabric shapes to create the scenery, while appliqué refers to attaching individual pieces, such as the hills, tree, and sun, to a larger background fabric. Couching is another useful technique for the design; it involves laying yarn, cord, or thicker decorative thread over the fabric and securing it with smaller stitches. This technique can reproduce the beautiful raised lines visible across the hills and tree. The contrast of red fabric, black fabric, and a warm cream background is central to the visual impact, so selecting materials with different textures can make the landscape appear deeper and more dimensional. The result is both a sewing project and a decorative artwork that can become a focal point in a craft room, living area, hallway, or creative studio.
Before beginning your Red Sun Landscape Patchwork Wall Panel Fabric Pattern, gather a cream or ivory fabric for the background, several black fabrics, bright or deep red fabrics, lightweight fusible web if desired, matching sewing thread, embroidery or decorative thread, batting, backing fabric, scissors, pins or clips, an iron, and a sewing machine. A hand-sewing version is also completely possible, especially if you enjoy slow stitching and embroidery. For a richly textured finish similar to the reference image, include black and red cords, pearl cotton, embroidery floss, narrow fabric strips, or yarn that can be stitched across the surface. Prepare a paper sketch before cutting your best fabrics because the sketch will help determine the proportions of the sun, distant hills, foreground waves, and tree. You do not need to copy every contour exactly; instead, preserve the key visual elements that make this fabric landscape pattern recognizable. The most important characteristics are the circular red sun, the dark tree silhouette, sweeping landscape curves, and alternating areas of black and red.
Planning the Landscape and Preparing the Fabric Pattern
Begin by deciding the finished size of your Red Sun Landscape Patchwork Wall Panel Fabric Pattern. A medium wall panel is convenient because it gives you enough space for the tree branches and curved landscape without requiring large quantities of fabric. Add approximately 1 to 2 inches of extra background fabric around every side so you can square and finish the panel after quilting. Prewash fabrics only if that is your usual quilting practice, then press everything carefully before tracing or cutting.
DISCOVER MORE FREE PATTERNS HERE!
Create a full-size paper drawing of the composition. Draw a rectangle representing the panel, then position the red sun in the upper-right area. Sketch the main tree on the left and allow some branches to stretch toward the center. Below these elements, draw several irregular curved lines to represent distant hills, central valleys, and the large foreground waves.
For the sun template, draw a clean circle using a compass, small plate, or circular household object. The sun should be large enough to become a strong focal point but should not dominate the tree. Trace the circle onto red fabric or fusible web and cut it neatly. A plain red fabric works well, while a subtly textured fabric can create even more visual interest.
Next, number the hill shapes on your paper pattern from back to front. This step is particularly useful because the pieces will overlap. The distant mountains should generally be installed first, followed by middle-ground sections and finally the large foreground shapes. Labeling them prevents confusion after all the templates have been separated.
Transfer each landscape shape to tracing paper, freezer paper, or another pattern-making material. Remember that raw-edge appliqué pieces can usually be cut directly to the desired finished shape, while turned-edge appliqué requires additional fabric around the edges. For this artistic design, raw-edge appliqué combined with decorative stitching is especially practical because additional thread can cover and secure the edges.
Finally, organize your fabrics before sewing. Place black pieces together, red pieces together, and test the composition on the cream background. Photographing or observing the arrangement from a distance can help you recognize imbalance. At this stage, adjust the height of hills, size of the sun, or direction of curves before permanently attaching anything.
Building the Red and Black Patchwork Landscape
Start constructing the Red Sun Landscape Patchwork Wall Panel Fabric Pattern with the background and distant hills. Place the cream fabric on a flat surface and position the highest black mountain shapes along the lower-middle area. Slight overlaps between sections will eliminate unwanted gaps and create a continuous landscape. Pin, glue-baste, or fuse the pieces temporarily before stitching.
Add the first red landscape sections behind or between the black hills. These red shapes should appear as narrow flashes of color rather than perfectly uniform stripes. Their irregular widths give the panel its natural, flowing appearance. Keep checking the reference composition and your own drawing so the red sections visually connect across the landscape.
Continue adding black layers toward the foreground. Each new piece should overlap the previous layer enough to hide its raw lower edge. Dark textured fabrics are excellent for this part because woven patterns, subtle prints, and different surface finishes prevent the large black areas from looking flat. This is where fabric selection for landscape quilting can significantly affect the final result.
Place larger red sections in the foreground to create the dramatic movement seen in the project. These red curves can represent hills, paths, streams, or simply abstract lines of light. Cut them with long sweeping contours rather than sharp corners. Gentle curves are easier to stitch and reinforce the peaceful landscape effect.
Once you are satisfied with the placement, secure every major appliqué shape. If using fusible web, follow its manufacturer instructions and protect the fabric surface while pressing. If you prefer traditional sewing, use temporary fabric glue, hand-basting stitches, or fine pins. Avoid excessive adhesive because thick areas can become difficult to quilt later.
Stitch around the appliqué edges with a narrow zigzag, blanket stitch, straight stitch, or free-motion line. A black thread can blend into the darker pieces, while red thread preserves the clean appearance of the red fabric. Slight imperfections are appropriate in art quilt landscapes because irregular stitching can contribute to the handmade character of the panel.
Creating the Tree, Red Sun, and Dimensional Texture
Position the circular sun in the upper-right portion of your Red Sun Landscape Patchwork Wall Panel Fabric Pattern. Stitch around its edge securely, then begin working from the outside toward the center with red decorative thread, yarn, or narrow cord. Closely spaced circular rows create the attractive spiral texture visible in the inspiration image and make the sun appear slightly raised from the background.
The tree requires more patience because it contains many irregular branches. Begin with a strong central trunk that rises from the lower-left landscape. You can cut the trunk and major branches from black fabric, create them from narrow bias strips, or build them directly with black cord. Avoid making every branch identical because natural asymmetry will produce a more convincing silhouette.
After creating the trunk, add secondary branches that divide into smaller forms. Keep some open background visible between them so the top of the tree does not become one solid black mass. Extend several branches horizontally toward the center of the panel, helping visually connect the left side of the design with the red sun on the right.
Build the foliage using short loops of black thread, small fabric pieces, narrow cords, dense embroidery stitches, or free-motion quilting. Group the foliage into irregular clusters rather than covering every branch continuously. This technique creates the characteristic layered canopy while preserving the elegant negative spaces between the branches.
Now enhance the hills with couching stitches. Lay black or red cord along selected contours and stitch across it at short intervals using matching thread. Multiple parallel rows will emphasize the sweeping curves and provide the sculptural quality that makes this type of textured textile art especially attractive. Follow the existing hill shapes instead of forcing perfectly straight decorative lines.
Continue adding texture selectively rather than covering every inch equally. Some black sections may contain dense parallel stitching, while others can remain comparatively smooth. Red areas can include several flowing lines that echo the shape of the sun. Variation creates depth, allowing certain areas to appear closer while calmer sections visually recede into the background.
Quilting, Finishing, and Displaying the Wall Panel
After completing the appliqué, assemble the quilt sandwich for your Red Sun Landscape Patchwork Wall Panel Fabric Pattern. Place the backing fabric face down, add thin batting, and position the finished landscape top face up. Smooth all three layers carefully and baste them with pins, spray basting, or large temporary stitches. Thin batting is particularly suitable for wall art because it provides dimension without excessive bulk.
Quilt around the major landscape contours first. Stitching close to the edges of hills, the sun, and tree stabilizes the layers and emphasizes the shapes. You can then add additional quilting lines inside the black and red areas. Curved quilting that follows the direction of each hill maintains the flowing movement of the composition.
The cream background can remain relatively simple. Light echo quilting around the branches and sun can make those elements stand forward without competing with their detailed textures. If you enjoy free-motion quilting, add subtle horizontal or gently irregular lines that suggest movement in the sky while keeping enough open space to maintain visual balance.
Square the panel only after the quilting is complete. Use a quilting ruler and rotary cutter to create straight sides and clean corners. Measure from several points before trimming because heavy decorative stitching can occasionally distort fabric slightly. Correcting small irregularities during this stage gives the finished patchwork wall hanging a more polished appearance.
Finish the edges with traditional quilt binding or a faced edge. Black binding will create a strong frame, while cream binding will visually blend with the background. Another elegant option is a hidden facing, which keeps the artwork appearance uninterrupted when viewed from the front. Choose the finish that best matches where you intend to display the project.
Add a hanging sleeve to the back if the panel will be mounted on a wall. Cut a fabric strip slightly shorter than the finished width, form it into a tube, and hand-sew it securely near the upper edge without allowing stitches to show through the front. Insert a lightweight hanging rod, then display the panel away from excessive moisture and prolonged direct sunlight to help protect the fabrics.
FAQ About the Red Sun Landscape Patchwork Wall Panel Fabric Pattern
What is a Red Sun Landscape Patchwork Wall Panel Fabric Pattern?
A Red Sun Landscape Patchwork Wall Panel Fabric Pattern is a decorative textile design that uses layered fabrics, appliqué, patchwork-inspired construction, quilting, and decorative stitching to represent a stylized landscape. Its recognizable elements include a red circular sun, black tree silhouette, dark hills, and flowing red areas.
Is this project suitable for beginners?
An adventurous beginner can make it, especially when using fusible raw-edge appliqué. The basic shapes are relatively forgiving because mountains and landscape curves do not need to be perfectly symmetrical. The tree and extensive decorative stitching require more patience, so beginners may simplify those elements during their first version.
What fabrics are best for a landscape wall panel?
Quilting cotton is one of the easiest materials to handle because it cuts cleanly and works well with both appliqué and machine quilting. Linen blends, textured cotton, batiks, and selected upholstery-weight accents may also work. When mixing fabric weights, test them first so the panel does not become uneven.
What does patchwork mean in this project?
Patchwork traditionally refers to assembling pieces of fabric into a larger textile surface. In this landscape project, different fabric sections form the hills, valleys, sun, and foreground. Because some pieces are layered rather than joined entirely with seams, the project also incorporates strong elements of appliqué and textile collage.
What is appliqué?
Appliqué is a sewing technique in which a fabric shape is placed on top of a larger background and stitched into position. In this design, the sun and landscape sections are excellent examples of appliqué elements. The technique allows complex pictures to be created without piecing every boundary as a traditional seam.
What is couching in textile art?
Couching is a decorative method in which a thicker thread, yarn, cord, or ribbon is laid over the surface and secured with smaller stitches. It is particularly useful for this panel because it can create raised branches, curved hill contours, and the concentric texture of the red sun.
Can I sew the entire project by hand?
Yes. Hand appliqué, embroidery, couching, and hand quilting can all be used. A hand-sewn version will usually require more time, but it can also achieve beautiful texture. Use a thimble when working through several fabric layers and select needles appropriate for the thickness of your materials.
Can I make the design with a regular sewing machine?
Yes. A standard sewing machine with straight stitch and zigzag options is enough for most of the construction. A free-motion quilting foot is useful for organic lines and foliage but is not essential. Many decorative effects can be achieved simply by turning the fabric gradually while using a regular presser foot.
How can I keep curved fabric pieces from moving while sewing?
Temporary fusible web is one of the easiest solutions. You can also use appliqué glue, fine pins, or hand-basting stitches. Secure the center of large shapes first and smooth outward toward the edges before stitching to reduce puckering.
Does the landscape have to use only red, black, and cream?
No. Those colors create the distinctive dramatic appearance of the Red Sun Landscape Patchwork Wall Panel Fabric Pattern, but the same composition can be adapted to other palettes. Blue and silver could create a moonlit landscape, while gold, brown, and rust could produce an autumn-inspired version.
How can I make the tree look dimensional?
Combine several techniques instead of relying on one flat fabric silhouette. Use fabric for the main trunk, cord or embroidery for thinner branches, and dense thread loops or small fabric fragments for foliage. Layering materials naturally creates shadows and depth.
Should batting be used in a fabric wall panel?
Batting is recommended when you want a quilted, dimensional appearance. A thin batting usually works best because a wall panel does not require the loft of a bed quilt. It also makes decorative stitches and raised landscape contours more visible.
How do I prevent the finished panel from becoming wavy?
Baste the layers thoroughly, quilt from major areas toward smaller sections, and avoid pulling the fabric while stitching. Extremely dense quilting in only one region can cause distortion, so distribute your stitches gradually across the composition. Square the project only after all quilting is complete.
How can I resize the Red Sun Landscape Patchwork Wall Panel Fabric Pattern?
Create the complete pattern on paper and enlarge or reduce all components by the same percentage. Keeping the proportions consistent will preserve the balance between the tree, sun, and hills. When making a very small version, simplify tiny branches and foliage because extremely detailed shapes become difficult to sew.
What makes this project different from a traditional quilt block?
A traditional quilt block often relies on geometric units and repeated measurements. This fabric landscape pattern is more illustrative and organic. It combines artistic composition with quilting techniques, allowing curved shapes, irregular silhouettes, surface embroidery, and dimensional thread work to become important parts of the design.
Conclusion
Creating a Red Sun Landscape Patchwork Wall Panel Fabric Pattern is an opportunity to combine practical sewing skills with expressive textile art. The project begins with a simple cream background and gradually develops through layered black hills, brilliant red landscape accents, a textured circular sun, and an elegant tree silhouette. By planning the composition before cutting, organizing the landscape pieces from background to foreground, and securing each appliqué carefully, even an intricate-looking scene becomes manageable.
The techniques covered in this tutorial include patchwork, raw-edge appliqué, fabric layering, couching, decorative stitching, quilting, binding, and wall-panel finishing. Each technique contributes something different: appliqué establishes the main shapes, couching creates raised texture, and quilting unifies the layers while reinforcing the movement of the hills. The design can be followed closely or adapted with different fabrics, proportions, textures, and stitching styles.
EASILY FIND THE PDF FOR THIS PATTERN HERE!
Most importantly, allow the handmade character of the project to remain visible. Landscape textile art benefits from slightly irregular curves, individual stitch choices, and personal interpretations of trees and terrain. Those details make every completed panel unique rather than simply reproducing an identical object. If you create your own Red Sun Landscape Patchwork Wall Panel Fabric Pattern, leave your sincere opinion about the project and share which part of the tutorial was most useful. Suggestions for different colors, textures, finishing techniques, or future fabric-pattern projects are also welcome, because creative ideas can inspire new versions of this dramatic red-and-black landscape.