
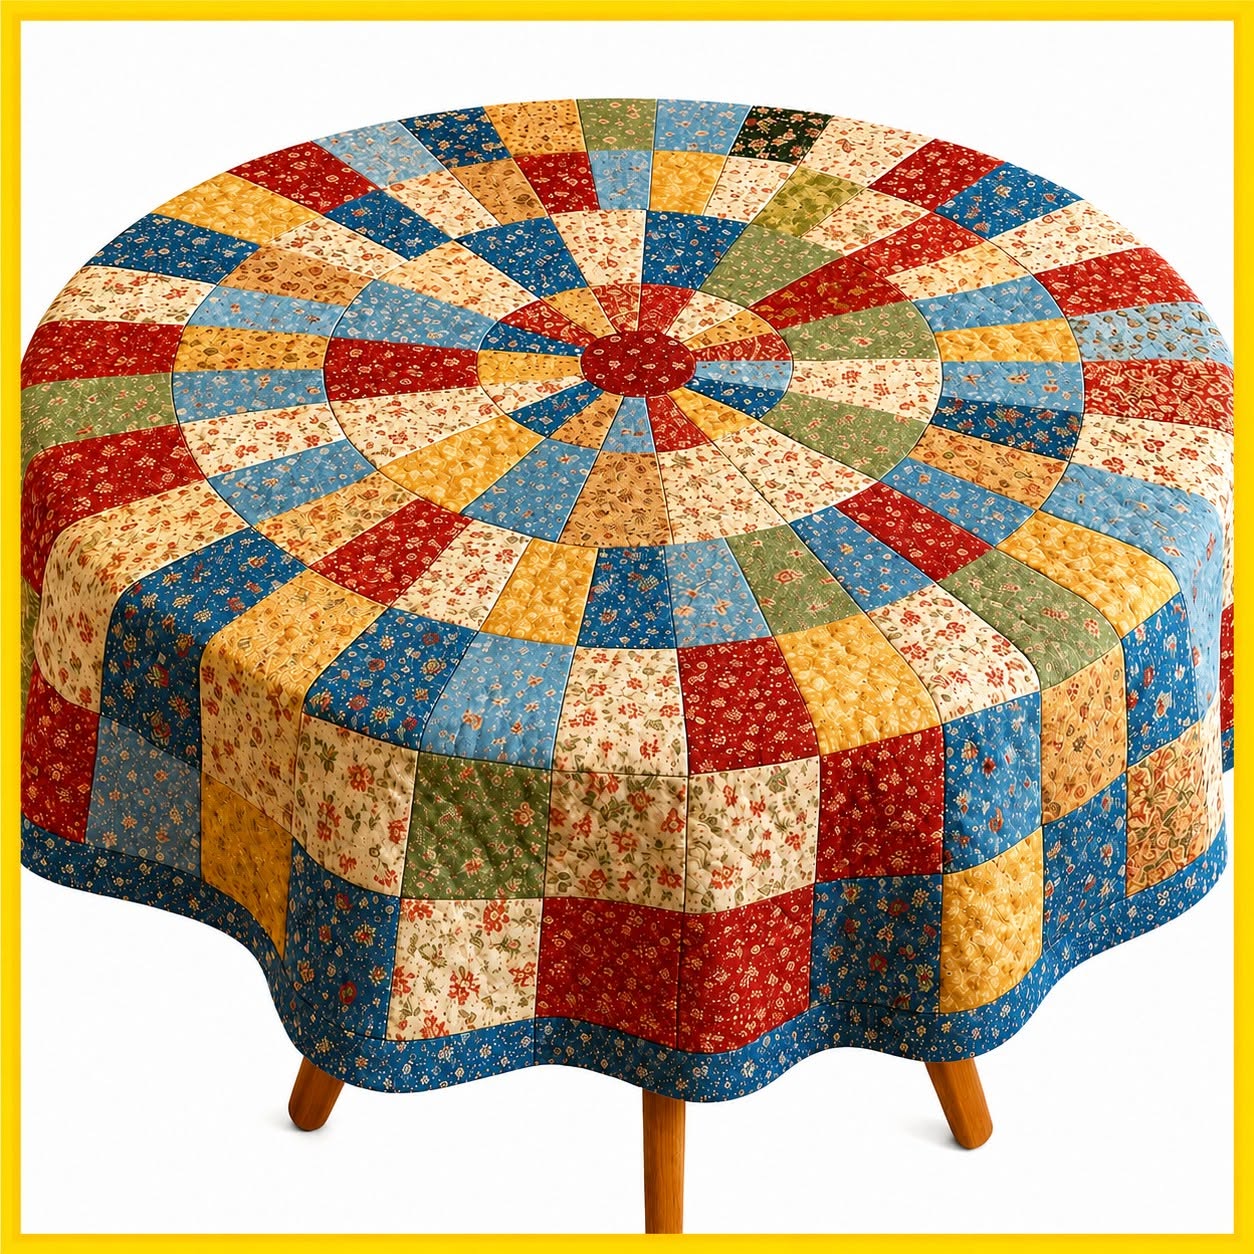
The Round Patchwork Tablecloth Fabric Pattern is a beautiful sewing project for anyone who enjoys combining traditional quilting techniques with a practical piece of home décor. Inspired by the tablecloth shown in the image, this design features a striking circular patchwork center made from wedge-shaped fabric pieces arranged in concentric sections. The mix of blue, cream, mustard yellow, muted green, and deep red fabrics creates a warm vintage appearance, while the tiny floral prints give the project a charming country-style personality. Although the finished tablecloth may look complex at first, the construction becomes much easier when the project is divided into individual sections. Instead of trying to assemble the entire circle at once, you will create groups of wedges, join them into rings, and gradually build the centerpiece outward. The result is a decorative round patchwork tablecloth that can become a focal point for a dining room, breakfast table, craft room, or cozy country kitchen.
Learning how to make a Round Patchwork Tablecloth Fabric Pattern is also an excellent way to improve essential patchwork and quilting skills. You will practice accurate cutting, consistent seam allowances, fabric placement, pressing, curved construction, and careful alignment of multiple seams. One of the most appealing details in this pattern is the way the pieces radiate from the center like rays of a colorful fabric sun. Several circular rows surround the small center, and the wedges become wider as the design expands. Around this decorative centerpiece, rectangular and square patchwork pieces create the longer portion that hangs over the edge of the table. A coordinating blue border finishes the outside and visually frames the entire composition. Because the design can be adjusted to different table sizes, the same basic construction method can be used for a small breakfast table or a much larger round dining table.
Before beginning the Round Patchwork Tablecloth Fabric Pattern, remember that careful preparation is more important than sewing quickly. Patchwork projects containing many radial seams require precision because small measurement differences can accumulate as additional pieces are joined. Prewash fabrics if you normally prewash quilting cotton, press every piece carefully, and test your seam allowance before assembling the main sections. The tablecloth in the reference image uses a balanced assortment of small-scale floral fabrics, but you can easily personalize the project with solids, reproduction fabrics, farmhouse prints, scraps, or coordinated quilting collections. The important element is maintaining enough contrast between neighboring pieces so that the circular construction remains visible. Once the fabrics have been selected and organized, the project can be completed methodically from the center toward the outer edge.
Materials and Planning for the Round Patchwork Tablecloth
The first step is selecting fabrics for your Round Patchwork Tablecloth Fabric Pattern. Medium-weight quilting cotton is one of the easiest materials to work with because it cuts accurately, presses well, and creates crisp seams. For a look similar to the photographed tablecloth, select approximately five main color families. Deep blue can act as the dominant color, while cream, red, mustard, and soft green provide contrast. Small floral patterns work particularly well because they add visual texture without hiding the geometry of the patchwork.
DISCOVER MORE FREE PATTERNS HERE!
The amount of fabric required depends primarily on the diameter of your table and how far you want the cloth to hang over the edge. Measure straight across the center of the tabletop to determine its diameter. Then measure the desired drop from the edge of the table downward. Multiply that drop measurement by two and add it to the table diameter. This gives you an approximate finished diameter for your round tablecloth pattern, although you should also include additional fabric for seam allowances and final trimming.
You will need basic sewing and quilting supplies, including fabric scissors or a rotary cutter, a cutting mat, an acrylic ruler, quilting pins or clips, thread, an iron, and a reliable sewing machine. A large piece of paper or pattern-making material is useful for drafting the wedge template. A flexible measuring tape can also help when checking circular measurements. Because precision matters in a fabric patchwork pattern, sharp cutting tools and a clearly marked ruler can make construction considerably easier.
The central design is constructed with wedge-shaped pieces. Think of the circle as a pie divided into equal slices. The number of wedges determines how narrow or wide each section appears. A design containing approximately 20 to 24 wedges creates the detailed radial effect visible in the reference image. Whatever number you select, divide 360 degrees by that number to determine the angle at the center of each complete wedge. For example, 24 wedges would each occupy approximately 15 degrees.
Each wedge can then be divided horizontally into several sections to reproduce the concentric-ring appearance. Instead of cutting one long wedge from a single fabric, separate the template into three or four segments. Add your preferred seam allowance to every edge that will be joined. These smaller patchwork fabric pieces can then be cut from different colors before being sewn together to reconstruct the complete wedge. Changing the colors from section to section produces the beautiful circular mosaic effect.
Before cutting all your fabrics, make one test wedge from inexpensive cotton. Sew the wedge sections together, press the seams, and check the finished dimensions against your original template. This simple test can prevent significant problems later. When the test piece matches the pattern correctly, prepare all remaining wedges. Numbering the pieces or arranging them in sewing order will help preserve the planned color distribution throughout the Round Patchwork Tablecloth Fabric Pattern.
Cutting and Sewing the Circular Patchwork Center
Begin construction with the smallest pieces near the center. Cut a small circular fabric piece for the central medallion, remembering to include enough seam allowance around the circumference. The reference design uses a dark red floral center that provides strong contrast against the surrounding colors. You can reproduce this effect or choose whichever fabric you want to emphasize. Keeping the center relatively small allows the surrounding radial wedges to become the main decorative feature.
Next, organize the first row of wedge sections around the center before sewing anything permanently. Alternate colors so that identical prints do not repeatedly touch each other. A successful Round Patchwork Tablecloth Fabric Pattern usually looks pleasantly random while still maintaining an intentional balance. Distribute darker colors throughout the circle rather than concentrating them in one location. Repeat the same strategy with lighter cream and yellow fabrics to create an even visual rhythm.
Sew neighboring wedge sections together using the same seam allowance throughout the entire project. Accuracy at this stage is essential because the narrow ends of the wedges all meet near the center. After sewing several pieces, press the seams carefully instead of dragging the iron across the fabric. Pressing rather than aggressively ironing reduces distortion. Depending on the thickness of the seam intersections, you can press seams consistently to one side or press selected seams open to reduce bulk.
Continue joining wedges until they form larger units, such as pairs, quarter circles, and half circles. Sewing in smaller groups is generally easier than trying to manage every wedge individually around the center. Place each unit on a flat surface after pressing and confirm that the edges remain smooth. If a section starts curving unexpectedly or becoming wavy, check the seam allowance before proceeding. Correcting a small problem early protects the accuracy of the complete circular patchwork design.
Join the half-circle sections to form the complete central circle. Pay particular attention to the point where all the radial seams approach the center. Perfect alignment is attractive, but a tiny mismatch can easily be hidden beneath the central circular appliqué. Position the center circle over the meeting point, secure it carefully, and stitch around its perimeter. You can use a narrow machine stitch, a decorative stitch, or hand appliqué depending on the finish you prefer.
Press the completed circular section from both sides, using appropriate heat for your fabric. At this stage, the central portion of your Round Patchwork Tablecloth Fabric Pattern should resemble a colorful wheel with multiple rings of prints moving outward from the middle. Check the circumference and trim only if necessary. Avoid excessive trimming because you will need sufficient seam allowance when attaching the surrounding patchwork area.
Building the Outer Patchwork and Tablecloth Drop
The next stage creates the section that extends from the decorative circular center and eventually falls over the side of the table. In the photographed project, this transition is beautifully achieved with additional patchwork pieces that gradually become more rectangular toward the outside. This construction allows the radial motif to remain prominent on the tabletop while the lower portion forms a practical tablecloth drop. It also provides an opportunity to repeat the fabrics used in the central design.
Start by measuring the circumference or outer sections of your completed center. Draft the next group of pieces so they correspond accurately to the outer edge. Depending on your preferred construction method, these pieces may resemble wider trapezoids rather than rectangles at first. Sew them together in groups and attach them progressively around the circle. Continue checking that the work remains flat because stretched edges can create unwanted ripples in a round patchwork tablecloth.
Once the expanding circular section reaches approximately the edge of your tabletop, begin incorporating larger rectangular patchwork pieces. The reference image uses alternating blocks that visually continue the colors of the center while creating a relaxed, handmade appearance. Cut rectangles or squares from your remaining fabrics and arrange them before sewing. Mixing prints rather than establishing a rigid repeated sequence can reproduce the charming scrap-quilt character visible in the original inspiration.
Join the outer blocks into rows or curved sections before attaching them to the tablecloth body. Press every seam as you work. When two rows meet, try to nest opposing seam allowances whenever possible. Nested seams help patchwork intersections align and reduce shifting while sewing. This is particularly useful with a fabric tablecloth pattern because the finished piece will be viewed from many directions, making neat intersections more noticeable.
After all outer sections have been attached, place the tablecloth on a large flat surface. Measure from the center to the outside at several points. These measurements should be reasonably consistent. If one area extends farther than another, make small adjustments during final trimming. Use a long measuring tape, string compass, or homemade radius guide to establish a smooth outer circle. Mark the line lightly before cutting so that you can examine the complete shape first.
Finish the outer edge with a coordinating fabric border or binding. The photographed Round Patchwork Tablecloth Fabric Pattern uses a dark blue printed border, which connects visually with the blue pieces throughout the quilt. Bias binding is especially practical for a round edge because it bends smoothly around curves. Attach the first side of the binding with the sewing machine, fold it around the raw edge, and finish the second side either by machine or with neat hand stitches.
Finishing, Styling, and Customizing Your Tablecloth
Once the main sewing is complete, inspect the entire Round Patchwork Tablecloth Fabric Pattern for loose threads and unfinished seams. Clip thread tails carefully and press the finished tablecloth from the reverse side. A final pressing helps the circular design lie smoothly over the tabletop. Avoid forcing the outer edge flat with excessive heat or steam because circular edges can stretch more easily than straight grain edges.
If you want additional structure, you can add a lightweight backing fabric. A backing gives the project more body and hides the patchwork seam allowances. Place the backing and patchwork layers together carefully and secure them using your preferred quilting method. Simple stitching along selected seam lines can emphasize the radial geometry without overwhelming the printed fabrics. You do not need dense quilting for a decorative tablecloth unless you specifically prefer that appearance.
Another option is creating the project as a traditional quilted topper rather than a long tablecloth. Simply reduce the outer drop measurement and finish the piece closer to the edge of the tabletop. This variation is useful when chairs need to move freely underneath the table. The distinctive centerpiece remains unchanged, so the characteristic Round Patchwork Tablecloth Fabric Pattern effect is still clearly visible.
Color selection can completely transform the personality of this design. Red, cream, and green fabrics can produce a traditional holiday version, while blue and white create a fresh coastal appearance. Pastel fabrics are suitable for spring décor, and earth tones can create a rustic farmhouse tablecloth. You could also use fabric scraps from previous quilting projects. Scrap-based sewing gives the tablecloth sentimental character while helping make practical use of smaller leftover pieces.
For the most polished result, maintain consistency rather than chasing absolute perfection. Equal seam allowances, careful pressing, balanced fabric placement, and a smooth outer edge matter more than making every intersection mathematically exact. Handmade patchwork naturally contains small variations, and those details contribute to its character. The circular layout already creates a strong visual impression, so the finished patchwork tablecloth can look impressive even when constructed by an intermediate beginner.
Finally, place the completed tablecloth over the table and allow the fabric to settle naturally. Check that the drop is reasonably even around the circumference and that the central motif sits close to the middle of the tabletop. The combination of radial wedges, floral prints, traditional colors, and a coordinating border transforms a functional household textile into a decorative sewing project that can be enjoyed for years.
Frequently Asked Questions About the Round Patchwork Tablecloth Fabric Pattern
Is the Round Patchwork Tablecloth Fabric Pattern suitable for beginners?
A confident beginner can make this project, although some previous experience with basic patchwork is helpful. The most challenging part is maintaining accurate seams where the wedges meet. Creating a test section before cutting all your fabrics is highly recommended.
What fabric works best for a round patchwork tablecloth?
Quilting cotton is generally an excellent choice because it is stable, widely available, easy to cut, and easy to press. Using fabrics with similar weights also helps the tablecloth hang consistently around the table.
How do I determine the finished tablecloth size?
Measure the diameter of your table and decide how much fabric you want hanging over each side. Add twice the desired drop to the tabletop diameter. For example, if you want a 10-inch drop, add approximately 20 inches to the tabletop diameter before allowing for construction and finishing adjustments.
How many different fabrics should I use?
There is no strict requirement. Five to ten coordinating fabrics can provide plenty of variety. A scrap patchwork tablecloth may contain many more prints. The important consideration is distributing colors throughout the design so the overall composition remains balanced.
How can I keep the center of the patchwork from becoming bulky?
Press seam allowances carefully and avoid placing excessive fabric at the exact meeting point. Sewing the wedges in larger sections before joining them can also improve control. Covering the central intersection with a small circular appliqué is another effective method.
Do I need to quilt the tablecloth?
Not necessarily. If you are creating a lightweight tablecloth, the patchwork top can be finished with a backing or carefully finished seams. If you prefer a quilted table topper, you can add batting and backing before quilting the layers together.
Can I make the pattern for an oval or rectangular table?
The central circular motif can still be used, but the outer construction would need to be redesigned. For a rectangular table, you could create the circular patchwork as a central medallion and surround it with rectangular borders rather than continuing the entire project as a circle.
What is the best way to finish a curved tablecloth edge?
Bias binding is one of the easiest and cleanest options because fabric cut on the bias naturally follows curves. Apply the binding slowly and avoid stretching it excessively while sewing.
Can I use leftover fabric scraps for this project?
Yes. This design is particularly suitable for scraps because many of the pieces are relatively small. Choose scraps with compatible fabric weights and organize them by color before cutting your wedges and blocks.
Why does my circular patchwork refuse to lie flat?
A wavy circle often indicates that some seams are slightly too narrow, while a circle that cups upward can result from seams being too wide. Stretching bias edges during sewing can also cause distortion. Accurate cutting, consistent seam allowances, and careful pressing are the best preventive measures.
Should all the wedges use the same color arrangement?
No. The reference style benefits from variation. Repeating the exact color order would create a more formal radial pattern, while changing the color placement produces a warmer and more traditional scrappy patchwork appearance.
Can the Round Patchwork Tablecloth Fabric Pattern be made larger?
Yes. Increase the radius by adding another ring of patchwork pieces or by making the outer drop deeper. Always check the measurements of your actual table before enlarging the pattern so the centerpiece remains appropriately proportioned.
Conclusion
The Round Patchwork Tablecloth Fabric Pattern combines practical sewing with the timeless visual appeal of traditional patchwork. Starting with carefully selected quilting fabrics, you can draft wedge pieces, divide them into colorful sections, assemble the radial center, expand the design with additional patchwork, create the tablecloth drop, and finish everything with a smooth coordinating border. The most important techniques are accurate cutting, consistent seam allowances, careful pressing, thoughtful color distribution, and frequent measurement throughout construction. What makes this project especially enjoyable is its flexibility. The same Round Patchwork Tablecloth Fabric Pattern can look completely different depending on the fabrics you choose. Vintage florals create a nostalgic country look, modern prints make the design more contemporary, and leftover quilting fabrics can turn the project into a meaningful scrap collection. Once you understand the basic circular construction, you can easily adapt the dimensions, colors, number of wedges, and outer patchwork arrangement to create your own interpretation.
EASILY FIND THE PDF FOR THIS PATTERN HERE!
If you make this round patchwork tablecloth, share your sincere opinion about the project and the techniques described here. It would also be wonderful to hear your suggestions, favorite color combinations, and ideas for adapting the pattern. Your creative choices can inspire new versions of this classic patchwork design and help other sewing enthusiasts discover fresh ways to personalize their own handmade tablecloths.