
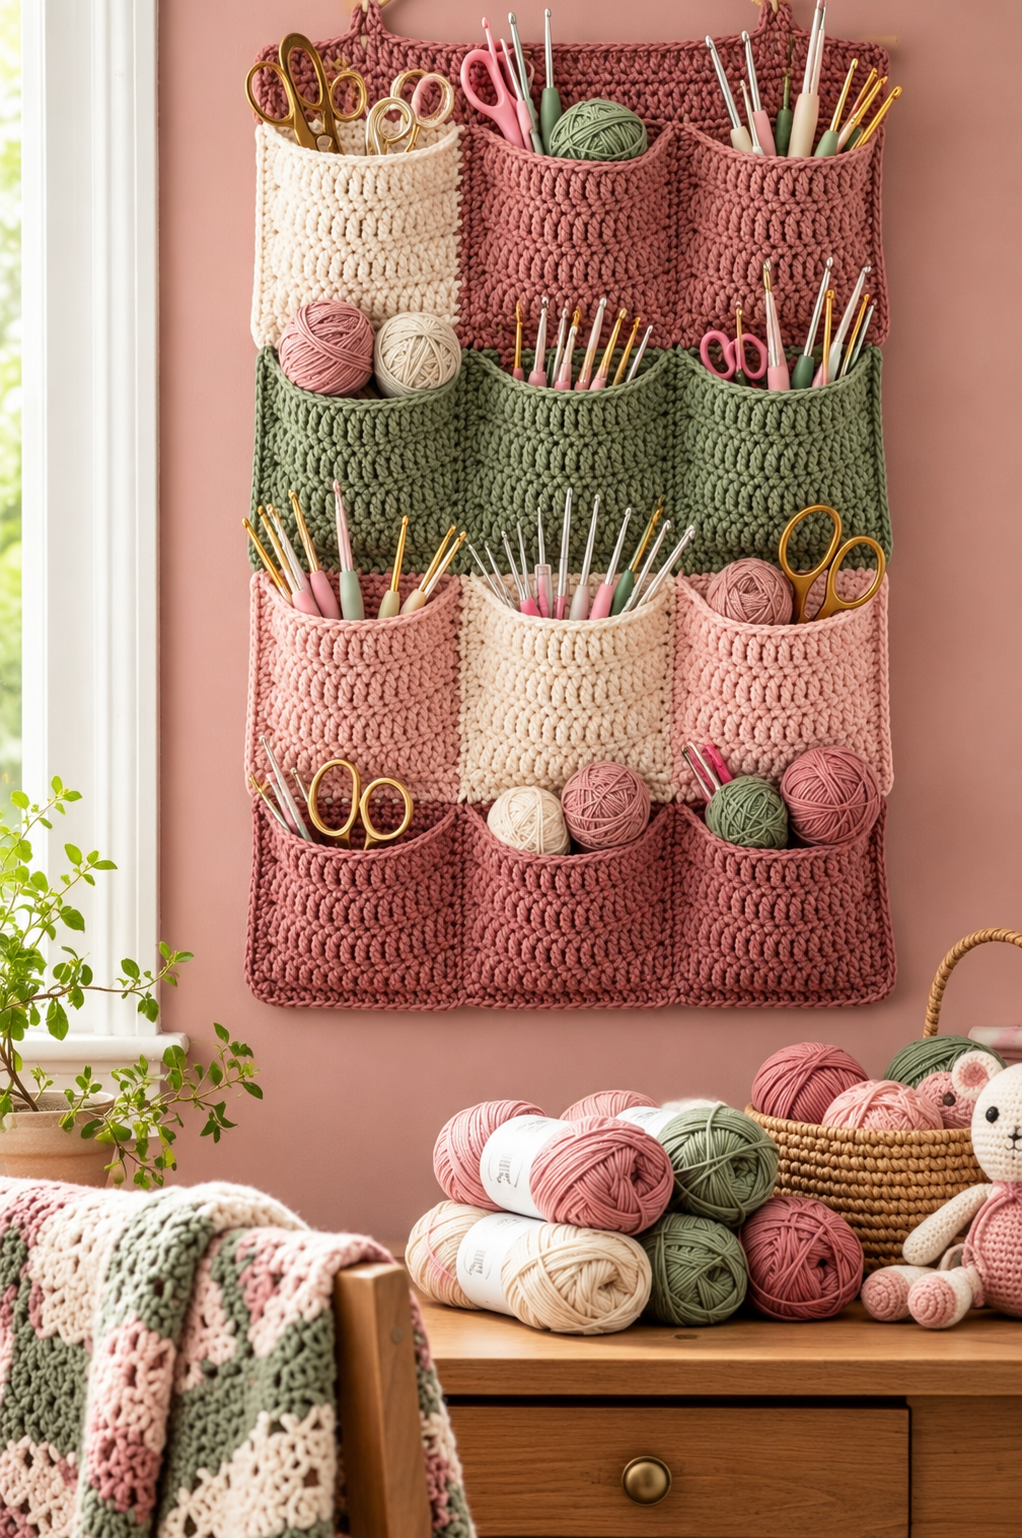
The Crochet Wall Organizer with Pockets Pattern is a practical and beautiful crochet project designed to turn an ordinary wall into useful storage space. With several handmade pockets arranged in rows, this organizer can hold crochet hooks, scissors, yarn balls, measuring tapes, stitch markers, sewing notions, craft tools, and many other lightweight supplies. The design is especially useful in a craft room because everything remains visible and within easy reach while the workspace stays organized. It can also be adapted for a bedroom, home office, nursery, entryway, or sewing corner. One of the most attractive features of this project is the opportunity to combine different yarn colors while maintaining a coordinated handmade appearance. Even crocheters with basic experience can complete the organizer by working slowly through each pocket and following the construction process in order.
This crochet wall organizer is mainly built from rectangular crochet pieces, which makes the pattern easier to understand than projects involving complicated shaping. The pockets can be created separately and then sewn onto a strong crocheted backing, allowing you to customize their height, width, color, and position. Basic stitches such as chain stitch, single crochet, half double crochet, and double crochet are enough to create a sturdy organizer with an attractive texture. Because the pockets need to support craft supplies, choosing a yarn with good structure is more important than creating a very soft fabric. Cotton or a cotton-blend medium-weight yarn is an excellent choice because it produces defined stitches and holds its shape well. By understanding how each part works, you can easily modify the Crochet Wall Organizer with Pockets Pattern to fit the exact wall space available in your home.
Another advantage of making your own crochet pocket organizer is the freedom to personalize every detail. You may use warm mustard, olive green, cream, rust, and brown tones for a cozy craft-room look, or choose pastels, neutrals, bright rainbow shades, or colors that coordinate with your décor. Small pockets are ideal for crochet hooks and scissors, while wider pockets can hold yarn cakes or small skeins. A strong backing keeps the individual sections stable, and reinforced seams help prevent the pockets from stretching when they are being used. Throughout this tutorial, the construction process is explained from preparing the materials to assembling, finishing, and hanging the completed organizer. The goal is to create a functional handmade piece that looks polished while remaining practical for everyday storage.
Materials, Crochet Stitches, and Planning the Organizer
Before beginning the Crochet Wall Organizer with Pockets Pattern, gather medium-weight yarn in several coordinating colors. Worsted weight, often labeled Category 4 yarn in the United States, is a practical option for this project. Approximately 1,200 to 1,800 yards may be needed depending on the final dimensions, the number of pockets, and your crochet tension. Cotton yarn provides excellent firmness, while acrylic can also work if you choose a yarn that does not stretch excessively. Using leftover yarn from other projects is another creative way to build a colorful organizer. Just make sure the different yarns have similar thicknesses so the finished fabric remains consistent.
DISCOVER MORE FREE PATTERNS HERE!
A crochet hook between H-8 (5 mm) and I-9 (5.5 mm) usually works well with worsted weight yarn. However, the exact hook size should produce a fairly dense crochet fabric rather than loose, open stitches. You will also need scissors, a yarn needle, stitch markers, measuring tape, and optional blocking pins. A wooden dowel, curtain rod, or sturdy hanging bar may be used along the top edge. If you prefer hanging loops instead, they can easily be crocheted and sewn to the backing. The organizer should always be mounted securely according to the type of wall and the amount of weight you expect it to hold.
The first important crochet term is ch (chain). A chain stitch forms the foundation row of most crochet rectangles and is also useful for creating hanging loops. To make a chain, yarn over the hook and pull the yarn through the loop already on the hook. Continue repeating the movement until you reach the required number of chains. Try to keep each chain relaxed and similar in size. Chains that are too tight can cause the bottom of a pocket to curve inward.
The next essential stitch is sc (single crochet), a compact stitch that creates a strong fabric. Insert the hook into the indicated stitch, yarn over, and pull up one loop. You will now have two loops on the hook. Yarn over again and pull through both loops. Single crochet is particularly useful around pocket edges because it creates stability and gives the finished piece a clean outline. It can also be used for the entire organizer if you prefer a dense, highly structured fabric.
Another helpful stitch is hdc (half double crochet). Yarn over first, insert the hook into the stitch, yarn over, and pull up a loop. With three loops on the hook, yarn over and pull through all three loops. Half double crochet is slightly taller than single crochet but remains fairly dense. It works beautifully for pockets because it grows faster while still providing enough structure for lightweight supplies. Alternating rows of single crochet and half double crochet can create subtle texture without making the pattern difficult.
You may also use dc (double crochet) for larger sections. Yarn over, insert the hook into the next stitch, yarn over, and pull up a loop. Yarn over and pull through two loops, then yarn over again and pull through the final two loops. Double crochet creates taller stitches and allows a large backing panel to grow faster. For a wall organizer, avoid working double crochet too loosely because large gaps may appear between stitches. A slightly smaller hook can help produce a stronger and more professional-looking fabric.
Step-by-Step Crochet Backing and Pocket Construction
Begin the backing panel by deciding the approximate finished dimensions of your Crochet Wall Organizer with Pockets Pattern. A useful medium-size organizer may measure around 24 inches wide by 32 inches tall, although you can make yours smaller or larger. Create a foundation chain slightly wider than the desired finished measurement because the fabric may contract after the first rows. For example, with medium-weight yarn and a 5 mm hook, you might begin with approximately 85 to 100 chains. Since every crocheter has a different tension, measuring your actual foundation chain is more reliable than depending completely on a fixed stitch count. Add one turning chain if you are using single crochet.
For Row 1, insert your hook into the second chain from the hook and work one single crochet into each chain across. Chain 1 and turn. For Row 2, work one single crochet into every stitch across again. Continue repeating Row 2 until the backing reaches the required height. If you prefer faster construction, work half double crochet instead, chaining 2 at the beginning of each row. Maintaining the same stitch count throughout the panel is essential for straight edges.
Once the backing is complete, add a border around all four sides. Work one round of single crochet evenly around the rectangle, placing additional stitches in the corners so they do not curl. A common method is to place approximately three single crochet stitches in each corner. When working along row ends, distribute the stitches evenly instead of inserting several stitches into one space. Slip stitch to the first single crochet to close the border. This finishing round strengthens the backing and provides a stable area for attaching hanging loops or a rod sleeve.
Now begin creating the individual pockets. A simple small pocket can start with 25 chains, although the number can be increased or reduced depending on your desired size. Work one single crochet into the second chain from the hook and continue across. Chain 1, turn, and work one single crochet in each stitch. Continue until the rectangle measures approximately 6 to 7 inches tall. Fasten off while leaving a long yarn tail for sewing.
For medium and large pockets, simply increase the foundation chain and number of rows. A medium pocket might begin with approximately 35 chains, while a wide pocket may begin with 50 or more chains. Instead of relying only on stitch counts, place the unfinished pocket against the backing frequently to check the proportions. Remember that the pocket should contain a little extra width if you want it to hold bulky objects. A completely flat pocket works well for crochet hooks and scissors, while a roomier pocket is better for yarn balls.
To create additional capacity, make the pocket wider than the area where it will be attached. For example, a 12-inch-wide crochet rectangle can be sewn into a 10-inch-wide space. When attaching it, create small folds or pleats near the bottom corners. These folds provide depth and allow the pocket to expand forward. This technique is especially useful for the larger yarn-storage sections of the crochet wall organizer. Keep the top edge free so objects can be inserted easily.
Assembling the Crochet Wall Organizer with Pockets
Before sewing anything permanently, arrange all the completed pockets on the backing. This is one of the most important stages of the Crochet Wall Organizer with Pockets Pattern because good placement improves both appearance and function. Position larger pockets toward the bottom because they may hold heavier supplies. Smaller pockets work well near the upper and middle sections. Experiment with color placement until the overall design looks balanced. Photographing the arrangement can help you remember the exact placement while sewing.
Leave approximately 1 to 2 inches between horizontal rows whenever possible. This small amount of space makes it easier to reach inside each pocket. If pockets are positioned too close together, the upper row may cover the opening of the row underneath it. Use removable stitch markers to hold the corners temporarily. Measure from both sides of the backing so each row remains reasonably straight. Handmade pieces do not need to be mathematically perfect, but consistent spacing creates a more polished result.
Thread a yarn needle with a matching yarn color and begin attaching the first pocket. Sew through the bottom edge and both side edges while leaving the upper edge completely open. A whip stitch is easy and strong for this purpose. Pass the needle through both the pocket and backing, then continue around the edge using evenly spaced stitches. Avoid pulling the yarn excessively tight because this can distort the backing. Knot or weave the yarn securely into the wrong side when finished.
For additional strength, you can use a backstitch-style seam along the lower edge of each pocket. The bottom receives much of the pressure when objects are placed inside, so reinforcement is valuable. If you plan to store heavier crochet hooks, scissors, or yarn balls, consider sewing the bottom edge twice. Another option is to crochet the pocket directly to the backing using slip stitches. Sewing with a yarn needle, however, provides greater control and makes it easier to adjust the position.
Large pockets can also be divided into smaller compartments. After attaching the outside edges of a wide pocket, decide where you want the divisions. Thread the needle with matching yarn and sew vertical lines from the bottom edge toward the top. Secure each line carefully at both ends. One large rectangle can therefore become two or three storage sections without crocheting additional pieces. This method is perfect for creating narrow spaces designed specifically for crochet hooks, knitting needles, pens, rulers, or scissors.
Continue attaching pockets one row at a time until the entire organizer is complete. Periodically place a few lightweight objects inside the finished sections to make sure the seams remain stable. Avoid overloading the organizer during testing. If a pocket pulls heavily away from the backing, reinforce the side and bottom seams before continuing. Once all pockets are attached, weave in every loose yarn end securely. Careful finishing is what transforms a collection of crocheted rectangles into a durable and attractive handmade wall organizer.
Finishing, Hanging, Customizing, and Caring for the Organizer
A strong hanging system is essential for the completed Crochet Wall Organizer with Pockets Pattern. One effective method is to create a sleeve across the upper back edge for a wooden dowel. Crochet a narrow rectangle approximately the same width as the backing panel and sew its upper and lower edges across the back, leaving both ends open. Slide a dowel through the sleeve. The dowel distributes the weight across the full width of the organizer. This helps prevent the upper edge from stretching unevenly.
Another option is to create several crochet hanging loops. Chain approximately 15 to 25 stitches for each loop, depending on the desired size. Slip stitch into the first chain to create a ring, or work one row of single crochet before forming the loop for additional strength. Make at least three loops for a medium-size organizer: one near each upper corner and one in the center. Larger organizers may need four or five loops. Sew each loop securely through several stitches of the backing.
Blocking can improve the final appearance, especially if the backing panel became slightly uneven during construction. Follow the care recommendations appropriate for your yarn fiber. Gently shape the organizer into a straight rectangle and allow it to dry completely before hanging. Do not aggressively stretch the pockets because they need to retain their structure. Once dry, check the seams and hanging points one final time. Reinforce any area that appears weaker than the surrounding fabric.
Color is one of the easiest ways to personalize this crochet storage pattern. A warm combination of mustard yellow, cream, olive green, rust, and brown creates an inviting handmade appearance. For a modern room, consider cream, beige, gray, and muted green. Children’s rooms can feature pastel combinations or brighter colors. Using one consistent color for the backing and several coordinating shades for the pockets helps keep a multicolor organizer visually balanced.
The design can also be customized for different purposes. In a sewing room, use narrow pockets for seam rippers, fabric markers, rotary-cutting accessories, measuring tapes, and small notions. In an office, create compartments for pens, notebooks, envelopes, and stationery. In a child’s room, the organizer can hold lightweight craft materials or small soft items, provided it is installed safely and out of reach when necessary. A simplified version with only three or four large pockets can become attractive general-purpose wall storage.
Routine care will help your Crochet Wall Organizer with Pockets Pattern maintain its shape. Remove all contents before cleaning. Depending on the yarn, gentle hand washing or a delicate machine cycle may be appropriate, but always follow the yarn manufacturer’s care instructions. Reshape the organizer while damp and allow it to dry flat whenever possible. Check the attachment seams occasionally, particularly around heavily used pockets. With thoughtful care and reasonable loads, this handmade organizer can remain useful for years.
Frequently Asked Questions About the Crochet Wall Organizer with Pockets Pattern
Is the Crochet Wall Organizer with Pockets Pattern suitable for beginners?
Yes. A confident beginner who already knows how to make a chain, single crochet, and basic seams can complete this project. Most pieces are simple rectangles, so there is very little complicated shaping involved. The assembly stage requires patience, but it is straightforward when the pockets are positioned before sewing.
What yarn is best for a crochet wall organizer?
Medium-weight cotton or cotton-blend yarn is an excellent option because it creates firm stitches and has relatively little stretch. Worsted-weight acrylic can also be used, especially for decorative organizers holding lightweight supplies. Avoid extremely soft or elastic yarns when possible because the pockets may sag.
What crochet hook size should I use?
For Category 4 worsted-weight yarn, a 5 mm or 5.5 mm crochet hook is a good starting point. The ideal hook depends on your yarn and personal tension. Your goal should be a dense but flexible crochet fabric.
How many pockets should the organizer have?
There is no required number. You might create six large pockets, twelve smaller compartments, or a combination of both. Consider what you plan to store before deciding. Narrow compartments are useful for hooks and tools, while wider pockets work better for yarn.
How do I stop the pockets from stretching?
Use a relatively firm yarn, work with a tight and consistent tension, and reinforce the bottom and side seams. You can also use single crochet around the edges before attaching each pocket. Avoid placing excessively heavy objects inside.
Can I change the organizer dimensions?
Absolutely. The Crochet Wall Organizer with Pockets Pattern is very adaptable because both the backing and pockets are rectangular. Simply increase or decrease the foundation chain to change the width and crochet additional or fewer rows to change the height.
Can leftover yarn be used for this pattern?
Yes, and this project is an excellent way to use coordinating yarn leftovers. Try to select yarns with approximately the same thickness. Mixing very thin and very thick yarn may create pockets with different levels of firmness.
Should the pockets be crocheted separately?
Crocheting the pockets separately is usually easier because you can arrange them before sewing. It also makes color customization simple. More experienced crocheters can experiment with building pockets directly into the backing, but separate rectangles provide greater flexibility.
How can I make a pocket deeper?
Create the pocket slightly wider than the area where it will be attached. Add small folds or pleats at the lower corners before sewing. This creates extra space inside the pocket and allows it to expand outward.
Can I use double crochet for the entire organizer?
You can, but double crochet creates a more open and flexible fabric. If you choose this stitch, consider using a slightly smaller hook and firm tension. Single crochet or half double crochet generally produces better structure for storage pockets.
How should the organizer be hung?
A wooden dowel inserted through a crocheted sleeve is one of the most stable methods because the weight is distributed across the upper edge. Strong crochet loops can also work. Whatever system you choose, make sure the wall hardware is appropriate for the surface and expected load.
What can I store inside a crochet wall organizer?
The organizer works particularly well for crochet hooks, yarn balls, scissors, measuring tapes, stitch markers, knitting needles, sewing notions, and other lightweight craft supplies. It may also be adapted for office supplies, accessories, or decorative storage. Avoid heavy objects that could stretch the crochet fabric or damage the hanging system.
Conclusion
The Crochet Wall Organizer with Pockets Pattern combines crochet, organization, and home décor in one highly customizable project. Starting with a strong rectangular backing, you learned how to create pockets using basic crochet stitches, adjust their dimensions, add extra depth, arrange them in functional rows, and securely sew each section into place. You also learned how reinforced seams, appropriate yarn choices, careful spacing, and a reliable hanging system can improve the durability of the finished organizer. This project is especially useful because there is no single required arrangement. You can create a compact crochet pocket organizer for a small craft corner or make a large wall piece with numerous compartments for an entire crochet and sewing collection. Change the yarn colors, pocket sizes, stitch textures, and layout to create a version that suits your own room and storage needs.
EASILY FIND THE PDF FOR THIS PATTERN HERE!
Most importantly, enjoy the process of transforming simple crochet rectangles into something both practical and decorative. Handmade organization can make a creative space easier to use while adding warmth and personality to the room. After finishing your Crochet Wall Organizer with Pockets Pattern, leave your sincere opinion about the project and share any suggestions or creative modifications you would make. Your ideas may inspire new color combinations, pocket arrangements, and useful variations of this versatile crochet pattern.