
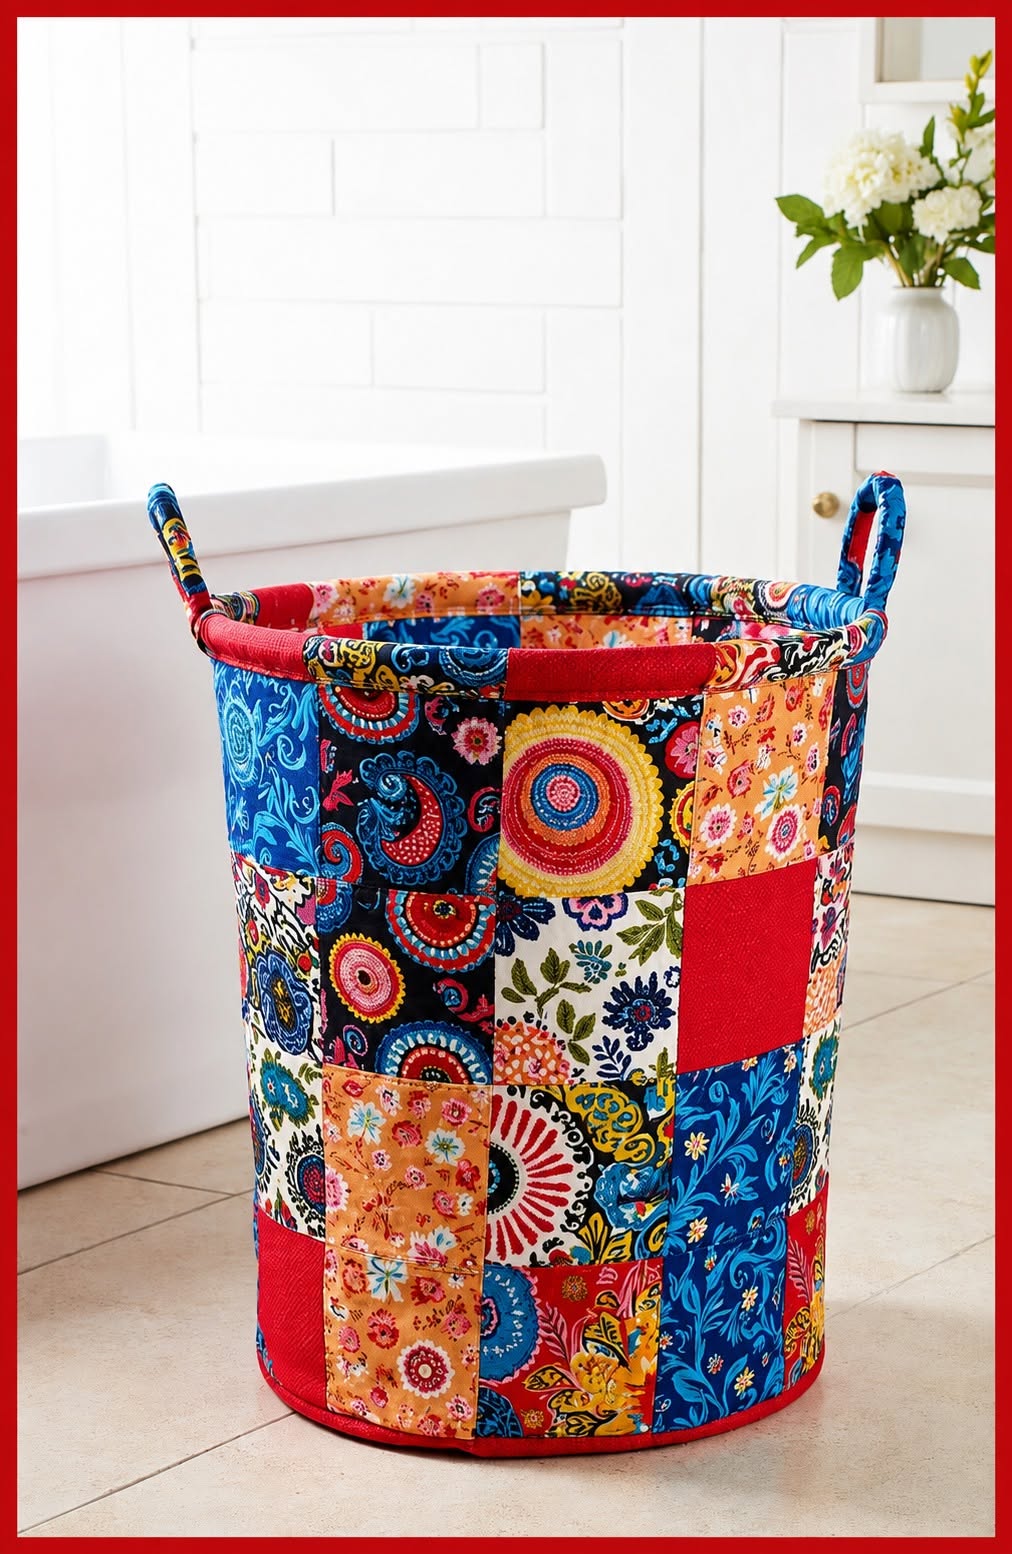
The Patchwork Fabric Basket Pattern is a practical and colorful sewing project that transforms small fabric pieces into a useful storage basket with a structured cylindrical shape. Inspired by the basket shown in the reference image, this project combines vibrant floral prints, paisley motifs, solid fabrics, and contrasting colors to create an attractive patchwork surface. The finished basket can be used to organize yarn, sewing supplies, toys, towels, craft materials, or other lightweight household items. One of the most appealing aspects of this design is that no two baskets need to look exactly alike because the fabric combinations can be completely personalized. It is also a wonderful project for using leftover quilting cotton and fabric scraps that might otherwise remain unused. Throughout this tutorial, you will learn how to prepare the patchwork panels, stabilize the structure, sew the basket body, create the base, and finish the upper edge and handles.
A Patchwork Fabric Basket Pattern is essentially a sewing pattern that combines several small fabric sections into a larger panel before that panel is transformed into a three-dimensional storage container. The word patchwork refers to the technique of joining individual fabric pieces together with seams to create a larger decorative surface. Fabric basket describes the final object: a soft but structured container made primarily from fabric rather than rigid materials such as plastic or wood. Finally, the word pattern refers to the measurements, shapes, and construction sequence used to reproduce the project successfully. Together, these elements create a versatile sewing project suitable for confident beginners as well as experienced quilters. Because the construction relies mostly on straight seams and simple shapes, the project is approachable while still offering plenty of opportunities for creative fabric placement.
The basket in the photo features a lively combination of blue, red, cream, orange, yellow, and floral fabrics arranged in rectangular and square sections around the exterior. A red fabric accent appears along the upper rim and lower edge, helping visually frame the patchwork design, while two fabric handles make the basket easier to carry. To reproduce this appearance, you can work with quilting cotton in several coordinated prints and combine it with interfacing, batting, or another stabilizer that gives the basket enough body to remain upright. Exact dimensions can be adapted to your preferred finished size, which makes this project especially flexible. Before cutting your best fabrics, however, it is helpful to understand how every section fits together and how seam allowances influence the final dimensions. The following instructions provide a complete method for creating your own colorful Patchwork Fabric Basket Pattern from beginning to end.
Materials, Measurements, and Fabric Preparation
Start by selecting approximately six to twelve coordinating quilting fabrics for the exterior patchwork. You can reproduce the colorful appearance of the photographed basket by mixing deep blue prints, bright red fabrics, warm orange florals, cream backgrounds, and occasional yellow accents. Small scraps work extremely well because most sections of the Patchwork Fabric Basket Pattern are relatively compact. Try combining large-scale designs with smaller prints so that the surface remains interesting without becoming visually repetitive. Solid fabric blocks can also provide resting areas between heavily patterned pieces. Press every fabric before measuring or cutting.
DISCOVER MORE FREE PATTERNS HERE!
For a medium basket, plan to create an exterior patchwork rectangle approximately 34 inches wide by 24 inches high before final assembly, although the dimensions can be adjusted. The finished circumference will depend on the width of this rectangle after seam allowances are removed. If you prefer a smaller basket for sewing notions, reduce the measurements proportionally. A larger basket may require heavier stabilizer to prevent the walls from collapsing. When modifying the size, remember that the circular base must correspond correctly to the finished circumference of the body. Careful measurement is one of the most important parts of any fabric basket pattern.
Cut several squares and rectangles in different dimensions rather than making every patch identical. Pieces measuring approximately 4 to 7 inches can produce the varied patchwork appearance seen in the reference basket. Include a consistent seam allowance, such as 1/4 inch, on every patchwork seam. Arrange your pieces on a large table before sewing them together. Move the fabrics until bright colors and strong prints are distributed evenly across the layout. Taking a photograph of the arrangement can help you remember the final placement while sewing.
You will also need lining fabric, batting or fusible fleece, and firm interfacing. The lining may be a single solid fabric or a subtle print because the decorative focus is generally on the exterior. Fusible fleece provides softness and moderate structure, while heavier interfacing can make the basket more rigid. For an especially stable basket, some sewists combine fleece with a firm sew-in stabilizer. Test a small sample before applying heat because different fusible products require different temperatures. Always follow the handling instructions appropriate for the stabilizer you choose.
Prepare additional fabric strips for the upper rim, lower binding, and handles. In the photographed design, the red accents create a strong visual connection between the many patchwork fabrics. Cutting these decorative pieces from one coordinating fabric can make the finished basket feel more unified. For each handle, a strip approximately 3 to 4 inches wide can be folded and reinforced before stitching. The finished handles should be strong enough to support the basket when it contains lightweight craft supplies. Avoid making them excessively long because shorter handles generally keep the basket easier to control.
Before beginning construction, check that your machine has a suitable universal or quilting needle and that your thread coordinates with the fabrics. Neutral thread is usually convenient for interior patchwork seams, while decorative topstitching can match the rim color. Prepare scissors or a rotary cutter, ruler, cutting mat, clips or pins, an iron, and a marking tool. Accurate cutting and pressing will improve the final appearance significantly. Once everything is prepared, the actual assembly becomes much easier. Good preparation is particularly valuable when making a Patchwork Fabric Basket Pattern with many individual fabric sections.
How to Sew the Patchwork Basket Exterior
Begin by joining individual fabric pieces into small rows or sections. Place two pieces right sides together, align the edges, and stitch using your chosen seam allowance. Open the pieces and press the seam carefully. Continue adding patches until each row reaches the required width. Pressing after every seam prevents distortion and helps the patchwork panel remain flat. Alternate the direction of seam allowances when possible so bulky intersections are easier to sew.
Next, sew the completed rows together to create one large rectangular panel. Align the horizontal seams carefully so the patchwork intersections look clean. Pin or clip the layers before stitching, especially if several seam allowances meet at the same point. Once the rows are connected, press the entire exterior panel from both sides. The result should resemble a colorful quilt top with an irregular mixture of floral, geometric, paisley, and solid blocks. This panel will eventually become the cylindrical wall of the basket.
Place the patchwork panel over the batting or fusible fleece and trim the stabilizer to match. If you are using fusible fleece, attach it according to the product instructions, applying even pressure without stretching the fabric. You may also quilt the exterior panel to the batting for additional strength. Simple vertical or horizontal quilting lines are usually enough because the patchwork itself already provides strong visual detail. Stitching close to some patchwork seams is another attractive option. This process gives the patchwork basket the padded appearance visible in the reference image.
After stabilizing the panel, square the edges carefully. Patchwork construction can sometimes shift the original measurements slightly, so trimming at this stage helps ensure that the basket body will join evenly. Measure the final width because this measurement determines the required circumference of the base. Do not remove too much fabric while squaring the panel. A small difference in width can affect the way the base fits later. Accuracy here makes the curved assembly much easier.
Fold the patchwork rectangle right sides together so the short vertical edges meet. Stitch this seam to transform the flat panel into a tube. Press the seam open or to one side depending on the thickness of your stabilizer. Turn the tube right side out temporarily and check that the patchwork distribution looks balanced. The seam can be positioned at the back of the basket if you want the front to have an uninterrupted design. At this stage, the project should already begin to resemble the photographed basket.
If you want the narrow contrasting lower edge shown in the photo, attach a fabric band around the bottom of the basket before connecting the circular base. This band can match the upper rim for a coordinated finish. Cut the strip long enough to fit around the body with seam allowance included. Join its short ends first, then attach the resulting loop evenly around the lower edge. Press carefully to keep the band straight. This small detail gives the Patchwork Fabric Basket Pattern a polished and professional appearance.
Making the Base, Lining, Handles, and Rim
To create the base, calculate the approximate diameter required for your finished basket body or use the completed tube as a direct guide. Lay the basket body gently over pattern paper and trace the opening without stretching the fabric. Add your preferred seam allowance around the traced circle. Cut one circle from exterior fabric, one from lining fabric, and the necessary stabilizer. A reinforced base helps the basket remain upright when placed on the floor or table. For additional support, use firm interfacing between the fabric layers.
Divide both the circular base and the lower basket opening into four equal sections and mark each quarter. Matching these reference marks makes it much easier to sew a circular piece into a straight-sided tube. Place the exterior base and basket body right sides together and align the quarter marks. Clip generously around the entire circumference. Sew slowly, adjusting the fabric gradually rather than forcing it under the presser foot. Small corrections along the curve will produce a smoother finished base.
Construct the lining using measurements corresponding to the exterior body. The lining can be made from one large rectangle instead of patchwork because this reduces unnecessary interior seams. Stabilization is usually lighter on the lining because most structure comes from the exterior layers. Sew the lining side seam but leave a turning opening if your preferred assembly method requires one. Attach the lining base using the same quarter-mark technique. Press accessible seams carefully without flattening the basket excessively.
For the handles, fold each fabric strip lengthwise with right sides together and stitch along the long edge, or use a folded construction similar to double-fold binding. Add interfacing inside each handle for reinforcement. Turn the handles right side out if necessary and press them flat. Topstitch close to both long edges to create a neat finish. Make two handles of equal length and check that they are symmetrical before attaching them. The handles in the reference project extend upward from opposite sides of the basket.
Position each handle against the upper exterior edge with the ends pointing upward or downward according to your chosen construction method. Measure from the side seam so that both handles are evenly spaced. Baste them securely before adding the lining or rim. Because handles receive repeated pulling, reinforce the attachment points with several lines of stitching. Even when the basket is intended mainly for decorative storage, strong handle construction increases durability. Avoid carrying extremely heavy objects unless the basket has been specifically reinforced for that purpose.
Finish the upper edge with a contrasting binding or rim fabric. The red rim in the photographed Patchwork Fabric Basket Pattern creates a beautiful frame around the colorful body. Join the rim strip into a loop, attach it around the top edge, fold it over the raw seam, and secure it with topstitching. Keep the width consistent around the entire basket. Press carefully, shape the basket with your hands, and inspect the final edge. A clean rim is one of the details that most influences the professional appearance of the finished project.
Finishing Details and Customizing Your Patchwork Basket
After completing the main construction, inspect every seam carefully and trim loose threads. Shape the basket by gently pressing the sides outward from the inside. If the stabilizer has developed folds during construction, light pressing can help restore an even surface. Do not apply excessive heat to synthetic batting or foam stabilizers. The basket should stand upright but still maintain the comfortable textile appearance typical of handmade storage accessories. Small irregularities are normal and often add character to patchwork work.
You can customize the Patchwork Fabric Basket Pattern by changing the fabric theme completely. Pastel fabrics create a soft nursery-style basket, while neutral linen and cream prints create a more minimalist appearance. Christmas fabrics can transform the same construction method into seasonal storage, and scraps from previous quilts can turn the basket into a meaningful memory project. Denim can also be incorporated in small quantities for additional texture. The important factor is maintaining enough structural support for the weight of the selected fabrics.
Patch placement is another easy way to create different visual effects. Random placement gives the basket a relaxed scrappy appearance similar to the photographed version. Repeating the same colors diagonally produces a more organized patchwork rhythm. You can also build the exterior from traditional quilt blocks instead of simple rectangles. Whatever design you choose, maintaining accurate seam allowances will help the exterior remain properly sized. This makes the pattern adaptable without changing its basic construction principles.
Decorative stitching can add another layer of personality to the project. Consider quilting around selected patches, adding simple parallel lines, or using contrasting topstitching around the rim and handles. Keep embellishments practical if the basket will be used frequently. Flat details usually perform better than delicate decorations that could catch on stored objects. The fabrics themselves already provide strong decoration, so additional stitching does not need to be elaborate. A balanced finish often looks more refined than an overly complicated one.
The basket is especially useful in sewing rooms and craft spaces because the wide opening makes contents easy to see and reach. Yarn, fabric rolls, unfinished projects, patterns, and lightweight tools can all be organized inside. It can also serve as decorative storage for blankets, soft toys, or other household textiles. Making several baskets in coordinated colors can create an organized collection while using the same basic Patchwork Fabric Basket Pattern. Different sizes can be produced simply by adjusting the body and base measurements proportionally.
Before considering the project finished, check the base for stability, the handles for secure stitching, and the rim for an even shape. Set the basket on a flat surface and observe whether it stands correctly. If one area collapses more than another, gently reshape it and press according to the stabilizer requirements. Record your final measurements and any adjustments you made during construction. These notes can become your personal reusable fabric basket pattern for future projects. With the construction method understood, additional baskets will usually become quicker and easier to make.
FAQ About the Patchwork Fabric Basket Pattern
What is a Patchwork Fabric Basket Pattern?
A Patchwork Fabric Basket Pattern is a sewing guide for constructing a fabric storage basket from multiple pieces of fabric joined together in patchwork style. The decorative patchwork usually forms the exterior, while batting, interfacing, or another stabilizer provides structure. A separate fabric lining covers the interior seams and gives the finished basket a clean appearance.
Is this patchwork basket suitable for beginners?
Yes. A beginner who is comfortable with basic straight stitching can complete the project successfully. Sewing the circular base is generally the most challenging step, but dividing the circle and basket opening into quarters makes alignment much easier. Practicing on inexpensive fabric first can also help new sewists become comfortable with curved seams.
What is the best fabric for a patchwork basket?
Quilting cotton is one of the easiest choices because it cuts accurately, presses well, and comes in a wide range of coordinating prints. Medium-weight cotton can also work. Very thin fabrics may require additional stabilization, while extremely heavy fabrics can create bulky seams. Combining similar fabric weights generally produces the most consistent results.
Do I need interfacing for a fabric basket?
Interfacing is strongly recommended when you want the basket to maintain its shape. Without enough support, a large basket may collapse when empty. Fusible fleece creates a softer padded structure, while firm interfacing gives greater stiffness. Some projects combine both materials for a balance between softness and stability.
Can I make the basket from fabric scraps?
Absolutely. In fact, using scraps is one of the main advantages of a Patchwork Fabric Basket Pattern. Small pieces left from quilts, bags, cushions, and other sewing projects can be combined into a new decorative surface. Try selecting a repeating color family to make unrelated scraps look intentionally coordinated.
How do I calculate the circular base size?
The base needs to correspond to the finished circumference of the basket body. One approach is to divide the circumference by approximately 3.14 to estimate the diameter and then add seam allowance. Another practical method is to form the completed basket tube, place it on paper, trace around the opening, and add the required seam allowance.
Can the basket be made without a circular base?
Yes. The project can be redesigned with a square or rectangular base, but the construction and appearance will be different from the cylindrical basket shown in the photo. A circular base produces the soft rounded shape that characterizes this version of the Patchwork Fabric Basket Pattern.
How can I make the basket more rigid?
Use firmer interfacing, foam stabilizer, or multiple compatible support layers. Reinforcing the base separately can also improve stability. Keep in mind that additional thickness makes seams bulkier, particularly around the base and upper rim, so make sure your sewing machine and needle can comfortably handle the combined layers.
Should the patchwork be quilted before assembling the basket?
It is not always required, but quilting the patchwork to batting can improve durability and help prevent the outer fabric from shifting away from the stabilizer. Simple straight quilting lines are sufficient. Stitching along or near patchwork seams is an easy choice that complements the design without competing with the printed fabrics.
Can I wash a patchwork fabric basket?
Washability depends on the fabrics, batting, interfacing, and stabilizers used in the construction. If you want a washable basket, choose materials that are specifically compatible with washing and consider prewashing the cotton fabrics before cutting. Gentle cleaning and reshaping while drying can help preserve the basket structure.
Can I change the size of the Patchwork Fabric Basket Pattern?
Yes. The dimensions are highly adaptable. A small version can hold sewing notions or bathroom accessories, while a larger basket can accommodate yarn, textiles, or toys. When resizing, adjust both the body circumference and the base dimensions carefully. Larger baskets usually need stronger stabilization than smaller ones.
How can I make professional-looking handles?
Use interfacing inside the handle strips, press the folds accurately, and topstitch both long edges at an equal distance from the sides. Measure the handle positions carefully before attaching them to the basket. Reinforcing the attachment points will make them stronger and help both handles remain symmetrical.
Conclusion
Creating a Patchwork Fabric Basket Pattern is an enjoyable way to combine practical sewing with the creativity of patchwork. In this tutorial, you learned how to select and prepare coordinating fabrics, arrange patchwork pieces, sew the exterior panel, add stabilizer, construct the cylindrical body, prepare a circular base, make the lining, reinforce the handles, and complete the basket with a contrasting upper rim. These techniques can be reused for many future fabric storage projects. The colorful basket shown in the reference image demonstrates how ordinary fabric squares and rectangles can become an attractive handmade organizer. Bold blue prints, warm floral fabrics, bright red accents, and contrasting patterns work together because the repeated colors create visual balance. You do not need identical fabrics to achieve a similar effect. The real strength of patchwork sewing is the freedom to combine materials in a way that reflects your own style.
EASILY FIND THE PDF FOR THIS PATTERN HERE!
Once you understand the basic Patchwork Fabric Basket Pattern, experiment with new dimensions, fabric combinations, handle styles, quilting designs, and levels of structure. Save your scraps, test different arrangements, and make each basket unique. If you try this project, leave your sincere opinion about the tutorial and share your suggestions for future sewing and patchwork projects. Your ideas can inspire new variations and help make the next handmade project even more creative.