
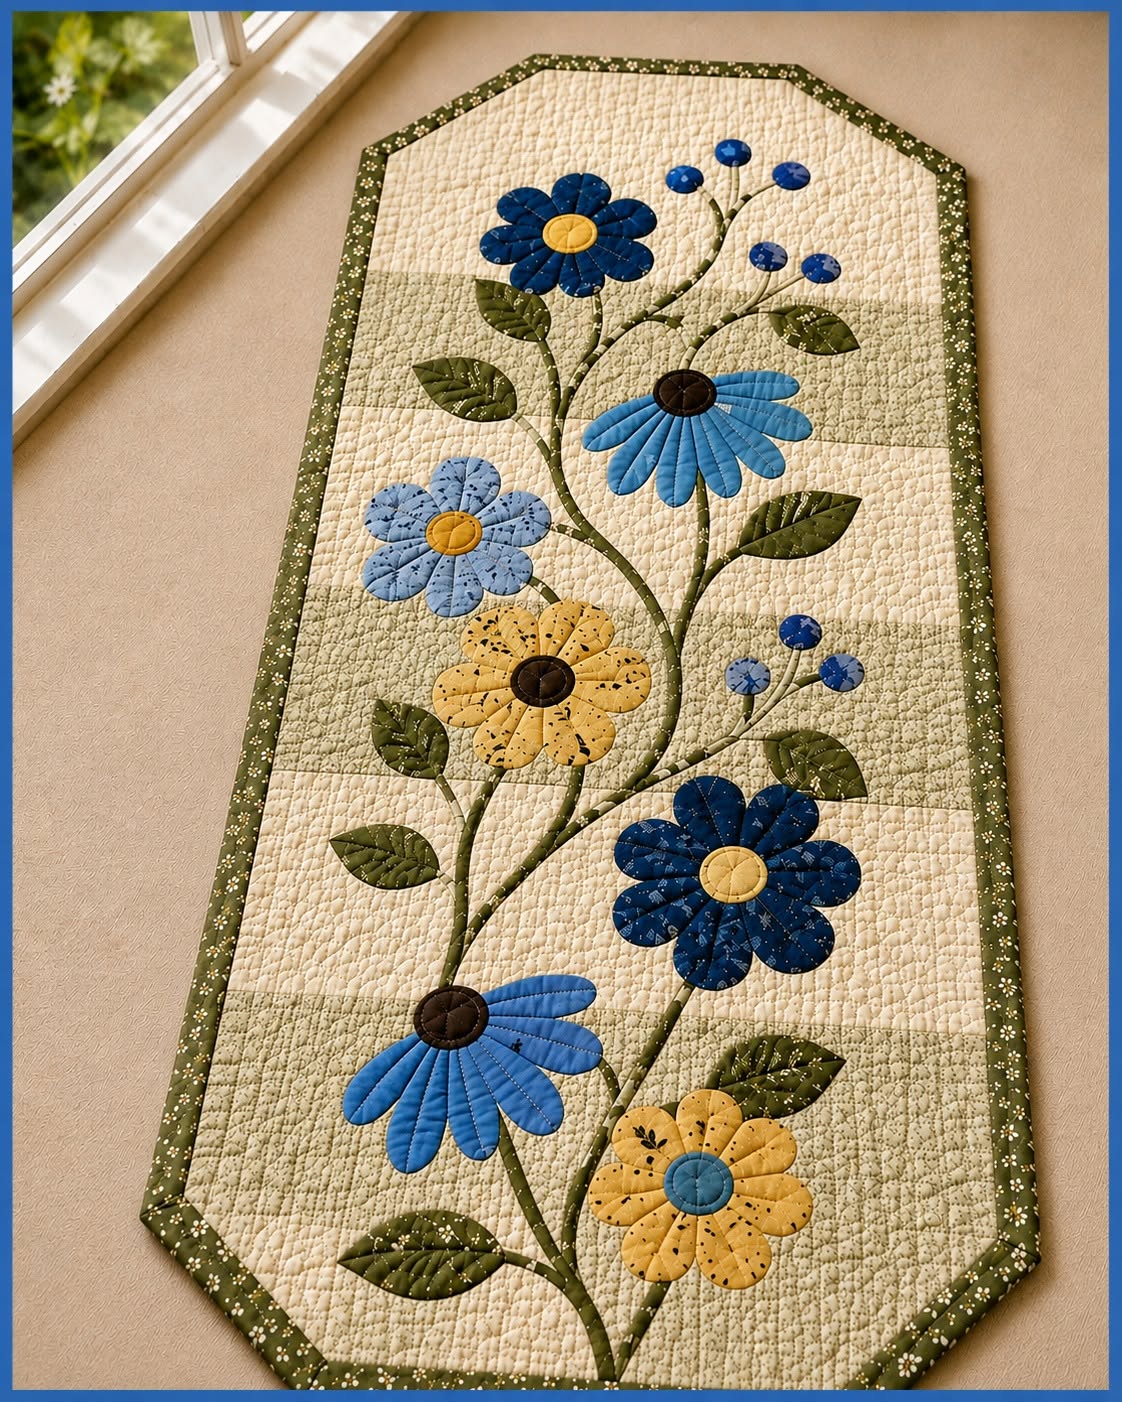
Quilted table runner with floral motifs Fabric Pattern is a charming sewing project that combines traditional quilting, floral appliqué, soft colors, and practical home décor in one beautiful handmade piece. Inspired by the project shown in the image, this table runner features an elongated shape, gently angled ends, layered flowers, curved stems, appliquéd leaves, decorative quilting, and a coordinating fabric binding. The finished runner can brighten a dining table, console, sideboard, coffee table, or bedroom dresser while bringing a welcoming handmade feeling into the room. Although the floral arrangement looks detailed, the design can be completed successfully when the project is divided into manageable stages. Careful preparation, accurate cutting, patient appliqué work, and consistent quilting are the main elements needed to recreate this elegant design.
One of the most appealing characteristics of this floral quilted table runner is its balanced mixture of rustic and contemporary details. The cream background gives the flowers enough contrast to become the focal point, while the olive-green leaves and stems create natural movement along the length of the runner. Blue, navy, golden yellow, and soft brown fabrics add variety without making the composition feel overly busy. The visible quilting provides texture and helps every appliqué shape stand out from the background. You can reproduce the same general color palette or select fabrics that coordinate with your kitchen, dining room, or seasonal decorations. Because the design is handmade, small variations in flower placement or stitching can make the finished runner feel even more personal.
This tutorial explains how to create a Quilted table runner with floral motifs Fabric Pattern from beginning to end, including fabric selection, pattern preparation, appliqué placement, layered assembly, quilting, trimming, and binding. The instructions are suitable for confident beginners as well as experienced quilters who want a relaxing decorative project. Exact measurements may be adjusted according to the size of your table, but a practical finished size is approximately 18 inches wide by 48 inches long. This proportion provides enough room for the floral arrangement while still leaving visible space around the runner when it is placed on a table. Before cutting your best fabrics, read through every stage and prepare a paper layout so you can visualize the complete composition.
Materials, Measurements, and Fabric Preparation
Begin by gathering the fabrics for the Quilted table runner with floral motifs Fabric Pattern. You will need approximately one yard of cream or light beige cotton fabric for the main background, depending on the desired runner size. Prepare additional fabric for the backing, batting, flowers, leaves, stems, corner sections, and binding. Quilting cotton is the easiest material to handle because it presses well, holds its shape, and is available in many coordinating prints. Small fabric scraps are especially useful for the flower petals and circular centers.
DISCOVER MORE FREE PATTERNS HERE!
For a runner measuring approximately 18 by 48 inches, cut the background fabric slightly larger than the intended finished measurement. A starting rectangle of about 20 by 50 inches allows room for quilting shrinkage and final trimming. Cut the backing and batting approximately two inches larger than the background on every side. The additional space prevents the layers from shifting beyond the edges during quilting. Do not trim the runner to its exact size until all quilting has been completed.
The term fabric pattern refers to the collection of templates, measurements, and placement guides used to construct the project. For this design, the pattern includes petal shapes, circles, leaves, small buds, curved stems, and the outline of the table runner. Draw the templates on paper or template plastic before transferring them to fabric. Create at least three petal sizes so the flowers appear varied and natural. A combination of narrow petals, rounded petals, and daisy-style petals will closely reproduce the visual character of the photographed runner.
The runner in the image has an elongated body with angled or clipped corners rather than a plain rectangular outline. To create this shape, begin with a rectangle and measure approximately four inches inward from each corner along both adjoining edges. Draw diagonal lines connecting the marks, then cut along those lines. Check that all corners are symmetrical by folding the background fabric in half lengthwise and comparing both ends. This simple adjustment gives the finished floral table runner pattern a polished and distinctive silhouette.
Prewash your quilting fabrics when there is a possibility that strong colors may bleed or shrink. After drying, press each fabric with a warm iron to remove creases before cutting. Flat, wrinkle-free fabric produces more accurate appliqué pieces and makes the final runner easier to assemble. When using small scraps from previous projects, test them for colorfastness by pressing a damp white cloth against the material. This precaution is particularly important for navy, dark blue, brown, and deep green fabrics.
Prepare fusible web if you plan to use raw-edge appliqué. Fusible web is a thin adhesive material that bonds fabric shapes to the background with heat. It stabilizes the petals and leaves before they are permanently secured with stitching. Choose a lightweight product so the table runner remains flexible rather than stiff. You will also need neutral thread for piecing, coordinating threads for appliqué, quilting thread, sharp scissors, pins or basting spray, a sewing machine, an iron, and basic quilting rulers.
Creating and Arranging the Floral Appliqué Design
The floral layout is the central feature of the Quilted table runner with floral motifs Fabric Pattern. Before attaching any fabric pieces, sketch a gentle branching stem that travels from the lower section toward the upper end of the runner. The stem should curve naturally rather than forming a perfectly straight line. Add smaller branches extending toward the flowers, leaves, and buds. Keep the design centered while allowing some flowers to reach toward the sides to create visual movement.
To create the stems, cut narrow bias strips from olive-green or muted brown fabric. Bias strips are cut diagonally across the fabric grain, allowing them to bend smoothly around curves. Strips approximately ¼ to ⅜ inch wide work well for this project. Press the raw edges toward the center or use a bias tape maker for a cleaner finish. Arrange the main stem first, then add the smaller branches after confirming the locations of the flowers.
Trace each flower petal, leaf, and center circle onto the paper side of the fusible web. Leave a small amount of space between the shapes so they can be cut apart easily. Fuse the rough adhesive side to the wrong side of the selected fabrics according to the manufacturer’s temperature instructions. Allow the pieces to cool, cut accurately along the traced lines, and remove the protective paper. Avoid using excessive heat, as this can flatten the fabric or make the adhesive difficult to stitch through.
Build the flowers one at a time on a pressing surface before transferring the full arrangement to the background. Most flowers can be created by positioning six to ten petals around a circular center. Overlap the inner ends of the petals slightly so no background fabric shows through the middle. Use different petal shapes and sizes to prevent the composition from becoming repetitive. The floral motifs fabric pattern can include navy daisies, pale blue flowers, golden blooms, and small blue buds similar to those visible in the inspiration image.
Arrange the largest flowers first because they establish the balance of the entire design. Place one large flower near the top, another around the center, and one or two toward the lower half. Fill the spaces between them with medium flowers, leaves, and small buds. Step back from the work occasionally or take a photograph with your phone to evaluate the composition from a distance. Leave some open background areas so the detailed quilting remains visible and the flowers do not appear crowded.
When you are satisfied with the placement, fuse the stems, leaves, petals, and centers to the background. Work in small sections and use a pressing cloth to protect the fabrics. Secure each raw edge using a narrow zigzag, blanket stitch, or straight stitch approximately ⅛ inch from the edge. A dark olive thread works well for stems and leaves, while blue, yellow, or neutral threads can be used around the flowers. Slow stitching produces smoother curves and gives the appliqué table runner a neat handcrafted finish.
Layering, Quilting, Binding, and Final Finishing
After the appliqué has been securely stitched, prepare the quilt sandwich. Place the backing fabric wrong side up on a clean, flat surface and smooth away all wrinkles. Position the batting over the backing, followed by the appliquéd top with its right side facing upward. Make sure the batting and backing extend beyond every edge of the top. Secure the layers with curved safety pins, long hand-basting stitches, or a temporary fabric basting spray.
Begin quilting near the center and gradually work toward the outer edges. This approach reduces wrinkles and prevents the fabric layers from shifting. The inspiration runner uses dense, textured quilting that creates a soft, slightly puckered appearance around the appliqué shapes. You may quilt a small grid, gentle meandering lines, or closely spaced straight lines across the cream background. Keep the quilting stitches away from the flower centers at first so you can decide later whether those areas need additional detail.
Stitch around each flower, leaf, and stem to emphasize the outline of the appliqué. This technique is often called echo quilting because the stitched line follows the shape of the motif. Additional lines can be placed approximately ¼ inch away from the first outline to create greater definition. Quilt decorative veins inside the leaves and radiating lines inside the petals when desired. These small details help the quilted floral motifs appear dimensional without adding extra layers of fabric.
The photographed project also includes pieced sections near the corners and ends. To recreate this feature, sew soft green or beige fabric strips to portions of the background before the appliqué stage, or imitate the appearance with carefully placed appliqué panels. A subtle patchwork arrangement adds interest while preserving the calm color palette. Keep these sections lighter than the main flowers so they remain supporting details. Quilting across the seams will unite the decorative panels with the rest of the runner.
Once all quilting is complete, place the runner on a cutting mat and trim the backing and batting even with the top. Use a long acrylic ruler to keep the edges straight and confirm that the clipped corners remain symmetrical. Measure the runner at several points to check that both long sides are parallel. If quilting has caused minor distortion, make small adjustments during trimming rather than trying to force the fabric into position. Accurate trimming makes the binding process considerably easier.
Prepare double-fold binding from coordinating dark olive or small-print fabric. Join the strips with diagonal seams, press the strip in half lengthwise, and sew it around the front of the runner with a ¼-inch seam allowance. Carefully fold the binding around the angled corners, creating neat miters without excessive bulk. Wrap the binding to the back and secure it by hand for an invisible finish or machine-stitch close to the folded edge. Press the completed Quilted table runner with floral motifs Fabric Pattern gently and allow it to cool flat.
Frequently Asked Questions About Floral Quilted Table Runners
What is the best fabric for a quilted floral table runner? Quilting cotton is generally the most practical choice because it is stable, washable, easy to press, and simple to stitch. Cotton also works well with fusible web and holds detailed appliqué shapes. Avoid fabrics that stretch excessively or fray heavily unless you have experience stabilizing them. Linen blends may be used for the background, but they should be prewashed and supported with lightweight interfacing when necessary.
Can a beginner make this Quilted table runner with floral motifs Fabric Pattern? Yes, a motivated beginner can complete this project by working slowly and practicing the appliqué stitch on scrap fabric first. The runner does not require complicated quilt blocks or difficult curved piecing. The most time-consuming part is preparing and stitching the individual floral shapes. Beginners may simplify the project by using fewer flowers, larger petals, and straight-line quilting rather than dense free-motion quilting.
How can I resize the table runner for a different table? Measure the available table surface and decide how much wood or tablecloth you want visible around the runner. Add length to the background before arranging the flowers, then extend the stem and add extra motifs as needed. For a shorter runner, remove one large flower and several connecting leaves. Maintain at least two inches of open background between the appliqué and the binding so the design does not look cramped.
Should the appliqué edges be turned under or left raw? Both techniques are suitable for a floral fabric pattern. Raw-edge appliqué is faster and works well when fusible web is used underneath the shapes. Turned-edge appliqué creates a more traditional and refined result but requires additional preparation. A narrow zigzag or blanket stitch protects raw edges from excessive fraying, while straight stitching creates a relaxed handmade appearance that may soften slightly after washing.
How should a quilted table runner be washed? Hand washing or a gentle machine cycle with cold water is usually appropriate when all materials are washable cotton. Use mild detergent and avoid strong bleach. Reshape the runner while damp and dry it flat whenever possible. A low-temperature tumble-dry cycle may be used for a more crinkled, vintage quilt texture. Always test dark appliqué fabrics for color bleeding before assembling the project.
How can I prevent puckering during quilting? Begin with well-pressed fabrics, use batting and backing larger than the quilt top, and baste the three layers thoroughly. Quilt from the center outward and avoid pulling the fabric while guiding it through the sewing machine. Check the thread tension on a test sandwich made from the same materials. If free-motion quilting feels difficult, use a walking foot and stitch gentle lines, diamonds, or a grid across the quilted table runner.
Conclusion
Creating a Quilted table runner with floral motifs Fabric Pattern is a rewarding way to combine fabric scraps, appliqué techniques, decorative quilting, and functional home décor. Throughout this project, you learned how to select a harmonious color palette, prepare an angled runner shape, create petal and leaf templates, form curved stems, arrange balanced floral motifs, secure the appliqué, build the quilt sandwich, add texture through quilting, and finish the edges with coordinating binding. Each stage contributes to the final appearance, but the design remains flexible enough to reflect your personal style.
EASILY FIND THE PDF FOR THIS PATTERN HERE!
The completed runner can be displayed throughout the year or adapted for spring, summer, autumn, holidays, and special occasions simply by changing the fabric colors. Take your time, enjoy the creative process, and remember that handmade details do not need to be perfectly identical to look beautiful. Please leave your sincere opinion about this floral quilted table runner and share any suggestions, color combinations, or creative changes that could inspire future sewing projects.