
The Zippered Pouch with Hexagon Patchwork Fabric Pattern is a charming sewing project that combines practical storage with the timeless beauty of handmade patchwork.
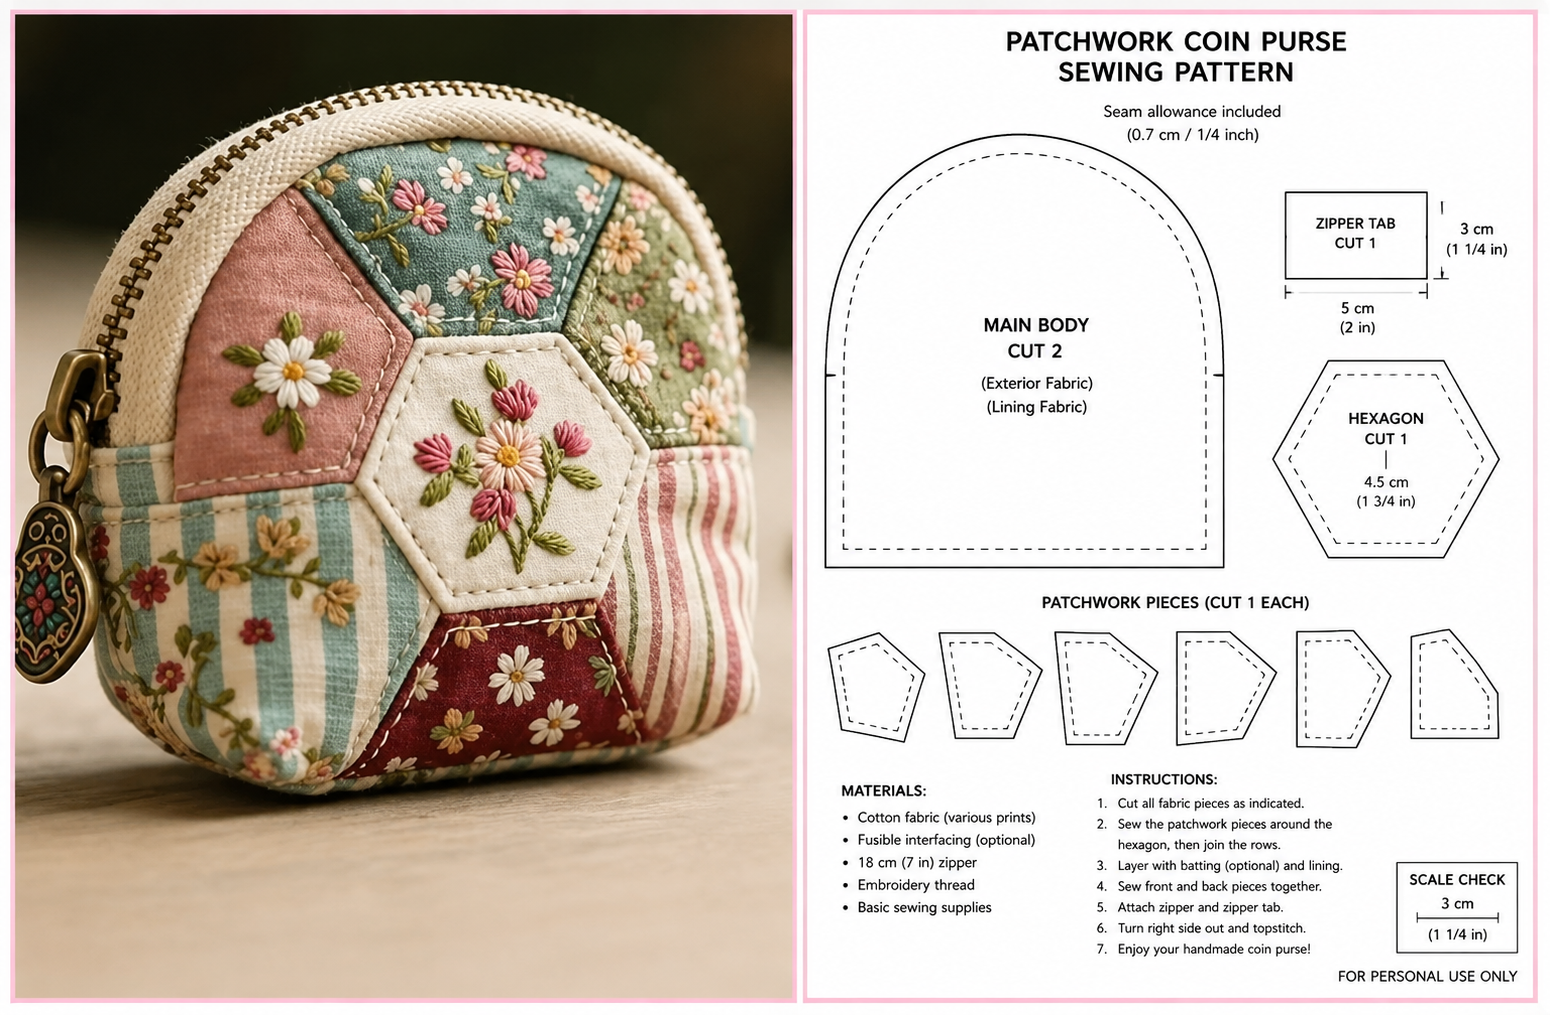
Its rounded shape, visible zipper, floral embroidery, and carefully arranged fabric sections create an accessory that feels both useful and decorative.
This type of pouch can hold coins, sewing notions, jewelry, small cosmetics, earbuds, keys, or other everyday essentials.
Because the design uses relatively small fabric pieces, it is also an excellent project for transforming favorite scraps into something valuable.
Each section can feature a different print, allowing you to combine florals, stripes, checks, solids, and vintage-inspired textiles.
The result is a compact handmade pouch with personality, texture, and a polished boutique-style appearance.
Creating a hexagon patchwork fabric pattern may look complicated at first, but the construction becomes manageable when the project is divided into clear stages.
The central hexagon acts as the main visual feature, while the surrounding pieces form a balanced patchwork arrangement around it.
A layer of interfacing or thin batting gives the pouch structure and helps the decorative stitching remain neat and visible.
The embroidered flowers shown in the center can be stitched by hand, made with an embroidery machine, or replaced with printed floral fabric.
You can also simplify the project by using decorative fabric without embroidery while preserving the same overall layout.
Careful measuring, accurate seam allowances, and patient pressing are the most important elements for achieving a professional result.
This tutorial explains how to make a Zippered Pouch with Hexagon Patchwork Fabric Pattern from the initial template to the final zipper installation.
The instructions can be adapted to different pouch sizes, although a small rounded pouch is especially suitable for this design.
Beginners with basic sewing experience can complete the project by working slowly and testing the zipper before the final assembly.
More experienced makers can personalize it with hand quilting, decorative topstitching, beading, appliqué, or a special zipper charm.
The project is also suitable for handmade gifts because every combination of fabrics creates a completely unique finished accessory.
By following the steps below, you can produce a durable pouch that celebrates traditional patchwork in a fresh and functional format.
Materials, Measurements, and Pattern Preparation
To make the Zippered Pouch with Hexagon Patchwork Fabric Pattern, gather several coordinating cotton fabrics, lining fabric, lightweight interfacing, thin batting, thread, and one zipper. Choose quilting cotton whenever possible because it is easy to cut, press, and stitch accurately. Small scraps are usually large enough for the individual patchwork sections.
DISCOVER MORE FREE PATTERNS HERE!
For a compact pouch, plan a finished size of approximately 5 inches wide by 5 inches tall. You will need two outer patchwork panels, two lining panels, and optional batting pieces. A zipper measuring approximately 7 inches gives you enough extra length to work comfortably around the curved opening.
Create a paper template for the rounded pouch body before cutting the fabric. Draw a shape with a gently curved top, rounded side edges, and a slightly flatter bottom so the pouch can rest upright. Add a ¼-inch seam allowance around the entire shape unless your template already includes it.
Next, draw the central hexagon template. A finished hexagon measuring approximately 2 inches across works well for a small pouch, but the exact dimensions can be adjusted. Add a ¼-inch seam allowance to every side so the fabric pieces can be joined without reducing the intended size.
Arrange paper shapes around the central hexagon to create the surrounding patchwork design. These pieces may resemble wedges, trapezoids, or irregular polygons, depending on the curve of the pouch. Number every template and mark its top edge to prevent confusion during assembly.
The term patchwork fabric pattern refers to a planned arrangement of smaller fabric sections that are sewn together to form one larger panel. In this project, the patchwork is not random. The central hexagon becomes the focal point, while the surrounding pieces guide the eye toward the floral centerpiece and curved pouch silhouette.
Cutting and Sewing the Hexagon Patchwork Panels
Begin by pressing all fabrics before cutting. Wrinkles can distort small pattern pieces and cause inaccurate seams. Place each paper template on the wrong side of the chosen fabric, trace carefully, and cut along the outer seam allowance line using sharp fabric scissors or a rotary cutter.
Select a light solid fabric for the center if you plan to add embroidery. Cream, ivory, pale beige, or soft white will make colorful floral stitches more noticeable. Transfer the embroidery design before attaching the central piece to the surrounding patchwork because it is easier to work on a single section.
For a handmade floral motif, draw a few simple stems and small flowers with a removable fabric marker. Use backstitch or stem stitch for the stems, lazy daisy stitches for petals, and French knots for the flower centers. Keep the embroidery relatively flat so the pouch remains easy to assemble.
Join the first surrounding piece to one side of the central hexagon with right sides together. Sew using an accurate ¼-inch seam allowance, then press the seam toward the darker fabric. Continue adding the surrounding sections one at a time, following the numbered pattern and matching all corners carefully.
After each seam, check that the new piece lies flat and that the edges align with the paper layout. Small inaccuracies can multiply as more sections are added. Pressing after every seam helps create crisp lines and prevents bulky seam allowances from gathering around the central hexagon patchwork area.
Repeat the process to make the second outer panel. The back panel can use the same design, a simplified patchwork arrangement, or one complete piece of coordinating fabric. Using patchwork on both sides creates a more detailed pouch, while a solid back makes the project quicker and allows the front design to remain the main attraction.
Adding Structure, Quilting, and the Zipper
Once the outer panels are complete, place each one over a matching piece of lightweight interfacing or thin batting. Interfacing produces a clean and flexible result, while batting creates a softer quilted texture. Avoid very thick batting because it can make the curved zipper difficult to sew.
Baste the patchwork panel to the stabilizing layer with a long machine stitch or temporary fabric adhesive. Quilt close to the patchwork seams using matching or neutral thread. This technique, often called stitch-in-the-ditch quilting, secures the layers without distracting from the fabric prints and embroidery.
You may also topstitch approximately ⅛ inch from each seam to outline the geometric sections. Decorative stitching highlights the hexagon fabric pattern and gives the pouch a handcrafted appearance. Keep the stitch length consistent and avoid sewing through the embroidered flowers unless that effect is intentional.
Trim both quilted outer panels using the original rounded pouch template. Cutting after quilting corrects minor distortion caused by stitching. Cut two identical lining pieces, but do not attach batting or interfacing to the lining unless the fabric is unusually thin.
Prepare the zipper by marking its center and the center of the pouch’s curved top edge. For a zipper that must bend around a tight curve, carefully clip only the zipper tape at intervals. Never cut into the zipper teeth. These small clips help the tape follow the shape without wrinkling.
Place the zipper right side down against the right side of the first outer panel. Position the lining right side down over the zipper, creating a fabric-and-zipper sandwich. Sew with a zipper foot, turn the layers right side out, press gently, and add neat topstitching beside the zipper teeth.
Final Assembly, Finishing Details, and Customization
Attach the opposite side of the zipper to the second outer panel and lining in the same way. Match the center marks so both sides remain balanced. After sewing, open the layers, press carefully, and topstitch along the second zipper edge to prevent the lining from catching in the zipper.
Before sewing the pouch together, open the zipper at least halfway. This step is essential because the open zipper provides the space needed to turn the finished pouch right side out. Forgetting to open it can make the turning process extremely difficult.
Place the two outer panels right sides together and place the lining panels right sides together. Match the ends of the zipper, patchwork seams, side edges, and bottom corners. Pin or clip around the entire perimeter, making sure the zipper teeth are directed toward the lining side.
Sew around the pouch using a ¼-inch seam allowance, but leave a 2- to 3-inch opening along the bottom of the lining. Sew slowly near the zipper ends because this area contains multiple layers. Reinforce those sections with a second line of stitching for additional durability.
Clip small notches around the curved seam allowances without cutting through the stitching. Trim bulky areas near the zipper ends, then turn the pouch through the lining opening. Gently shape the curves with a blunt turning tool and check that the zipper opens and closes smoothly.
Close the lining opening with a narrow machine stitch or an invisible ladder stitch by hand. Push the lining inside, press the pouch carefully, and add a decorative zipper pull if desired. Your Zippered Pouch with Hexagon Patchwork Fabric Pattern is now ready to use, display, sell, or give as a thoughtful handmade gift.
Frequently Asked Questions
What type of fabric is best for a zippered patchwork pouch?
Quilting cotton is one of the best choices because it is stable, easy to press, widely available, and suitable for accurate patchwork seams. Linen blends can also be used, but they may require interfacing because they tend to stretch or fray more easily. Very slippery, heavy, or stretchy fabrics are less suitable for a first attempt.
Can beginners make a Zippered Pouch with Hexagon Patchwork Fabric Pattern?
Yes. A confident beginner can complete this project with basic experience in straight stitching, pressing, and zipper installation. The most challenging areas are joining the small patchwork pieces and sewing the zipper around a curve. Making a test version with inexpensive fabric can help beginners understand the construction before using special materials.
How can I keep the hexagon points aligned?
Mark the ¼-inch seam intersections on the wrong side of each fabric piece. Begin and stop sewing exactly at those intersection points instead of stitching beyond them. Pin the corners carefully and check the alignment before completing each seam. Accurate cutting and pressing also make a major difference.
Is embroidery required for the central hexagon?
No. The embroidery is a decorative option rather than a structural requirement. You can use floral fabric, appliqué, a monogram, a small quilt block, printed text, or a solid fabric center. The central section should simply provide a clear focal point within the surrounding patchwork arrangement.
What interfacing should I use for the pouch?
Lightweight or medium-weight fusible woven interfacing is suitable for a structured but flexible pouch. Thin cotton batting works well for a quilted appearance. Foam stabilizer can create a firm shape, but it may be too bulky for a small curved zipper design unless the seam allowances are carefully trimmed.
How do I prevent the lining from getting caught in the zipper?
After attaching each zipper side, pull the lining away from the zipper teeth and press it flat. Add a line of topstitching close to the outer fabric edge. This secures the lining and reduces the chance that loose fabric will move into the zipper path during use.
Can I make the pouch larger or smaller?
Yes. Enlarge or reduce every pattern piece by the same percentage, including the outer body, lining, central hexagon, and surrounding sections. Choose a zipper longer than the required opening so there is enough tape to handle during installation. Remember that very small versions require greater precision.
How can I make the pouch washable?
Prewash the cotton fabrics before cutting, especially when combining dark and light colors. Use washable interfacing, polyester or cotton thread, and a durable zipper. Hand washing or gentle machine washing in a protective laundry bag is preferable. Allow the pouch to air-dry to preserve its shape and embroidery.
Can fabric scraps be used for this project?
Absolutely. This patchwork pouch pattern is ideal for using leftover pieces from quilting and sewing projects. Choose scraps with similar fabric weights and coordinate the colors before cutting. Even very small pieces can be used for the geometric sections surrounding the center.
Why does my pouch look uneven after sewing?
Unevenness may be caused by inaccurate seam allowances, stretched curved edges, thick seam intersections, or unmatched zipper centers. Use a consistent ¼-inch seam allowance, stabilize the outer panels, and trim both completed panels with the same template. Pressing each stage also improves the final shape.
How can I create a vintage-inspired appearance?
Combine muted floral prints, ticking stripes, faded checks, dusty rose, burgundy, cream, and soft blue fabrics. Add hand embroidery, visible quilting stitches, an antique-style zipper pull, or a small metal charm. The goal is to create a coordinated mix that feels collected over time rather than perfectly matched.
Can the finished pouch be sold as a handmade product?
A maker can sell pouches created from an original or properly licensed pattern, provided the fabrics and decorative elements are also suitable for commercial use. Strong stitching, a clean lining, reliable zipper operation, accurate product descriptions, and consistent finishing are important when preparing handmade items for customers.
Conclusion
The Zippered Pouch with Hexagon Patchwork Fabric Pattern combines useful construction techniques with creative fabric selection, embroidery, quilting, and zipper installation. Throughout this project, you learned how to prepare a rounded pouch template, create a central hexagon, arrange coordinating patchwork pieces, stabilize the outer panels, install a curved zipper, and finish the lining neatly. This project is especially rewarding because it can be adapted to many styles. Soft floral fabrics create a romantic vintage pouch, bright colors produce a playful accessory, and neutral textiles offer a modern minimalist result. You can also change the embroidery, zipper charm, quilting method, and pouch dimensions to create a design that reflects your personal sewing style.
EASILY FIND THE PDF FOR THIS PATTERN HERE!
With careful cutting, accurate ¼-inch seams, regular pressing, and patient assembly, this small pouch can achieve a polished and durable finish. The completed accessory is perfect for organizing small belongings, using fabric scraps, practicing patchwork skills, or creating a memorable handmade gift. Please leave your honest opinion about this Zippered Pouch with Hexagon Patchwork Fabric Pattern and share any suggestions, color combinations, embroidery ideas, or creative details you would add to your own version.