
Patchwork Coasters Fabric Pattern is a charming sewing project that transforms small fabric pieces into practical and decorative accessories for the home.
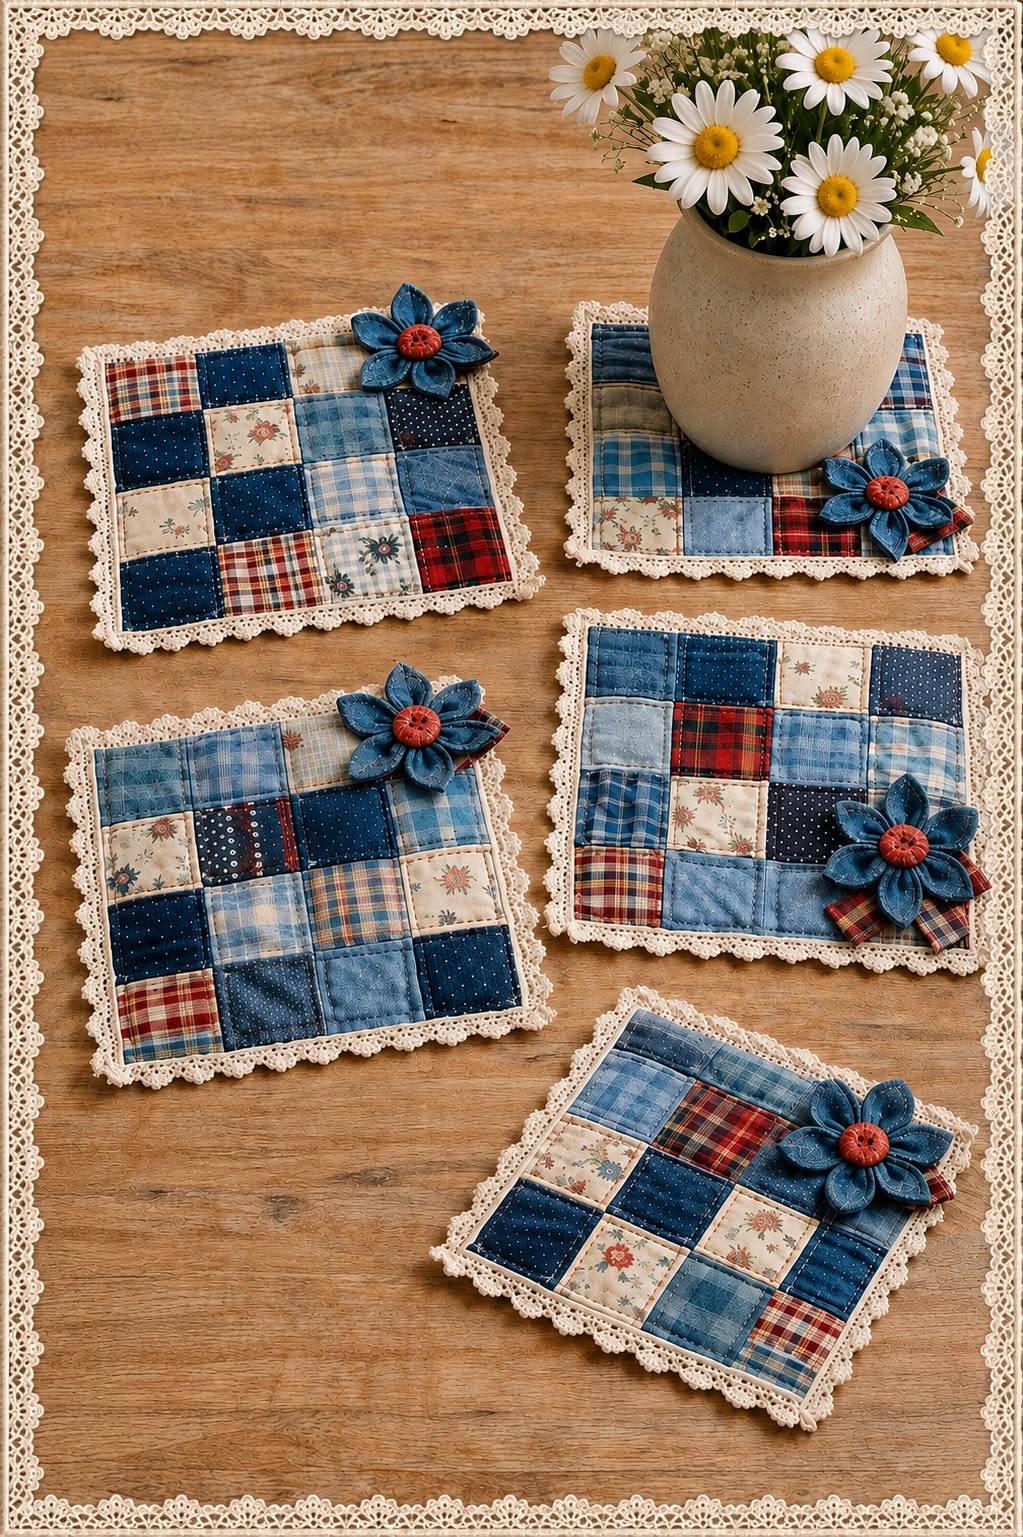
Inspired by the handmade coasters shown in the image, this project combines blue denim, plaid cotton, floral prints, dotted fabrics, lace trim, and dimensional fabric flowers.
Each coaster is created from several small squares joined together to form a colorful patchwork surface with a warm country-style appearance.
Because the pieces are relatively small, this pattern is an excellent way to reuse leftover fabric from quilting, clothing, bag-making, and home décor projects.
The finished coasters can protect tables from cups, mugs, flower vases, and small serving dishes while adding a handcrafted accent to the room.
With basic sewing tools and careful construction, both beginners and experienced sewists can create a coordinated collection of beautiful quilted coasters.
One of the most attractive features of this Patchwork Coasters Fabric Pattern is its versatility.
You can follow the blue, cream, and red color palette from the photograph or adapt the design to match your kitchen, dining room, sewing space, or seasonal decorations.
Denim gives the coasters structure and durability, while lightweight cotton prints create contrast and visual variety.
The crochet-style lace around the edges adds a delicate finish that balances the rustic appearance of the denim and plaid pieces.
A padded inner layer helps absorb light moisture and provides enough thickness to protect wooden surfaces from warm drinkware.
Decorative fabric flowers may be added to selected corners, allowing every coaster to look slightly different while remaining part of the same coordinated set.
This tutorial explains every important stage, including choosing materials, calculating measurements, assembling the patchwork squares, adding batting, quilting the layers, attaching lace, and making the optional flowers.
The main term, Patchwork Coasters Fabric Pattern, refers both to the printable arrangement of the fabric pieces and to the complete method used to construct the finished coasters.
“Patchwork” means joining smaller fabric sections to create a larger design, while “fabric pattern” describes the measurements, layout, and sewing instructions needed to reproduce the project.
You do not need an advanced sewing machine or complicated quilting equipment to complete these coasters successfully.
Accurate cutting, a consistent seam allowance, and patient pressing are more important than using specialized tools.
By working through the project step by step, you can produce a polished set that is useful for your home, thoughtful as a handmade gift, and ideal for using treasured scraps.
Materials, Measurements, and Fabric Preparation
Begin by selecting several coordinating fabrics for your Patchwork Coasters Fabric Pattern. Denim, quilting cotton, plaid, gingham, floral fabric, and small dotted prints work especially well together. Choose fabrics with similar weights whenever possible, but do not worry if the denim is slightly heavier. That difference can add interesting texture to the completed patchwork.
DISCOVER MORE FREE PATTERNS HERE!
For one medium square coaster, prepare sixteen fabric squares arranged in four rows of four. Cut each square approximately 2 inches by 2 inches, or 5 centimeters by 5 centimeters. After the seam allowances are sewn, the patchwork panel will measure approximately 6½ inches square, although the final size can vary depending on your seam allowance.
You will also need one backing square and one piece of thin batting for each coaster. Cut both pieces slightly larger than the finished patchwork top, approximately 7 inches by 7 inches. The extra fabric around the edges makes layering and quilting easier, and it can be trimmed away before the lace is attached.
Gather coordinating sewing thread, quilting pins or clips, fabric scissors, a rotary cutter, a cutting mat, a quilting ruler, and an iron. A sewing machine is recommended for strong and even seams, although the project may also be completed by hand. Choose a universal needle for cotton fabrics or a denim needle when several thicker pieces will be stitched together.
For the decorative edge, use narrow cotton lace, crocheted trim, eyelet lace, or another washable edging. Measure the perimeter of the coaster and add several extra inches so the ends can overlap neatly. A cream or ivory lace creates a soft vintage appearance, but white, navy, red, or patterned trim can also be used.
Wash and dry all fabrics before cutting, especially when combining denim with quilting cotton. Prewashing helps prevent uneven shrinkage after the coasters are completed. Press the fabrics thoroughly, remove wrinkles, and cut each square accurately so that the corners align correctly during assembly.
Sewing and Quilting the Patchwork Coaster Top
Lay the sixteen squares on a flat surface before sewing. Arrange darker blue pieces, light denim, plaid fabric, floral cotton, and dotted prints so that similar colors are distributed evenly. Take a photograph of the chosen arrangement or label each row to prevent the squares from becoming mixed up.
Sew the four squares in the first row together using a ¼-inch seam allowance. Place the first two squares with right sides facing, align the raw edges, and sew one straight seam. Add the third and fourth squares in the same way, then repeat the process for the remaining three rows.
Press the seam allowances carefully after completing each row. To help the intersections nest together, press the seams of the first and third rows in one direction and the seams of the second and fourth rows in the opposite direction. This technique reduces bulk and makes it easier to match the corners accurately.
Place the first two rows with right sides together and align every vertical seam. Pin or clip the intersections, then sew across the entire row using the same ¼-inch seam allowance. Join the third and fourth rows, and finally sew the two larger sections together to complete the patchwork top.
Press the completed patchwork panel from the wrong side first, then turn it over and press gently from the front. Avoid stretching the fabric, particularly along the edges. The small squares should remain straight, and the seams should form an even grid across the entire coaster.
Inspect the panel and trim only when necessary. A slightly imperfect outside edge can be corrected after quilting, so avoid removing too much fabric at this stage. The character of a handmade Patchwork Coasters Fabric Pattern comes from its varied textiles and carefully joined sections, not from every piece looking mechanically identical.
Layering, Quilting, and Finishing the Lace Edge
Place the backing fabric on the work surface with the wrong side facing upward. Position the batting over the backing, followed by the patchwork top with its right side facing upward. This creates a traditional quilt sandwich with the batting secured between the decorative top and the backing.
Smooth each layer from the center toward the edges to remove wrinkles. Secure the layers with quilting pins, safety pins, temporary fabric adhesive, or clips around the perimeter. Make certain that the patchwork top remains centered over the slightly larger batting and backing pieces.
Quilt along both sides of the patchwork seams or stitch directly in the ditch, which means sewing within the seam lines. Straight-line quilting is ideal for this project because it highlights the square layout and keeps every layer stable. Sew slowly across bulky denim intersections to avoid breaking the needle.
After quilting, trim the backing and batting so that all three layers have even edges. Use a ruler and rotary cutter to create a neat square. Check that the corners form approximately 90-degree angles, but do not worry about tiny differences because the lace trim will soften the outline.
Position the lace along one edge of the coaster, leaving a small tail at the starting point. Sew it slowly around all four sides, folding or gathering the trim slightly at each corner. Keep the decorative portion of the lace extending beyond the coaster while the inner edge remains securely attached to the fabric layers.
When you reach the starting point, overlap the lace ends and trim away the excess. Fold the raw end underneath before completing the seam. For extra durability, add a second row of topstitching around the coaster, ensuring that the backing, batting, patchwork top, and lace are firmly connected.
Creating Fabric Flowers and Personalizing the Final Set
The dimensional flowers shown in the inspiration image are optional, but they give the Patchwork Coasters Fabric Pattern a distinctive handmade finish. To create one flower, draw a simple pointed oval petal template measuring approximately 2½ inches long. Cut ten fabric pieces to make five completed petals.
Place two petal pieces with right sides together and sew around the curved edges, leaving the bottom open. Trim the seam allowance at the tip, turn the petal right side out, and press it gently. Repeat until you have five padded-looking petals made from denim or another coordinating fabric.
Fold or pleat the open bottom of each petal and secure it with a few stitches. Arrange the five petals in a circle, overlapping their bases slightly. Sew through all the layers by hand until the flower holds its shape and the center opening is small.
Cover the middle of the flower with a fabric-covered button, a regular decorative button, or a small gathered circle of contrasting fabric. The rust-colored centers in the photograph create a beautiful contrast with the dark blue petals. Make sure every button is sewn securely, especially when the coasters will be washed regularly.
Attach the flower to one corner of the coaster using strong hand stitches. Keep the flower away from the central area where a cup or glass will rest. You may also add a small plaid ribbon beneath the flower, as seen on some of the coasters in the image, to create another layer of color and texture.
Complete several coasters with slightly different fabric arrangements to form a coordinated set. One coaster can feature a flower at the upper corner, another at the lower corner, and a few may be left without dimensional decorations. This variation makes the collection feel creative while the repeated colors, lace trim, and square layout maintain visual consistency.
Frequently Asked Questions About Patchwork Coasters
What is the best fabric for patchwork coasters?
Quilting cotton is one of the easiest fabrics to use because it cuts accurately, presses well, and comes in many colors and prints. Lightweight denim, chambray, linen blends, plaid cotton, and recycled shirt fabric are also suitable. Avoid extremely stretchy or slippery materials because they can be difficult to align in such small pieces.
Do patchwork coasters need batting?
Batting is highly recommended because it gives the coaster body, improves absorbency, and protects the table from moderate heat. Thin cotton batting is an excellent choice. Polyester batting can also be used, but it may be less absorbent and should not be placed under extremely hot cookware.
What is the ideal finished size for a fabric coaster?
Most fabric coasters measure between 4½ and 7 inches across. The project described here creates a generously sized coaster that can hold mugs, glasses, small bowls, or decorative vases. You can reduce the square measurements to make smaller coasters or increase them to create matching mug rugs.
Can I make this Patchwork Coasters Fabric Pattern with fabric scraps?
Yes. This design is especially suitable for small leftovers because every patchwork square requires only a little fabric. Save scraps from quilts, aprons, bags, clothing, and table runners. Combining fabrics from previous projects can make the coaster set more meaningful and reduce textile waste.
How much seam allowance should I use?
A ¼-inch seam allowance is standard for patchwork and quilting. It is narrow enough to preserve the size of the small squares while still creating secure seams. The most important point is consistency, so use the same seam allowance throughout the entire patchwork panel.
How do I keep the corners of the squares aligned?
Press alternating rows in opposite directions so that the seam allowances nest together. Pin each intersection before sewing the rows. Stitch slowly as the presser foot approaches the intersection, and avoid pulling the fabric from behind the sewing machine.
Can these fabric coasters be washed?
Yes, provided that all materials are washable and the decorations are firmly attached. Hand washing in cool or lukewarm water is the safest option, especially when the coasters include lace and dimensional flowers. Reshape them while damp and allow them to air-dry flat.
Can I use fusible fleece instead of batting?
Fusible fleece can be used, but select a thin variety to prevent the small patchwork seams from becoming overly bulky. Follow the manufacturer’s instructions when applying it. Cotton batting generally produces a flatter, more traditional quilted appearance.
How can I make the coasters more heat resistant?
Add a layer of heat-resistant batting designed for sewing projects between the patchwork top and backing. Confirm that the material is suitable for the intended temperature. Fabric coasters are designed mainly for mugs and warm drinkware, not for pans, baking dishes, or cookware taken directly from the oven.
Is the decorative flower practical for everyday use?
The flower is practical when it is attached near a corner and does not interfere with the base of the cup. For heavily used dining coasters, a flatter decoration or no flower may be more convenient. Dimensional flowers are especially attractive for decorative sets, gifts, or coasters used beneath vases.
How can I make a matching larger mat?
Use the same square size and increase the number of rows and columns. A six-by-six or eight-by-eight arrangement can become a mug rug, vase mat, small centerpiece, or table protector. Add the same batting, quilting lines, lace edging, and fabric flowers for a coordinated result.
Is this project suitable for beginners?
Yes. The construction uses straight seams, simple fabric squares, basic quilting, and easy finishing techniques. Beginners can practice cutting, maintaining an even seam allowance, matching intersections, layering a quilt sandwich, and applying decorative trim without committing to a large quilt.
Conclusion
The Patchwork Coasters Fabric Pattern is a practical and creative project that combines traditional patchwork techniques with useful home décor. Throughout this tutorial, you learned how to select coordinating denim and cotton fabrics, cut uniform squares, organize the layout, sew accurate rows, press the seams, assemble the quilt sandwich, and quilt the finished panel. You also learned how to trim the coaster, add a delicate lace edge, construct dimensional fabric flowers, and personalize each piece without losing the coordinated appearance of the full set. These methods can be adapted to different colors, seasonal themes, scrap collections, and finished sizes, making the pattern suitable for many sewing styles.
EASILY FIND THE PDF FOR THIS PATTERN HERE!
A handmade coaster set can brighten a dining table, protect furniture, decorate a coffee station, or become a thoughtful gift. The small scale of the project also makes it an enjoyable way to practice quilting techniques and make good use of fabric leftovers. After creating your own version, please leave your sincere opinion about the project and share any suggestions that could make the Patchwork Coasters Fabric Pattern even more useful, attractive, or beginner-friendly.