
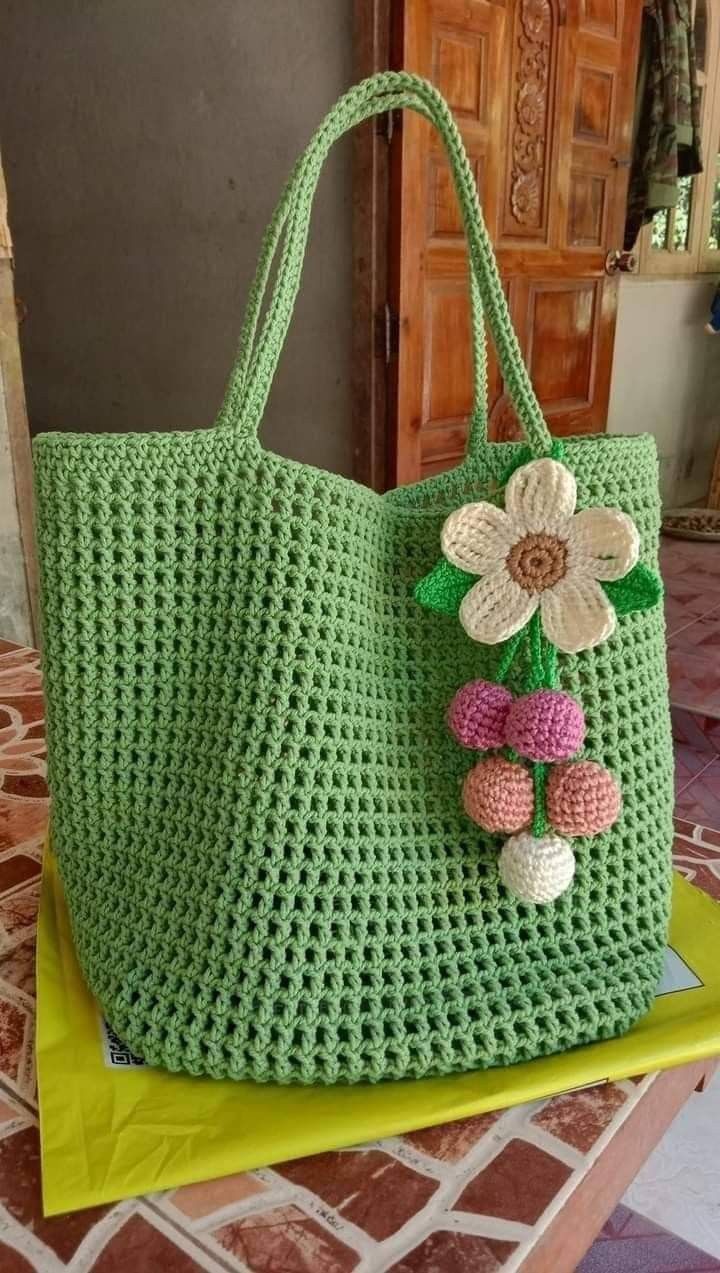
Green Crochet Bag Pattern is a practical and decorative project designed for anyone who enjoys creating useful handmade accessories. Inspired by the spacious green bag shown in the photo, this pattern combines an open crochet texture, sturdy handles, a roomy shape, and a charming floral decoration. The finished piece can be used as a market tote, beach bag, craft organizer, everyday carryall, or reusable shopping bag. Its simple rectangular construction also makes it approachable for confident beginners who already understand basic crochet stitches. By following the instructions carefully, you can customize the width, height, handle length, and decorative elements according to your personal style.
One of the most attractive features of this green crochet tote bag is the balance between beauty and function. The open stitch pattern gives the fabric a light appearance, while the reinforced base and upper border help the bag keep its shape. A soft cotton or cotton-blend yarn is an excellent choice because it produces visible stitch definition and comfortable handles. The flower, leaves, and small crocheted balls add a playful handmade finish without changing the practical structure of the bag. You may reproduce these decorations or keep the front simple for a more minimalist result.
This tutorial explains the project from the foundation chain to the final decorative stitches. It also includes the essential crochet abbreviations, guidance for choosing materials, instructions for assembling the bag, and suggestions for making the handles stronger. The measurements are adaptable because yarn thickness, hook size, and individual tension can affect the final dimensions. Before beginning the full project, make a small swatch and compare it with the desired texture. A well-planned swatch will help you create a durable Green Crochet Bag Pattern that looks balanced and feels comfortable to carry.
Understanding the Green Crochet Bag Construction
The bag is built around a wide rectangular body with a flat bottom and two long handles. The stitch pattern resembles a simple mesh made with combinations of double crochet stitches and chain spaces. This texture allows the bag to remain flexible while reducing the total weight of the finished project. For greater privacy or support, a fabric lining can be added after the crochet work is completed.
DISCOVER MORE FREE PATTERNS HERE!
The approximate finished size may be 40 to 45 centimeters wide, 35 to 40 centimeters tall, and 10 to 14 centimeters deep. These dimensions are only a starting point for the crochet bag pattern, and they can be changed easily. To make a smaller handbag, begin with fewer foundation chains. For a large market tote, add chains in the correct stitch multiple.
The base should be denser than the main mesh section because it supports everything placed inside the bag. A solid base made with single crochet stitches gives the project stability and helps prevent excessive stretching. You can crochet a separate rectangular base and attach the side panels, or work continuously around the foundation chain. The continuous method reduces the number of seams and creates a smooth shape.
The front and back panels should have the same stitch count and height. Accurate counting is especially important when working the open mesh because one missed chain space can make the sides uneven. Place a stitch marker at the beginning of every round. Check the width of the bag after every few rows so that any mistake can be corrected early.
The handles are worked as long narrow straps and attached securely to the upper edge. They may be crocheted separately or formed directly from the bag’s top border. Separate handles are easier to reinforce, while integrated handles create fewer seams. The example in the photo has shoulder-length straps, making the bag comfortable to carry even when it contains larger items.
The decorative flower is attached near one handle on the front of the bag. Beneath the flower, green leaves and a narrow stem support several small crocheted balls in pink, peach, and cream. These elements are optional, but they give the Green Crochet Bag Pattern a cheerful botanical personality. All embellishments must be sewn firmly, especially when the bag will be used frequently.
Materials, Crochet Keys, and Preparation
Choose a medium-weight cotton yarn, often classified as worsted weight or category 4. Cotton is recommended because it has limited stretch, good stitch definition, and enough strength for a reusable bag. Depending on the desired size, prepare approximately 600 to 900 grams of green yarn. Keep small amounts of cream, brown, bright green, pink, peach, and white yarn for the decorations.
A crochet hook between 4.0 mm and 5.0 mm usually works well with medium-weight cotton. Select a slightly smaller hook when you want a firm fabric or a larger hook for a softer mesh. You will also need scissors, stitch markers, a yarn needle, sewing pins, and an optional piece of cotton fabric for the lining. A flexible measuring tape will help you maintain consistent dimensions.
The main crochet keys used in this tutorial are: ch for chain, sl st for slip stitch, sc for single crochet, hdc for half double crochet, dc for double crochet, tr for treble crochet, st for stitch, sp for space, sk for skip, rep for repeat, and rnd for round. Instructions inside parentheses are repeated as directed. A number placed before a stitch tells you how many times to work that stitch.
To make a chain, create a slip knot, insert the hook, yarn over, and pull the yarn through the loop. For a single crochet, insert the hook into the stitch, yarn over, pull up a loop, yarn over again, and pull through both loops. For a double crochet, yarn over before inserting the hook, pull up a loop, and complete the stitch by pulling through two loops twice.
Make a gauge swatch before starting the bag. Crochet at least 15 centimeters using the planned mesh pattern, then wash and dry the sample as you intend to care for the finished piece. Measure the number of stitches and rows within 10 centimeters. Gauge does not have to be exact for a tote, but it helps you estimate the final size and yarn consumption.
For the mesh pattern, use a multiple of two stitches plus the turning chains. A basic repeat can be written as dc, ch 1, sk 1, repeated across the row. On the following row, work each double crochet into the previous double crochet and each chain above the chain space. This creates neat vertical openings similar to the texture visible in the inspirational bag.
Step-by-Step Green Crochet Bag Pattern
Begin the base by making ch 61, or enough chains to reach approximately 36 centimeters without stretching. Starting in the second chain from the hook, work one sc in each chain across. Make ch 1, turn, and work one sc in every stitch. Continue until the rectangle measures approximately 10 to 12 centimeters deep, creating a strong foundation for the bag.
Do not fasten off after completing the base. Make ch 1 and begin working evenly around all four sides of the rectangle. Place one sc in every stitch across the long edges and distribute the stitches evenly along the short edges. Work three sc in each corner to help the fabric turn smoothly. Join the round with a sl st and count the stitches.
Work four to six rounds of sc to form a solid lower section. Begin each round with ch 1, which does not count as a stitch, and place one sc in every stitch around. Join with a slip stitch. This firm band protects the bottom of the bag and creates a strong transition between the base and the open body.
For the first mesh round, make ch 3, which counts as the first dc. Work ch 1, sk 1 st, dc in the next st. Repeat the sequence of ch 1, skip one, and dc in the next stitch around the bag. Adjust the final repeat if necessary so that the pattern closes neatly. Join with a slip stitch in the top of the beginning chain.
For the following mesh rounds, make ch 3, then work ch 1 and dc in the next dc. Continue placing each dc directly above the dc from the previous round, with one chain between the posts. Join every round carefully. Repeat until the mesh section measures approximately 28 to 32 centimeters from the solid lower band.
Finish the body with five or six rounds of sc. In the first solid round, place one sc in every dc and one sc in every chain space. Continue working one sc in each stitch around. This upper border provides a stable area for attaching the handles. Fasten off only after confirming that the front and back edges are even and that the opening lies flat.
Handles, Flower Decoration, Assembly, and Finishing
To make the first handle, chain enough stitches to measure approximately 70 to 80 centimeters. Starting in the second chain from the hook, work one sc in every chain. Make ch 1 and turn. Continue in sc for four to six rows, depending on the desired strap width. Fasten off with a long tail for sewing and make a second identical handle.
Position the ends of each handle approximately 10 to 12 centimeters apart on the front and back of the bag. Use stitch markers or sewing pins to hold them in place. Sew each end to the solid upper border with several passes of yarn. For added strength, stitch a square around each attachment area and then sew diagonally across the square.
The flower begins with brown yarn. Make a magic ring and work 10 sc into the ring. Join with a slip stitch. In the next round, work two sc in each stitch for a total of 20 stitches. Change to cream yarn. To form each petal, work ch 3, 3 tr, ch 3, sl st into the appropriate stitch or space, repeating five times evenly around the center.
For each leaf, use bright green yarn and make ch 9. Starting in the second chain from the hook, work sl st, sc, hdc, dc, dc, hdc, sc, sl st. Work along the opposite side of the foundation chain using the same sequence. Join at the base and fasten off. Make two or three leaves and arrange them beneath the flower.
To make the decorative balls, create a magic ring and work six sc into it. In the second round, work two sc in each stitch. In the third round, repeat sc in the next stitch, 2 sc in the next stitch. Work two or three rounds without increasing, then begin decreasing. Add a small amount of washable stuffing before closing the opening securely.
Create a narrow stem by making a chain of the desired length and working slip stitches back across it. Sew the flower, leaves, stem, and balls to the front of the bag with matching yarn. Weave in every loose end on the inside. Lightly block the completed green crochet bag by shaping it on a flat surface and allowing it to dry naturally.
Frequently Asked Questions About the Green Crochet Bag Pattern
Is this Green Crochet Bag Pattern suitable for beginners?
The project is suitable for advanced beginners who understand chains, single crochet, double crochet, slip stitches, and basic seaming. The rectangular base and repeating mesh pattern are straightforward. The flower and decorative balls require a little more concentration, but they can be omitted while you practice the main construction.
What is the best yarn for a crochet tote bag?
Cotton or a firm cotton-blend yarn is usually the best option. Cotton provides durability, clear stitch definition, and less elasticity than many soft acrylic yarns. Recycled cotton cord may also create a strong bag, although it can make the finished piece heavier.
How can I stop the handles from stretching?
Use a smaller hook for the handles, work tight single crochet stitches, and make the straps slightly shorter than the final desired length. You can also sew cotton webbing, ribbon, or fabric inside each strap. Another useful method is to carry a strong non-stretch thread along the handle while crocheting.
Can I add a fabric lining?
Yes. A fabric lining can prevent small objects from slipping through the mesh and reduce stretching. Cut two fabric rectangles slightly larger than the front and back of the bag, sew the sides and bottom together, fold the upper edge inward, and hand-sew the lining beneath the crochet border.
How do I make the bag wider?
Increase the number of foundation chains while respecting the stitch multiple. Since the suggested mesh repeat uses two stitches, add chains in groups of two. Remember that a wider bag will require more yarn and may need broader handles to support the additional capacity.
How do I make the bag taller?
Simply repeat more mesh rounds before beginning the upper solid border. Check the length while the bag is hanging because the fabric may stretch under its own weight. Stop a little before the desired measurement when using a yarn with noticeable elasticity.
Can I use acrylic yarn for this pattern?
Acrylic yarn can be used, but the result may stretch more than a cotton version. Choose a firm acrylic yarn rather than a very soft or fluffy variety. Adding a lining and reinforcing the handles will improve the structure of an acrylic bag.
Why is my bag becoming wider as I crochet?
The most common reason is accidental increases at the beginning or end of a round. Count the double crochet posts regularly and mark the first stitch of each round. Also check that you are not placing extra stitches into the joining slip stitch.
How can I wash the finished crochet bag?
Follow the care instructions printed on the yarn label. Gentle hand washing in cool water is generally appropriate for handmade cotton bags. Support the bag while wet, reshape it carefully, and dry it flat. Avoid hanging a wet bag because the weight of the water can stretch the handles.
Are the flower and hanging decorations necessary?
No. The decorations are optional and can be adapted to match your preferred style. You may use only the flower, replace the balls with leaves, add a small bow, or leave the front completely plain. The structural instructions remain the same.
How much yarn will I need?
A medium or large bag may require approximately 600 to 900 grams of medium-weight yarn. The exact amount depends on the bag dimensions, stitch tension, handle length, yarn type, and hook size. Buying an extra ball from the same dye lot is helpful when you plan to enlarge the project.
Can this crochet bag hold heavy items?
The bag can carry everyday objects when made with strong yarn and reinforced handles. However, open crochet fabric will stretch when overloaded. A fabric lining, reinforced base, and securely sewn straps make the bag more dependable for books, groceries, or craft supplies.
Conclusion
The Green Crochet Bag Pattern offers a flexible way to create a spacious, reusable, and visually appealing handmade accessory. Throughout this tutorial, you learned how to select suitable yarn, understand the main crochet keys, build a firm rectangular base, work the open mesh body, add a solid upper border, and crochet durable shoulder handles. You also learned how to create the flower, leaves, stem, and colorful decorative balls that give the bag its distinctive character.
EASILY FIND THE PDF FOR THIS PATTERN HERE!
This pattern can be customized by changing the dimensions, yarn colors, handle length, mesh density, or embellishments. Adding a lining and reinforcing the straps will make the finished bag even more practical. Whether you use it for shopping, travel, crochet supplies, or daily essentials, the project combines functionality with the warmth of handmade craftsmanship. Please leave your sincere opinion about this Green Crochet Bag Pattern and share your suggestions for colors, decorations, or improvements you would enjoy using in a future version.