
The Cross Back Apron Fabric Pattern is a practical and elegant sewing project designed for anyone who wants comfortable protection while cooking, gardening, painting, cleaning, or working on handmade crafts.
Unlike traditional aprons that use neck ties, this model has wide straps that cross naturally over the back and distribute the weight across the shoulders.
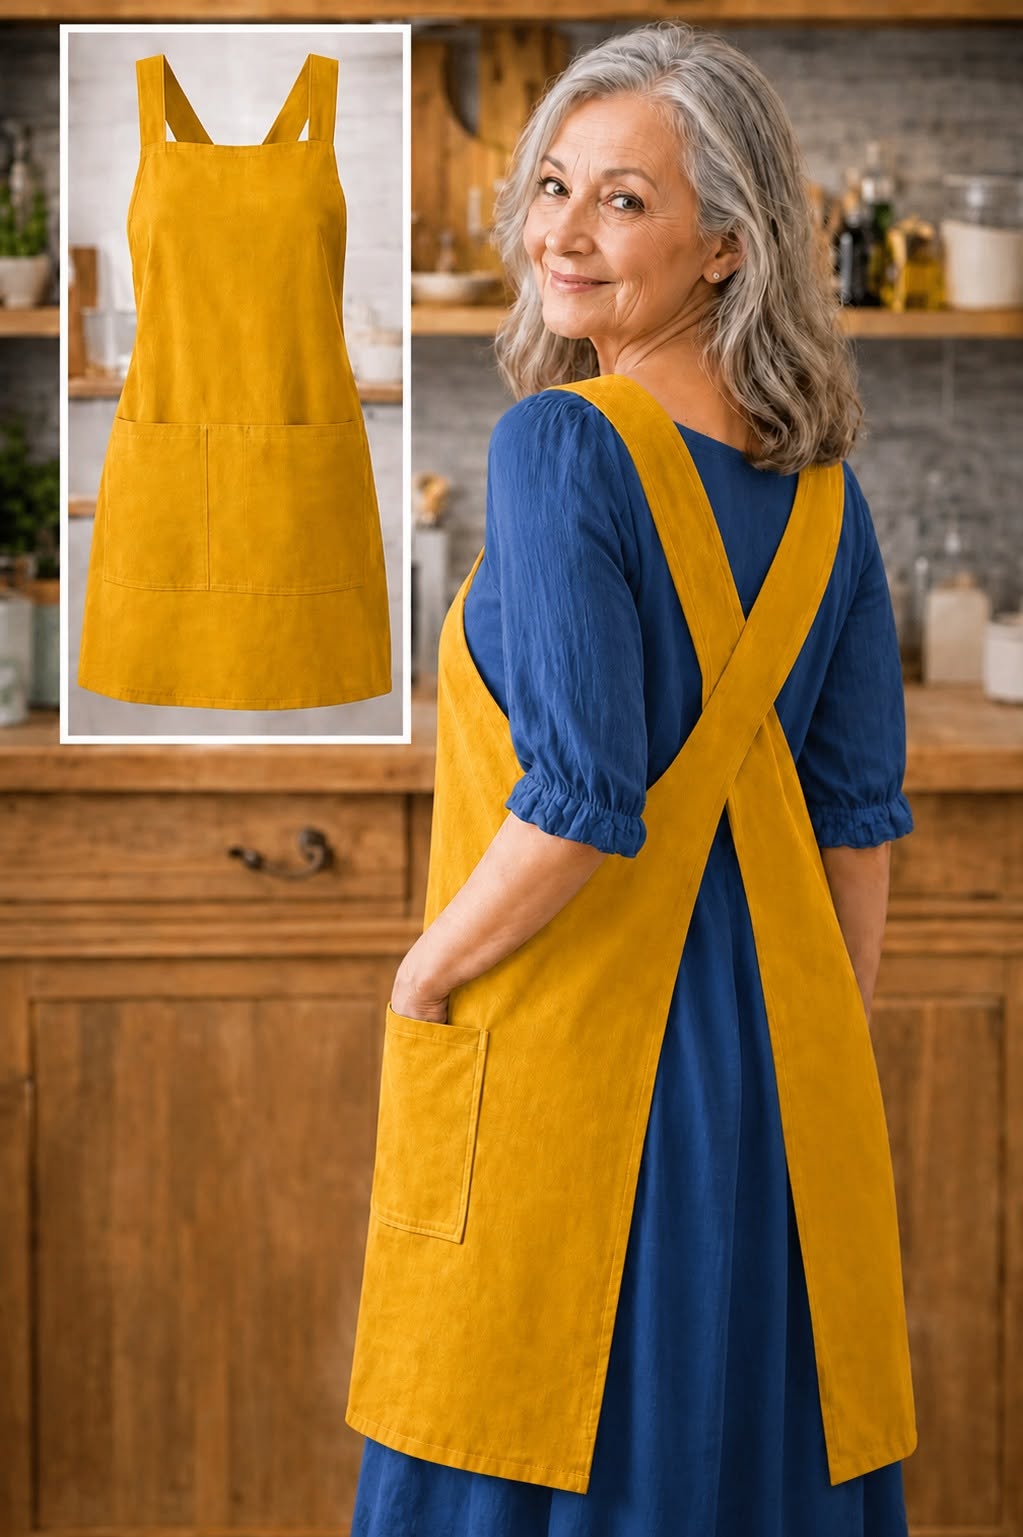
The design shown in the reference image features a deep navy-blue fabric, a relaxed silhouette, generous coverage, and functional front pockets.
Its open-back construction makes the apron easy to put on and remove without dealing with complicated buttons, buckles, or long ties.
Because the shape is simple and adaptable, the project can be completed by confident beginners while still offering enough customization for experienced sewists.
Throughout this guide, you will learn how to draft, cut, assemble, finish, and personalize your own cross-back apron from start to finish.
A well-made cross back apron combines comfort, movement, durability, and visual appeal in one useful garment.
The crossed straps prevent the apron from pulling against the neck, which can make it more pleasant to wear for several hours.
The loose sides allow air circulation and give the wearer enough room to bend, reach, sit, or move around a busy kitchen or studio.
Large pockets can hold utensils, sewing tools, garden gloves, recipe cards, a phone, or other small items that need to stay close at hand.
The apron may be made from linen, cotton canvas, denim, twill, chambray, or a medium-weight cotton blend, depending on the desired appearance.
Choosing the right fabric and carefully preparing the pattern are the first steps toward creating a professional-looking finished project.
This fabric apron pattern can also be adjusted to suit different heights, body shapes, work environments, and personal styles.
You may lengthen the body for additional coverage, shorten it for easier movement, enlarge the pockets, or alter the strap width for greater shoulder support.
A solid navy fabric creates a timeless and sophisticated result similar to the apron in the photo, while prints can produce a cheerful farmhouse or cottage-style design.
Contrasting thread, decorative topstitching, embroidered details, labels, or patchwork pockets can make the apron feel completely unique.
Before cutting your chosen material, read the entire tutorial, take accurate measurements, and prepare all tools so the construction process remains organized.
Careful planning will help you avoid fabric waste and ensure that every part of the Cross Back Apron Fabric Pattern fits together correctly.
Materials, Measurements, and Fabric Preparation
For this Cross Back Apron Fabric Pattern, select approximately 2 to 2.5 yards of fabric that is at least 44 inches wide. The exact amount depends on the apron length, fabric width, pocket size, and whether the material has a directional print. Medium-weight linen, cotton canvas, denim, or cotton twill will provide enough structure while remaining flexible and comfortable.
DISCOVER MORE FREE PATTERNS HERE!
Linen is an excellent choice for a breathable and naturally textured apron, although it wrinkles more easily than some cotton fabrics. Cotton canvas is stronger and provides excellent protection for cooking, gardening, woodworking, or crafting. Denim creates a durable workwear appearance, while cotton twill offers a smooth surface and good resistance to repeated washing.
You will also need matching or contrasting sewing thread, fabric scissors, paper scissors, pins or sewing clips, a measuring tape, a ruler, tailor’s chalk, pattern paper, an iron, and a reliable sewing machine. A seam gauge is useful for keeping hems consistent. An optional walking foot can help feed thicker layers evenly when using denim or canvas.
Begin by taking the wearer’s chest, waist, hip, shoulder-to-waist, and desired apron-length measurements. The apron should provide generous coverage without fitting tightly like a dress. Add sufficient ease around the body so the side panels can overlap comfortably when the straps cross at the back.
For an average adult size, the main apron body may be approximately 30 to 34 inches wide and 34 to 38 inches long. Each shoulder strap can measure around 4 to 5 inches wide before finishing and 28 to 34 inches long. These measurements are starting points and should always be adjusted according to the wearer’s height and proportions.
Prewash and dry the fabric using the same method that will be used after the apron is completed. This important step allows natural shrinkage to occur before cutting. Press the material carefully, straighten the grain, and examine it for flaws, fading, stains, or irregular sections that should not appear on the finished apron.
Drafting and Cutting the Cross Back Apron Pattern
To draft the main body, draw a large rectangle on pattern paper using the desired finished width and length. Add a standard seam allowance of approximately ½ inch around the sides and upper edge. Add 1 to 1½ inches along the bottom if you plan to create a double-fold hem.
Shape the upper section by marking the desired bib width across the top. The bib should cover the front of the chest but remain comfortable beneath the arms. Draw gentle diagonal or slightly curved lines from the top bib corners toward the wider hip area, creating a smooth transition between the upper and lower portions.
The straps are the defining feature of the cross back apron pattern. Draft two long rectangles using the selected strap length and width. Wider straps generally feel more comfortable because they spread pressure across a larger area of the shoulders. Remember to include seam allowances before cutting the fabric.
Draft one large pocket or two separate pockets according to your preference. A practical pocket size is approximately 8 to 10 inches wide and 9 to 12 inches deep. For a design similar to the reference image, position two spacious rectangular pockets on the lower front, keeping them easy to reach with either hand.
Place the pattern pieces on the prepared fabric while following the grainline. Pin or weigh down each piece and trace around the edges with tailor’s chalk. Confirm that directional prints, stripes, or fabric texture are positioned correctly before making the first cut.
Cut the main apron body, two straps, and the selected pocket pieces. Transfer all important pattern markings, including strap placement, pocket position, center front, fold lines, and matching points. Accurate markings will make assembly easier and prevent the straps or pockets from being attached unevenly.
Sewing the Pockets, Straps, and Apron Body
Begin construction with the pockets because they are easier to attach while the main apron body is still flat. Finish the raw pocket edges with a zigzag stitch, overlock stitch, or serger if the fabric frays easily. Fold the upper edge toward the wrong side, press it, fold it again, and topstitch to create a clean opening.
Press the remaining pocket edges toward the wrong side using the seam allowance included in the pattern. For curved pocket corners, make small easing stitches or use a cardboard pressing template to achieve a smooth shape. Pin the pockets to the apron front using the transferred placement marks.
Topstitch around the pocket sides and lower edges, leaving the upper opening free. Reinforce both upper corners with small triangles or bar tacks because these areas receive frequent stress. A second row of topstitching can add durability and create a polished workwear-style finish.
To construct each strap, fold the piece in half lengthwise with the right sides together. Sew along the long edge, then turn the fabric tube right side out. Press the seam toward the center back of the strap so it will be less visible when worn.
Tuck the raw short ends inside the straps and press them neatly. Topstitch around all four edges, keeping the stitching an even distance from the edge. This step strengthens the straps, helps them remain flat after washing, and gives the fabric apron pattern a professional appearance.
Finish the side and lower edges of the apron body with double-fold hems. Press each fold carefully before sewing to prevent twisting or uneven stitching. At the curved or angled upper sections, use narrow hems, bias binding, or a facing, depending on the thickness of the material and your preferred finishing method.
Attaching the Crossed Straps and Finishing the Apron
Position the front ends of the straps at the top corners of the apron bib. Pin them securely, making sure the straps are not twisted. Baste them temporarily, try the apron on, and check whether they rest comfortably over the shoulders before completing the permanent stitching.
Cross the straps across the wearer’s back. The left strap should connect to the right side of the apron, while the right strap should connect to the left side. This crossing action holds the apron against the body without requiring a neck loop or a waist tie.
Adjust the strap length until the upper bib sits at a comfortable height and the lower apron hangs evenly. The straps should feel secure without pulling tightly against the shoulders. Mark the final attachment points at the side or lower-back edges of the apron.
Secure each strap using a reinforced square with an X stitched through the center. This strong stitching method helps the attachment withstand frequent movement, washing, and the weight of items carried in the pockets. For heavy canvas or denim, sew the reinforcement twice using a longer stitch length.
Try on the apron again and inspect the overall balance. Confirm that the pockets are level, the straps lie flat, the side sections overlap properly, and the hem is parallel to the floor. Make small adjustments before completing any final topstitching.
Give the finished Cross Back Apron Fabric Pattern a thorough pressing. Trim loose threads and examine every seam for skipped stitches or unfinished edges. A final row of topstitching around the outer apron edge can help maintain its shape and create a clean, coordinated appearance.
Frequently Asked Questions About the Cross Back Apron Fabric Pattern
What is a cross-back apron?
A cross-back apron is an apron with two shoulder straps that cross over the back instead of connecting to a neck loop. The crossed construction distributes weight more evenly and allows the garment to stay in place without a tight waist tie.
Is this apron suitable for a beginner sewing project?
Yes. The project primarily uses straight seams, simple hems, rectangular pockets, and basic topstitching. Beginners should work slowly, press each seam, and test the strap placement before sewing the final reinforcement.
What is the best fabric for a cross-back apron?
Medium-weight linen, cotton canvas, cotton twill, and lightweight denim are among the best options. The ideal material should be durable, washable, breathable, and comfortable enough to move with the body.
How much fabric is needed to make the apron?
Most adult aprons require approximately 2 to 2.5 yards of 44-inch-wide fabric. More material may be necessary for a long apron, an extended size, oversized pockets, matching fabric patterns, or wider straps.
Should the fabric be washed before cutting?
Yes. Prewashing is highly recommended because natural fibers such as cotton and linen may shrink. Washing before cutting also removes manufacturing finishes and helps reveal the fabric’s final texture.
How long should cross-back apron straps be?
Adult straps commonly measure between 28 and 34 inches, but the correct length depends on the wearer’s height, shoulder width, and desired overlap. Making the straps slightly longer at first allows room for fitting adjustments.
Can the apron be made reversible?
Yes. A reversible version can be created by cutting two complete apron bodies and sewing them together with the straps enclosed between the layers. This method requires additional fabric but produces clean interior seams and two wearable sides.
How can I adjust the pattern for a larger size?
Increase the width of the main body, extend the straps, and move the side attachment points as needed. Measure the wearer before cutting and create a test version from inexpensive fabric when making major size adjustments.
Can I add more pockets to the pattern?
Absolutely. You may add divided tool pockets, a chest pocket, a towel loop, a pencil section, or an internal phone pocket. Keep the contents in mind so the pockets do not become too heavy or interfere with movement.
Why are the straps crossing too high on the back?
The straps may be too short, or their lower attachment points may be positioned too high. Release the temporary stitching, lengthen the straps if possible, and test lower attachment points until the crossed section feels comfortable.
How should the finished apron be washed?
Follow the washing instructions for the selected fabric. Most cotton aprons can be machine-washed with mild detergent, while linen may benefit from a gentle cycle. Avoid excessive heat if the apron includes delicate embroidery, decorative labels, or contrasting trims.
How can I make the apron look more professional?
Use consistent seam allowances, press every fold, reinforce stress points, finish all raw edges, and maintain even topstitching. Coordinated thread, symmetrical pocket placement, and neatly secured straps will greatly improve the final appearance.
Conclusion
The Cross Back Apron Fabric Pattern is a rewarding project that combines practical protection, lasting comfort, and timeless style. In this tutorial, you learned how to choose suitable fabric, take measurements, draft the apron body, prepare wide shoulder straps, create functional pockets, finish the raw edges, and attach the straps in the correct crossed position. The most important parts of the process are accurate measurements, careful fabric preparation, balanced strap placement, and strong reinforcement at the attachment points. By testing the apron before the final stitching, you can adjust the fit and create a garment that rests comfortably on the shoulders without pulling against the neck.
EASILY FIND THE PDF FOR THIS PATTERN HERE!
Once the basic cross back apron is complete, it can be personalized with embroidery, contrasting pockets, decorative topstitching, patchwork details, labels, or printed fabrics. The same pattern can be adapted for cooking, gardening, sewing, pottery, painting, cleaning, or handmade gifts. Please leave your sincere opinion about this project and share any suggestions for future sewing tutorials. Your ideas and experiences can inspire useful adjustments, new pocket designs, creative fabric combinations, and more comfortable variations of the Cross Back Apron Fabric Pattern.