
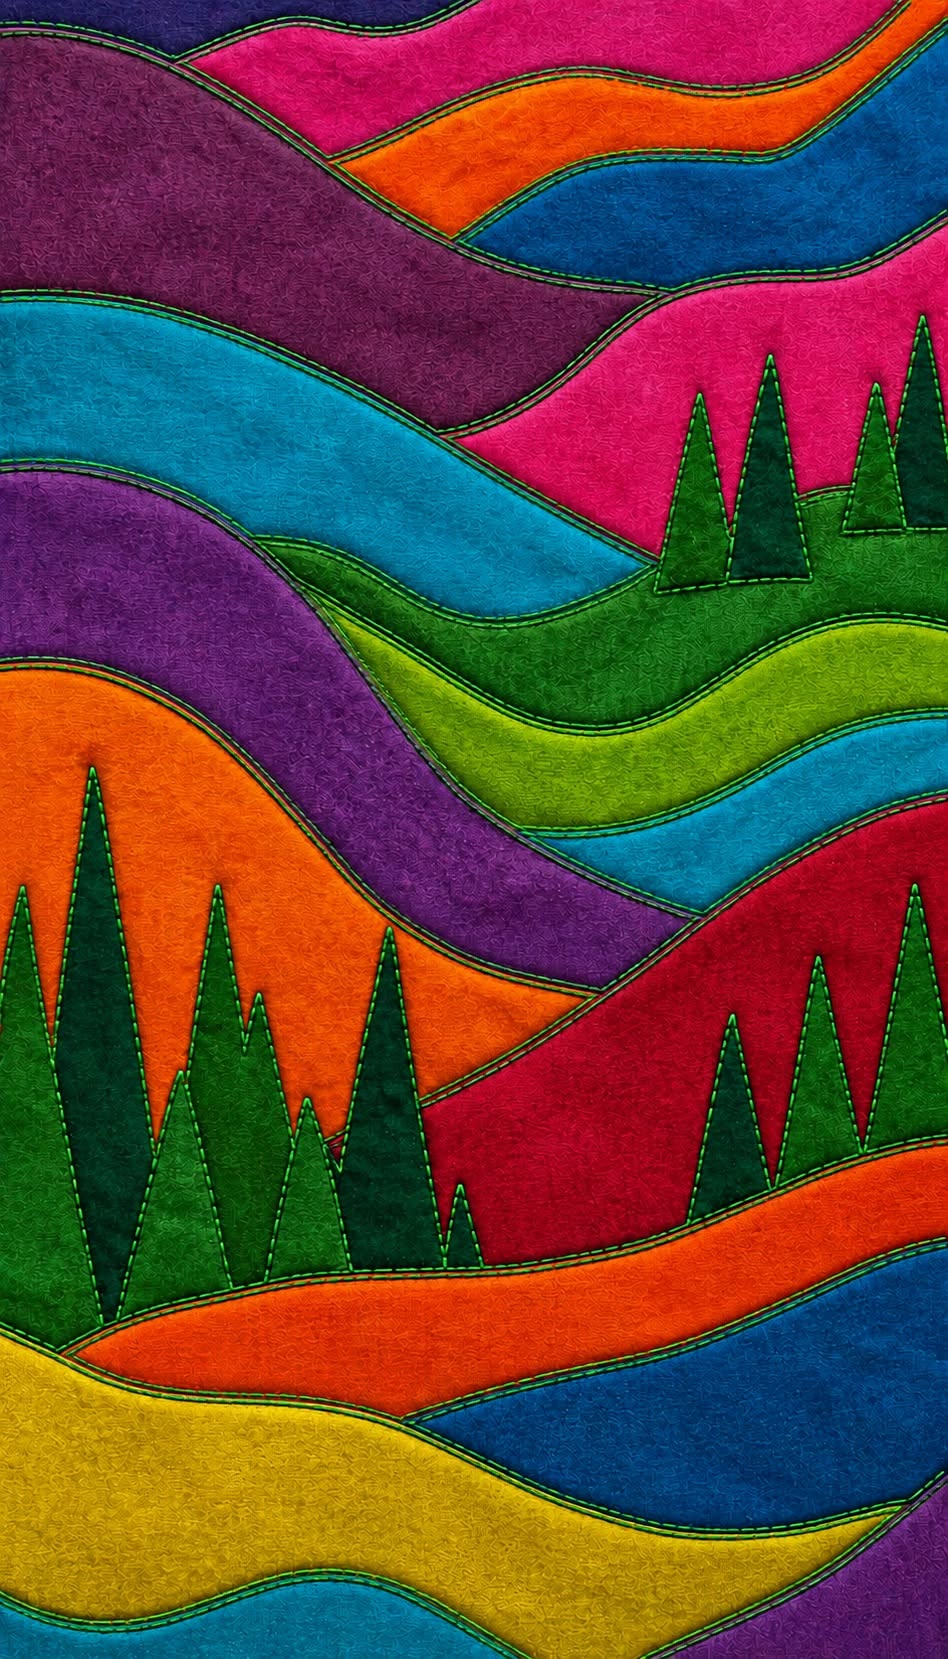
The Wave Landscape Bedspread Quilt Pattern is a striking textile project that transforms flowing hills, colorful horizons, and stylized evergreen trees into a modern quilted landscape. Inspired by the image shown, this design relies on curved fabric sections arranged in overlapping layers, allowing the quilt to suggest mountains, valleys, rivers, and distant fields without requiring complicated realistic shapes. The combination of jewel tones such as magenta, purple, turquoise, orange, blue, green, and yellow gives the finished bedspread a warm contemporary personality. Although the curves look sophisticated, the project becomes much easier when each section is treated as an individual landscape layer. Careful tracing, controlled cutting, accurate placement, and smooth stitching are more important than advanced sewing techniques. This makes the pattern suitable for confident beginners who want to explore landscape quilting, while still giving experienced quilters plenty of opportunities for creative free-motion quilting and artistic fabric selection.
One of the most appealing characteristics of the Wave Landscape Bedspread Quilt Pattern is its freedom. Unlike a traditional geometric quilt that depends on identical blocks, this project uses organic curves that can be slightly adjusted without ruining the overall composition. The waves can represent rolling hills, changing skies, flowing water, or abstract terrain depending on the colors you choose. The tall triangular trees create contrast against the horizontal curves and immediately give the quilt a recognizable woodland atmosphere. Because the design is based on broad shapes instead of tiny piecing, it can also be enlarged for a bedspread, reduced for a wall hanging, or adapted into a decorative throw. The important principle is maintaining visual movement from one side of the quilt to the other. When the curved lines continue naturally across the surface, the entire piece feels connected, balanced, and intentional.
The term Wave Landscape Bedspread Quilt Pattern describes a quilt construction style in which curved, wave-like fabric pieces are combined to create an artistic landscape large enough to function as a decorative bed covering. “Wave” refers to the flowing curved lines that form the principal composition. “Landscape” describes the representation of natural scenery through fabric, especially hills, valleys, water, skies, and trees. “Bedspread quilt” indicates that the finished project can be sized to cover a bed rather than simply functioning as a small wall quilt. Finally, “pattern” refers to the arrangement, templates, construction sequence, and sewing instructions that guide the maker from individual fabric pieces to the completed textile. Understanding these elements before cutting fabric will help you approach the project systematically and achieve the rich layered appearance visible in the inspiration image.
Materials, Color Planning, and Preparing the Landscape Design
Begin by deciding the finished dimensions of your Wave Landscape Bedspread Quilt Pattern. A practical throw-sized version may measure approximately 130 × 170 cm, while a larger bedspread can be adjusted according to your mattress. Add several centimeters around the planned finished dimensions so the quilt can be squared after quilting. Making the project slightly oversized is safer than trying to match the final measurement before the layers have been quilted.
DISCOVER MORE FREE PATTERNS HERE!
Choose quilting cotton or another stable woven fabric for the colored landscape pieces. The photographed design works especially well because it combines saturated colors with subtle tonal texture. Select approximately eight to twelve coordinating colors, including several greens for the land and trees, two or three blues or turquoise shades, warm oranges or yellows, and deeper purple, burgundy, or magenta tones. Color contrast is essential because adjacent waves must remain visually distinct.
Prepare a large foundation fabric approximately the same size as the quilt top. This foundation can be a lightweight cotton and will remain hidden beneath the appliquéd landscape. Using a foundation is particularly helpful for this style because it stabilizes every curved piece while you build the composition. Press it carefully before beginning, since wrinkles beneath the appliqué can distort the finished quilt.
Sketch your landscape on paper before cutting expensive fabric. Draw long horizontal curves that cross the entire width of the composition. Avoid making every curve identical. Some should rise dramatically, while others should remain shallow and gentle. The original visual effect comes from alternating wide and narrow bands, creating the impression of depth. Number each section so you can remember the intended order.
Create full-size templates from kraft paper, freezer paper, or another pattern-making paper. Transfer each major wave shape from the sketch onto the paper. Because adjacent pieces overlap slightly, add approximately 1 to 1.5 cm beneath the upper edge of each lower layer where needed. This hidden allowance prevents foundation fabric from showing between the waves if the pieces shift slightly while sewing.
Before cutting, arrange the selected fabrics in the planned sequence and photograph or label the order for reference. Try not to place two fabrics with nearly identical values directly beside each other. A dark purple beside bright turquoise, for example, produces a stronger landscape boundary than two medium greens. Thoughtful fabric placement is one of the easiest ways to make an artistic quilt look professionally designed.
Cutting and Building the Flowing Wave Landscape
Place the first paper template on the appropriate fabric and trace its shape carefully. Cut using sharp fabric scissors or a rotary cutter when the curve is gentle enough to control safely. Curves should remain smooth rather than angular. If you are uncomfortable cutting a long curve in one motion, make several controlled cuts while keeping the fabric flat and avoiding jagged edges.
Begin constructing the quilt from the background or uppermost landscape area. Position the first large wave on the foundation fabric and temporarily secure it using fabric glue designed for appliqué, fusible web, or fine pins. If using fusible web, follow its instructions carefully and use only enough heat to secure the fabric without distorting the foundation.
Add the next curved section so its edge overlaps the first appropriately. Continue working downward across the quilt. Frequently step several feet away from your work to evaluate the composition. This simple habit helps you notice awkward curves or unbalanced color areas that may not be obvious when you are looking closely at the sewing table.
After the main waves are positioned, secure each visible curved edge with a narrow appliqué stitch. A small zigzag, blanket stitch, or straight edge-stitch can all work depending on the desired appearance. For a clean contemporary result similar to the inspiration image, stitch close to the edge with thread that blends with the fabric. Consistent appliqué stitching creates the strong outlines that visually separate the colored landscape layers.
Work gradually rather than attaching every layer before sewing. For example, position two or three waves, stitch them securely, and then continue with the next group. This limits fabric shifting and makes the large quilt top easier to manage. Press gently from the reverse side whenever possible to keep the appliquéd surfaces smooth.
Continue until the entire foundation is covered by the flowing landscape bands. At this stage, your Wave Landscape Bedspread Quilt Pattern should already resemble an abstract series of hills and valleys. Do not worry if individual waves differ slightly from your original drawing. Small variations often improve organic designs because natural landscapes rarely contain perfect repetition.
Creating the Evergreen Trees and Adding Dimensional Quilting
The trees are created from elongated triangular appliqué shapes. Draw several triangles in different heights, approximately 12 to 35 cm tall depending on the scale of your quilt. Avoid using only one tree size. The inspiration image gains depth because small trees appear farther away while large trees dominate the foreground. Slightly irregular triangles can also make the forest feel more natural.
Cut the trees from several shades of dark and medium green fabric. Deep emerald and forest green are excellent for foreground trees, while brighter green can be used for trees positioned farther away. Arrange them in clusters instead of placing them at perfectly equal intervals. Leave some landscape sections without trees so the curved waves remain visible and the design does not become overcrowded.
Temporarily position every tree before attaching them permanently. Move them around until the clusters feel balanced. Some trees can partially overlap others, which creates useful depth. Once satisfied, fuse or pin each tree in place and stitch around its edges using the same raw-edge appliqué method used for the landscape curves.
When the quilt top is complete, prepare the quilt sandwich. Place the backing fabric right side down, spread the batting smoothly over it, and position the finished landscape top right side up. Make sure the backing and batting extend at least 5 cm beyond every side of the quilt top. Baste the three layers together using safety pins, temporary basting spray, or long hand-basting stitches.
Quilt along the main curved seams first. Following the existing landscape lines stabilizes the layers while emphasizing the wave effect. Stitch approximately 2 to 5 mm away from selected appliqué seams if you want a subtle echo outline. This technique visually reinforces the movement of the landscape quilt and helps the colored bands appear more dimensional.
After stabilizing the principal shapes, add texture within the large colored areas. Free-motion quilting can include gentle loops, small meanders, flowing lines, or organic patterns inspired by wind and water. Keep the quilting density relatively consistent across the surface. Areas with extremely dense quilting beside completely unquilted areas may shrink differently and create distortion.
Finishing the Bedspread and Achieving a Professional Result
Once the quilting is complete, spread the quilt on a large flat surface and inspect all edges. Trim away excess batting and backing, then square the quilt carefully. Use a long ruler to verify that opposite edges remain reasonably straight. Because organic appliqué creates some movement during quilting, minor trimming is completely normal.
Prepare binding strips approximately 6 to 7 cm wide and join them into one continuous length using diagonal seams. Press the long strip in half lengthwise with wrong sides together. Binding can match one of the darker colors from the quilt or provide additional contrast. A deep blue, purple, burgundy, or green border can frame the colorful landscape effectively.
Sew the binding to the front edge of the quilt using approximately a 0.7 cm seam allowance, folding clean miters at the corners. Wrap the binding to the back and secure it using hand stitching or machine stitching. Take extra care at the corners, since neat binding immediately improves the professional appearance of a finished bedspread quilt.
Wash the finished quilt only if the fabrics, batting, fusible products, and thread are suitable for washing. Prewashing fabric before construction can reduce concerns about color bleeding, especially when combining deep reds, purples, and blues with lighter shades. If fabrics were not prewashed, consider using a color-catching laundry sheet during the first gentle wash.
The finished Wave Landscape Bedspread Quilt Pattern should have a soft visual rhythm, strong contrasting colors, and enough quilting texture to highlight the scenery without overwhelming the appliqué. When displayed on a bed, the long horizontal curves naturally draw the eye across the entire quilt, while the tree clusters provide vertical accents that prevent the composition from appearing too flat.
Remember that artistic quilting allows room for personal interpretation. You can replace some waves with patterned fabrics, add a sun or moon, introduce smaller tree clusters, create additional hills, or limit the palette to three or four colors. The construction principles remain the same: establish the foundation, layer the curves, secure the appliqué, add focal shapes, quilt the layers, and finish with binding.
FAQ – Frequently Asked Questions About the Wave Landscape Bedspread Quilt Pattern
Is the Wave Landscape Bedspread Quilt Pattern suitable for beginners?
Yes. A confident beginner can complete this design successfully, especially when using fusible appliqué rather than traditional curved piecing. The most important skills are accurate cutting, careful fabric placement, basic machine stitching, and patience while constructing the layers. Practicing the technique on a smaller sample before making a full bedspread can also increase confidence.
Do I need to sew curved seams to create the waves?
Not necessarily. The easiest approach is raw-edge appliqué, where the curved shapes overlap and are stitched directly onto a foundation. This eliminates the difficulty of matching two opposing curved seams. Traditional curved piecing can also be used, but it requires more precision and is not essential for achieving the appearance shown.
What type of fabric works best for this quilt?
High-quality quilting cotton is a dependable option because it is stable, easy to cut, easy to press, and widely available in many colors. Tonal fabrics with subtle printed texture can create additional visual interest without competing with the landscape shapes.
How many colors should I use?
There is no strict number, although eight to twelve colors create a rich landscape similar to the inspiration image. Try including a mixture of warm and cool colors as well as light, medium, and dark values. Strong value differences help each wave remain clearly visible.
How can I prevent the appliqué edges from fraying?
A narrow zigzag or blanket stitch helps protect raw edges. Fusible web also stabilizes the fabric and reduces movement. Some minor fraying may occur after washing, but this can contribute to the handcrafted character of a raw-edge appliqué quilt.
Can I make this pattern without fusible web?
Yes. The pieces can be held in position using pins, temporary fabric adhesive, or hand basting. Fusible web is convenient because it keeps large curved pieces stable, but it is not the only construction method.
What batting should I use for a bedspread quilt?
A lightweight or medium-weight cotton, cotton-blend, or polyester batting can work well. A bedspread intended for regular use should remain flexible enough to drape comfortably over a bed. Very thick batting may make the large appliquéd design more difficult to quilt on a domestic sewing machine.
How do I create smooth wave shapes?
Draw curves with long, flowing movements rather than many short changes in direction. When cutting, rotate the fabric gradually while maintaining a controlled cutting motion. Templates also help preserve the original curve when several adjacent pieces must align.
Should I quilt every colored wave differently?
You can, but it is not required. Using subtle variations in quilting texture can enhance the landscape, while repeating one or two motifs creates greater visual unity. The most important consideration is keeping the overall quilting density reasonably balanced.
Can the Wave Landscape Bedspread Quilt Pattern be made into a wall hanging?
Absolutely. The same design can be reduced substantially and displayed as fiber art. A smaller version is also a useful way to practice the wave construction, tree appliqué, and quilting techniques before making a full-size bedspread.
How do I choose colors that work together?
Start with one dominant color family and build around it with complementary or contrasting shades. In this project, vibrant greens provide a natural anchor while turquoise, purple, magenta, orange, yellow, and blue introduce energy. Arrange fabric swatches before cutting and evaluate them from a distance.
Can patterned fabric be used instead of solid colors?
Yes. Tonal patterns, batiks, hand-dyed fabrics, and subtle prints can add beautiful texture. Very large or highly detailed prints may distract from the shape of the landscape, so fabrics with restrained patterns are often easier to integrate.
How can I make the trees look more dimensional?
Use several shades of green, vary their heights, and overlap some trees. Larger and darker trees tend to appear closer, while smaller and lighter trees seem more distant. This basic use of scale and color value creates convincing depth without complicated techniques.
Conclusion
The Wave Landscape Bedspread Quilt Pattern combines the freedom of artistic quilting with approachable construction methods. Throughout this project, you learned how to plan a flowing landscape, choose a vibrant color palette, prepare full-size wave templates, build the design on a stable foundation, secure curved pieces with appliqué techniques, create dimensional evergreen tree clusters, assemble the quilt sandwich, add decorative quilting, and finish the project with clean binding.
The key to achieving the visual impact of the photographed design is not perfect symmetry. Instead, focus on smooth movement, balanced color contrast, varied wave sizes, thoughtful tree placement, and consistent stitching. These elements work together to transform simple fabric shapes into a dramatic landscape that can become a functional and expressive bedspread.
EASILY FIND THE PDF FOR THIS PATTERN HERE!
Once you understand the construction process, the pattern can easily become your own. Change the colors, enlarge certain hills, create a sunset palette, add more trees, simplify the landscape, or experiment with different quilting textures. Every variation can produce a completely different interpretation while preserving the characteristic flowing style of the Wave Landscape Bedspread Quilt Pattern. If you make this quilt or adapt the idea for your own project, leave your sincere opinion about the design and the techniques described here. Your suggestions are also welcome: share which colors you would choose, what you would change in the landscape, and which quilting methods you would like to see explained in even greater detail in a future project.