
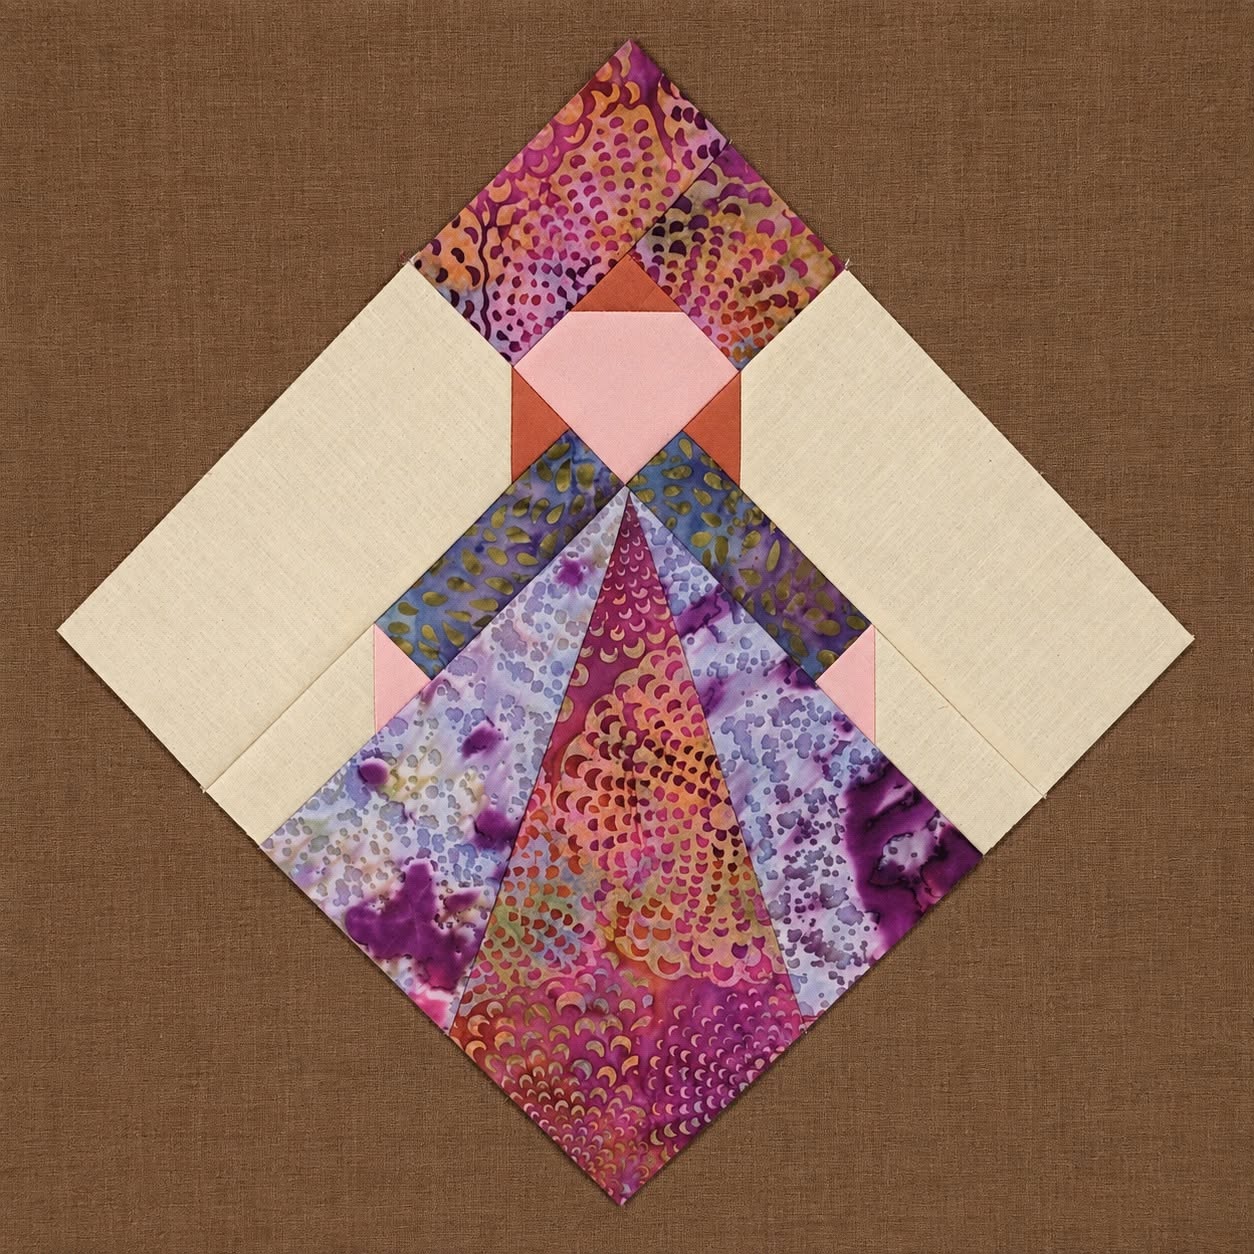
The Quilt Block with Diamond Fan Pattern is a beautiful patchwork project that combines precise geometric piecing with the soft movement of fan-shaped fabric sections. The design shown in the reference photo has an elegant vertical composition, with a central diamond, narrow triangular details, contrasting side strips, and a colorful fan that expands toward the lower point of the block. Although the finished design appears sophisticated, it can be created successfully by breaking the construction into smaller sections and sewing them together in a logical order. This project is especially attractive for quilters who enjoy combining batik fabrics, solid cottons, geometric shapes, and carefully matched seams. The contrast between the light background and the purple, pink, blue, and orange fabrics helps every section remain clearly visible. Throughout this tutorial, you will learn how to reproduce the Quilt Block with Diamond Fan Pattern while understanding why each construction step matters.
One of the most interesting characteristics of this block is the combination of structured geometry and visual movement. The upper diamond creates a strong focal point, while the lower fan spreads outward and gives the design a graceful, almost dress-like silhouette. For the best results, choose 100% quilting cotton or good-quality batik fabric because both are stable enough for accurately pieced blocks. You will also need a rotary cutter, quilting ruler, cutting mat, fine pins or clips, iron, sewing machine, matching thread, and a reliable 6 mm seam allowance, which is close to the traditional quarter-inch quilting seam. Accurate cutting is especially important because diamonds and triangles contain bias edges that can stretch if they are handled too aggressively. Taking time to prepare your pieces before sewing will make the final block flatter, cleaner, and easier to assemble.
The proportions of the project can be adjusted, so there is no single mandatory finished size for the Quilt Block with Diamond Fan Pattern. For a practice version, you can make a block approximately 30 cm to 35 cm wide, measuring and trimming the finished unit after construction. The most important goal is keeping corresponding pieces symmetrical rather than forcing the project to match an exact dimension from the beginning. Before cutting expensive fabric, consider making a test block using scraps so you can understand how the diamond, fan wedges, and background pieces interact. Press each seam as you work instead of waiting until the entire design has been assembled, because progressive pressing helps prevent distortion. When completed carefully, this diamond fan quilt block can become the centerpiece of a pillow, wall hanging, table runner, tote bag, or larger patchwork quilt.
Choosing Fabrics and Preparing the Quilt Pieces
Start by selecting the fabrics for your Quilt Block with Diamond Fan Pattern. The reference design works beautifully because it combines a quiet neutral background with richly patterned fabrics in related purple, pink, coral, blue, and violet tones. You do not need identical prints; instead, concentrate on creating enough contrast between the background, central diamond, fan wedges, and accent triangles.
DISCOVER MORE FREE PATTERNS HERE!
For the background, cut pieces from a light quilting cotton, cream fabric, ivory fabric, or another low-volume material. Two long rectangular or slightly angled background sections create the open space on either side of the central motif. Their light appearance gives the colorful patchwork enough visual room to stand out without making the block look overcrowded.
Next, prepare the fabrics for the upper section. You will need pieces that can form a small central diamond, two contrasting triangular accents, and patterned pieces extending upward from the diamond. A soft pink central diamond combined with coral triangles works particularly well, but these colors can easily be changed to coordinate with your own quilt.
The lower section requires several wedge-shaped pieces for the fabric fan pattern. Create one long central wedge and additional wedges that expand toward each side. In the reference project, the central section is warmer and darker, while the surrounding wedges contain lavender, blue, violet, and watercolor-style prints, producing a layered fan effect.
When cutting triangular or diamond shapes, remember that some edges may run along the fabric bias. Bias edges stretch more easily than straight-grain edges, so avoid pulling them while cutting, pinning, pressing, or sewing. A sharp rotary blade and firm ruler pressure will help you obtain clean edges without repeatedly handling the fabric.
Lay all your pieces on a flat surface before sewing anything together. This simple quilt block layout step allows you to verify color placement, direction, symmetry, and overall balance. Take a quick reference photo if necessary so you can remember where every piece belongs once you begin moving sections to the sewing machine.
Building the Diamond and Fan Sections Step by Step
Begin the Quilt Block with Diamond Fan Pattern with the central diamond because it acts as the visual connection between the upper and lower sections. Position the two small accent triangles around the diamond according to your layout. Place the fabrics right sides together, align the edges precisely, and sew using a consistent 6 mm seam allowance.
Press the seams carefully after each small unit is completed. Rather than aggressively sliding the iron across the fabric, gently lift and lower it to avoid stretching the angled edges. You can press seams toward the darker fabric when practical, although pressing seams open may be useful where several pieces meet at the center.
Now construct the patterned upper section. Join the purple or multicolored pieces above the central diamond, checking that the upper edges create a balanced pointed shape. Sew one piece at a time instead of trying to assemble the complete section in a single pass, since controlled piecing usually produces more accurate intersections.
For the lower fan quilt section, begin with the center wedge. Add one adjacent wedge with the fabrics facing right sides together, stitch from top to bottom, and press the seam. Continue adding additional wedges alternately or sequentially until you have created the full fan shape shown in your planned layout.
Pay close attention to the narrow meeting point near the top of the fan. Several seam lines converge in this area, which can create unnecessary bulk if the seam allowances are all pressed in the same direction. Distribute the seams when possible and use steam carefully so the intersection remains flat without stretching the fabric.
Once the upper diamond assembly and lower fan assembly are complete, place them together on your work surface. Check that the central points align visually before stitching the sections. This alignment is one of the defining details of the Quilt Block with Diamond Fan Pattern, so a few extra minutes of pinning and checking can greatly improve the finished appearance.
Adding the Background and Creating a Clean Quilt Block
After completing the colorful center, begin attaching the light background sections. In the reference layout, large neutral pieces run diagonally along both sides of the motif, framing the design and emphasizing the colorful diamond fan patchwork. Position one background piece first and verify the angle before sewing.
Place the background fabric right sides together with the central unit and align the raw edges. Pin at important seam intersections rather than stretching the pieces until they appear to fit. Sew slowly with your normal quarter-inch or 6 mm quilting seam, allowing the feed dogs to move the fabric naturally through the machine.
Press the first background section outward and inspect the block. If everything remains flat, attach the opposite background piece using the same technique. The two sides should appear reasonably symmetrical, but minor differences along the outer edge can usually be corrected when the block is squared.
Additional small background pieces may be required around the sides of the fan or near its upper corners depending on the exact proportions you choose. These pieces help transform the irregular central design into a manageable patchwork quilt block. Cut them slightly oversized when you are unsure, because excess fabric can be trimmed more safely than an undersized piece can be corrected.
When the complete block has been assembled, press it from the wrong side first and then lightly from the right side. Place it on a cutting mat and use a large quilting ruler to inspect the vertical center, upper point, side edges, and bottom point. Do not immediately cut away large amounts of fabric simply to obtain a perfect square.
Finally, square or trim the block while preserving at least 6 mm of seam allowance beyond important points. This extra space prevents the tips of diamonds and triangles from disappearing when the block is later sewn into another project. The completed Quilt Block with Diamond Fan Pattern should look balanced, flat, and visually centered before you incorporate it into a larger quilt.
Finishing, Customizing, and Using the Diamond Fan Quilt Block
After construction, examine all seam intersections and reinforce any areas where the stitching appears loose. Remove stray threads and give the finished block one final pressing. A pressing cloth can be helpful when working with dark batiks because it protects the fabric surface and keeps the project looking polished.
You can customize the Quilt Block with Diamond Fan Pattern by changing the color arrangement. A dramatic version could combine black, cream, gold, and deep red, while a softer block might use pastel pink, sage green, lavender, and ivory. Scrap quilters can make every fan wedge from a different print while repeating one fabric throughout the diamonds.
Another option is to create multiple blocks using identical dimensions but different color families. Several diamond fan quilt blocks could be arranged vertically to create an elegant wall hanging, or repeated across rows to make a larger quilt. Rotating alternate blocks can also produce unexpected secondary patterns between the background sections.
The block works particularly well as a decorative cushion. After completing the patchwork top, add batting and backing fabric, quilt around the major geometric shapes, and then turn the piece into a pillow cover. Straight-line quilting or simple outline quilting will emphasize the diamond and fan without competing with the patterned fabrics.
For a wall hanging or table decoration, consider quilting approximately 3 mm to 6 mm away from important seam lines. This technique highlights the construction while providing subtle texture. If your fabrics already contain highly detailed batik patterns, relatively simple quilting will usually allow the fan design to remain the main attraction.
Most importantly, focus on careful construction instead of perfect mathematical appearance. Handmade quilting naturally includes small variations, and these details contribute to the character of the finished piece. With accurate cutting, patient pressing, and consistent seam allowances, the Quilt Block with Diamond Fan Pattern can become an impressive project that looks far more complicated than its step-by-step construction actually is.
FAQ – Frequently Asked Questions About the Quilt Block with Diamond Fan Pattern
What is a Quilt Block with Diamond Fan Pattern?
A Quilt Block with Diamond Fan Pattern is a geometric patchwork block that combines diamond-shaped pieces with several narrow or triangular fabric sections arranged like an opening fan. The design uses contrast, symmetry, and carefully aligned points to create an elegant decorative motif.
Is the Diamond Fan Pattern suitable for beginners?
A confident beginner can make this project, although it is slightly more challenging than a basic square-based block. The main skills required are accurate cutting, consistent seam allowances, careful pinning, and pressing angled seams without stretching them. Making a practice version with scrap fabric is a good way to learn the construction.
What fabric is best for this quilt block?
Medium-weight 100% cotton quilting fabric is one of the easiest choices. Batik cotton is especially effective because its rich colors and detailed prints complement the fan shape beautifully. Avoid highly stretchy fabrics while learning this pattern because they can make the angled seams harder to control.
What seam allowance should I use?
A standard quilting seam allowance of approximately 1/4 inch or 6 mm is recommended. The exact measurement is less important than consistency. If every seam uses the same allowance, the different components are much more likely to align correctly during final assembly.
How can I stop diamond points from disappearing?
Leave adequate fabric beyond every visible point before trimming the block. Ideally, approximately 6 mm of seam allowance should remain beyond important diamond and triangle tips. This allows the points to remain visible when the block is joined to another block, border, or background section.
Why does my fan section look wavy after sewing?
Waviness usually comes from stretched bias edges, excessive pressing, inaccurate cutting, or inconsistent seam allowances. Handle angled pieces gently and press by lifting and lowering the iron rather than pushing it back and forth. Measuring your pieces before and after assembly can also reveal where distortion occurred.
Should quilt seams be pressed open or to one side?
Both methods can work. Pressing toward the darker fabric is traditional and helps prevent darker seam allowances from showing through light fabric. However, around the central diamond and the top of the fan, pressing certain seams open may reduce bulk. Choose the method that allows the block to lie flattest.
Can I make the block larger or smaller?
Yes. The Quilt Block with Diamond Fan Pattern can be resized as long as all corresponding pieces are scaled consistently. Enlarging the design is often easier for beginners because larger pieces provide more room for accurate sewing and pressing.
Can I make this design with fabric scraps?
Absolutely. This is an excellent scrap quilting project because the fan contains several separate fabric sections. Choose scraps that have enough contrast so each wedge remains visible. Repeating one or two colors elsewhere in the block can help a scrappy version look coordinated rather than random.
How do I make the center intersection flatter?
Trim unnecessary thread tails, distribute bulky seam allowances in different directions, and press carefully. Avoid repeatedly stitching over the same intersection unless reinforcement is necessary. A tailor’s clapper or another flat pressing aid can also help encourage thick seams to remain flat while they cool.
What projects can I make with this block?
The finished block can be used for quilts, wall hangings, cushions, tote bags, table runners, decorative panels, and fabric organizers. A single block can become a focal project, while several repeated blocks can create an impressive larger patchwork design.
Do all the fan wedges need to use the same fabric?
No. In fact, using several coordinated prints often makes the fan more visually interesting. You can combine batiks from the same color family or intentionally use contrasting colors. The central wedge can also be made darker or brighter to create a stronger focal line through the design.
Conclusion
The Quilt Block with Diamond Fan Pattern brings together some of the most enjoyable elements of patchwork: geometric piecing, colorful fabric combinations, careful seam matching, and creative customization. By preparing your materials, constructing the central diamond, building the fan one wedge at a time, adding the neutral background, pressing each section carefully, and finally trimming the block, you can recreate the beautiful structure seen in the reference project.
EASILY FIND THE FREE PDF FOR THIS PATTERN HERE!
The key to success is not rushing the angled seams. Accurate 6 mm seam allowances, gentle handling of bias edges, careful pressing, and attention to the central intersection will improve both the appearance and durability of your block. Once you understand the basic construction, you can experiment with batiks, solids, pastels, bold prints, scraps, or completely different color palettes. Whether you use your Quilt Block with Diamond Fan Pattern in a cushion, decorative panel, table runner, wall quilt, or larger patchwork project, the design offers plenty of room for personal creativity. If you make your own version, leave your sincere opinion about the pattern and share any suggestions, color combinations, or quilting ideas that could inspire other makers.