
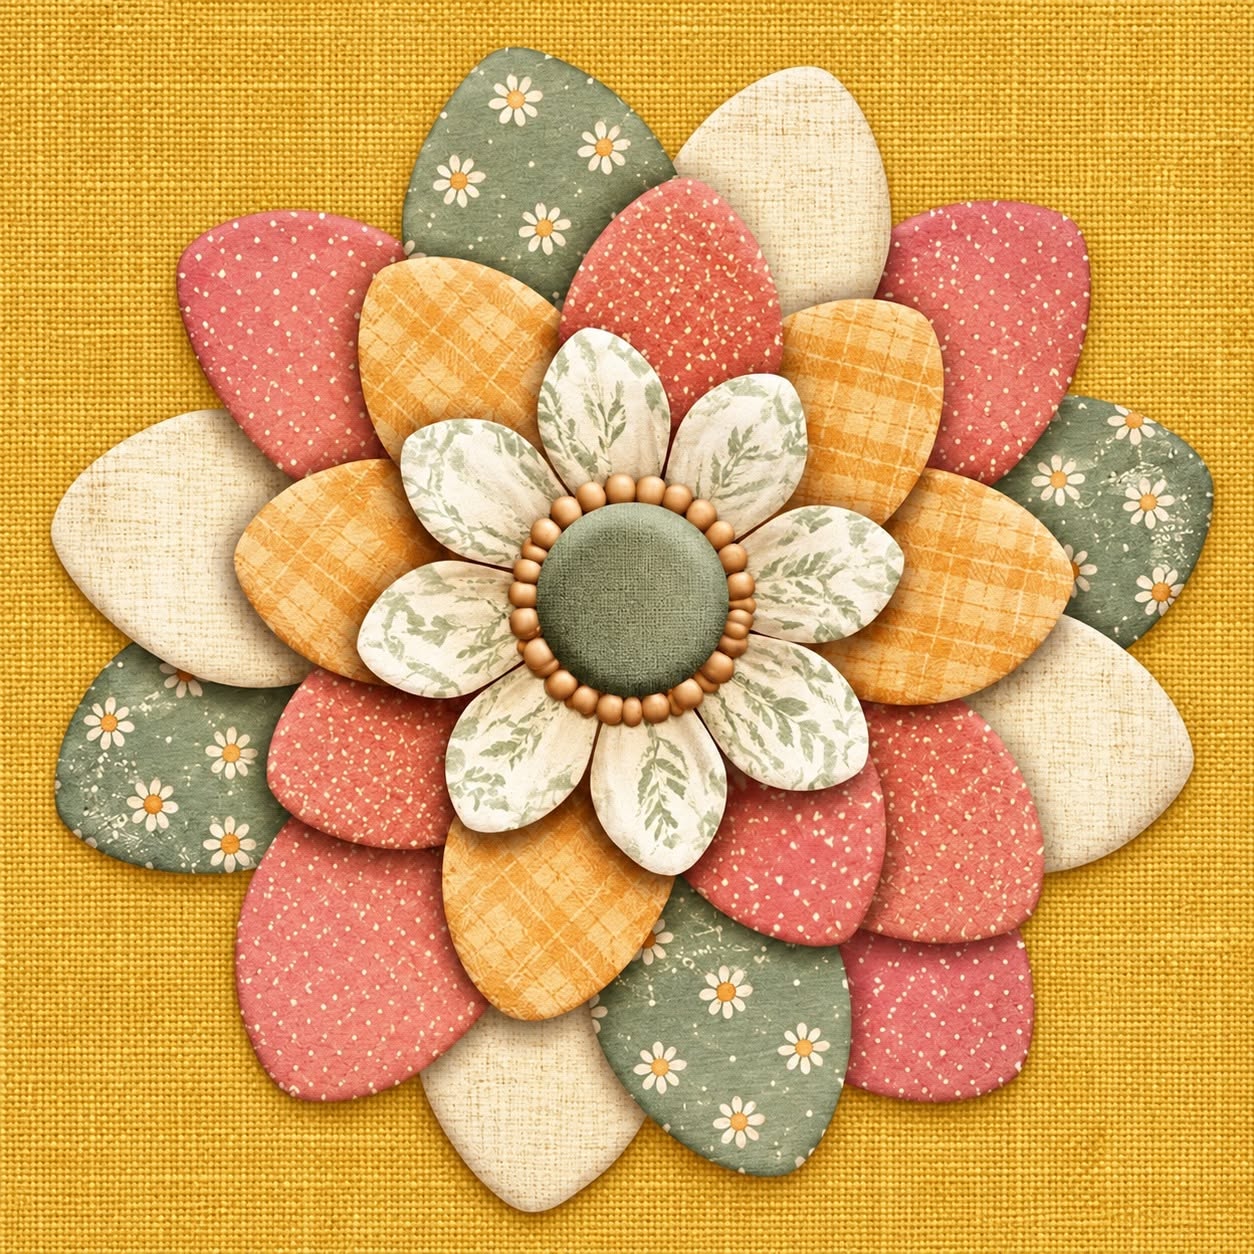
The Layered Fabric Flower Pattern is a beautiful sewing project that transforms small pieces of fabric into a dimensional decorative flower with several overlapping rows of soft petals. Inspired by the project shown in the reference photo, this design combines cream, muted green, warm mustard, and soft coral fabrics to create a cozy handmade appearance. The layered construction gives the flower depth, while the padded petals make the finished piece look soft and substantial rather than flat. A fabric-covered center surrounded by small wooden beads adds an especially charming finishing detail. This project is suitable for anyone who enjoys patchwork sewing, fabric crafts, appliqué, scrap-busting projects, and handmade home décor. Because the petals can be made individually, the pattern is also easy to personalize with fabrics you already have in your sewing collection.
One of the best features of a Layered Fabric Flower Pattern is that there is no single required color combination. You can reproduce the earthy palette visible in the photo or create an entirely different version using floral prints, gingham, polka dots, solids, or leftover quilting cotton. The finished flower can become a wall decoration, table accent, cushion embellishment, wreath centerpiece, bag decoration, or part of a larger quilted project. Although the finished piece looks detailed, the construction method is based on simple repeated shapes, making it manageable even for sewists who have never created a dimensional fabric flower before. The most important skills are accurate cutting, maintaining consistent seam allowances, turning curved fabric pieces carefully, and arranging the petals evenly. Taking your time during these stages will make the final flower look balanced and professionally finished.
This tutorial explains how to recreate the style of the photographed project from beginning to end using a practical fabric flower sewing pattern technique. Since the photograph does not provide an exact physical scale, the measurements below are suggested dimensions that can be adjusted according to the final size you want. For a medium decorative flower, preparing several petal sizes works especially well because each layer should gradually decrease toward the center. Lightweight cotton or quilting fabric is a reliable choice because it is easy to sew, turn, press, and shape. A small amount of polyester fiberfill or thin batting can be added inside the petals to produce the soft three-dimensional effect shown in the design. With careful arrangement and secure stitching, your Layered Fabric Flower Pattern can become a durable handmade decoration with plenty of texture and personality.
Materials, Fabric Choices, and Pattern Preparation
Start by gathering approximately five coordinating cotton fabrics. For a look similar to the reference project, choose a muted sage green floral print, soft coral or dusty red fabric, mustard or ochre fabric, cream fabric, and a light botanical print. You do not need large quantities because each petal uses only a small piece of material. Fat-quarter scraps and leftover quilting pieces are ideal for this project, making the Layered Fabric Flower Pattern a practical way to reduce fabric waste.
DISCOVER MORE FREE PATTERNS HERE!
You will also need coordinating sewing thread, fabric scissors, pins or sewing clips, a hand-sewing needle, polyester fiberfill or thin batting, and a basic sewing machine. A turning tool can help shape the curved petals after sewing, although the blunt end of a knitting needle or similar smooth tool can also work. Avoid using anything sharp enough to push through the seam.
For the decorative center, cut two circles approximately 10 cm in diameter from green or coordinating fabric. The center can be lightly stuffed with fiberfill so that it resembles a soft fabric button. Around this center, the photographed design includes a ring of small wooden beads. This detail is optional, and you can replace it with decorative stitching, fabric-covered cord, tiny fabric knots, or another securely attached embellishment.
Create three basic petal templates from paper or lightweight cardboard. A useful starting point is approximately 14 cm long by 8 cm wide for the large petals, 11 cm long by 7 cm wide for the medium petals, and 8 cm long by 5 cm wide for the small petals. These dimensions include room for shaping and sewing, but they can be enlarged or reduced depending on the intended project.
Shape each paper template like an elongated rounded leaf with a slightly flatter bottom edge. The rounded upper portion creates the soft petal shape, while the flatter lower section makes assembly easier because that portion will eventually be hidden underneath another row. Adding a 0.7 cm seam allowance around your template provides enough room for standard machine stitching.
Before cutting all your fabric, test one petal using scrap material. Sew it, turn it right side out, lightly fill it, and compare its proportions with the effect you want. This small test can prevent fabric waste and allows you to modify the fabric flower pattern before producing the complete set of petals.
Cutting, Sewing, and Shaping the Fabric Petals
For the outer layer, prepare approximately 12 large petals. The exact number can vary according to how much overlap you prefer. Each petal requires two matching fabric pieces, so place your fabric right sides together and cut both layers at once. Alternate the colors and prints throughout the outer ring rather than grouping identical fabrics together.
For the second layer, cut approximately 10 medium petals. Use fabrics that complement but do not completely match the outer row. The reference flower achieves much of its visual interest through alternating mustard, coral, cream, and green sections. Repeating colors in different positions creates a coordinated appearance without making the arrangement look overly symmetrical.
Prepare approximately 8 smaller petals for the inner decorative layer. A cream botanical print works beautifully here because a lighter fabric naturally draws the eye toward the center. If you prefer a more colorful Layered Fabric Flower Pattern, the inner petals could instead be made from contrasting fabric so that they stand clearly against the background layers.
To sew each petal, place two matching pieces with their right sides facing inward. Stitch around the curved edges using approximately a 0.7 cm seam allowance, leaving a small opening near the bottom. Backstitch at the beginning and end to prevent the seam from opening when the petal is turned. Repeat this process for every petal in all three sizes.
Carefully clip small notches around the curved seam allowance without cutting through the stitching. This step reduces bulk and allows the rounded edges to lie smoothly after turning. Turn each piece right side out and gently push the curved edge into shape. Press carefully with an iron, using a temperature appropriate for your fabric.
Add a very small amount of polyester fiberfill or batting to each petal. The goal is gentle dimension rather than heavy stuffing. Distribute the filling evenly, concentrating slightly more near the rounded tip and leaving the bottom portion relatively flat. Close the opening using hand stitches or a narrow machine stitch. When completed, the petals should feel soft and flexible enough to overlap naturally.
Assembling the Layers and Creating the Flower Center
Begin assembly by placing the large petals on a flat work surface in a circular arrangement. Point the rounded tips outward and allow the lower ends to overlap at the center. Alternate your colors as evenly as possible. Before sewing anything permanently, reposition the petals until the spacing looks balanced from every direction.
Once you are satisfied with the outer arrangement, temporarily secure the petals together using hand basting stitches. Another option is to place them onto a circular fabric backing approximately 20 to 24 cm in diameter. A backing makes the project easier to handle and provides a stable surface for attaching the following layers.
Position the medium petals over the gaps between the large petals. This staggered arrangement is important because it creates the full, dimensional appearance associated with the Layered Fabric Flower Pattern. Instead of placing one medium petal directly above every large petal, move each one slightly so that the tips fill the spaces between the petals underneath.
Attach the small botanical-print petals as the third layer. These petals should sit closer together and extend outward from the center like a small daisy. Keep checking the flower from a short distance while working. A slight variation in angle can make the finished flower look naturally handcrafted, but large uneven gaps should be corrected before final stitching.
To make the padded center, place the two circular fabric pieces right sides together and stitch almost completely around the circumference. Leave a small opening, turn the circle right side out, and insert enough fiberfill to create a gently rounded shape. Close the opening securely with a ladder stitch or another discreet hand-sewing stitch.
Position the padded circle over the raw bases of the smallest petals and stitch it firmly into place by hand. If adding wooden beads, sew them individually around the outer edge of the center circle using strong thread. Make sure every bead is securely attached, especially if the project will be frequently handled. Once the center is attached, inspect every layer and add hidden reinforcing stitches wherever necessary.
Layered Fabric Flower Pattern FAQ
What is the best fabric for a Layered Fabric Flower Pattern? Quilting cotton is one of the easiest fabrics to use because it holds its shape while remaining flexible enough for curved petals. Cotton prints also offer an enormous variety of colors and patterns. Linen blends can provide a rustic appearance, while lightweight canvas may work for larger flowers. Very stretchy or slippery materials can be harder for beginners to control.
How many petals do I need to make a layered fabric flower? The number depends on the diameter and amount of overlap you want. For the design shown here, approximately 12 large petals, 10 medium petals, and 8 small petals create a full three-layer arrangement. You can reduce these numbers for a simpler flower or add more petals for an especially dense appearance.
Should fabric flower petals be stuffed? Stuffing is optional, but a small amount gives the project the dimensional appearance seen in the reference photo. Use only enough fiberfill to soften and lift the petals. Overstuffed pieces can become difficult to layer and may cause the center of the flower to become excessively thick.
Can beginners make this fabric flower project? Yes. The repeated petal construction makes the Layered Fabric Flower Pattern for beginners approachable because the same sewing process is used many times. Beginners should focus on making one successful test petal first. Once the shape, seam allowance, and amount of filling are correct, the remaining petals can be completed assembly-line style.
What can I make with a finished Layered Fabric Flower Pattern? This handmade flower can be used as a wall decoration, pillow embellishment, table centerpiece, quilt decoration, bag accent, wreath centerpiece, or sewing-room décor. Smaller versions can decorate pouches and fabric baskets, while oversized versions can become striking textile wall art. Always consider how the object will be used when choosing embellishments and attachment methods.
How can I make the flower look more professional? Accurate templates, consistent seam allowances, controlled stuffing, and careful color placement make the biggest difference. Press every petal before assembly and spend time arranging all the layers before stitching them permanently. Keep the flower center circular and centered, and secure decorative details carefully. These small finishing choices can transform a simple fabric flower sewing project into a polished handmade piece.
Conclusion
The Layered Fabric Flower Pattern combines simple sewing techniques with thoughtful fabric placement to create an impressive three-dimensional textile decoration. You learned how to select coordinating cotton fabrics, prepare three sizes of petal templates, cut paired pieces, sew curved seams, add light filling, construct multiple overlapping layers, and finish the project with a padded fabric center. The combination of large petals, medium petals, small botanical petals, patchwork fabrics, and dimensional construction is what gives this project its distinctive handcrafted character.
EASILY FIND THE FREE PDF FOR THIS PATTERN HERE!
Once you understand the basic construction, this pattern is easy to customize. Try seasonal colors, vintage fabrics, modern prints, monochromatic combinations, or scraps left over from previous quilting projects. You can also resize the templates to produce anything from a small decorative flower to a large textile centerpiece. The most enjoyable part of making a Layered Fabric Flower Pattern is seeing individual fabric pieces gradually become a coordinated dimensional design. If you make your own version, leave your sincere opinion about the project and share any suggestions, color combinations, or creative variations you would love to try next.