
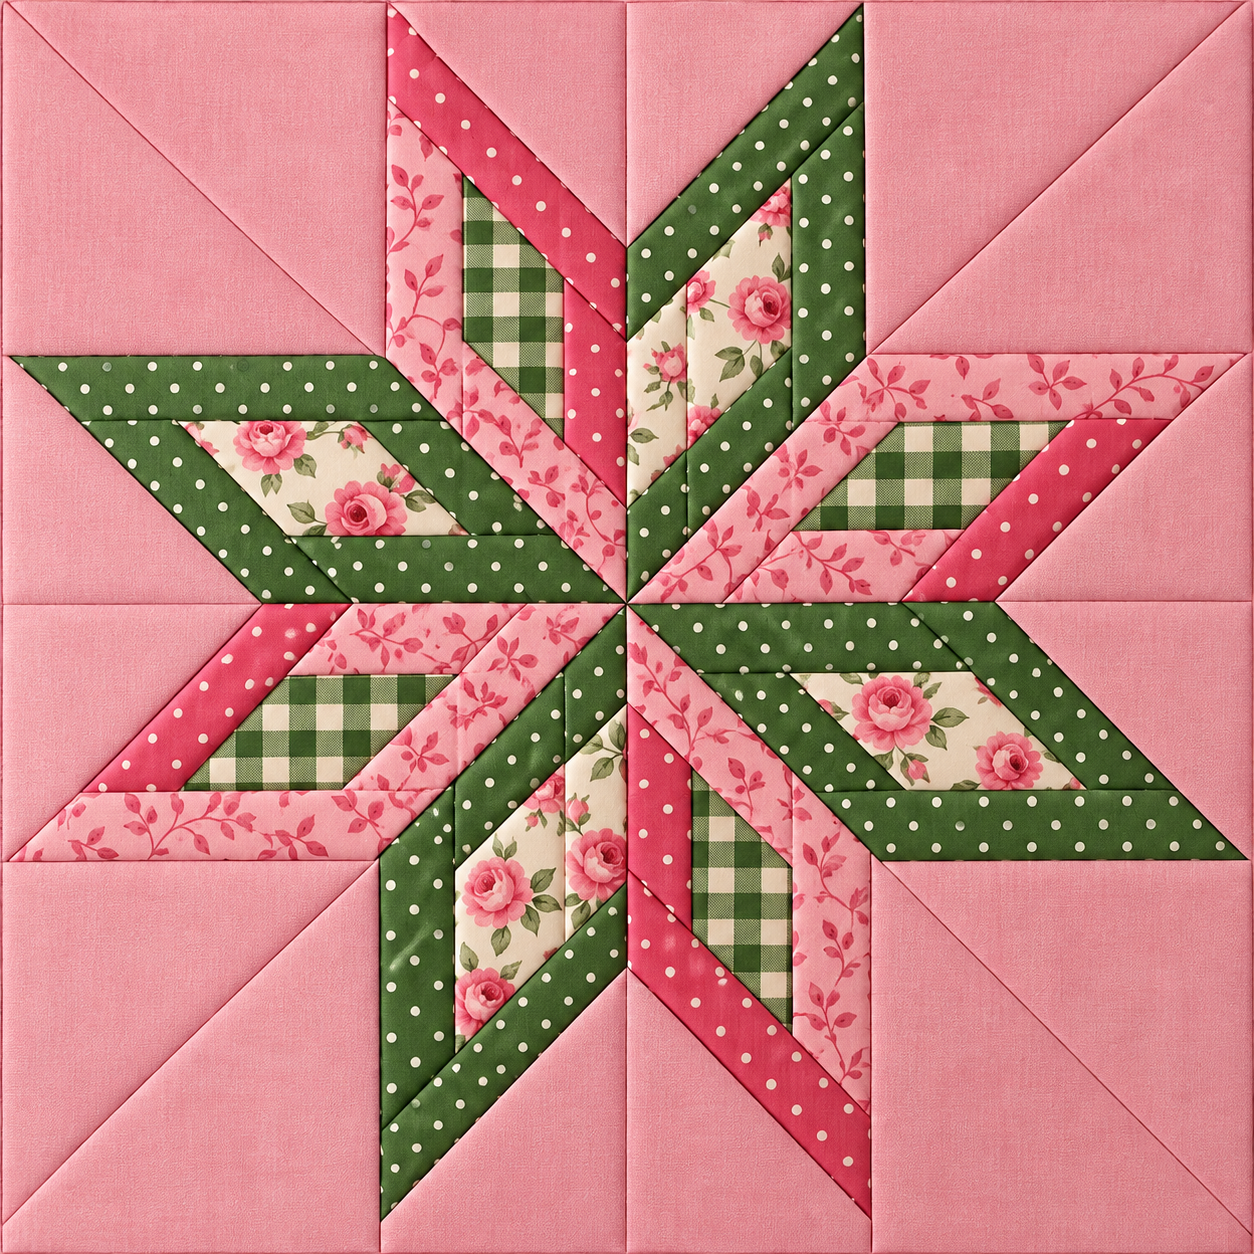
The Pink and green eight pointed star quilt block Pattern is a beautiful way to combine traditional quilt geometry with soft, romantic fabric choices. The block shown in the reference image uses a strong eight-pointed star arrangement, but its personality comes from the mixture of pink solids, green prints, floral fabrics, polka dots, and gingham. Instead of looking overly formal, the finished design feels warm and handmade. The repeating diagonal strips lead the eye toward the center, while the generous pink background gives every star point enough visual space to stand out.
One of the most appealing features of this eight pointed star quilt block is that it can look intricate without requiring extremely complicated construction. The design can be approached as eight coordinated star sections arranged around one central intersection. Each section combines angled strips and contrasting fabric inserts, while the outer background is built with pink triangles and squares. Careful cutting, consistent seam allowances, and accurate pressing are more important than speed. If you enjoy patchwork quilting, this project is also a wonderful opportunity to practice matching diagonal seams and controlling the direction of printed fabrics.
For this tutorial, the goal is to recreate the overall appearance of the photographed block rather than provide a factory-produced template. Because a photograph does not reveal the exact original dimensions or seam allowances, the measurements below provide a practical construction approach that can be adjusted to your preferred finished size. The most important characteristics to preserve are the eight-point symmetry, alternating pink and green fabrics, floral accents, and clean pink background. Make a test section before cutting all of your favorite fabric, especially if this is your first time sewing angled patchwork.
Choosing Fabrics and Preparing the Eight Pointed Star Quilt Block
The first step in making a Pink and green eight pointed star quilt block Pattern is selecting fabrics with enough contrast to reveal the geometry. The reference design combines medium and dark greens with several shades of pink. The green fabrics create visual depth, while the pink prints connect the star to the solid pink background. Cream floral fabric provides a lighter accent that prevents the center design from becoming visually heavy.
DISCOVER MORE FREE PATTERNS HERE!
For a similar look, choose approximately five or six coordinating fabrics. A solid dusty or medium pink works beautifully for the background. Add a dark green polka-dot fabric, a pink polka-dot print, a delicate pink botanical print, a cream floral print, and a green-and-cream gingham. You do not need to copy these prints exactly. What matters is maintaining a similar balance between solid fabric, geometric prints, floral fabric, and small-scale patterns.
Before cutting, press every fabric carefully. Quilting cotton should lie completely flat on the cutting surface because even a small fold can alter the angle of a piece. A rotary cutter, acrylic quilting ruler, self-healing cutting mat, sewing machine, neutral thread, pins or clips, iron, and ironing surface are the main tools needed. A square quilting ruler is especially helpful when checking the completed units.
Choose your finished block size before cutting. A practical starting point is approximately 40 cm × 40 cm (about 15¾ × 15¾ inches) for the finished block. Add your preferred seam allowance to every cut piece. In American quilting, a ¼-inch seam allowance is standard, which is approximately 6 mm. Consistency matters more than the measurement system you use.
The decorative star sections can be assembled from strips first and trimmed afterward. This method is often easier than trying to calculate every small parallelogram individually. Cut strips approximately 4 to 5 cm wide from the green, floral, gingham, and pink fabrics. Sew selected strips together lengthwise, press the seams carefully, and then make angled cuts through the strip sets. These angled segments can become the layered sections visible inside each star point.
Before continuing, arrange all your pieces on a table or design board. Place eight imaginary spokes around a central point and distribute the green, pink, gingham, and floral pieces so that neighboring sections feel balanced. Taking a photograph of this arrangement can be useful before sewing. The fabric placement is an important part of this pattern because the same construction can look dramatically different depending on where the darkest and lightest fabrics are positioned.
Cutting and Sewing the Eight Star Sections
Begin with one star section instead of cutting and sewing all eight at once. The reference block has elongated diagonal shapes that appear to wrap around smaller contrasting centers. You can reproduce this effect with strip piecing. Sew a dark green strip beside a floral or gingham strip, then add a pink botanical or polka-dot strip according to the section you are making. Press after every seam so the unit remains flat.
When joining strips, use a consistent ¼-inch seam allowance and avoid stretching the fabric. Diagonal edges can behave similarly to bias edges and may distort if pulled while sewing or ironing. Allow the sewing machine to feed the fabric naturally. When pressing, lift and lower the iron rather than aggressively sliding it across the unit. This simple habit helps preserve the sharp geometry of the star.
Once a strip set is complete, use the quilting ruler to cut it diagonally at the angle required for your star section. Make the first cut, rotate or reposition the ruler, and cut the opposite edge so that the resulting unit has the elongated diamond or angled appearance seen in the reference. Create a paper test template first if necessary. The objective is for the inner end of every section to meet cleanly at the center.
Alternate the fabrics as you make additional sections. Some points can feature green polka dots surrounding floral centers, while others can include pink botanical strips around gingham centers. This alternating arrangement gives the finished block its distinctive rhythm. Avoid placing all the gingham pieces on one side or all the floral sections together. Spread the visual weight around the star.
Lay the completed decorative units around the center before attaching the background. You should begin seeing the eight-pointed structure immediately. Opposite points should align on the same imaginary axis. If one section is noticeably longer or wider, trim it carefully before assembly rather than hoping the difference disappears in the final seams. Accurate trimming at this stage makes the next steps much easier.
Now prepare the solid pink background pieces. The corners of the reference block are intentionally simple, allowing the detailed star to dominate the composition. Depending on your construction method, these background areas can be created with triangles attached to the star sections or with larger background units assembled around them. Keep the pink fabric grain as stable as possible and avoid unnecessary handling of long diagonal edges.
After attaching the background pieces, trim each larger section to an identical size. Do not trim away the required seam allowance at the inner star tip. Place the units together temporarily and inspect the central intersection. The eight points should visually converge toward the same spot. This precision piecing stage is where careful measuring pays off.
Assembling the Pink and Green Star and Matching the Center
A manageable way to assemble the Pink and green eight pointed star quilt block Pattern is to think of the design as four quarters. Each quarter contains two neighboring star sections plus the surrounding pink background. Sew the appropriate units together and carefully match the diagonal lines. Pinning directly through important seam intersections can help prevent the pieces from shifting under the presser foot.
Press each quarter before joining it to another quarter. Seam direction can make a noticeable difference when several layers meet at the center. Where possible, press neighboring seams in opposite directions so they nest together. For bulky intersections, gently press seams open if your preferred quilting method allows it. The goal is a flat quilt block with crisp lines rather than a thick bump at the center.
Join two quarters to make the upper half and the remaining two quarters to make the lower half. Before sewing the final central seam, place the halves right sides together and insert a pin precisely through the center intersection of both pieces. Add pins or clips along the remaining seam. Sew slowly as you approach the middle, keeping the seam allowance consistent.
Open the block and inspect the center before pressing. Ideally, all eight visual lines will converge neatly. A tiny difference is normal in handmade patchwork and will usually become less noticeable after quilting. However, if the center is significantly misaligned, remove a few centimeters of stitching around the intersection and resew that portion. Correcting the center now is much easier than trying to disguise it later.
Press the completed block from the wrong side first and then lightly from the front. Check that no seam has folded in the wrong direction. Place a large square ruler over the block and measure from the center toward each outer edge. The center should remain centered, and opposite star points should have similar lengths. This step is called squaring up the quilt block.
Trim only what is necessary. Excessive trimming can remove the seam allowance beyond a star point and cause the point to disappear when the block is sewn into a larger quilt. Preserve at least your chosen seam allowance outside every important design element. Once squared, the block can be used alone as a decorative panel or repeated to create a larger quilt top.
Finishing, Quilting, and Creative Ways to Use the Pattern
If you want to turn the block into a small quilted project, layer the completed patchwork top with batting and backing fabric. The backing should be slightly larger than the quilt block on every side. Smooth the backing, position the batting, and center the patchwork star block on top. Baste the three layers together with your preferred method before quilting.
Simple quilting works especially well because the patchwork itself already provides plenty of detail. Consider stitching in the ditch along major seams or quilting straight lines that echo the eight star points. Another option is to quilt the solid pink background more densely while leaving the printed star sections relatively open. This contrast can make the central star appear slightly raised.
If you are still developing your machine-quilting skills, start with straight lines. Use a walking foot if available and begin near the center, working outward to reduce shifting. The quilting does not need to be elaborate to produce a polished result. Even evenly spaced lines can emphasize the strong diagonal movement of this eight pointed star pattern.
After quilting, trim the backing and batting evenly with the top. You can finish the project with traditional quilt binding or incorporate the block into a larger quilt before adding binding. A green binding creates a strong frame, while pink produces a softer transition. A small floral binding can also connect the cream floral details in the center to the outer edge.
The block can be adapted for many projects. One oversized block could become a quilted pillow cover, wall hanging, table topper, or decorative center panel. Multiple blocks could form a bed quilt. If repeating the pattern, consider rotating neighboring blocks so the diagonal lines create secondary designs across the quilt top. You could also change the palette seasonally while retaining exactly the same geometric structure.
Most importantly, treat your first version as both a finished project and a learning sample. Accurate cutting, consistent seams, careful pressing, and patient matching are the skills that make this pattern successful. Once you understand how the eight sections interact, it becomes much easier to experiment with scraps, different strip widths, alternate backgrounds, and your own combinations of floral and geometric prints.
FAQ About the Pink and Green Eight Pointed Star Quilt Block Pattern
What is an eight pointed star quilt block?
An eight pointed star quilt block is a patchwork design in which eight distinct points radiate from a central area. There are many construction methods and visual variations. In this project, strips and contrasting fabric inserts create a layered star with strong diagonal movement.
Is the Pink and green eight pointed star quilt block Pattern suitable for beginners?
An adventurous beginner can make it, although some basic sewing experience is helpful. The most challenging parts are maintaining accurate seam allowances, working with angled edges, and matching the center. Making one practice section from scrap fabric before beginning the complete block can make the process much easier.
What fabrics work best for this quilt block?
Standard 100% cotton quilting fabric is an excellent choice because it is stable, easy to cut, and easy to press. Combining small-scale florals, polka dots, gingham, botanical prints, and solids creates a look similar to the reference project. Avoid using too many equally busy prints because the star geometry may become difficult to see.
Why are pink and green so effective together in patchwork?
Pink and green create strong natural contrast while still feeling harmonious. Green provides visual weight, while pink brings warmth and softness. Adding cream fabric between them creates a useful light value, helping individual sections remain clearly defined.
How can I make the center of my eight pointed star match correctly?
Accuracy begins long before the final seam. Cut carefully, sew with the same seam allowance throughout the project, and square individual units before joining them. When assembling the final halves, insert a pin through the exact central intersection on both layers. Sew slowly across that area and check the result before pressing.
What should I do if my star points do not match perfectly?
First determine whether the difference is small enough to leave alone. Handmade quilting naturally includes minor variations. For a significant mismatch, carefully remove the stitches around the affected intersection, reposition the pieces, pin them accurately, and resew. Avoid repeatedly trimming the block because this can create new alignment problems.
Can I use fabric scraps for this pattern?
Yes. This design is particularly attractive as a scrap quilt block because the decorative star uses several relatively narrow fabric sections. Keep one consistent background fabric if you want the star to remain visually clear, then use coordinated scraps for the interior sections.
Can I make the quilt block larger or smaller?
Absolutely. The pattern can be resized as long as all related components are scaled consistently. Larger blocks are often easier for beginners because the pieces are less fiddly. Smaller versions can be beautiful but require more precise cutting and sewing.
Do I need a special sewing machine?
No. A standard domestic sewing machine with a reliable straight stitch is sufficient for piecing the block. A ¼-inch quilting foot can improve seam consistency, and a walking foot can be helpful when quilting the completed three-layer project, but neither is essential for basic construction.
Should quilt seams be pressed open or to one side?
Both approaches can work. Many quilters press seams to one side because neighboring seam allowances can then nest together. At the crowded center of an eight-pointed design, pressing certain seams open may reduce bulk. Choose the method that keeps your block flat while maintaining secure seams.
How do I prevent angled pieces from stretching?
Handle diagonal edges gently because they can contain exposed bias grain. Avoid pulling the fabric while sewing and use an up-and-down pressing motion instead of dragging the iron across the pieces. Leaving units slightly oversized and trimming them after piecing can also improve accuracy.
What can I make with one finished star block?
A single Pink and green eight pointed star quilt block Pattern can become a pillow front, mini quilt, table topper, tote bag panel, wall decoration, or centerpiece for a larger patchwork project. Adding borders is an easy way to increase its finished dimensions without making another star.
How can I change the colors without losing the original effect?
Think in terms of light, medium, and dark values rather than exact colors. Keep a relatively calm background, use darker fabric to define some of the star outlines, and place lighter prints inside selected sections. This preserves the visual hierarchy even when the entire color palette changes.
How much fabric should I buy?
The amount depends on the desired block size and cutting method. A single block can generally be made from relatively small pieces, especially when using strips and scraps. The solid background usually requires the largest continuous amount. It is wise to have extra fabric available for test pieces, trimming, and occasional cutting mistakes.
Can this block be hand quilted?
Yes. After machine or hand piecing the patchwork top, the finished block can be hand quilted. Following the star’s diagonal seams with hand quilting can beautifully emphasize its geometry. Decorative hand stitching in the solid pink areas can add even more texture.
What is the most important tip for getting a professional-looking result?
Do not rush the preparation stages. Precise cutting, a consistent ¼-inch seam allowance, frequent measurement, and careful pressing have a greater effect on the final appearance than sewing quickly. Checking every section before joining the complete star prevents small inaccuracies from accumulating.
Conclusion
The Pink and green eight pointed star quilt block Pattern combines classic patchwork geometry with a cheerful, romantic fabric palette. Throughout this tutorial, we explored how to choose coordinating pink, green, floral, polka-dot, and gingham fabrics; prepare accurate pieces; build decorative strip-pieced sections; arrange eight star points; add the solid background; and carefully match everything at the center.
The key techniques are strip piecing, precision cutting, accurate ¼-inch seams, controlled pressing, center matching, squaring, and basic machine quilting. None of these skills needs to be complicated on its own. The impressive finished appearance comes from repeating simple techniques consistently and arranging the fabrics thoughtfully around the central star.
EASILY FIND THE FREE PDF FOR THIS PATTERN HERE!
You can follow the pink-and-green palette closely or use this project as inspiration for your own color combination. Once you understand the underlying construction, the same idea can become a pillow, wall hanging, table topper, or part of a full-size quilt. Most importantly, enjoy the process of turning individual pieces of fabric into one unified geometric design. What do you think of this Pink and green eight pointed star quilt block Pattern? Leave your sincere opinion, and feel free to share suggestions about colors, fabrics, or variations you would love to see in a future version of this quilt block.