
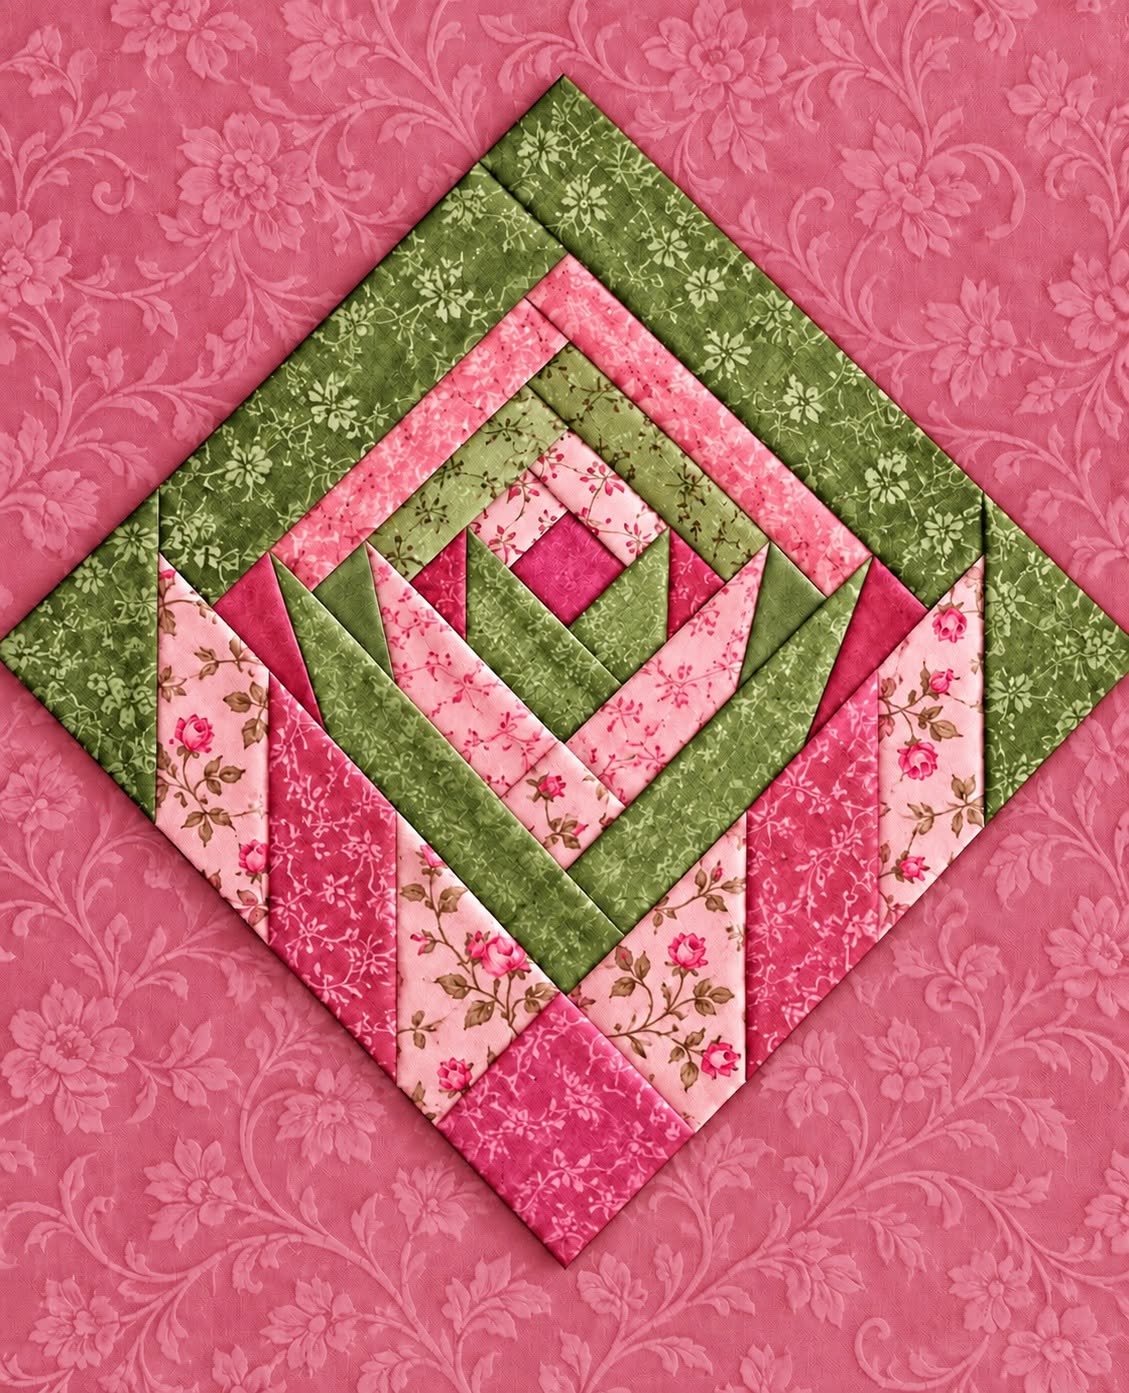
The Pineapple Style Quilt Block in Pink and Green Pattern is a beautiful way to combine traditional quilting geometry with the soft, romantic character of floral fabrics. Inspired by the layered construction of classic pineapple quilt blocks, this project builds outward from a small center square using carefully positioned fabric strips and angled pieces. The result is a dimensional-looking design in which shades of pink create the impression of layered petals while green and cream fabrics form a leafy frame. Although the finished block looks intricate, its construction becomes much easier when the design is divided into logical stages and each piece is added with patience and accurate seam allowances. This makes the project suitable for confident beginners as well as experienced quilters looking for a decorative block that can become a wall hanging, table centerpiece, pillow front, or part of a larger quilt.
One of the most attractive features of this pink and green quilt block is the way color placement defines the entire pattern. Deep burgundy-pink fabric around the outer section gives the block a strong frame, while medium and light pink fabrics gradually lead the eye toward the center. Green pieces create contrast and suggest leaves surrounding a stylized flower. Cream floral fabric adds brightness and prevents the saturated colors from becoming visually overwhelming. When choosing fabrics for your own Pineapple Style Quilt Block in Pink and Green Pattern, you do not need to reproduce every print exactly. The important idea is to create a clear progression between dark, medium, and light values while keeping enough contrast between the pink petals, green leaves, and floral background sections.
Accuracy matters because this type of pineapple-style quilt block depends on repeated angles and straight seams. A small difference in one early seam can become more noticeable as additional layers are added, so careful cutting, pressing, and alignment will make the final block cleaner. A standard quilting seam allowance of approximately 0.6 cm (1/4 inch) works well throughout the piecing process. Pressing after every seam is equally important because it prevents bulky intersections and keeps the block flat. Rather than rushing to complete an entire layer, treat every addition as a small individual step: position the fabric, check the direction, stitch, press, and trim before moving forward. That simple routine can make even an elaborate-looking block surprisingly manageable.
Materials, Fabric Selection, and Preparing the Quilt Pieces
Begin by gathering several coordinating cotton fabrics. For a look similar to the example, choose a dark burgundy or deep pink, two or three medium and light pink prints, at least two shades of green, and a cream floral fabric containing touches of pink and green. Quilting-weight cotton is ideal because it presses crisply, holds accurate seams, and remains stable while you construct the numerous angled sections. Avoid combining extremely lightweight material with heavy fabric because differences in thickness can make the block difficult to press evenly.
DISCOVER MORE FREE PATTERNS HERE!
You will also need a rotary cutter, quilting ruler, cutting mat, sewing machine, neutral thread, iron, ironing surface, pins or fabric clips, and a sharp pair of fabric scissors. A square quilting ruler is particularly helpful for checking the shape as construction progresses. Because the block is assembled through repeated layers, having a ruler with a clear 45-degree line makes it easier to keep the diagonals symmetrical and prevent the design from gradually leaning toward one side.
The exact finished size can be adjusted according to your intended project, but a practical practice block can be planned at approximately 30 cm square before rotating it into the diamond orientation. Cut the pieces slightly more generously when learning the technique, because the outer edges can be trimmed after the layered construction is complete. The central unit should remain relatively small because the visual character of a pineapple block comes from repeatedly expanding outward from that center.
For the center, prepare a small green square of approximately 5 cm × 5 cm. Around it, arrange small cream floral and pink pieces that will establish the first frame. Subsequent pink strips can be cut approximately 4 to 5 cm wide, with their lengths increasing as the design expands. Green and cream pieces for the lower leaf-like sections can be prepared from strips or rectangles and trimmed into their final angled shapes during assembly. These dimensions are adaptable rather than rigid because the most important requirement is maintaining consistent strip widths within each corresponding layer.
Before sewing, place several fabrics on your work surface and organize them from lightest to darkest. This simple preparation helps you understand how the colors will move through the finished block. The photograph demonstrates an effective progression: a small green center is surrounded by cream, pale pink, medium pink, and deeper pink, while darker burgundy fabric becomes increasingly prominent toward the outer edges. The green fabrics reappear along the sides and bottom, creating a visual connection with the center.
Pre-press every piece before cutting and assembling. Fabric that contains wrinkles can easily produce inaccurate measurements, particularly when cutting narrow strips. If you prewash your quilting cotton, do so for all fabrics rather than only some of them. After pressing, make clean cuts with the fabric grain whenever practical. Labeling groups such as Center, Pink Layer 1, Pink Layer 2, Green Leaves, Cream Floral, and Outer Border can also prevent confusion once many similar pieces are on your sewing table.
Building the Center and Creating the Pineapple-Style Layers
Start the Pineapple Style Quilt Block in Pink and Green Pattern with the small green center square. Position the first coordinating pieces around this square so that the center remains clearly visible. In the example, cream floral sections provide a light transition before stronger pink tones begin to dominate the design. Sew each piece using the same 0.6 cm seam allowance, then press the seam before attaching the next piece. Consistency here establishes the foundation for everything that follows.
Next, begin adding the first pink strips. Position a strip with right sides together along one edge of the central unit, stitch it in place, and press it outward. Rotate the block and repeat the process on the corresponding sides. The objective is to create an expanding geometric frame rather than simply stacking horizontal strips. Check frequently that the developing center remains balanced. If one side extends slightly farther than its opposite side, trim carefully before adding another layer.
The characteristic pineapple appearance develops when the corners of previous layers are partially covered by the next strips. This creates nested points and diagonal lines. Add pale and medium pink fabrics in alternating positions, allowing each new piece to overlap the ends of the previous layer. After sewing and pressing, use your ruler to trim excess fabric while preserving the desired angle. These repeated sew, press, and trim stages are the central technique behind the block.
Continue expanding outward with progressively longer pink strips. Use variations in print scale to make the layers easier to distinguish. A small floral print can sit beside a tonal pink fabric, followed by another delicate print. Even when the colors are similar, differences in value and pattern create definition. This is especially useful in a scrap quilt block, because many small pieces can be incorporated without making the finished composition appear random.
As the central pink section grows, introduce green triangles or angled strips along the sides. These pieces function visually as leaves and create the dramatic contrast seen in the reference design. Darker olive green can be paired with a lighter printed green for additional depth. Place corresponding green pieces symmetrically whenever possible. Sew each one with the same seam allowance, press it away from the center, and check that the pointed ends remain crisp.
Continue alternating pink, cream floral, and green sections until the central rose-like structure has reached the desired size. At this stage, place the block on a flat surface and view it from a short distance. You should be able to recognize a clear pink geometric flower surrounded by green leaf shapes. Do not worry if the outside perimeter looks uneven yet. Pineapple-style piecing often produces excess fabric around the perimeter, and final trimming will establish the clean finished shape.
Adding the Outer Frame, Trimming, Pressing, and Finishing the Block
Once the central flower and leaf structure is complete, begin constructing the dark outer frame. The deep burgundy-pink fabric is particularly effective because it echoes the pink center while providing significantly more contrast. Cut strips wide enough to create a substantial frame, approximately 5 to 7 cm, depending on the finished dimensions you want. Longer strips are useful because they can be trimmed after stitching instead of requiring perfect measurements before assembly.
Attach the outer strips one at a time. Place the first strip right sides together with the edge of the pieced unit and stitch using the established 1/4-inch or approximately 0.6 cm seam allowance. Press it outward before adding the next strip. Work around the block methodically. The corners should form clean geometric transitions that complement the angled construction in the center rather than interrupting it.
The outer green and cream pieces can then be incorporated to continue the leafy effect toward the bottom and sides. Notice how the cream floral fabric visually separates neighboring green sections. This is an excellent example of value contrast in quilting: even when several prints contain similar colors, a light fabric positioned beside darker fabrics creates separation. Keep the floral motifs secondary to the geometry so that the overall pineapple-inspired structure remains easy to see.
After all major pieces have been attached, press the entire block carefully from the back and then lightly from the front. Avoid aggressively sliding the iron across the surface because this can distort bias edges. Instead, lower the iron onto each area, lift it, and reposition it. Pressing rather than ironing is especially valuable for blocks containing multiple diagonal seams because fabric cut on the bias can stretch more easily than fabric cut along the straight grain.
Now square the block. Place it on the cutting mat and use the diagonal markings on your ruler to locate the true center. Trim one edge, rotate the block, and continue until all sides are even and the central design remains correctly positioned. If you intend to display the block as a diamond, remember that it can still be constructed and squared conventionally before being rotated for presentation. Accurate trimming gives the project the polished appearance associated with professionally finished quilt blocks.
Your completed Pineapple Style Quilt Block in Pink and Green Pattern can be used in many ways. Add batting and backing to transform it into a miniature quilt or wall hanging, use it as the front panel of a decorative cushion, or make several coordinating blocks for a larger quilt. For a quilted version, layer the top with batting and backing, baste securely, and quilt along selected seam lines or use gentle free-motion quilting in the larger fabric areas. Finish the perimeter with binding that complements the deep outer pink fabric.
Frequently Asked Questions About the Pineapple Style Quilt Block in Pink and Green Pattern
Is this pattern suitable for beginners? Yes, a patient beginner who already understands straight stitching and basic rotary cutting can attempt this project. The design appears complicated because it contains many overlapping geometric pieces, but the actual construction relies heavily on repeated straight seams. The key is to work slowly, press after every seam, and check alignment frequently instead of trying to assemble several sections at once.
What is the best fabric for this quilt block? 100% quilting cotton is generally the easiest option. It is stable, easy to cut, presses well, and is available in an enormous variety of floral and tonal prints. Using fabrics of approximately the same weight will help the block remain flat. Small-scale prints are especially effective in the narrow strips because their designs remain visible even after the fabric has been cut into smaller pieces.
Do I have to use pink and green fabrics? No. Pink and green reproduce the floral appearance of this particular Pineapple Style Quilt Block in Pink and Green Pattern, but the underlying geometry can work with many palettes. What matters most is contrast. Choose light, medium, and dark fabrics so that the different layers remain recognizable. If all fabrics have almost identical values, the pineapple structure can disappear visually even when the piecing is technically accurate.
Why does my pineapple quilt block become uneven while I sew? Uneven blocks commonly result from inconsistent seam allowances, stretched bias edges, inaccurate cutting, or skipping the pressing stages. Check your sewing machine’s 1/4-inch seam position and test it on scrap fabric before starting. Measure the developing block regularly and correct small discrepancies early. Waiting until the final trimming stage to fix major distortion can remove too much fabric from important points.
Should seams be pressed open or to one side? Either method can work, but pressing seams to one side is common in traditional quilting and can make some intersections stronger. However, bulky areas with many overlapping layers may benefit from strategic seam direction or occasionally pressing a seam open. The priority is to keep the surface flat and avoid creating thick ridges. Always allow the fabric to cool briefly after pressing before handling it again.
Can this block be enlarged for a pillow or wall hanging? Absolutely. The easiest method is to continue adding layers or add a wider outer border until the desired dimensions are reached. For a pillow, measure the finished block after squaring and design the backing accordingly. For a wall hanging, add batting, backing, quilting, and binding. Repeating several pink and green pineapple blocks can also create an impressive larger quilt with secondary geometric patterns appearing where neighboring blocks meet.
Conclusion
The Pineapple Style Quilt Block in Pink and Green Pattern combines precise geometric piecing with the warm personality of a floral quilt. Starting from a small green center, the design develops through layers of cream, pale pink, bright pink, burgundy, and contrasting green fabrics. The gradual expansion creates the characteristic pineapple-inspired geometry while also suggesting a rose surrounded by leaves.
The most important skills covered in this project are accurate cutting, consistent 0.6 cm (1/4-inch) seams, careful color placement, repeated pressing, diagonal alignment, and final squaring. None of these techniques needs to be complicated on its own. The richness of the finished block comes from repeating these simple techniques carefully and allowing each new layer to build upon the previous one.
Remember that precision is more valuable than speed. Check the center frequently, keep corresponding pieces balanced, and press every new seam before continuing. Small adjustments made during construction can prevent much larger alignment problems later. If this is your first pineapple-inspired project, making one practice block from leftover fabric is an excellent way to become familiar with the sequence.
Color selection also offers plenty of room for creativity. The romantic pink floral fabrics, olive greens, cream prints, and deep burgundy border shown in this project produce a garden-inspired result, but the same construction principles can be adapted to seasonal fabrics, solids, reproduction prints, modern geometrics, or favorite scraps from previous projects.
EASILY FIND THE FREE PDF FOR THIS PATTERN HERE!
Once finished, the block does not have to remain a sample. It can become a quilted pillow, table decoration, wall hanging, centerpiece, bag panel, or larger patchwork quilt. Adding batting and decorative quilting can emphasize the nested geometry even further and give the fabric surface additional texture. Most importantly, enjoy the process of watching a simple center square develop into a detailed geometric flower. If you make your own Pineapple Style Quilt Block in Pink and Green Pattern, leave your sincere opinion about the project and share any suggestions, color combinations, or creative variations you would like to try. Your ideas may inspire an entirely new version of this classic quilting design.