
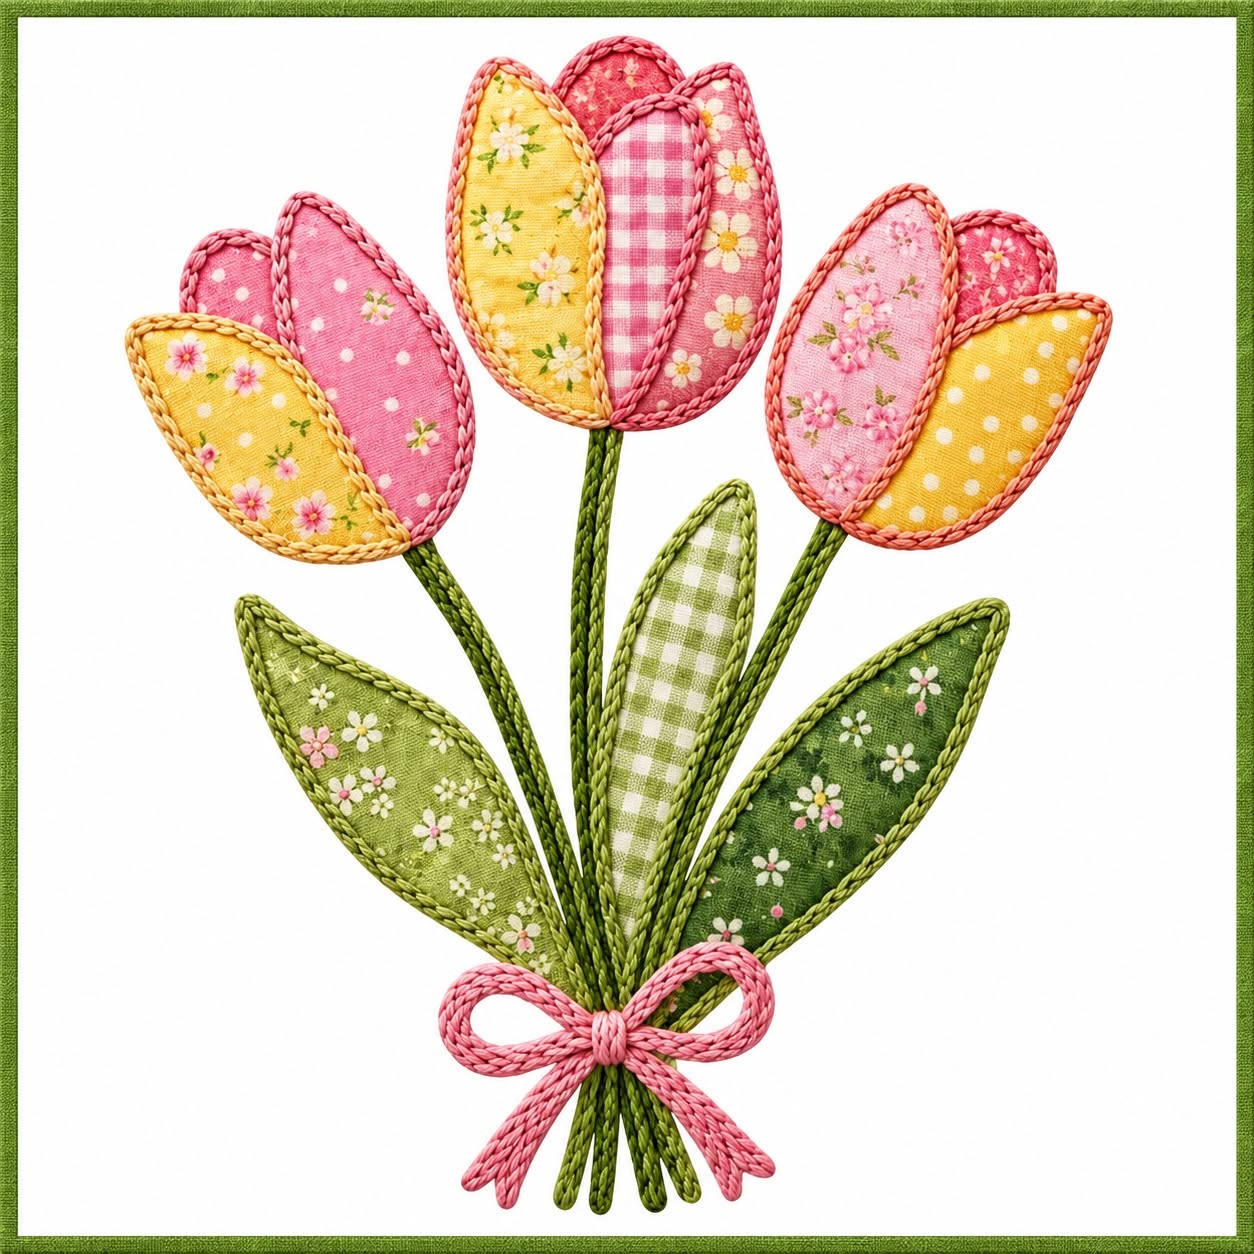
The Fabric Appliqué Panel with a Bouquet of Tulips Pattern is a cheerful sewing project that combines floral appliqué, colorful cotton prints, decorative stitching, and simple embroidery-inspired details. Inspired by the handmade bouquet shown in the reference image, this project features three dimensional-looking tulips in shades of pink and yellow, long green stems, coordinating leaves, and a charming pink bow that gathers the arrangement together. The combination creates a fresh spring-inspired design that can become a wall panel, quilt block, decorative cushion front, table decoration, or part of a larger textile project. One of the most appealing aspects of this fabric tulip appliqué is that every flower can be customized with scraps already available in your sewing room. Floral prints, gingham, polka dots, and small-scale patterns work especially well because they add visual variety without hiding the recognizable shapes of the tulips.
Although the finished bouquet looks detailed, the Fabric Appliqué Panel with a Bouquet of Tulips Pattern can be assembled through a series of manageable steps. The main idea is to construct the flowers from overlapping petal shapes, create narrow stems, add elongated leaves, and arrange everything into a balanced bouquet before permanently attaching the pieces to the background fabric. Decorative stitching around each appliqué shape gives the design its characteristic handcrafted outline and also helps define one fabric from another. Beginners can simplify the project with basic machine stitching, while experienced sewists can add hand embroidery, couching, blanket stitches, quilting, or additional dimensional details. Taking time to arrange the pieces before sewing is especially important because the graceful positioning of the stems and flowers is what makes the bouquet look natural rather than rigid.
Another advantage of this tulip fabric appliqué pattern is its flexibility. There is no requirement to reproduce every print exactly as it appears in the inspiration image. Instead, think of the photograph as a guide for color placement, proportion, layering, and composition. Yellow floral cotton can be paired with pink gingham, pink polka-dot fabric can sit beside tiny floral prints, and several shades of green can be mixed throughout the leaves. This approach makes the project excellent for using fabric scraps, particularly pieces that are too small for larger quilting projects. A light neutral background allows the colorful bouquet to stand out clearly, while batting or interfacing can be introduced when additional body is desired. With careful cutting and patient stitching, the project develops from a collection of simple fabric pieces into an attractive textile bouquet.
Materials and Preparation for the Fabric Tulip Appliqué
Begin the Fabric Appliqué Panel with a Bouquet of Tulips Pattern by selecting your fabrics. For a look similar to the reference project, collect several pink and yellow cotton prints for the flowers. Small florals, gingham, dots, and subtle vintage-style patterns are excellent choices. Select three or more coordinating green fabrics for the leaves and stems. Using different prints within the same color family gives the bouquet depth while keeping the overall composition harmonious.
DISCOVER MORE FREE PATTERNS HERE!
You will also need a piece of background fabric large enough for your planned panel, matching or contrasting sewing thread, fabric scissors, small detail scissors, pins or fabric clips, an iron, and your preferred appliqué supplies. Depending on your chosen method, these supplies might include lightweight fusible web, appliqué adhesive, tear-away stabilizer, or thin interfacing. A sewing machine is convenient, but much of this floral appliqué project can also be completed by hand.
Before cutting your favorite fabric, create paper templates for the tulip petals and leaves. The flowers in the inspiration image are constructed from elongated, gently curved petal shapes with pointed or rounded upper ends. Make a few variations rather than using one identical shape for every flower. This slight variation helps the three tulips look handmade and organic. For the leaves, draw long tapered shapes with pointed tips and softly curved sides.
For the stems, prepare narrow green strips or use another technique that creates smooth, slender lines. Bias-cut strips can be particularly useful because they bend more naturally into gentle curves. Press the strips carefully so the raw edges are controlled. The stems should remain narrow enough that the flowers and leaves stay visually dominant. Prepare an additional narrow pink strip or decorative cord-like fabric element if you want to recreate the bow near the bottom of the bouquet.
Wash and press cotton fabrics beforehand when appropriate for the materials you are using. Pressing is particularly important because wrinkled scraps can distort small appliqué pieces. If fusible web is part of your method, follow its specific manufacturer instructions regarding temperature and pressing time. Avoid stretching small pieces while pressing, especially the narrow stems and pointed leaves.
Finally, test your stitches on leftover scraps. The visible outlines are an important feature of this Fabric Appliqué Panel with a Bouquet of Tulips Pattern, so testing beforehand can prevent problems on the finished panel. Experiment with a narrow zigzag, blanket stitch, straight stitch, or decorative machine stitch. If working by hand, try blanket stitch, whipstitch, or small running stitches. Choose the technique that produces the handmade appearance you prefer.
Cutting, Layering, and Building the Three Tulip Flowers
Start with the left tulip. Cut approximately three overlapping petal sections from complementary fabrics. A yellow floral fabric can form the front petal, while two different pink fabrics create the petals behind it. Position the outer petals first and allow them to overlap toward the center. The bottom edges should meet naturally so that the completed flower has a gently rounded base where it connects to the stem.
The center tulip can be made slightly taller than the other two flowers. This creates the triangular composition visible in the inspiration image and prevents the bouquet from looking too flat. Combine a yellow floral petal with pink gingham and pink floral prints. Place the narrow center section prominently between the outer petals. Small differences in height between the petals help suggest the layered structure of a real tulip.
For the right flower, reverse some of the color placement. Pink fabrics can dominate the upper and center areas while a yellow dotted or floral fabric becomes a prominent front petal. Repeating the same colors in different positions is an effective scrap fabric appliqué technique because it creates continuity without making the flowers identical. Keep checking all three tulips together rather than designing each flower completely in isolation.
Once you are satisfied with each flower, secure the petal pieces according to your chosen appliqué technique. If you are using fusible appliqué, position the pieces carefully and press them in stages so they do not shift. If you prefer turned-edge appliqué, allow an appropriate seam allowance when cutting the templates and turn the edges under gradually. Raw-edge appliqué is another practical option and can give the project a slightly more rustic appearance.
Stitch around the individual petals after securing them. Work slowly around the curved edges and pointed tips. Reduce your sewing speed when approaching tight curves, and stop with the needle down whenever you need to pivot slightly. Decorative stitching can be made in coordinating pink and yellow threads, or you can choose one consistent thread color to visually connect all the flower sections.
Layering is what gives the fabric tulip flowers their recognizable form. Therefore, preserve the visible boundaries between neighboring petals instead of covering them completely. If desired, add a slightly raised corded outline or a heavier decorative stitch around the petals to imitate the pronounced edging seen in the reference image. Keep the treatment consistent across the three flowers so the bouquet looks intentionally designed.
Creating the Stems, Leaves, Bouquet Arrangement, and Bow
Place the three flowers temporarily on the background before attaching the stems. Position the center tulip highest, with the left and right flowers slightly lower and angled outward. This arrangement creates an open bouquet silhouette. Leave enough room beneath the flowers for several stems to converge near the bottom. At this stage, nothing needs to be permanently attached because adjusting the composition is easier while the pieces remain movable.
Next, position the narrow green stems. Each flower should have a stem that travels downward toward the central gathering point. Slight curves look more natural than perfectly straight lines. Allow some stems to cross subtly as they approach the base. Secure the strips using your preferred appliqué method, then stitch along their edges. If the stems are extremely narrow, decorative couching or hand stitching can also provide an attractive finish.
Now add the leaves. The reference arrangement contains long pointed leaves placed on both sides of the bouquet as well as through the central area. Use multiple shades of green, including floral prints and gingham, to create contrast. Position the outer leaves at an angle so they open away from the stems. A narrower central leaf can point upward between the flowers, helping connect the lower foliage with the blossoms.
Stitch around each leaf using the same general decorative treatment used on the flowers. Because the leaves have sharp tips, approach each point slowly. Stop at the tip with the needle down, lift the presser foot if machine sewing, pivot the fabric, and continue along the opposite side. This technique helps maintain a clean outline. Hand sewists can achieve the same controlled appearance with short, evenly spaced stitches.
The pink bow is one of the sweetest finishing details in the Fabric Appliqué Panel with a Bouquet of Tulips Pattern. Position it where the stems gather. You can construct the bow from a narrow fabric tube, bias strip, decorative cord, or carefully prepared appliqué pieces. Form two loops with two short tails extending downward. Secure the center firmly so the bow appears to wrap naturally around the stems rather than simply sitting on top of them.
Once all pieces are positioned, inspect the entire tulip bouquet appliqué from a short distance. Look for unwanted gaps, uneven spacing, or leaves that compete with the flowers. The goal is not perfect symmetry. Instead, aim for visual balance: the taller center tulip should provide height, the two outer flowers should provide width, and the leaves should guide the eye toward the bow. Make any final adjustments before completing the remaining stitching.
Finishing the Panel, Creative Variations, FAQ, and Final Tips
After completing the appliqué, press the panel carefully from the back whenever the chosen materials allow it. Protect dimensional stitches from being flattened excessively. If the panel will become a quilted wall hanging, layer the finished appliqué top with batting and backing fabric. Baste the layers together and add quilting around the bouquet rather than directly through every decorative detail. This can make the colorful flowers appear slightly raised from the background.
For a simple wall panel, quilted lines can follow the contours of the flowers and leaves. Echo quilting is especially effective because it repeats the outline of the bouquet without distracting from it. Alternatively, use subtle background quilting such as gentle curves, grids, or widely spaced straight lines. Keep the quilting understated so the Fabric Appliqué Panel with a Bouquet of Tulips Pattern remains the focal point.
The design can also be adapted into smaller projects. Reduce the templates for a greeting-card-sized textile piece, mug rug, small pouch, or decorative pocket. Enlarge the bouquet for a cushion cover or central quilt panel. Individual tulips can even be separated and used as repeating blocks. This flexibility makes the tulip appliqué pattern useful beyond a single finished panel.
Color changes can completely transform the mood of the project. For a spring design, use pastel pink, yellow, green, lavender, and cream. For a stronger modern interpretation, try saturated reds, coral, deep pink, and emerald green. A vintage version could combine muted rose, mustard, sage, and small reproduction-style floral prints. The important principle is to maintain enough contrast between adjacent petals for the layered flower construction to remain visible.
If you want additional dimension, consider lightly padding selected petals before stitching their outer edges. Another option is to use embroidery floss or heavier decorative thread for the outlines. Small embroidered details can be added to the leaves, while the bow can be slightly raised. These additions are optional; a straightforward flat appliqué version can be equally attractive and is generally easier for beginners.
When the sewing and quilting are complete, square the panel carefully and finish it according to its intended use. Add binding for a wall hanging, incorporate it into a larger quilt, or sew it into a cushion front. Check all thread ends and secure anything loose. The finished Fabric Appliqué Panel with a Bouquet of Tulips Pattern should showcase the colorful fabric choices while retaining the simple, recognizable silhouette of a hand-tied bouquet.
FAQ About the Fabric Appliqué Panel with a Bouquet of Tulips Pattern
What is the best fabric for a tulip appliqué panel?
Quilting cotton is one of the easiest choices because it is stable, widely available, and simple to cut into small shapes. Small-scale floral prints, gingham, polka dots, and coordinating solid fabrics are particularly effective for this design. Very large prints may lose their visual impact when cut into small petals.
Is this Fabric Appliqué Panel with a Bouquet of Tulips Pattern suitable for beginners?
Yes. Beginners can simplify the project by using fusible raw-edge appliqué and straightforward machine stitching. The individual pieces are relatively simple shapes, while the finished arrangement looks much more detailed because of the layering. Practice the decorative stitching on scrap fabric before working on the actual panel.
Do I need a sewing machine to make the bouquet?
No. The project can be made with hand appliqué techniques as well. Hand stitching can actually enhance its traditional handmade character. A sewing machine simply makes the process faster, especially when securing the background layers or quilting a larger finished panel.
How do I keep small appliqué pieces from moving while sewing?
Temporary fusible web, appliqué adhesive designed for fabric, pins, or careful basting can help. The best option depends on the appliqué method and fabric. Avoid excessive adhesive because it may make small pieces stiff. Always test unfamiliar products on scrap fabric first.
Can I use leftover fabric scraps for all the tulip petals?
Absolutely. This design is especially suitable for a fabric scrap project because the petals and leaves require relatively small pieces. Using several coordinating prints can actually make the bouquet more interesting. Try repeating one or two colors across different flowers to keep the varied scraps visually connected.
How can I make the appliqué edges look more decorative?
Try blanket stitch, narrow zigzag stitching, decorative machine stitches, hand embroidery, or carefully couched thread. A slightly heavier outline emphasizes each petal and creates an effect similar to the raised edging visible in the inspiration design. Keep your stitch choice reasonably consistent throughout the bouquet.
Should the three tulips be exactly the same size?
They do not need to be identical. Making the center flower slightly taller and varying the outer flowers creates a more natural bouquet. Small variations in petal size and angle also contribute to the handmade character of the floral fabric appliqué.
What can I make with the finished tulip panel?
The appliqué can become a wall hanging, cushion front, quilt block, tote bag panel, table decoration, fabric organizer, or central feature in a larger quilt. When adapting it to an item that will be washed frequently, make sure every appliqué edge is securely stitched.
How can I prevent puckering around the flowers and leaves?
Use stable background fabric, avoid excessive thread tension, and consider placing lightweight stabilizer behind the work while applying dense decorative stitches. Sewing slowly is also helpful. Press between major stages rather than waiting until the entire project is finished.
Can the colors be changed while keeping the same pattern?
Yes. The Fabric Appliqué Panel with a Bouquet of Tulips Pattern can be adapted to almost any palette. Blue and white could create a fresh cottage look, while purple and lavender can produce a romantic bouquet. Red and pink offer a brighter version, and muted earth tones can create a more traditional decorative panel.
Conclusion
The Fabric Appliqué Panel with a Bouquet of Tulips Pattern turns simple pieces of patterned cotton into a beautiful handmade floral arrangement. By preparing the fabrics carefully, cutting layered petals, creating slender stems, arranging pointed leaves, and finishing the bouquet with its distinctive pink bow, you can reproduce the essential character of the project while still making the design your own.
The most important lesson is to build the panel gradually. Begin with the flower shapes, experiment with their placement, introduce the stems and leaves, and only then secure everything permanently. This method gives you plenty of opportunities to adjust proportions and color balance before committing to the final arrangement.
Decorative stitching provides the finishing touch, defining the individual petals and emphasizing the charming handmade appearance of the bouquet. Whether you choose machine appliqué, hand stitching, subtle quilting, or more dimensional embellishment, consistency will help all the different fabrics work together as one unified design.
This project is also an excellent reminder that beautiful sewing does not always require large pieces of new fabric. Fabric scraps, leftover quilting cotton, small floral prints, and tiny pieces of gingham can become the most interesting parts of the bouquet. Every combination creates a slightly different interpretation of the same tulip theme.
EASILY FIND THE FREE PDF FOR THIS PATTERN HERE!
Once completed, the panel can stand alone as textile art or become part of another sewing project. That versatility makes the Fabric Appliqué Panel with a Bouquet of Tulips Pattern a rewarding design for both practicing appliqué techniques and creating a colorful decoration that can be enjoyed throughout spring and beyond. If you make your own version of this fabric tulip bouquet, leave your sincere opinion about the project and share your suggestions. Which fabric combinations would you choose for the tulips, and what other flowers would you like to see transformed into a fabric appliqué pattern?