
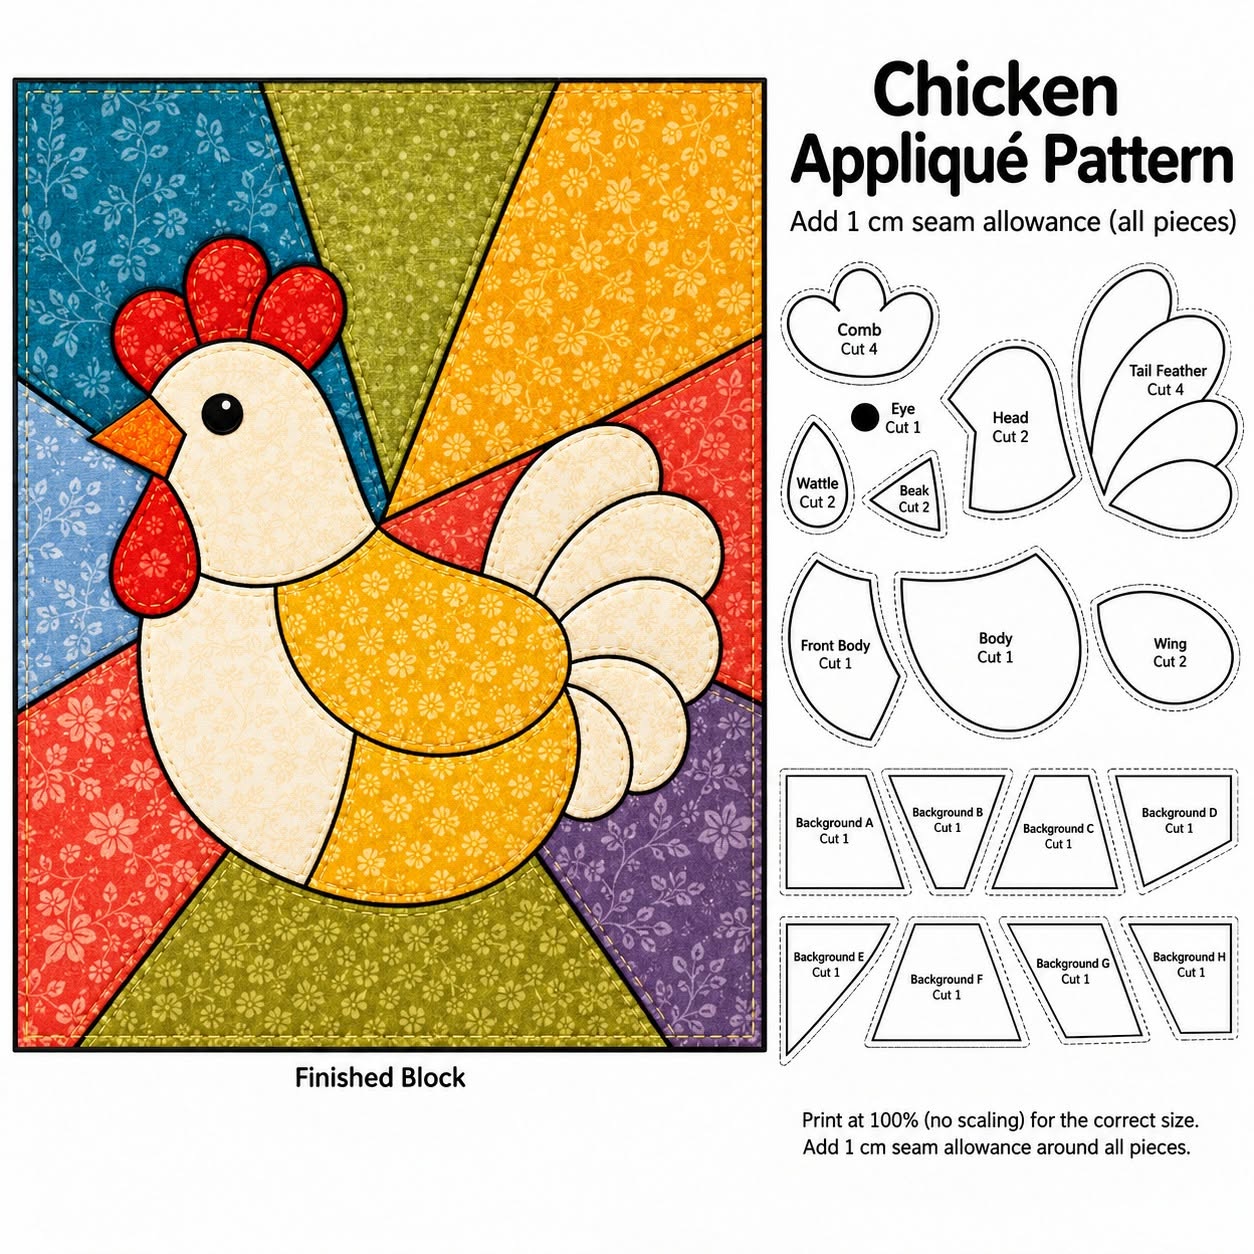
The Patchwork Panel with Chicken Appliqué Pattern is a cheerful sewing project that combines colorful patchwork, curved appliqué shapes, decorative stitching, and a charming farmhouse-inspired chicken motif. Based on the project shown in the reference image, the design places a large chicken in the center of a square fabric panel while wedge-shaped pieces radiate toward the outer edges. The combination of teal, mustard yellow, coral red, olive green, soft blue, purple, cream, and orange gives the piece a warm handmade personality without making the composition feel too busy. Small floral prints work especially well because they add texture while allowing the silhouette of the chicken to remain easy to recognize. This project can be used as a quilt block, wall hanging, decorative pillow front, table mat, or the center of a larger patchwork quilt. Even though the finished panel looks detailed, the construction becomes approachable when the work is divided into background piecing, appliqué preparation, stitching, and finishing.
One of the most important concepts in this Patchwork Panel with Chicken Appliqué Pattern is appliqué, a sewing method in which smaller fabric shapes are positioned and attached over a larger background. In this project, appliqué is used to create the chicken’s head, body, wing, comb, beak, wattle, tail feathers, and eye. Patchwork, on the other hand, creates the colorful geometric background by joining individual fabric sections into one larger panel. Combining these two methods provides a wonderful opportunity to practice accurate cutting, smooth curved edges, fabric placement, and decorative topstitching. Beginners can simplify the process by using fusible web appliqué, while experienced sewists may prefer needle-turn appliqué or another traditional technique. Regardless of the method, careful preparation before stitching will make the final panel look cleaner and more balanced.
For a panel approximately 40 cm x 40 cm, prepare several cotton quilting fabrics, lightweight fusible web, matching or contrasting sewing thread, batting if you want to quilt the finished piece, and backing fabric. You will also need fabric scissors, paper scissors, a rotary cutter, quilting ruler, cutting mat, iron, pins or fabric clips, marking pencil, and a sewing machine. Choose fabrics with enough contrast between the background and the chicken so that each shape remains visible. The chicken in the reference design uses creamy neutral fabric for the head and breast, golden yellow for the body and wing, red for the comb and wattle, orange for the beak, and pale neutrals for the tail. A dark outline around the appliqué pieces gives the project its distinctive illustrated appearance. Preparing all materials before beginning will help you work through the Patchwork Panel with Chicken Appliqué Pattern without unnecessary interruptions.
Preparing the Fabrics and Creating the Patchwork Background
Begin by pre-pressing every fabric you intend to use. Quilting cotton is an excellent choice because it is stable, easy to cut, and available in many small-scale floral and tonal prints similar to those visible in the reference project. Remove strong wrinkles before measuring because creases can distort cutting accuracy. If your fabric tends to shrink significantly, you may choose to prewash and dry it before construction. Whichever method you select, use it consistently for all fabrics in the project.
DISCOVER MORE FREE PATTERNS HERE!
For the background, cut a square foundation or plan a finished patchwork area of approximately 40 cm x 40 cm. The image uses irregular triangular and wedge-shaped sections that visually radiate from the area behind the chicken. Instead of trying to make every section identical, create a balanced arrangement of wedges in different widths. Include approximately eight to ten fabric sections so that you have plenty of color variation. Leave an additional 0.7 cm seam allowance around pieced edges unless your preferred quilting method uses another allowance.
Lay the background sections on a flat surface before sewing them together. Try placing teal and blue fabrics on one side, yellow and green toward the upper portion, and warmer coral or red fabrics around the lower and side areas. A purple section can add contrast near one corner. The goal is not to reproduce every fabric exactly but to maintain the energetic radial composition. Photographing your arrangement before sewing can help you remember the intended placement.
Join neighboring background pieces with a straight stitch using approximately a 0.7 cm seam allowance. Press each seam as you work rather than waiting until the entire background has been assembled. Pressing seams to alternating sides may help distribute bulk, while pressing them open can create an especially flat surface for appliqué. Always press rather than aggressively sliding the iron across the patchwork because excessive movement can stretch bias edges. Continue joining sections until you have one complete square panel.
Once the background has been assembled, place it on the cutting mat and square the edges with a quilting ruler. Trim the piece to approximately 40 cm x 40 cm, or adjust the dimensions to your intended finished project. Check that none of the seam allowances have opened during trimming. If necessary, secure loose seam ends with a few machine stitches. A flat and accurately squared background will make later appliqué placement considerably easier.
The radial background is an important feature of the Patchwork Panel with Chicken Appliqué Pattern because it creates movement without requiring complicated quilting blocks. It also provides an opportunity to use fabric scraps that might otherwise remain unused. Small floral prints, dots, vines, and tone-on-tone fabrics are particularly effective because they create visual depth while remaining subtle. Avoid placing several extremely bold prints directly beside one another unless you want a very dramatic result. The chicken should remain the central focus.
Creating and Positioning the Chicken Appliqué Pieces
Create paper templates for the chicken before cutting your fabrics. You will need separate templates for the head and neck, lower breast, large body, wing, three comb sections, wattle, triangular beak, eye, and approximately four overlapping tail feathers. The shapes do not need to be mechanically perfect; the gentle irregularity of handmade appliqué contributes to the charm of the project. Keep the curves smooth so they are easier to stitch. Label each template before cutting it from paper.
For fusible appliqué, trace every template onto the paper side of lightweight fusible web. When a shape has a directional orientation, remember that tracing it onto fusible web can reverse the final piece. Leave a small amount of space between traced shapes and cut them roughly apart. Fuse each piece to the wrong side of its corresponding fabric according to the manufacturer’s instructions for your fusible product. Allow the fabric to cool completely before trimming.
Cut directly along the traced outlines to create clean appliqué shapes. Use cream or ivory fabric for the head and breast, golden yellow fabric for the body and wing, red for the comb and wattle, and orange for the beak. For the tail feathers, use several light neutral fabrics with subtle floral prints so they remain distinguishable while still appearing coordinated. A small dark circle can be cut for the eye, although a button or embroidered eye could also be used after quilting if desired. Keep every cut piece organized until assembly.
Place the lower breast and large yellow body first because these establish the main proportions of the chicken. Next position the head so that its lower edge overlaps the body naturally. Add the golden wing over the body and arrange the tail feathers behind the body, allowing each feather to overlap the one beside it. Position the comb pieces above the head, followed by the red wattle underneath. Complete the silhouette with the orange beak.
Before permanently fusing anything, step back and examine the composition. The chicken should occupy most of the center area without touching the outer border of the patchwork square. Make sure the tail feathers remain clearly visible and that the head is positioned at a natural angle. Adjust the wing until its curved shape follows the body comfortably. Once you are satisfied, lightly mark important placement points with a removable fabric marker.
Fuse the appliqué pieces progressively rather than attempting to attach everything at the same time. Tail feathers that sit behind the body should usually be fused first, followed by the main body, breast, head, wing, comb, beak, and wattle. Follow the recommended heat and pressing time for your fusible web. Do not slide the iron because that may shift smaller pieces. The completed arrangement should now closely resemble the central composition of the Patchwork Panel with Chicken Appliqué Pattern.
Stitching the Appliqué and Adding the Characteristic Outlines
The dark outlines are one of the most recognizable visual elements of this project. They define the chicken against the colorful patchwork and give the appliqué an almost illustrated appearance. You can reproduce this effect with dark brown, charcoal, or black thread. Choose a thread weight appropriate for your sewing machine and test it on scrap fabric first. Adjust tension if necessary before stitching the actual panel.
A narrow zigzag stitch is a beginner-friendly way to secure raw-edge appliqué. Set the machine so that one side of the zigzag catches the appliqué fabric while the other side falls just beyond its edge. Another option is a blanket stitch, which creates a more decorative handcrafted look. For a softer result, a straight stitch positioned approximately 2 mm inside the appliqué edge can also be attractive. The choice depends on the finish you prefer.
Begin stitching the shapes that sit underneath other pieces whenever their visible edges remain accessible. Work slowly around the curved tail feathers because smooth curves are essential to the finished appearance. When turning around tight curves, stop with the needle lowered into the fabric, lift the presser foot slightly, rotate the panel, and continue sewing. Small rotations create smoother lines than one large pivot. Avoid pulling the panel while stitching.
Outline the body, breast, head, wing, comb, wattle, and beak in the same manner. Pay particular attention to the junction between the head and body because several curved edges meet in that area. Consistent stitching makes the individual fabric pieces read as one unified chicken rather than disconnected shapes. If you are using blanket stitch, maintain the same stitch length around all major pieces. Decorative consistency is more important than absolute perfection.
Add the eye only after the main appliqué is secure. A small black fabric circle produces the graphic appearance seen in the reference design. You can fuse and stitch it, create it with satin stitch embroidery, or attach a small button if the final piece will not be used by very young children. Position the eye slightly forward and above the center of the head. A tiny highlight can be added with pale thread if you want a livelier expression.
When the outlines are complete, inspect the back and front of the panel. Trim long thread tails and correct any edges that have not been secured properly. The combination of raw-edge appliqué, decorative stitching, and patchwork piecing gives the project its distinctive handmade texture. These techniques are at the heart of the Patchwork Panel with Chicken Appliqué Pattern and can later be adapted to many other animal, floral, or seasonal fabric designs.
Quilting, Finishing, and Using the Completed Panel
If you want the piece to become a quilted panel, prepare a backing square and batting slightly larger than the patchwork top. For a 40 cm x 40 cm top, pieces around 44 cm x 44 cm provide enough extra material for handling and trimming. Place the backing wrong side up, add the batting, and position the appliqué panel right side up. Smooth all three layers carefully before basting them together.
Baste with safety pins, temporary basting spray, or long hand stitches. Start in the center and work toward the outer edges so that no wrinkles become trapped between the layers. Check the back after basting because folds can be difficult to correct once quilting begins. Keep pins away from the immediate sewing path. A well-basted quilt sandwich helps create an even, professional finish.
For simple quilting, stitch along some of the seams in the colorful patchwork background. This technique is commonly called stitching in the ditch, meaning that the quilting line follows the seam between two fabric sections. You can also echo-quilt approximately 5 mm to 10 mm outside the chicken silhouette. These lines help emphasize the appliqué while securing the layers. Avoid excessive quilting directly across the facial features unless that is part of your intended style.
After quilting, square the project again and trim away excess batting and backing. Check all four corners with a quilting ruler. A properly squared panel will be easier to bind and will hang more evenly if displayed as wall décor. If you plan to transform the panel into a pillow cover, you can skip traditional binding and use the quilted panel as the front of the cushion. The design is versatile enough for several finishing options.
To bind the panel, prepare fabric strips approximately 6 cm wide and join them until you have enough length to surround the square. Fold the binding lengthwise with wrong sides together and press. Sew it around the front edge with approximately a 0.7 cm seam allowance, creating neat mitered corners. Fold the binding over the raw edge toward the back and secure it by hand or machine. Press the completed panel gently when finished.
Your completed Patchwork Panel with Chicken Appliqué Pattern can become a decorative wall quilt, kitchen textile, cushion front, farmhouse table decoration, or central block in a larger quilt. The project is especially effective because it combines several foundational sewing skills in one manageable format. You practice color coordination, geometric patchwork, fusible appliqué, curved stitching, quilting, and binding. Once you understand the construction order, you can easily change the colors or scale while maintaining the recognizable chicken design.
FAQ – Frequently Asked Questions
Is the Patchwork Panel with Chicken Appliqué Pattern suitable for beginners?
Yes. A confident beginner can successfully complete this project, particularly when using fusible web for the appliqué. The geometric background requires basic straight-seam sewing, while the chicken introduces gentle curved stitching. Beginners should practice their chosen appliqué stitch on scraps first. Working slowly around curves will usually produce better results than trying to sew quickly.
What is appliqué in quilting?
Appliqué is a decorative technique in which fabric shapes are attached to the surface of a larger piece of fabric. In this project, separate pieces create the chicken’s body, head, wing, tail, beak, comb, and wattle. Fusible web can temporarily and sometimes permanently bond those pieces before their edges are stitched. Appliqué allows detailed images to be created without piecing every shape into the background.
What is patchwork?
Patchwork is the process of sewing smaller pieces of fabric together to create a larger textile surface. The colorful background of this chicken panel is an example of patchwork because multiple geometric pieces are joined into one square. Patchwork can be highly structured or intentionally irregular. In this design, wedge-shaped pieces create the impression of rays spreading behind the chicken.
What fabric works best for this chicken appliqué project?
Quilting-weight cotton is one of the easiest fabrics to use. It cuts cleanly, presses well, and remains relatively stable while sewing. Small floral, dotted, and tonal prints are especially suitable for the look shown in the reference image. Try combining warm and cool colors while keeping the chicken fabrics sufficiently different from the background.
Can I sew the appliqué without fusible web?
Yes. Traditional needle-turn appliqué can be used instead of fusible web, although it requires additional preparation and hand sewing. You can also use freezer-paper templates or another turned-edge method. Raw-edge machine appliqué is generally faster and creates the strong outlined appearance that suits this particular chicken appliqué pattern.
Which stitch is best around the appliqué?
A narrow zigzag stitch, blanket stitch, or straight edge stitch can all work. The original visual style is especially compatible with a dark outline, so a dense but not overly wide stitch can emphasize each shape effectively. Test the stitch settings first because different thread weights and fabric thicknesses may require adjustments.
How can I prevent the appliqué from puckering?
Begin with a smooth, well-pressed background and apply fusible web evenly. Avoid stretching the patchwork while stitching curved sections. If the fabric still shifts, consider placing lightweight stabilizer behind the panel during appliqué stitching. Remove the stabilizer afterward if the product is designed to be removable.
Can I enlarge the Patchwork Panel with Chicken Appliqué Pattern?
Absolutely. The same design can be scaled to create a larger wall hanging or quilt center. Enlarge every template proportionally so that the chicken retains its original proportions. Increase the background dimensions accordingly and remember to preserve your seam allowances separately from the template scaling.
Can this design be used for a pillow?
Yes. A quilted version makes an attractive pillow front. After quilting the appliqué panel, trim it to the desired cushion dimensions and add either an envelope-style or zippered backing. For a pillow, consider keeping bulky buttons or dimensional decorations to a minimum so the surface remains comfortable.
Do I need to quilt directly over the chicken?
No. Quilting around the chicken can be enough to secure the layers while preserving the appliqué as the visual focus. Echo quilting around the silhouette is particularly effective. You can add limited quilting inside larger areas such as the body or wing if you want additional texture.
How do I make the curves look smooth?
Slow sewing is the key. Reduce the stitch length slightly when approaching tighter curves and rotate the fabric gradually with the needle down. Making several small directional adjustments creates a much smoother outline than forcing the fabric around the presser foot. Practicing on a curved scrap shape before beginning the actual chicken can also help.
Can fabric scraps be used for this project?
Yes, and this is one of the best features of the design. The background sections, comb, beak, wing, and tail feathers require relatively small pieces of fabric. Coordinated scraps can create a rich, varied look while reducing waste. Selecting fabrics from a similar print style can help make many different colors feel connected.
Conclusion
The Patchwork Panel with Chicken Appliqué Pattern brings together traditional patchwork and playful appliqué in a colorful project that can be adapted for many decorative uses. The process begins with assembling a geometric patchwork background and continues with creating individual templates for the chicken’s body, head, wing, tail feathers, comb, wattle, eye, and beak. Careful placement allows the layered shapes to form a balanced central motif without losing the movement created by the multicolored background.
You also learned how fusible appliqué can simplify construction, how dark decorative stitching can define each fabric shape, and how quilting can add stability and texture to the completed panel. Techniques such as raw-edge appliqué, stitching in the ditch, echo quilting, binding, accurate pressing, and careful fabric selection are useful far beyond this single project. They can become part of your foundation for creating additional quilt blocks, wall panels, cushions, table decorations, and personalized fabric art.
EASILY FIND THE FREE PDF FOR THIS PATTERN HERE!
Most importantly, this project does not have to be reproduced color for color. You can make your chicken bright and whimsical, soft and rustic, modern and minimalist, or completely scrap-based. What makes the Patchwork Panel with Chicken Appliqué Pattern appealing is the opportunity to combine your favorite fabrics while practicing practical quilting skills in a design that feels warm, cheerful, and distinctly handmade. If you make this project, leave your sincere opinion about the design and the techniques used. Which fabric combination would you choose for your chicken panel? Share your suggestions, color ideas, and possible improvements as well—creative feedback can inspire even more beautiful versions of this Patchwork Panel with Chicken Appliqué Pattern.