
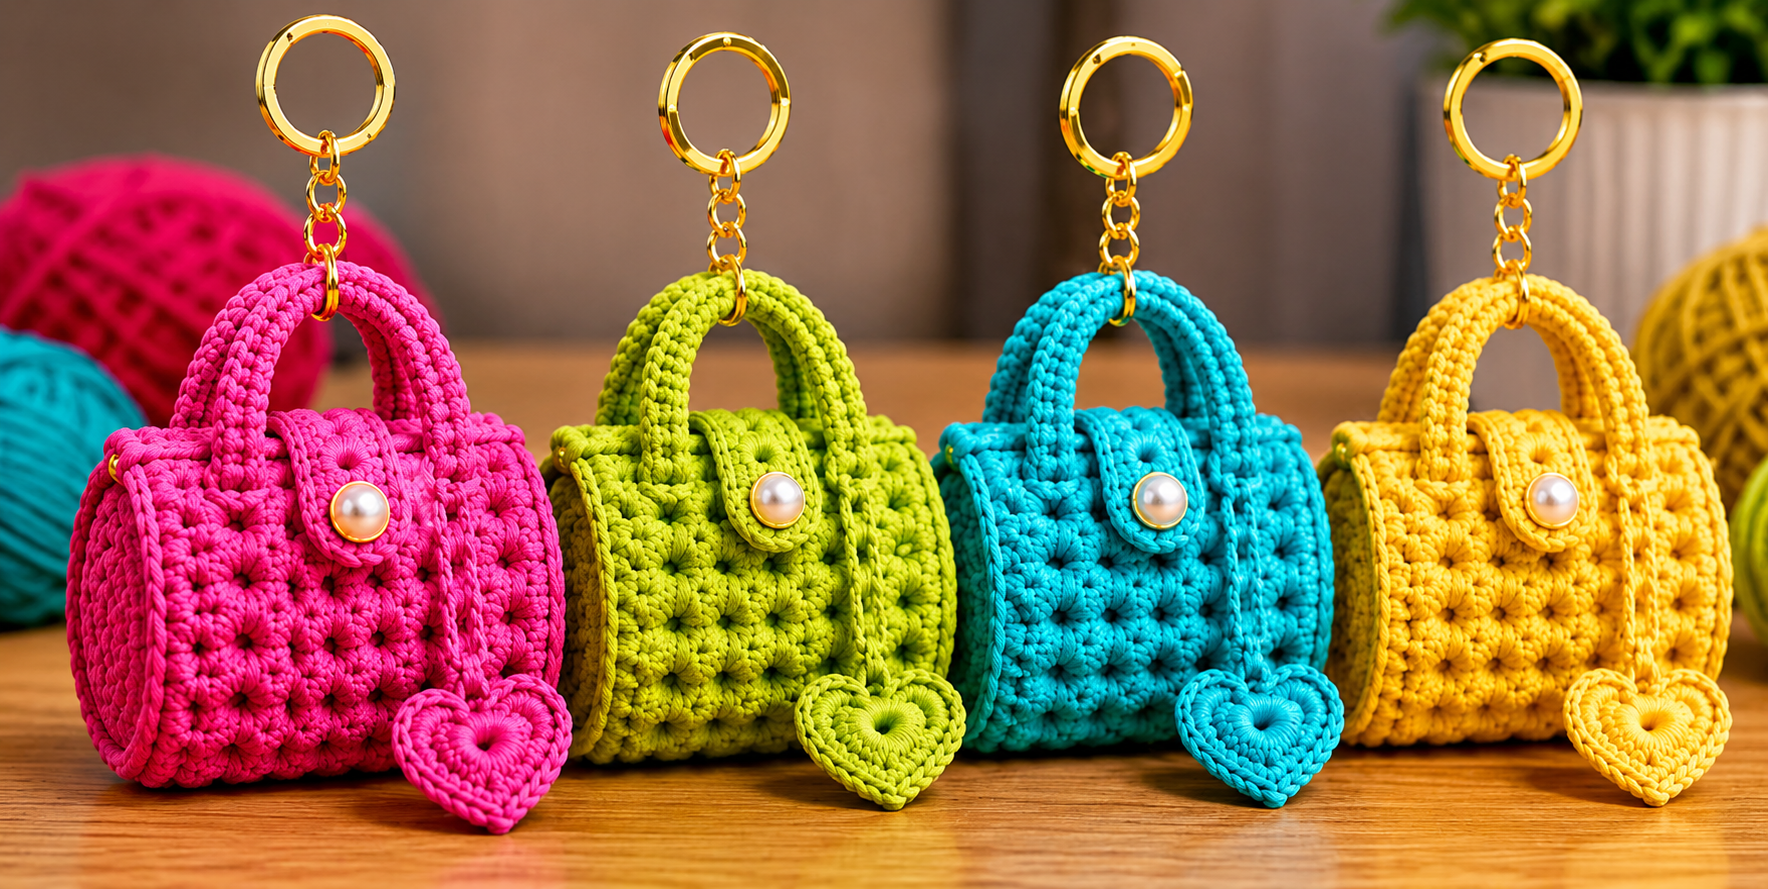
The Crochet Mini Bag Keychain Pattern is a charming project for anyone who loves creating small crochet accessories that are colorful, practical, and enjoyable to make. Inspired by miniature handbags with rounded handles, decorative closures, and keychain hardware, this design combines basic crochet techniques with a polished handmade appearance. Because the finished piece is small, it is a convenient project for using leftover yarn while practicing stitch consistency and shaping. Beginners can work slowly through each section, while more experienced crocheters can easily customize the design with different colors, textures, buttons, pearls, or charms. The project can become a keychain, backpack decoration, purse charm, handmade gift, or small decorative accessory. Most importantly, the pattern focuses on clear construction rather than complicated techniques, making it approachable for many skill levels.
One of the best features of this Crochet Mini Bag Keychain Pattern is that the structure can be created from only a few crochet components. You will make a compact rectangular bag body, shape the sides, crochet small handles, prepare a closure flap, and finally attach the key ring. A textured stitch can be used on the front to create the dimensional appearance seen in many modern mini crochet bags. The design is also flexible, so slight differences in yarn thickness or hook size will simply produce a slightly larger or smaller accessory. Cotton yarn provides excellent stitch definition, while a soft polyester cord can create a firmer and more structured mini handbag. Before beginning, read through the full instructions so you understand how the individual pieces will eventually connect.
For this tutorial, the terminology follows common US crochet terms, which makes the pattern easier to follow for crocheters familiar with American instructions. The approximate finished bag measures 7 to 8 cm wide, 5 to 6 cm high, and about 2.5 to 3 cm deep, excluding the handles and key ring. You will typically need a small amount of yarn, approximately 15 to 25 grams depending on thickness, a suitable crochet hook, yarn needle, scissors, stitch markers, a small decorative pearl or button, and a metal keychain ring with a short chain. A hook around 2.5 mm to 3.5 mm works well for many cotton or lightweight cord yarns, but always choose a hook that creates a firm fabric without making your hands uncomfortable. Since this project is decorative rather than size-sensitive clothing, precise gauge is less important than achieving a neat, dense fabric.
Materials, Crochet Stitch Key, and Preparation
Before making your Crochet Mini Bag Keychain Pattern, prepare all materials so the project can be completed without interruptions. Choose one main yarn color for the bag, although contrasting handles, flaps, or charms can also look beautiful. Cotton yarn is especially useful because it produces clean stitches and holds the shape of a miniature bag well. You will also need a crochet hook matched to your yarn, a tapestry needle, scissors, a small button or pearl-style embellishment, and a keychain ring. Optional items include a small amount of stuffing or felt if you want the bag to maintain an especially firm shape.
DISCOVER MORE FREE PATTERNS HERE!
Understanding the crochet stitch key before starting makes the instructions much easier. In this pattern, ch = chain, sl st = slip stitch, sc = single crochet, hdc = half double crochet, dc = double crochet, st = stitch, sts = stitches, sp = space, inc = increase, dec = decrease, FO = fasten off, and rep = repeat. These abbreviations are commonly used in US crochet patterns. When the pattern says “2 sc in next st,” you will work two single crochet stitches into the same stitch, creating an increase.
The basic chain stitch (ch) creates the foundation of several parts of the mini handbag. Make a slip knot, place it on the hook, yarn over, and pull the yarn through the loop already on the hook. Repeat this movement for each additional chain. Keep the chains relaxed and consistent because chains that are too tight can distort the base or handles. A smooth foundation helps the following rows remain even and prevents the finished accessory from curling unnecessarily.
The single crochet (sc) is one of the most important stitches in this mini bag pattern. Insert the hook into the indicated stitch, yarn over, and pull up a loop so that two loops remain on your hook. Yarn over again and pull through both loops. Single crochet produces a compact, sturdy fabric that is ideal for miniature accessories. For the side panels, handle edges, and joining sections, this stitch provides both stability and a tidy handmade finish.
For additional texture, you can use a compact cluster-style stitch across the front and back panels. One beginner-friendly option is to alternate groups of half double crochet stitches or small puff stitches with basic single crochet rows. To create a simple puff, yarn over, insert the hook into the stitch, pull up a loop, and repeat this action several times in the same stitch before pulling the yarn through the accumulated loops. Keep the puffs small because oversized texture can overwhelm a miniature project. Consistent tension is more important than making every decorative stitch extremely prominent.
Before starting the main construction, make a small test section with your chosen yarn and hook. Crochet approximately 10 to 15 stitches and work several rows to see whether the fabric feels firm enough. If large openings appear between stitches, try a slightly smaller hook. If the fabric is extremely stiff and difficult to crochet, increase the hook size slightly. This quick preparation can greatly improve the final appearance of the Crochet Mini Bag Keychain Pattern because miniature pieces highlight uneven tension more noticeably than larger projects.
Crocheting the Mini Bag Body Step by Step
Begin the body by making ch 15, or enough chains to measure approximately 7 cm. Starting in the second chain from the hook, work 1 sc in each ch across, giving you approximately 14 stitches. Ch 1 and turn. Work another row of single crochet across. This creates a strong lower foundation for the miniature handbag and gives you a stable edge for building the decorative body.
For the third row, begin adding texture. Ch 1 and work a small puff or textured cluster into the first appropriate stitch, then secure it with a single crochet in the following stitch. Continue alternating the textured stitch and sc across the row. If you prefer a simpler beginner crochet pattern, work entirely in single crochet instead. The silhouette of the finished mini handbag will still look attractive even without raised decorative stitches.
Continue working until the rectangle measures approximately 5 to 6 cm high. Try to maintain the same number of stitches in every row because accidental increases along the sides can make the bag widen toward the top. Place a stitch marker in the first and last stitch if necessary. When the first panel reaches the desired height, FO and weave the yarn tail temporarily toward the inside. Make a second identical rectangle for the opposite side of the bag.
To give the mini bag some depth, crochet a narrow strip approximately 2.5 to 3 cm wide that will form the bottom and sides. Start with enough chains to reach the desired width, then crochet back and forth in single crochet. Continue until the strip is long enough to travel from one upper corner, around the side, across the bottom, and up to the opposite upper corner of the rectangular panel. Do not worry if the measurement varies slightly because the strip can be adjusted before final assembly.
Position the narrow strip against the first body panel with the edges aligned. Using the main yarn color, work sl st or sc through both layers around the first side, bottom, and second side. Repeat the process with the second panel. Working the join on the outside creates a decorative raised edge, while joining from the wrong side and turning the piece afterward produces a smoother seam. Both methods are suitable for the Crochet Mini Bag Keychain Pattern.
Once both panels are joined, gently shape the miniature bag with your fingers. Check the corners and make sure the top opening remains reasonably straight. If the fabric feels too soft, you may place a small piece of felt inside for added structure, although this is optional. Do not overfill the bag because excessive stuffing can distort the crochet texture. At this point, the project should resemble a tiny handbag without its handles, closure, or keychain hardware.
Making the Handles, Flap, Heart Charm, and Key Ring
For the first handle, make approximately ch 18 to ch 24, depending on the yarn thickness and desired handle size. The chain should create a small arch measuring roughly 5 to 6 cm from one attachment point to the other. Starting in the second chain from the hook, work 1 sc in each chain. For a thicker handle similar to a structured miniature handbag, turn and crochet one additional row of sc. FO, leaving a long tail for sewing.
Create a second handle using exactly the same number of chains and rows. Place one handle on the front panel and one on the back panel, making sure both are centered. Sew each handle approximately 1 to 1.5 cm inward from the side edges. Stitch through the handle ends several times so they remain secure when attached to a key ring. Avoid pulling the sewing thread too tightly because this can make the top edge of the miniature bag pucker.
The small center flap gives the Crochet Mini Bag Keychain Pattern its recognizable handbag appearance. Ch 4 or 5 and work short rows of sc until the flap measures approximately 1.5 to 2 cm long. For a rounded end, place two or three stitches into the final edge or decrease gently toward the tip. Sew the upper end of the flap to the center of the back or front top edge, depending on the style you prefer. Add a small decorative button or pearl to imitate a handbag clasp.
A matching crochet heart charm can make the finished accessory more playful. Begin with a magic ring. Into the ring, work a combination such as ch 2, 3 dc, 3 hdc, ch 1, 1 dc, ch 1, 3 hdc, 3 dc, ch 2, sl st. Pull the magic ring closed carefully. Because yarn thickness affects the shape, gently adjust the stitches with your fingers until the heart looks balanced. Leave a long yarn tail or add a small chain loop for attaching the charm.
To attach the heart, make a short crochet cord using approximately ch 5 to ch 8 and connect it to one side of the handbag. Alternatively, use a small metal jump ring if you prefer jewelry-style hardware. The charm should hang slightly below the bottom edge without becoming disproportionately long. You can create the heart in the same color as the bag for a coordinated appearance or use a contrasting color for a more playful crochet keychain design.
Finally, attach the keychain hardware. A small metal split ring with a short chain works particularly well. Pass the final chain link around the center of both crochet handles or attach it securely through a reinforced stitch at the top. Use pliers carefully if the hardware requires opening a jump ring. Check that every connection is closed and stable before using the accessory. The combination of sturdy handles, compact crochet fabric, and properly attached hardware makes the finished mini bag both decorative and functional.
Finishing, Customizing, and Improving Your Crochet Mini Bag
Finishing details can transform a simple crochet project into a beautifully polished accessory. Use a yarn needle to weave each loose tail through several stitches on the wrong side of the work. Change direction once or twice before trimming the yarn so the tail is less likely to work loose. Inspect the seams and gently reshape the corners. A careful finishing process is especially important for a mini crochet bag because small imperfections can be more noticeable on compact pieces.
Color is one of the easiest ways to personalize the Crochet Mini Bag Keychain Pattern. Bright pink, turquoise, lime green, yellow, lavender, red, or orange can create cheerful accessories, while cream, beige, brown, black, and gray produce more neutral designs. You can also crochet several mini bags in different colors while using identical hardware. A coordinated set can make an appealing handmade gift collection without requiring you to learn a completely different pattern for every piece.
Yarn choice also changes the appearance dramatically. Smooth mercerized cotton emphasizes individual stitches and creates a crisp finish. Softer cotton blends give the bag a gentler texture, while thin polyester cord can produce a more structured look. Avoid extremely fuzzy yarn when making your first miniature bag because it can make the stitches difficult to identify. Being able to see each stitch clearly helps tremendously when working small rows and joining narrow pieces.
If your bag becomes wider as you crochet upward, count your stitches at the end of every row. Beginners sometimes accidentally crochet into the turning chain, creating an unwanted increase. If the fabric becomes narrower, the final stitch may have been skipped. Using stitch markers at both ends of each row is a simple solution. Correct stitch counts are one of the most effective ways to keep the Crochet Mini Bag Keychain Pattern symmetrical.
Another common issue is a handle that twists after attachment. Before sewing each handle permanently, place the bag flat on a table and make sure the chain is facing the same direction along the entire arch. Pin or temporarily secure both ends, compare the front and back handles, and then sew them firmly. Taking an extra minute to check alignment can make the final accessory look considerably more professional.
Once you understand the basic construction, this pattern offers plenty of opportunities for creativity. Add tiny flowers, embroidered initials, miniature bows, contrasting edging, small beads, or different crochet charms. You can also adapt the foundation chain to create slightly wider bags or reduce it for very small versions. Keep the proportions balanced by adjusting the height, handles, and flap accordingly. This flexibility is what makes the Crochet Mini Bag Keychain Pattern an enjoyable project to repeat and personalize.
FAQ – Frequently Asked Questions About the Crochet Mini Bag Keychain Pattern
Is the Crochet Mini Bag Keychain Pattern suitable for beginners? Yes. The basic version mainly uses chain stitches, single crochet, slip stitches, and simple joining techniques. Beginners can omit textured puff stitches during their first attempt and make the entire body using single crochet. Once they become comfortable with the construction, texture can easily be added to future versions.
What size should the finished crochet mini bag be? A practical finished size is approximately 7 to 8 cm wide and 5 to 6 cm high, not including the handle or key ring. However, crochet tension and yarn thickness will affect the exact measurements. Because this is an accessory rather than a fitted garment, small variations are completely acceptable.
Which yarn is best for a crochet mini bag keychain? Cotton or cotton-blend yarn is an excellent option because it usually provides good stitch definition and durability. Thin polyester or macramé-style cord can also work when a firmer structure is desired. The most important factor is choosing a yarn that allows you to crochet dense, neat stitches.
How much yarn do I need for one mini bag? Most versions require only a small quantity, often around 15 to 25 grams of yarn, although this depends on yarn weight, stitch texture, and finished dimensions. This makes the project particularly useful for leftover yarn from larger crochet projects.
Can I make the mini bag without a heart charm? Absolutely. The heart is purely decorative. You can leave the bag without a charm, replace it with a crochet flower, star, tassel, miniature bow, or another small motif. Keeping the decoration lightweight helps prevent unnecessary strain on the crochet handle.
Can I replace the pearl-style closure? Yes. A small button, bead, embroidered knot, crochet bobble, or miniature flower can replace the pearl. Make sure any small decorative component is attached securely, particularly when the keychain will be used frequently.
Why are there holes between my crochet stitches? Large gaps usually indicate that the hook is slightly too large for the yarn or that the tension is loose. Try moving down one hook size and crochet a small test swatch. For miniature bags, a relatively firm crochet fabric generally provides better structure and more clearly defined texture.
How can I make the bag more structured? Use a slightly smaller hook, select firm cotton or polyester cord, and maintain consistent tension. You may also add a small felt lining inside the body. Another option is to crochet the panels using single crochet, which creates a denser fabric than many taller stitches.
Can I make several sizes from the same pattern? Yes. Increase or decrease the foundation chain to change the width, then adjust the number of rows to maintain the desired proportions. If you enlarge the body significantly, also lengthen the side strip, handles, and flap so every component remains visually balanced.
What does US crochet terminology mean in this pattern? This tutorial uses American stitch names. For example, sc means single crochet, hdc means half double crochet, dc means double crochet, ch means chain, and sl st means slip stitch. Knowing the terminology is important because some international crochet systems use different names for equivalent stitches.
How do I keep both handles the same size? Write down the number of chains and rows used for the first handle, then repeat exactly the same numbers for the second. Count carefully and compare both handles before sewing them onto the bag. Consistent tension also helps keep them symmetrical.
Can this pattern be used to make handmade gifts? Certainly. Mini crochet bag keychains are compact projects that can be personalized with favorite colors, initials, charms, or decorative closures. If making them for children, remember that small beads, buttons, and detachable hardware may present a choking hazard, so age-appropriate construction and supervision should always be considered.
Conclusion
The Crochet Mini Bag Keychain Pattern combines simple crochet construction with adorable handbag-inspired details. Throughout this tutorial, you learned how to choose appropriate yarn and hook sizes, understand important crochet abbreviations, create firm front and back panels, add a narrow side section, join the bag, crochet matching handles, prepare a decorative flap, make a small heart charm, and attach keychain hardware. These techniques can also be reused in many other miniature crochet accessories.
Once you have completed your first mini bag, experiment with different colors, stitches, buttons, pearls, and charms to create your own variation. The same basic pattern can produce a cheerful collection of pink, green, turquoise, yellow, neutral, or multicolored keychains while allowing each piece to have its own personality. Practicing consistent tension and careful finishing will improve each new version you make. I hope this Crochet Mini Bag Keychain Pattern helps you turn a small amount of yarn into a creative handmade accessory while developing useful crochet skills along the way. If you make this project, leave your sincere opinion about the pattern and share your suggestions for future crochet projects. Your ideas about colors, decorative details, stitch variations, and other miniature accessories can inspire even more creative versions of this design.