
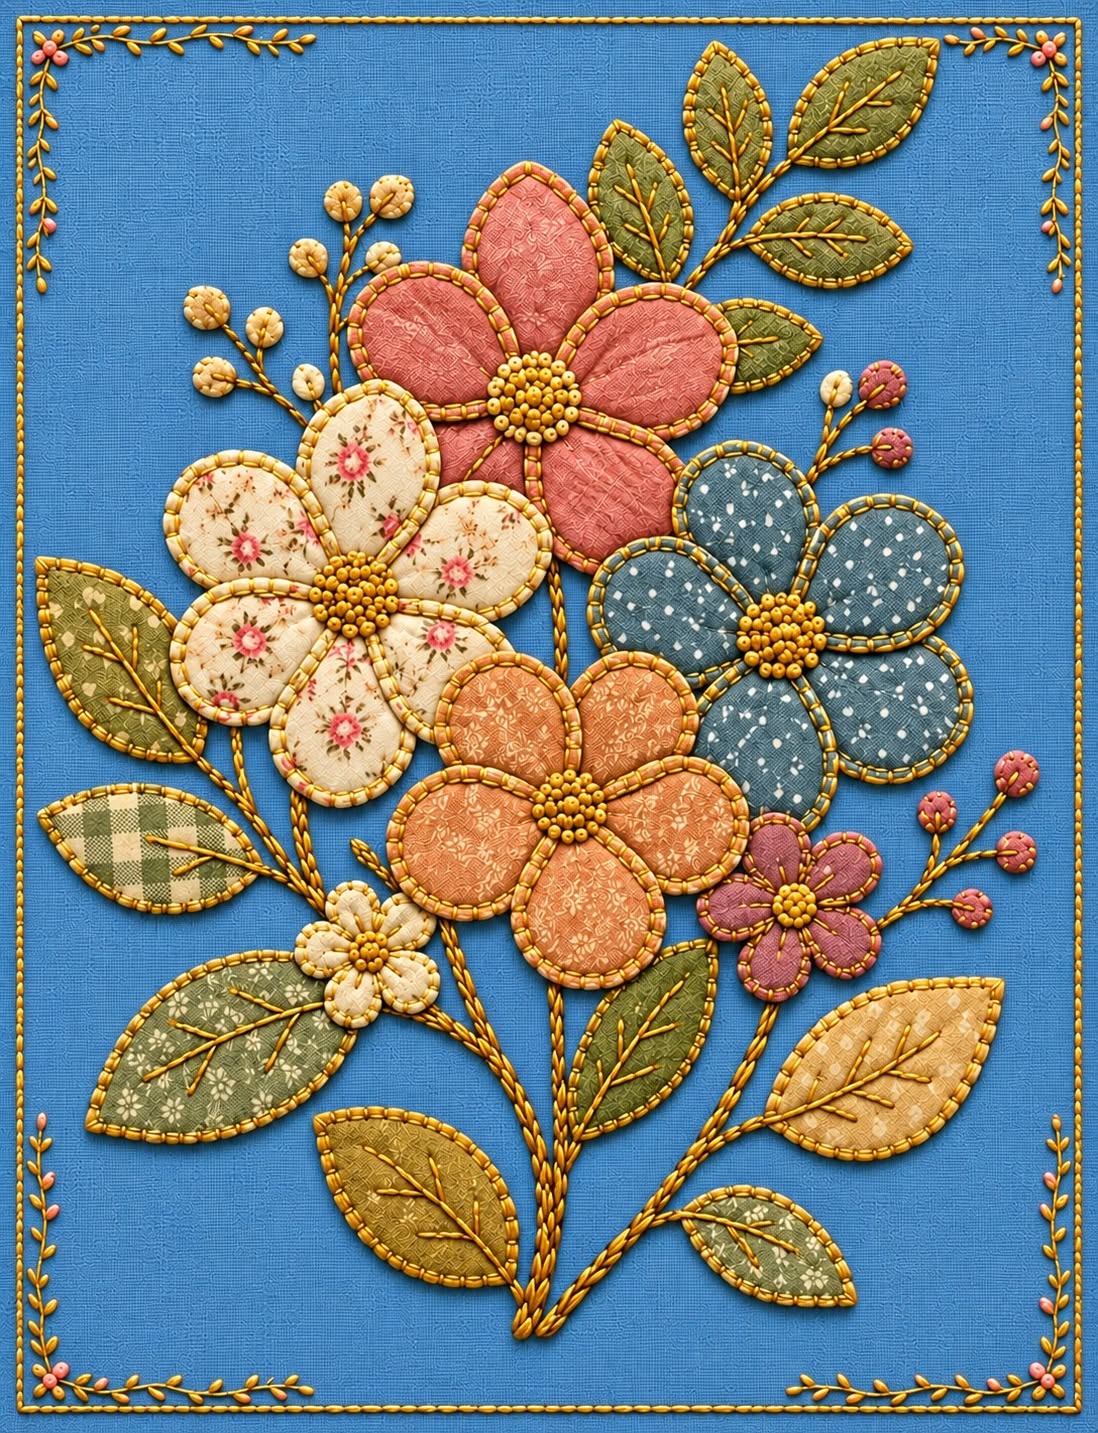
The Patchwork Flower Bouquet with Appliqué Pattern is a charming textile project that combines soft floral shapes, carefully selected fabrics, decorative embroidery, and traditional hand-appliqué techniques. Inspired by the photograph, this design features several layered flowers in muted pink, blue, cream, peach, and mauve tones, surrounded by fabric leaves, embroidered stems, and delicate buds. The finished composition has a warm vintage appearance that works beautifully as framed textile art, a quilt block, a cushion panel, a wall hanging, or the centerpiece of a larger patchwork project. Although the arrangement looks elaborate, it can be completed gradually by preparing one flower, leaf, and stem at a time. This makes the project enjoyable for patient beginners while still offering enough creative detail to interest experienced quilters.
A patchwork flower bouquet is created by combining fabric pieces of different colors, prints, and textures into a unified botanical arrangement. Patchwork refers to the use of multiple fabric sections within the same design, while appliqué is the process of attaching shaped fabric pieces to a larger background. In this project, the petals and leaves are cut separately and sewn onto a neutral fabric base. Visible blanket stitches or decorative running stitches define each shape and contribute to the handmade character of the bouquet. Embroidered branches, leaf veins, flower centers, and tiny buds add depth without making the design feel overly complicated. The result is a dimensional fabric picture that celebrates slow sewing and allows even small fabric scraps to become part of something beautiful.
The term appliqué pattern describes the set of templates used to reproduce the flowers, petals, leaves, and smaller decorative components. A good pattern helps maintain consistent proportions while still leaving room for individual interpretation. For this bouquet, the templates can be drawn by observing the basic shapes in the reference image: rounded teardrop petals, pointed oval leaves, small circular centers, and gently curved stems. Exact duplication is not necessary because natural flowers are rarely perfectly symmetrical. Slight differences between the petals and leaves can make the composition more organic. By following the preparation, assembly, stitching, and finishing instructions below, you can create your own Patchwork Flower Bouquet with Appliqué Pattern using fabrics that match your home, sewing style, or favorite seasonal palette.
Materials, Fabrics, and Appliqué Preparation
Begin by choosing a firm but pleasant background fabric for the fabric flower appliqué. Natural linen, cotton-linen blend, quilting cotton, or lightweight canvas can all work well. A cream, ivory, pale beige, or light gray background allows the flowers and leaves to remain the main focus. Wash, dry, and press the background before cutting it because natural fibers may shrink. Cut the panel several centimeters larger than the planned finished size so that it can be trimmed after the embroidery and appliqué are complete.
DISCOVER MORE FREE PATTERNS HERE!
Select a group of coordinating fabrics for the petals and leaves. The photographed arrangement uses dusty rose, faded blue, peach, cream, olive, sage, taupe, and soft mauve. Small floral prints, dots, checks, and tone-on-tone patterns create visual variety without overwhelming the composition. Choose medium and light values as well as a few darker pieces for contrast. The beauty of a scrap fabric appliqué project is that you can use leftover quilting cotton from previous work, provided the pieces are large enough for the templates.
You will also need paper or lightweight cardboard for the templates, sharp fabric scissors, embroidery scissors, sewing pins, a washable fabric marker, coordinating sewing thread, embroidery floss, and a suitable hand-sewing needle. Optional supplies include fusible web, lightweight interfacing, fabric glue, a small embroidery hoop, and batting. Fusible web is useful for stabilizing the pieces before stitching, but traditional needle-turn appliqué can be used instead. Select the method that feels most comfortable and appropriate for the desired finish.
Create the flower templates by drawing rounded petals in at least three sizes. The larger flowers in the reference have five broad petals, while the smaller blossoms also use five petals in a more compact arrangement. Draw pointed oval templates for the leaves, including large, medium, and small versions. Add a circular template for each flower center and tiny oval or circular shapes for the buds. Mark every template with its name, size, and quantity so the preparation stage remains organized.
Decide whether the pattern pieces will include a seam allowance. For raw-edge appliqué, cut directly on the finished outline because the edge will remain visible and be covered or secured with decorative stitches. For needle-turn appliqué, add approximately 6 millimeters around each template. This extra fabric is folded underneath while sewing. If you use fusible appliqué, trace the templates onto the paper side of the fusible web, cut them roughly, iron them to the wrong side of the chosen fabrics, and then cut along the exact outlines.
Before attaching anything, arrange the cut pieces on the background. Place the largest flowers first because they establish the scale and balance of the appliqué flower bouquet. Add the medium and small flowers, leaving enough open space for stems, leaves, buds, and branches. Take a photograph of the arrangement before moving the pieces. This image will serve as a placement guide and prevent confusion when the components are removed for stitching.
Building the Main Patchwork Flowers
Start with the large upper flower, which can be made from dusty rose fabric. Position five rounded petals so that their narrow ends meet near the center. Slightly overlap the petal bases to avoid visible gaps. Pin, baste, glue, or fuse the petals in position. Keep the shape relaxed rather than perfectly geometric. A handcrafted patchwork appliqué flower often looks more natural when each petal has a slightly different angle.
Sew around each petal using blanket stitch, whipstitch, or small running stitches. Blanket stitch creates a clearly defined border similar to the visible stitching in the reference image. Use embroidery floss in a shade slightly darker than the fabric to emphasize the edges. Keep the stitch length consistent, but do not worry about absolute perfection. The small variations created by hand stitching contribute to the rustic and vintage personality of the design.
Create the cream floral-print flower using another set of five petals. Place it slightly lower and to the left of the upper flower. A printed fabric introduces delicate details that contrast with the solid or tone-on-tone petals. Stitch each petal separately, allowing the edges to overlap gently. If the fabric is thin, apply lightweight interfacing to the back before cutting. This prevents distortion and gives the petals enough structure to lie smoothly against the background.
Construct the blue flower on the right using dotted or softly printed blue-gray fabric. Position it so that it overlaps part of the cream flower or sits close enough to create a connected bouquet. Repeating the same basic five-petal form helps unify the design, while the change in fabric makes every bloom distinct. Rotate the templates as you trace them so that the print direction varies naturally across the petals.
Add the peach flower near the lower center of the composition. This flower visually connects the larger blossoms with the smaller mauve flower and the surrounding foliage. Use peach, terracotta, faded coral, or pale brown fabric depending on the available scraps. To add dimension, place a small piece of thin batting beneath each petal before sewing. Trim the batting slightly smaller than the fabric shape so it remains hidden beneath the stitched edge.
Complete the main flowers by forming textured centers. Small French knots, colonial knots, seed stitches, or tiny gathered fabric circles can reproduce the clustered centers shown in the image. Use golden beige, tan, ochre, or light brown embroidery thread. Work the knots close together, beginning around the outer edge and filling toward the middle. A dense center gives the textile flower bouquet a tactile quality and helps conceal the meeting points of the petals.
Adding Leaves, Stems, Buds, and Embroidery
Once the flowers are secure, lightly draw the main stems with a removable fabric marker. The stems should begin near the lower center and curve upward toward the blossoms. Avoid making every line perfectly straight. Gentle curves create movement and make the bouquet appear freshly gathered. Use stem stitch, split stitch, couching, or a twisted cord technique to embroider these lines with brown, olive, or muted green floss.
Prepare the fabric leaves in several shades of olive, sage, khaki, taupe, and gray-green. Using different prints and tones prevents the greenery from becoming flat. Position some leaves close to the flowers and others near the outer edges of the arrangement. Turn the leaves in different directions so that the bouquet feels balanced. Secure them with the same appliqué stitch used for the petals to maintain a consistent finish throughout the project.
Embroider a central vein on each leaf using stem stitch or backstitch. Add smaller diagonal veins that branch toward the edges. These lines can be slightly uneven because real leaf veins are irregular. Choose thread that is darker than the leaf fabric but still harmonious with it. The embroidered veins provide definition and visually connect the fabric leaves with the stitched stems.
Create the smaller blossoms after the large flowers and leaves are in place. A little cream flower near the lower left and a mauve flower near the lower right can fill open spaces without competing with the main focal points. Use smaller versions of the five-petal template. Their centers may be made with a single cluster of knots, a small fabric circle, or a tiny embroidered wheel. These secondary flowers help the floral quilt block feel complete and thoughtfully arranged.
Add narrow branches with small buds to both sides and the upper portion of the bouquet. Embroider each branch using a fine stem stitch. For the buds, use tiny fabric circles, padded satin stitch, French knots, or small appliquéd ovals. Mix cream, beige, dusty pink, and mauve to repeat colors already present in the main flowers. Repetition is important because it creates harmony across the entire composition.
Review the arrangement and fill any awkward empty areas with a small leaf, curved branch, or simple embroidered line. Do not fill every part of the background. Negative space allows the flowers to remain easy to see and keeps the finished panel from looking crowded. Hold the work at a distance or photograph it in black and white to check whether the visual weight is evenly distributed between the upper, lower, left, and right portions.
Finishing and Displaying the Appliqué Bouquet
After completing the appliqué and embroidery, inspect the back of the panel. Secure loose thread ends with small knots or weave them underneath nearby stitches. Avoid leaving long thread tails because they may show through a light background. If you used a washable marker, remove the remaining lines according to the manufacturer’s instructions. Allow the panel to dry completely before pressing it.
Press the finished Patchwork Flower Bouquet with Appliqué Pattern from the wrong side. Place it face down on a folded towel so the textured knots and raised stitches are not flattened. Use moderate heat suitable for the fabrics and avoid dragging the iron across the surface. Pressing from the reverse side smooths the background while protecting the dimensional flower centers and decorative stitching.
To transform the panel into a quilt block, layer it with batting and backing fabric. Baste the layers and quilt around the outside of the flowers and leaves. This technique, often called echo quilting or outline quilting, emphasizes the shapes. Additional quilting may be added to the background with gentle curves, small leaves, or a simple grid. Keep the quilting subtle so it supports rather than competes with the appliqué.
For a cushion cover, trim the panel to the required size and add patchwork borders if necessary. A narrow inner border in dusty rose, blue, or olive can frame the bouquet, while a wider neutral border creates breathing room. Add an envelope-style back or a zipper closure. Insert a cushion form only after checking that every seam and appliquéd element is secure.
The design can also be displayed as textile wall art. Stretch the completed panel over an artist’s canvas, place it in a shadow box, or sew a backing and hanging sleeve to create a small wall quilt. Avoid pressing the finished piece directly against glass because the raised centers and appliquéd petals are important parts of its character. A deep frame provides protection while preserving the three-dimensional texture.
Finally, personalize the project through fabric selection and decorative details. Spring versions may use pastel pink, lavender, pale yellow, and fresh green. Autumn versions can include rust, mustard, burgundy, and brown. A modern interpretation could feature bold solids and contrasting thread, while a romantic version might use vintage floral prints. The core appliqué pattern remains adaptable, making this bouquet suitable for many creative styles.
Frequently Asked Questions About the Patchwork Flower Bouquet with Appliqué Pattern
What is the best fabric for a flower appliqué project?
Quilting cotton is one of the best choices because it is stable, easy to cut, available in many prints, and comfortable to sew by hand or machine. Linen blends can also be used for leaves and petals, although loosely woven fabrics may require interfacing. Avoid very stretchy materials unless they are stabilized before cutting.
Can a beginner make this patchwork flower bouquet?
Yes. A beginner can complete the design by working slowly and treating each component as a separate mini project. Start with larger petals and leaves because they are easier to handle. Practice blanket stitch on scrap fabric before sewing the final pieces. The small imperfections of hand appliqué usually enhance the handmade appearance.
What is the difference between patchwork and appliqué?
Patchwork joins fabric pieces along their edges to create a larger surface, such as a traditional quilt top. Appliqué places shaped pieces on top of a background and stitches them in position. This project uses patchwork principles through its combination of assorted scraps, but the flowers and leaves are primarily constructed with appliqué.
Should I use fusible web or traditional needle-turn appliqué?
Fusible web is faster and helps prevent the shapes from moving while they are stitched. It is a practical option for beginners and for raw-edge appliqué. Needle-turn appliqué produces smoother folded edges and a traditional finish, but it requires more time and practice. Both methods are suitable for the Patchwork Flower Bouquet with Appliqué Pattern.
How can I prevent the appliqué pieces from fraying?
Use a closely spaced blanket stitch, apply a small amount of fabric sealant to raw edges, or select fusible web designed for appliqué. Needle-turn appliqué naturally hides the raw edge beneath the shape. Tightly woven quilting cotton also frays less than loosely woven fabric.
Can the appliqué be sewn with a sewing machine?
Yes. Use a narrow zigzag, satin stitch, blanket stitch, or appliqué stitch. Reduce the sewing speed and pivot carefully around the curves. A stabilizer placed behind the background may prevent puckering. Machine stitching creates a cleaner and faster result, while hand stitching gives the bouquet a softer folk-art appearance.
How do I enlarge or reduce the appliqué pattern?
Scan or photocopy the templates and adjust the percentage setting. When enlarging the design, remember that the seam allowance should remain approximately the same rather than increasing proportionally. Arrange the resized paper templates on the intended background before cutting fabric to confirm that the full bouquet will fit.
What type of thread is best for the decorative stitches?
Cotton embroidery floss is ideal for visible blanket stitches, flower centers, branches, and leaf veins. Standard cotton sewing thread works well for nearly invisible appliqué. Pearl cotton can be used when a stronger raised line is desired. Choose colors that contrast gently with the fabrics so the stitching remains visible without appearing harsh.
How can I make the flower centers more dimensional?
Work several layers of French knots, add a small circle of felt beneath the knots, or cover a tiny padded fabric circle. You may also attach small beads if the finished item will be decorative and kept away from small children. For washable household items, embroidered knots are generally more practical than beads.
What can I make with the finished flower bouquet panel?
The panel can become a cushion cover, wall quilt, framed textile artwork, tote bag front, table runner center, quilt block, book cover, sewing-machine cover, or decorative pocket. Its final use should be considered before stitching so the background size, stabilizer, quilting, and seam allowances can be planned correctly.
Conclusion
The Patchwork Flower Bouquet with Appliqué Pattern brings together fabric scraps, floral templates, appliqué stitching, embroidery, and thoughtful color placement in one rewarding handmade project. You learned how to prepare the background, choose coordinating fabrics, create petal and leaf templates, assemble the large and small flowers, embroider textured centers, add curved stems and buds, and finish the panel for use in a quilt, cushion, or decorative wall piece.
EASILY FIND THE PDF FOR THIS PATTERN HERE!
The pattern can be adapted to almost any color palette, making every bouquet unique while preserving the gentle handcrafted spirit of the original composition. Please leave your sincere opinion about this project and share suggestions for colors, fabrics, stitches, or other creative details that could make a future version even more beautiful.