
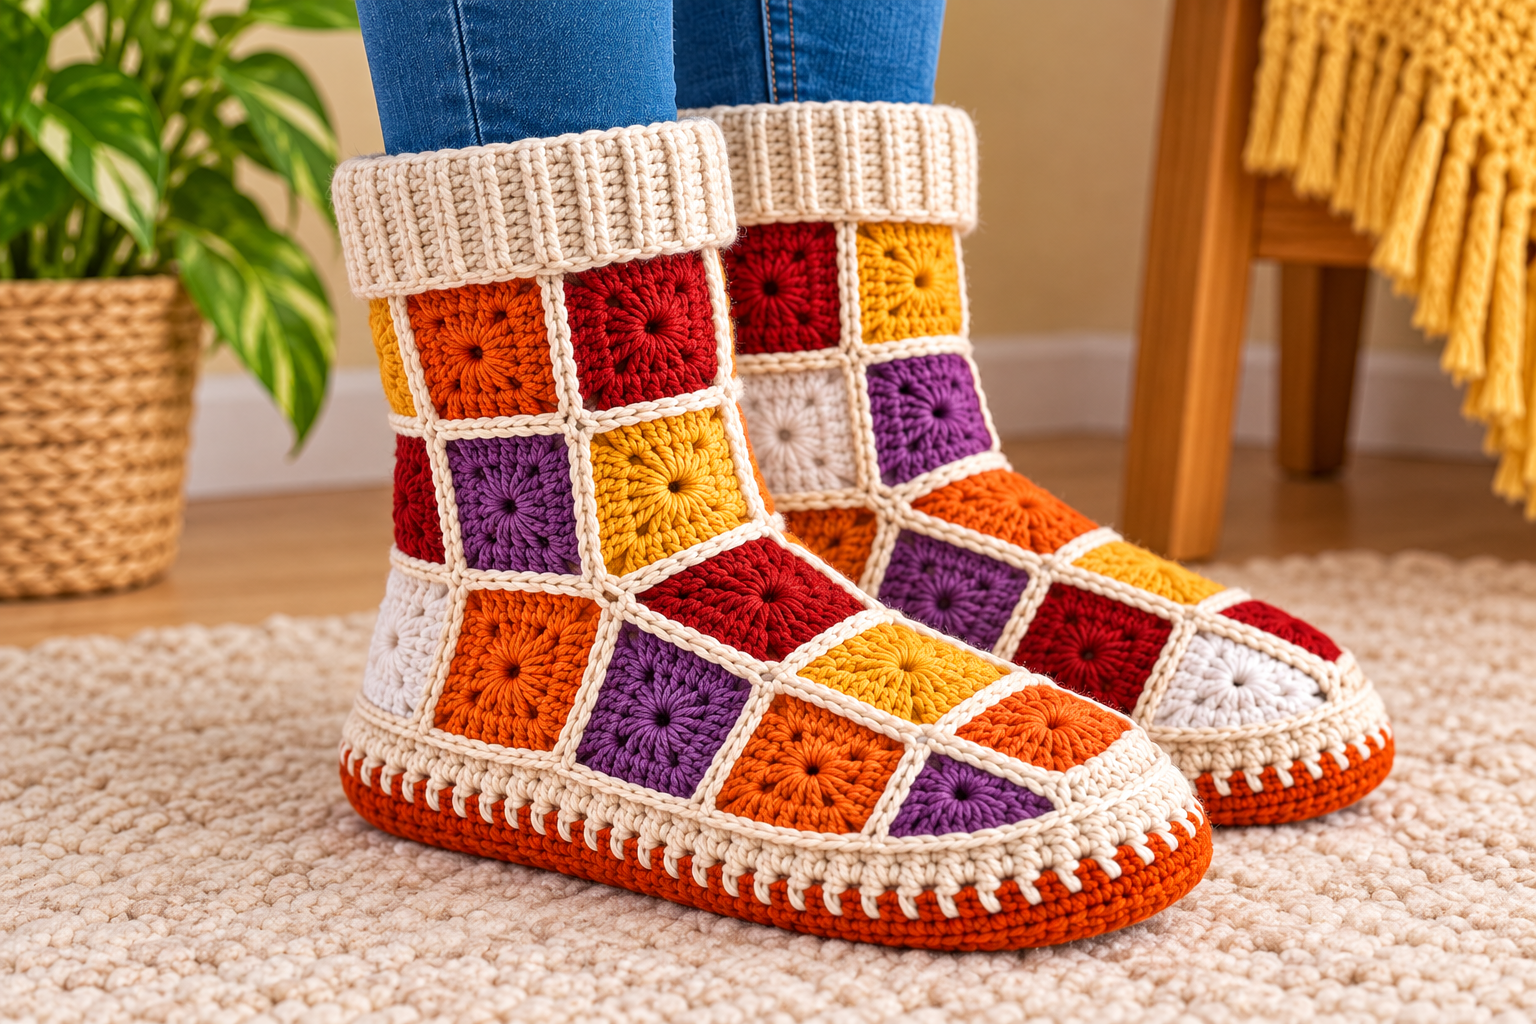
The Granny Square Style Crochet Boots Pattern is one of the most charming and creative projects for crochet enthusiasts who love combining comfort, color, and timeless craftsmanship. Inspired by the classic granny square motif, these cozy crochet boots transform traditional squares into stylish footwear that is perfect for relaxing at home or giving as a thoughtful handmade gift. Whether you are an intermediate crocheter looking for a new challenge or an adventurous beginner eager to expand your skills, this project offers the perfect balance between creativity and practicality. Throughout this guide, you will learn everything you need to confidently create your own beautiful pair while improving your crochet techniques.
One of the reasons the Granny Square Style Crochet Boots Pattern has become increasingly popular is its incredible versatility. Every pair can be customized using different yarn colors, square arrangements, edging techniques, and decorative details. This means no two finished pairs need to look exactly alike. You can create vibrant rainbow boots, elegant neutral designs, rustic farmhouse-inspired versions, or even seasonal color palettes for holidays. Besides being visually appealing, granny squares also make this project highly portable because each motif can be completed individually before assembling the entire boot.
Another great advantage of this Granny Square Style Crochet Boots Pattern is that it allows crocheters to practice multiple essential crochet skills within a single project. You’ll work with classic granny squares, joining techniques, shaping methods, edging, ribbing, and sole construction. Along the way, you’ll improve stitch consistency while learning how individual crochet motifs come together to form a wearable piece. By following the step-by-step instructions below, you’ll gain confidence in garment construction while enjoying a relaxing and rewarding crochet experience that results in a pair of cozy handmade boots you’ll be proud to wear.
Understanding the Granny Square Construction
The foundation of every Granny Square Style Crochet Boots Pattern begins with traditional granny squares. These small motifs are worked individually before being joined together to create the upper portion of each boot.
DISCOVER MORE FREE PATTERNS HERE!
Begin by creating a magic ring. Crochet three chain stitches to represent the first double crochet. Continue adding two double crochets, chain two, and repeat this sequence until you have four corners. Close the round with a slip stitch.
For the second round, work three double crochets into each chain-two corner space, separated by chain stitches that maintain the square shape. Continue around evenly while keeping each corner identical.
Repeat additional rounds until each granny square reaches approximately 8 to 10 cm, depending on the desired boot size. Maintain consistent stitch tension throughout every motif.
Most adult sizes require approximately twelve to sixteen granny squares for a complete pair of boots. Smaller sizes may use fewer motifs, while larger sizes may require additional squares.
Before joining the motifs, block every granny square carefully. Blocking helps flatten the fabric, align the corners, and ensures all pieces have identical measurements for easier assembly.
Step-by-Step Crochet Instructions for Assembling the Boots
Once all granny squares are complete, arrange them on a flat surface before joining them. Experiment with different color placements until you find a balanced and attractive design.
Join the granny squares using either slip stitches, whip stitch, mattress stitch, or the continuous join-as-you-go technique. Each joining method produces a slightly different decorative effect.
After joining the squares into the desired layout, fold the assembled fabric around the foot shape. Stitch the back seam first, ensuring both edges align perfectly.
Create the toe shaping by carefully joining the front edges together. This gradual shaping transforms the flat granny square fabric into a comfortable three-dimensional boot structure.
Crochet several rounds around the bottom opening using single crochet stitches. This creates a stable edge that will later attach securely to the sole of the boot.
For the upper cuff, switch to front-post and back-post double crochet stitches to create a stretchy ribbed section. Continue until the cuff reaches the desired height for a snug and comfortable fit.
Creating the Sole and Finishing Details
The sole provides structure, durability, and comfort for your finished Granny Square Style Crochet Boots Pattern. Many crocheters choose to create multiple layers for additional cushioning.
Begin with a chain that matches the length of the intended foot size. Work single crochet stitches around both sides of the chain, increasing evenly at each end to form an oval.
Continue adding rounds until the sole reaches the required width. Make two identical soles for each boot if you plan to create a double-layer construction.
Attach the completed upper section to the sole using single crochet or slip stitches worked evenly around the entire perimeter. Ensure the stitches remain consistent without puckering.
For additional durability, insert a felt sole, foam insole, or lightweight leather insert between crocheted layers. This improves comfort while extending the life of the finished boots.
Finish by weaving in every yarn end securely. Steam lightly if needed, reshape the boots, and allow them to dry completely before wearing or gifting.
Customization Ideas, Care Tips, and Helpful Crochet Advice
One of the greatest strengths of the Granny Square Style Crochet Boots Pattern is the endless opportunity for personalization. Change the color arrangement to create completely different visual styles.
Decorate the finished boots with wooden buttons, crochet flowers, pom-poms, tassels, bows, or decorative embroidery to make every pair unique.
Choose high-quality worsted-weight or bulky yarn with a soft texture for maximum comfort. Acrylic blends are durable, while wool blends provide excellent warmth during colder months.
Always check your gauge before completing all granny squares. Even slight variations in stitch tension may affect the final fit of the boots.
If the boots feel slightly loose, add an additional ribbed cuff or insert thicker insoles to improve the overall fit without rebuilding the entire project.
Hand wash the finished boots using cool water and mild detergent. Lay them flat on a towel to dry naturally, preserving both their shape and stitch definition for years of enjoyment.
Frequently Asked Questions (FAQ)
1. Is the Granny Square Style Crochet Boots Pattern suitable for beginners?
Yes. Beginners with basic knowledge of chain stitches, single crochet, double crochet, and slip stitches can complete this project successfully with patience and practice.
2. How many granny squares are needed?
Most adult sizes require between twelve and sixteen granny squares, depending on foot size, motif dimensions, and desired boot height.
3. Which yarn works best?
Medium-weight (worsted) yarn is the most popular choice because it offers durability, warmth, flexibility, and excellent stitch definition.
4. Can I make these boots in different sizes?
Absolutely. Simply adjust the size of each granny square or increase and decrease the total number of motifs to fit different foot measurements.
5. Are crochet boots suitable for outdoor use?
These boots are primarily designed as indoor slippers. However, you can increase durability by attaching suede, leather, or rubber soles.
6. How long does it take to finish a pair?
Depending on your experience, most crocheters complete a pair within one weekend or several evenings of relaxed crocheting.
7. Can I wash crochet boots?
Yes. Hand washing with cold water and mild soap is recommended to maintain the shape and appearance of the finished project.
8. What crochet stitches are mainly used?
The project primarily uses chain stitches, slip stitches, single crochet, double crochet, and front-post/back-post double crochet for the ribbed cuff.
9. Can I use leftover yarn?
Yes. This is one of the best stash-busting crochet projects because granny squares naturally accommodate multiple colors and yarn leftovers.
10. Why are granny squares so popular?
Granny squares are timeless, easy to learn, portable, highly customizable, and can be assembled into countless creative crochet projects, including blankets, bags, clothing, and boots.
Conclusion
The Granny Square Style Crochet Boots Pattern is much more than a cozy crochet project—it is a wonderful opportunity to practice essential techniques while creating something both beautiful and functional. From making classic granny squares and assembling the upper section to shaping the sole, adding a comfortable ribbed cuff, and customizing every detail, this project offers endless possibilities for creativity.
EASILY FIND THE PDF FOR THIS PATTERN HERE!
With careful planning, consistent stitching, and a little patience, you’ll have a unique pair of handmade crochet boots that reflect your personal style and craftsmanship. If you enjoyed this tutorial, please leave your honest opinion in the comments and share your suggestions or creative ideas. Your feedback helps inspire future crochet projects and supports fellow makers looking for their next handmade adventure.