
Flower and Bird Quilt Appliqué Pattern is a timeless quilting project that combines the beauty of floral appliqué with the delicate charm of a small bird, creating a handmade design that feels both elegant and welcoming. Whether you are a beginner learning the fundamentals of quilting or an experienced maker looking for a relaxing project, this Flower and Bird Quilt Appliqué Pattern offers an enjoyable creative experience. The combination of soft floral fabrics, simple embroidery stitches, and layered appliqué pieces makes this project suitable for decorative wall hangings, pillow covers, table runners, quilt blocks, and many other home décor ideas. Throughout this guide, you will discover every step needed to recreate the design while learning practical quilting techniques that improve both accuracy and finishing quality.
Creating a beautiful Flower and Bird Quilt Appliqué Pattern begins with thoughtful preparation. Instead of rushing into cutting fabrics, experienced quilters carefully organize their materials, select harmonious fabric combinations, and study the pattern before making the first cut. This careful planning helps avoid mistakes while making the sewing process much more enjoyable. One of the reasons this style remains popular is its versatility. Floral prints can be adapted to every season, while the little bird symbolizes peace, happiness, and nature, making the finished block suitable for countless quilting projects. Because the design is relatively simple, it allows the fabrics themselves to become the main decorative element.
Another reason why the Flower and Bird Quilt Appliqué Pattern continues to inspire quilting enthusiasts is its balance between traditional craftsmanship and creative freedom. Every maker can personalize the project by selecting different floral fabrics, adjusting leaf shapes, adding embroidery details, or choosing various background linens. These small customizations transform a single pattern into a completely unique handmade creation. As you follow this detailed tutorial, you will learn not only how to assemble the design but also how to achieve clean edges, balanced composition, secure appliqué stitching, and professional finishing techniques that produce beautiful long-lasting results.
Materials and Preparing Your Flower and Bird Quilt Appliqué Pattern
Before beginning your Flower and Bird Quilt Appliqué Pattern, gather all the necessary materials to ensure a smooth sewing process. A well-organized workspace helps maintain accuracy and reduces interruptions during construction. Essential materials include cotton quilting fabric, lightweight linen or cotton for the background, fusible web or freezer paper, embroidery floss, matching sewing thread, scissors, rotary cutter, cutting mat, pins, iron, and fabric marking tools.
DISCOVER MORE FREE PATTERNS HERE!
Select floral fabrics that complement one another without competing for attention. Combining several shades of pink or red with soft green leaves creates a harmonious natural appearance similar to traditional garden-inspired quilt designs. Small floral prints often work especially well because they provide texture without overwhelming the appliqué shapes.
The background fabric should remain neutral so the appliqué becomes the main focal point. Linen, natural cotton, or lightly textured quilting fabric creates an elegant base that highlights every flower, leaf, and embroidery stitch while maintaining a classic handcrafted appearance.
Prepare your templates by tracing each appliqué piece onto fusible web or freezer paper according to the pattern. Carefully label every piece to avoid confusion during assembly. Organizing templates before cutting significantly improves efficiency throughout the project.
Iron the fusible web onto the wrong side of each selected fabric following the manufacturer’s instructions. Allow the adhesive to cool before cutting each shape precisely along the template lines. Sharp scissors make a noticeable difference when cutting small petals and curved leaves.
Arrange all the cut pieces on the background fabric before permanently attaching anything. This planning stage allows you to adjust spacing, balance the overall composition, and ensure the flowers, stems, leaves, and bird appear naturally positioned.
Step-by-Step Guide to Constructing the Flower and Bird Quilt Appliqué Pattern
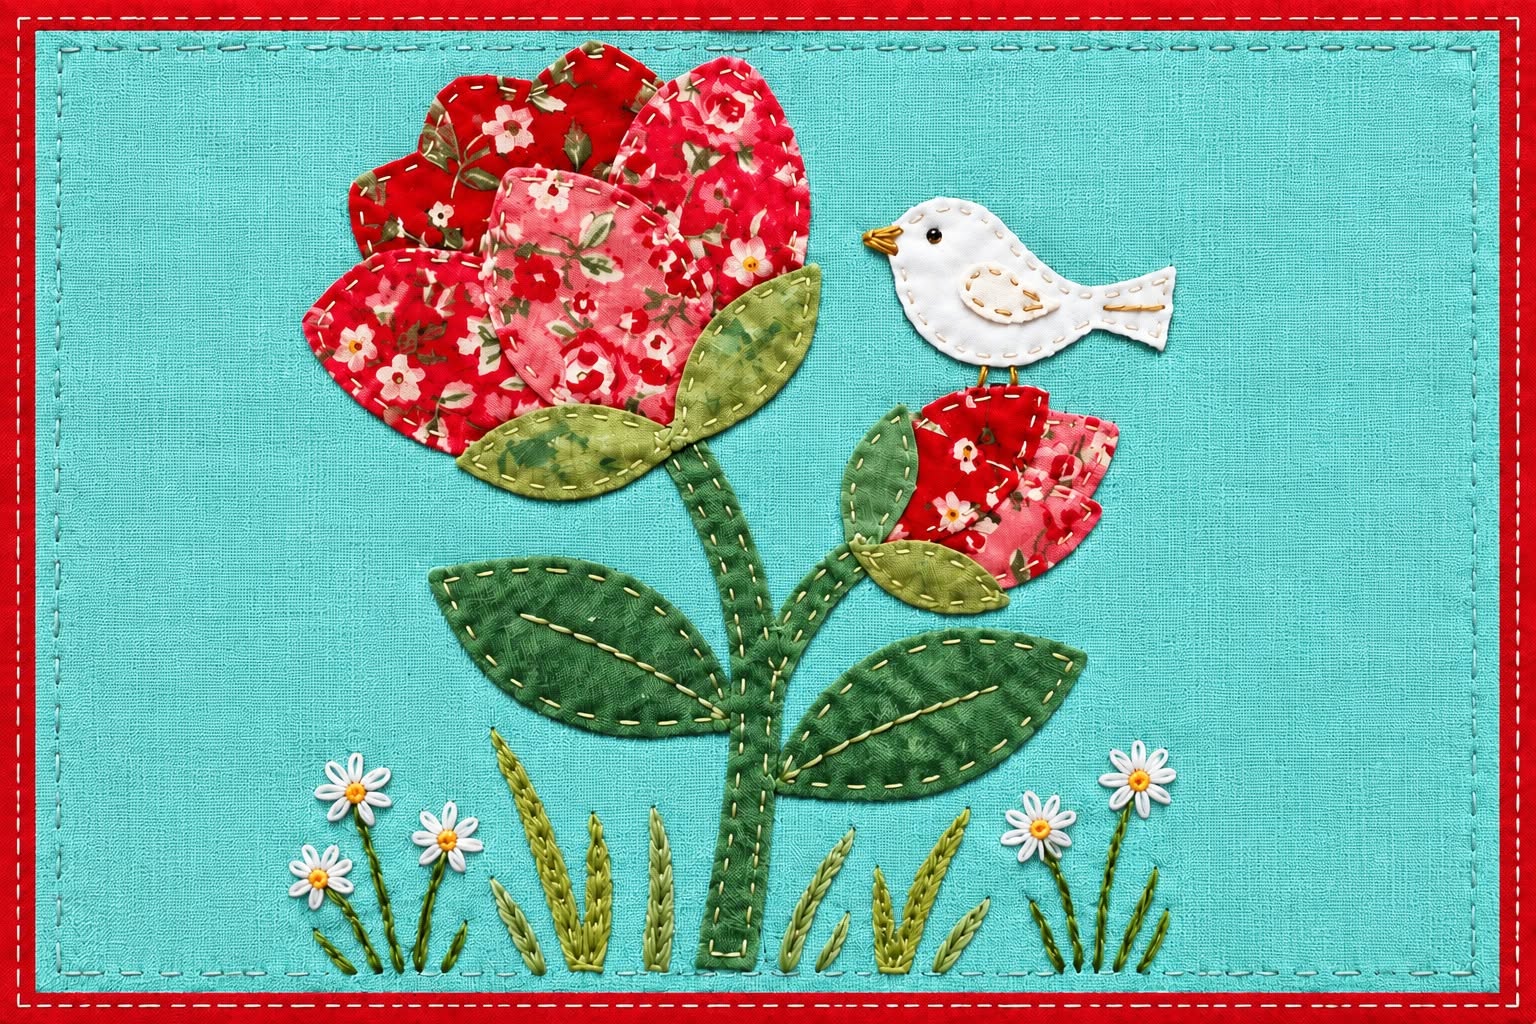
Begin by positioning the main flower stem vertically on the background fabric. This stem acts as the foundation for the entire design, making its placement especially important for visual balance. Once satisfied with the arrangement, lightly fuse it into place using a warm iron.
Next, position the larger flower petals at the top of the stem. Layer the petals slightly to create depth and a realistic floral appearance. Overlapping petals also conceal raw edges while producing a fuller blossom.
Attach the smaller flower bud on the side of the main stem. This secondary flower adds movement to the overall composition and creates a more natural garden-inspired layout. Adjust its angle until it complements the larger flower without appearing perfectly symmetrical.
Position the leaves carefully along both stems. Varying their direction creates a flowing appearance that mimics natural plant growth. Avoid placing every leaf at identical angles because slight variation produces a more organic result.
Place the bird just above the flower bud so it appears gently resting near the blossom. This positioning creates a pleasant visual relationship between the floral elements and the bird, giving the finished appliqué a peaceful storytelling quality.
Once every appliqué piece is correctly arranged, permanently fuse them according to the fusible web instructions. Double-check alignment before ironing because repositioning becomes difficult after the adhesive fully bonds to the background fabric.
Appliqué Stitching and Embroidery Techniques
With every appliqué piece secured, begin stitching around each shape using your preferred appliqué method. Blanket stitch remains one of the most popular choices because it provides durability while adding decorative texture around every edge.
If you prefer a more delicate appearance, use a narrow invisible appliqué stitch. This technique minimizes visible thread while allowing the colorful fabrics to remain the center of attention throughout the finished design.
Embroidery adds personality and dimension to the Flower and Bird Quilt Appliqué Pattern. Simple running stitches along the stems create gentle texture, while small backstitches emphasize leaf veins without overwhelming the appliqué.
Tiny embroidery details on the bird can significantly enhance the finished project. A small eye, wing outline, beak, and feet require only a few stitches but immediately make the bird appear more expressive and charming.
Decorative flowers near the bottom of the design can be embroidered using French knots for flower centers combined with simple lazy daisy stitches. These small embellishments complement the larger appliqué flowers while adding visual interest near the lower edge.
Work slowly and consistently throughout the embroidery process. Even stitching length and gentle thread tension create a refined handmade appearance while preventing puckering on the background fabric.
Finishing, Quilting, and Creative Ideas for Your Flower and Bird Quilt Appliqué Pattern
After completing the appliqué and embroidery, carefully press the project from the back using a pressing cloth to protect the fabric and stitches. Proper pressing helps flatten the design while preserving dimensional details created by layered fabrics.
If the appliqué will become part of a quilt, layer the quilt top with batting and backing fabric. Secure all three layers using quilting pins or temporary spray adhesive before beginning the quilting process.
Simple quilting lines work beautifully with this design. Gentle echo quilting around the flowers emphasizes the appliqué, while subtle background quilting adds texture without distracting from the central motif.
Trim the finished block square before attaching borders or incorporating it into a larger quilt layout. Accurate trimming ensures easier assembly when combining multiple quilt blocks into a complete project.
This Flower and Bird Quilt Appliqué Pattern can also become a decorative pillow, fabric wall hanging, tote bag panel, table topper, sewing room decoration, or framed textile artwork. The versatility of the design allows it to fit many different home décor styles.
Store your finished quilt or appliqué project away from prolonged direct sunlight to preserve fabric colors over time. Gentle washing using mild detergent and proper storage will help your handmade creation remain beautiful for many years.
Frequently Asked Questions
Is the Flower and Bird Quilt Appliqué Pattern suitable for beginners?
Yes. The pattern uses simple shapes that are easy to cut and assemble. Beginners can practice basic appliqué techniques while gradually developing confidence with embroidery and quilting.
Which fabrics work best?
High-quality quilting cotton is the most common choice because it is easy to cut, press, and stitch. Linen also creates an attractive background with natural texture.
Should I use hand appliqué or machine appliqué?
Both methods produce excellent results. Hand appliqué offers a traditional appearance, while machine appliqué provides faster construction and increased durability.
Can I change the flower colors?
Absolutely. One of the greatest advantages of the Flower and Bird Quilt Appliqué Pattern is its flexibility. You can create seasonal color palettes, pastel gardens, autumn flowers, or vibrant spring blossoms.
What stitches are commonly used?
Blanket stitch, invisible appliqué stitch, running stitch, backstitch, French knots, and lazy daisy stitches are among the most popular techniques for this project.
Can I resize the pattern?
Yes. Templates may be enlarged or reduced to create wall quilts, pillows, mini quilts, table runners, or larger quilt blocks while maintaining the overall proportions of the design.
How do I keep the appliqué pieces from shifting?
Lightly fuse the pieces before stitching or secure them with fine pins. Careful pressing before sewing also helps maintain accurate placement.
What can I make with this appliqué block?
Besides quilts, you can use the finished block for cushion covers, tote bags, fabric baskets, sewing machine covers, framed textile art, table toppers, and decorative wall hangings.
Conclusion
The Flower and Bird Quilt Appliqué Pattern is a beautiful project that combines traditional quilting techniques with delicate floral artistry and charming appliqué details. Throughout this guide, you learned how to prepare materials, organize templates, position every appliqué piece, apply embroidery details, complete the quilting process, and professionally finish the project.
EASILY FIND THE PDF FOR THIS PATTERN HERE!
By working carefully through each step, you can create a timeless handmade design that reflects your creativity and craftsmanship. Whether displayed as part of a quilt, transformed into home décor, or given as a thoughtful handmade gift, this project offers endless possibilities for personalization. If you enjoyed this tutorial, please leave your honest opinion, share your experience making the project, and feel free to suggest ideas or topics you would like to see in future quilting guides.