
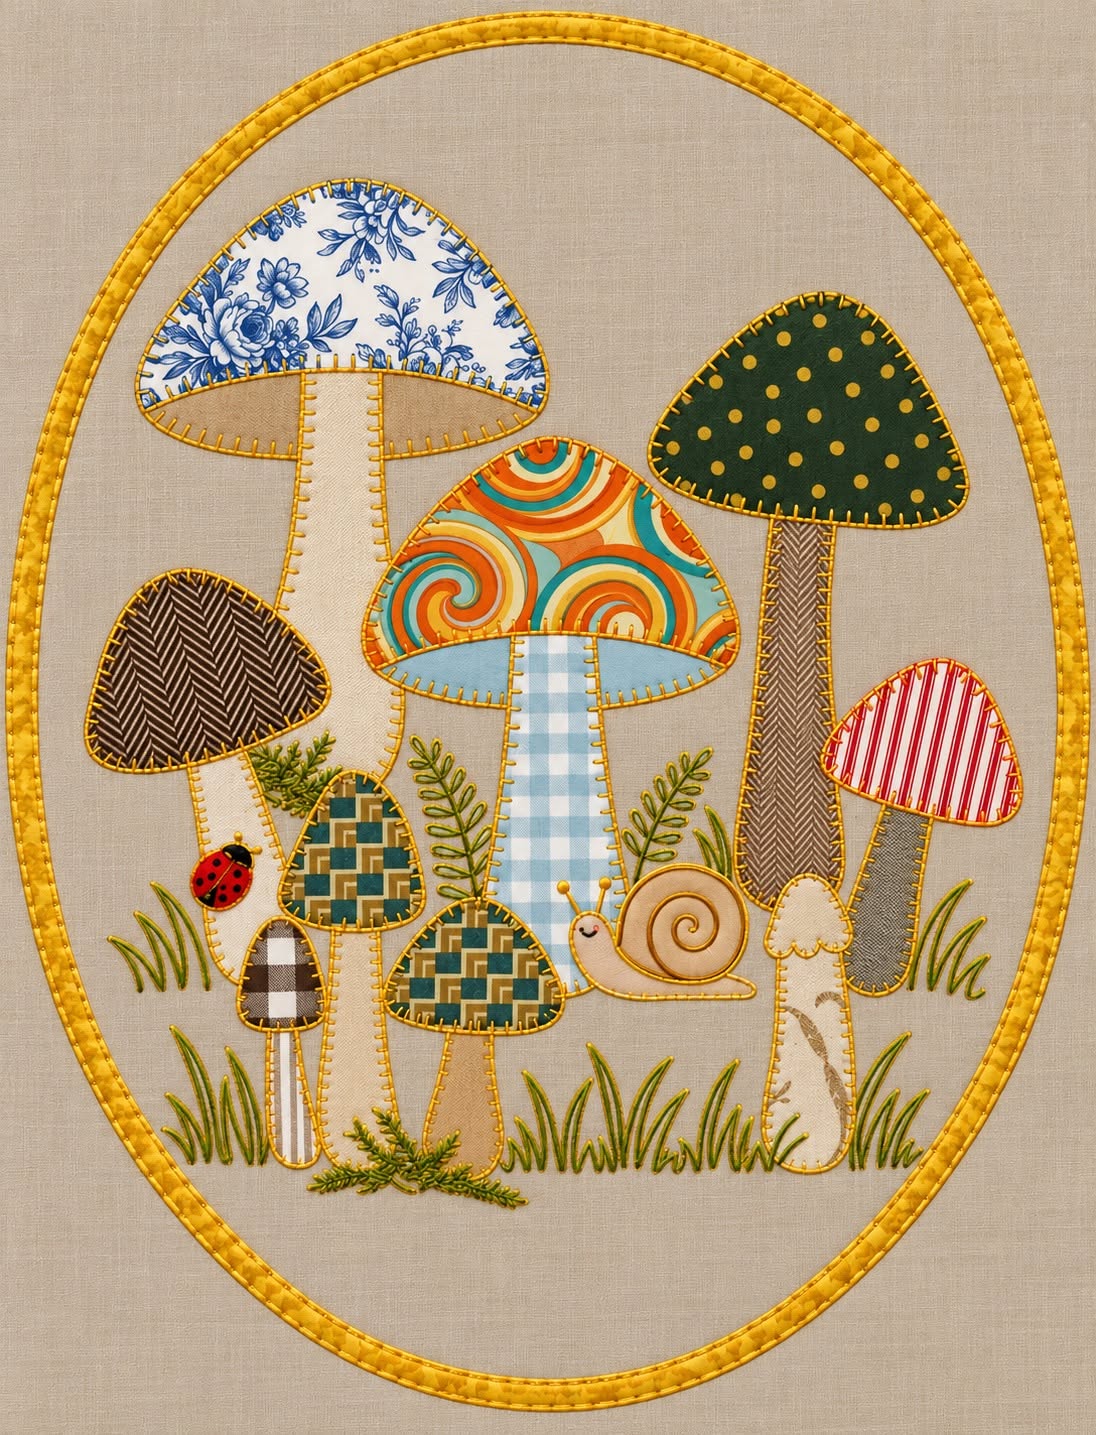
The Fabric Application Panel with Mushroom Print Pattern is a charming sewing project that combines appliqué, decorative stitching, printed fabrics, and simple embroidery to create a woodland-inspired textile scene. The design shown in the reference image uses mushrooms of different heights, shapes, colors, and fabric prints, surrounded by small natural details such as grass, leaves, a snail, and a ladybug. Because every mushroom can be made from a different fabric scrap, this project is also an excellent opportunity to use leftover pieces from previous sewing and quilting projects. The result can become a decorative wall panel, framed textile artwork, cushion front, or even the centerpiece of a larger quilt.
One of the most appealing characteristics of the Fabric Application Panel with Mushroom Print Pattern is the freedom it gives the maker. You do not need every fabric to match perfectly. In fact, combining floral prints, geometric designs, stripes, checks, dots, and textured neutrals gives the mushroom garden much of its personality. The basic construction relies on fabric appliqué, where individually cut shapes are positioned on a background fabric and stitched securely in place. Beginners can keep the shapes simple and use straightforward stitching, while experienced sewists can add detailed embroidery, free-motion stitching, layered fabrics, or decorative threadwork.
This tutorial explains how to recreate the project from beginning to end while keeping the handmade appearance of the reference design. Exact measurements can be adapted according to the size of panel you want to make, so the instructions focus on proportions and construction techniques rather than requiring one rigid template size. You will learn how to prepare the background, create mushroom caps and stems, arrange the composition, attach the appliqué pieces, add woodland details, and finish the panel neatly. With careful preparation and a little patience, the Fabric Application Panel with Mushroom Print Pattern can become a distinctive handmade decoration filled with texture, color, and character.
Materials, Fabric Selection, and Preparing the Mushroom Pattern
Begin by selecting a sturdy but easy-to-sew background fabric. A neutral cotton or linen-blend fabric works especially well because it allows the colorful mushroom prints to stand out clearly. Beige, cream, light gray, oatmeal, and natural linen shades are all suitable choices. Cut the background larger than your intended finished panel so you have enough fabric around the edges for trimming and finishing after the appliqué and embroidery are complete.
DISCOVER MORE FREE PATTERNS HERE!
For the mushroom caps, collect several contrasting fabric scraps. The reference composition demonstrates how effective variety can be: floral fabric can sit beside polka dots, stripes can contrast with swirling prints, and geometric scraps can be mixed with quieter neutral materials. Try to include both light and dark values. A varied selection makes it easier to distinguish individual mushrooms when several shapes overlap or stand close together.
The mushroom stems should generally be calmer than the caps. Solid fabrics, subtle checks, herringbone patterns, fine stripes, or lightly textured materials are excellent choices. You can also repeat a fabric used elsewhere in the project to create visual continuity. There is no requirement for realistic mushroom colors; the whimsical nature of this mushroom appliqué pattern allows blue checks, warm cream, gray, tan, or patterned stems.
Create paper templates for several mushroom sizes before cutting your fabric. Each mushroom requires a cap and a stem, although some designs can include a narrow underside section beneath the cap. Draw rounded, asymmetrical shapes rather than making every mushroom identical. The tallest mushrooms should provide the main vertical structure, while medium and small mushrooms help fill the lower areas of the composition.
If you plan to use fusible appliqué, trace each pattern piece onto the paper side of lightweight fusible web. Remember that fusible appliqué can reverse a design after tracing and cutting, although this usually makes little difference with simple mushroom shapes. Rough-cut around each traced piece, fuse it to the wrong side of the chosen fabric according to the fusible product instructions, and then cut accurately on the traced line.
Before attaching anything permanently, place all your fabric pieces on the background. Start with the tallest mushrooms and then introduce medium and small shapes around them. Keep some empty space between groups so the design does not become visually crowded. Take a photograph of the arrangement before removing pieces for pressing or stitching. This simple step gives you a useful reference when reconstructing your final layout.
Building the Fabric Appliqué Mushroom Garden Step by Step
Once you are satisfied with the arrangement, begin attaching the pieces from the visual background toward the foreground. When one mushroom overlaps another, the piece that appears farther away should normally be attached first. This creates more convincing layers and prevents awkward exposed edges. Work slowly because the arrangement stage strongly influences the finished appearance of your Fabric Application Panel with Mushroom Print Pattern.
Position the stems first where appropriate, followed by the mushroom caps. If using fusible web, remove the paper backing and press the pieces according to the manufacturer’s directions. Avoid sliding the iron because this can move small appliqué components out of position. Instead, lift and lower the iron carefully. A pressing cloth can also help protect delicate printed fabrics.
After fusing, secure the raw edges with stitching. A blanket stitch is especially attractive for this style because it produces a clearly defined handmade border. A narrow zigzag stitch is another practical option. Straight stitching close to the raw edge creates a more relaxed appearance and can work particularly well when slight fraying is intentionally part of the design.
Decorative stitching can make each mushroom more distinctive. For example, a dark contrasting thread around a pale stem emphasizes its shape, while lighter thread can soften a strongly patterned cap. You can use machine stitching or work by hand with embroidery floss. Consistency is helpful, but the stitches do not need to look mechanically perfect; small variations can complement the folk-art character of the panel.
Pay particular attention to the underside of the larger mushroom caps. Adding a narrow curved fabric section beneath the main cap creates extra dimension and helps separate the cap from the stem. Fine vertical stitches can suggest mushroom gills without requiring complicated embroidery. Keep these details subtle so they support rather than overwhelm the colorful printed fabrics.
Continue adding mushrooms until the primary composition is complete. Vary the heights and widths rather than arranging every element on a single horizontal line. The tallest shapes can rise toward the upper portion of the panel, while smaller mushrooms gather near the base. This variation creates a natural rhythm and gives the impression of a miniature woodland garden rather than a collection of isolated appliqué shapes.
Adding Embroidery, Woodland Details, and Decorative Texture
After completing the major appliqué pieces, begin developing the surrounding environment. Simple hand embroidery can transform an empty background into a convincing forest floor. Use backstitch, stem stitch, straight stitch, or small irregular lines to create grasses around the mushroom stems. Vary the direction and length of the stitches instead of making every blade identical.
Small leafy branches can be embroidered between mushrooms using a central stem with short diagonal stitches extending outward. These details are particularly useful for filling narrow spaces where another appliqué piece would make the composition too crowded. Choose muted greens, olive shades, brown, or gray-green thread so the vegetation complements the colorful mushroom caps.
A small snail can become a delightful focal point near the lower center of the panel. Create its body from a pale neutral fabric and its shell from a contrasting tan or cream piece. A simple spiral stitched onto the shell immediately communicates the snail shape. Tiny stitched antennae can extend from the head, adding character without requiring extremely small fabric pieces.
The ladybug provides another opportunity to introduce a bright accent. A tiny red fabric body with a dark head and small black markings is enough to make the insect recognizable. Because the piece is small, secure it carefully with fine stitches. Positioning the ladybug away from the brightest mushroom caps helps distribute strong colors across the composition.
Additional ground texture can be created with small scraps of green fabric, embroidery thread, or short irregular stitches around the bases of the stems. These elements help visually connect the separate mushrooms. Avoid filling every available area. Negative space is important because it gives the eye somewhere to rest and allows the main appliqué shapes to remain prominent.
When all the decorative elements are complete, inspect the entire panel from a short distance. Look for areas that seem unusually empty or overly busy. Add only the details that improve the overall balance. The objective is not to cover the background completely but to create the impression of a lively woodland scene while preserving the clean oval composition seen in the original inspiration.
Finishing and Displaying the Fabric Application Panel with Mushroom Print Pattern
Before finishing the outer edge, gently press the completed panel from the wrong side whenever possible. Place a soft towel underneath if your embroidery or appliqué has dimensional stitching. This protects raised details from being flattened. Follow appropriate heat recommendations for all fabrics, fusible products, and threads used in the project.
The oval outline can be used in several ways. For a simple textile wall panel, trace an oval around the completed design and stitch along the marked line. You can then add a backing fabric and turn the project right side out, or finish the edge with binding. Another possibility is to place the work inside an oval embroidery hoop or compatible decorative frame.
If you want a quilted finish, layer the completed appliqué top with thin batting and backing fabric. Baste the layers together and quilt lightly around the mushrooms rather than stitching heavily through every printed section. Outline quilting can emphasize the silhouettes while maintaining the soft, handcrafted appearance of the composition.
For a wall hanging, add a hanging sleeve to the back before completing the final binding. A narrow fabric sleeve allows a small rod or dowel to support the panel without being visible from the front. Make sure the sleeve is level so the oval design hangs straight. Alternatively, small textile panels can be displayed inside frames designed with enough depth to accommodate fabric and stitching.
Scrap selection makes every version of this pattern unique. One maker might choose vintage floral fabrics and muted browns, while another might use bright contemporary prints. Seasonal versions are also possible. Autumn colors can produce a warm woodland appearance, while pastel prints create a softer spring-inspired composition. The basic Fabric Application Panel with Mushroom Print Pattern remains recognizable even when the fabric palette changes completely.
Finally, examine every appliqué edge and remove loose threads. Make sure small components such as the ladybug, snail, and narrow stems are securely stitched. Give the back a tidy finish if the piece will be displayed without a frame. These final details may seem minor, but they can make a significant difference in the durability and overall presentation of your handmade fabric panel.
Frequently Asked Questions About the Fabric Application Panel with Mushroom Print Pattern
What is a Fabric Application Panel with Mushroom Print Pattern?
It is a decorative textile project created by arranging and stitching mushroom-shaped fabric pieces onto a larger background. The technique is commonly known as fabric appliqué. Embroidery and additional appliqué elements can then be used to build a complete woodland scene.
Is this mushroom appliqué project suitable for beginners?
Yes. Beginners can simplify the project by using fusible web and basic blanket or zigzag stitching. The mushroom shapes are forgiving because they do not need perfectly symmetrical edges. Starting with five or six mushrooms and gradually adding smaller details is an approachable way to learn the technique.
What fabric is best for mushroom appliqué?
Quilting cotton is one of the easiest materials to use because it is stable, widely available, and easy to cut accurately. Linen blends can work beautifully for the background. Small amounts of textured fabric can also be incorporated, provided they are not too bulky for your chosen stitching method.
Do I need fusible web for this project?
No. Fusible web is convenient because it holds the appliqué pieces in position while you sew, but traditional needle-turn appliqué, glue-basting, or careful pinning can also be used. Choose the method that suits your experience and the finish you want.
Should the raw edges of the mushroom pieces be covered?
That depends on your preferred appliqué technique. Blanket stitching and zigzag stitching help secure raw edges and limit fraying. Straight stitching can deliberately leave a slightly raw appearance. Needle-turn appliqué hides the raw edges completely by turning them underneath before stitching.
How can I make the mushroom caps look dimensional?
Use contrasting fabric beneath the caps, add stitched gill lines, and allow some mushroom pieces to overlap. Light quilting around the appliqué shapes can also create subtle relief when batting is placed behind the panel.
Can I sew the entire project by hand?
Absolutely. Hand appliqué and embroidery are especially well suited to this woodland style. The project can also be completed entirely by machine or with a combination of machine appliqué and hand embroidery.
How can I resize the mushroom pattern?
Maintain the general proportions of each cap and stem while enlarging or reducing the template. Using several different sizes usually creates a more interesting composition than repeating one mushroom at exactly the same scale.
What can I make with the finished mushroom panel?
The finished design can become wall art, a cushion front, a quilt center, a tote bag panel, a framed textile piece, or part of a larger patchwork project. If the design will be used on an item that receives frequent handling, reinforce the appliqué edges carefully.
How do I choose prints that work well together?
Combine large and small patterns while varying light and dark fabrics. If every mushroom uses a very bold print, the composition may become visually crowded. Mixing statement prints with quieter checks, stripes, dots, and neutrals usually creates better balance.
Can leftover fabric scraps be used?
Yes, and this is one of the best projects for doing so. Most mushroom components require only small pieces, making the design ideal for using fabric scraps that might otherwise remain unused.
How do I prevent appliqué pieces from shifting while sewing?
Fusible web provides excellent stability. Temporary fabric adhesive or appliqué glue can also help. If you prefer pins, use fine appliqué pins and keep them away from the immediate stitching path.
What embroidery stitches work well for the grass and plants?
Straight stitch, backstitch, stem stitch, lazy daisy stitch, and small detached stitches are all useful. Combining two or three techniques can create natural-looking vegetation without making the embroidery unnecessarily complicated.
Does every mushroom need to be realistic?
Not at all. The appeal of this mushroom print pattern comes largely from its playful interpretation of nature. Floral caps, geometric prints, checks, stripes, and unexpected colors can make the finished panel much more personal.
How should the finished fabric panel be cleaned?
A decorative wall panel usually requires only gentle dust removal. If washing is necessary, the appropriate method depends on the fabrics, threads, batting, adhesives, and embellishments used. Prewashing fabrics before construction can help reduce unexpected shrinkage or color transfer.
How long does this project take to complete?
The time varies considerably depending on the number of mushrooms and the amount of embroidery. A simplified version can be completed relatively quickly, while a detailed hand-stitched panel may become a relaxing multi-session project.
Conclusion
The Fabric Application Panel with Mushroom Print Pattern brings together several enjoyable textile techniques in one imaginative project. By beginning with a neutral background and gradually building a collection of patterned mushroom caps, textured stems, embroidered grasses, leaves, a snail, and a tiny ladybug, you can create a complete woodland scene from relatively small pieces of fabric.
The most important steps are careful template preparation, thoughtful fabric selection, balanced placement, secure appliqué stitching, and restrained decorative embroidery. Working from the background toward the foreground makes overlapping elements easier to manage, while varying mushroom sizes and fabric patterns creates depth and visual movement.
This project is also a wonderful reminder that useful materials do not always need to be large. Even small quilting cotton scraps, leftover prints, narrow pieces of textured fabric, and short lengths of embroidery thread can become important parts of the finished artwork. Instead of trying to reproduce every detail identically, use the original composition as inspiration while allowing your own fabric collection to influence the final appearance.
EASILY FIND THE FREE PDF FOR THIS PATTERN HERE!
Once completed, the panel can be displayed as textile wall art, incorporated into a cushion, framed, quilted, or adapted for another sewing project. Whether you choose colorful modern prints or traditional fabrics, the combination of appliqué and embroidery gives the piece a warm handmade quality. If you create your own Fabric Application Panel with Mushroom Print Pattern, leave your sincere opinion about the project and share your suggestions. Which mushroom fabrics would you choose, and what other woodland details would you add to make the design your own?