
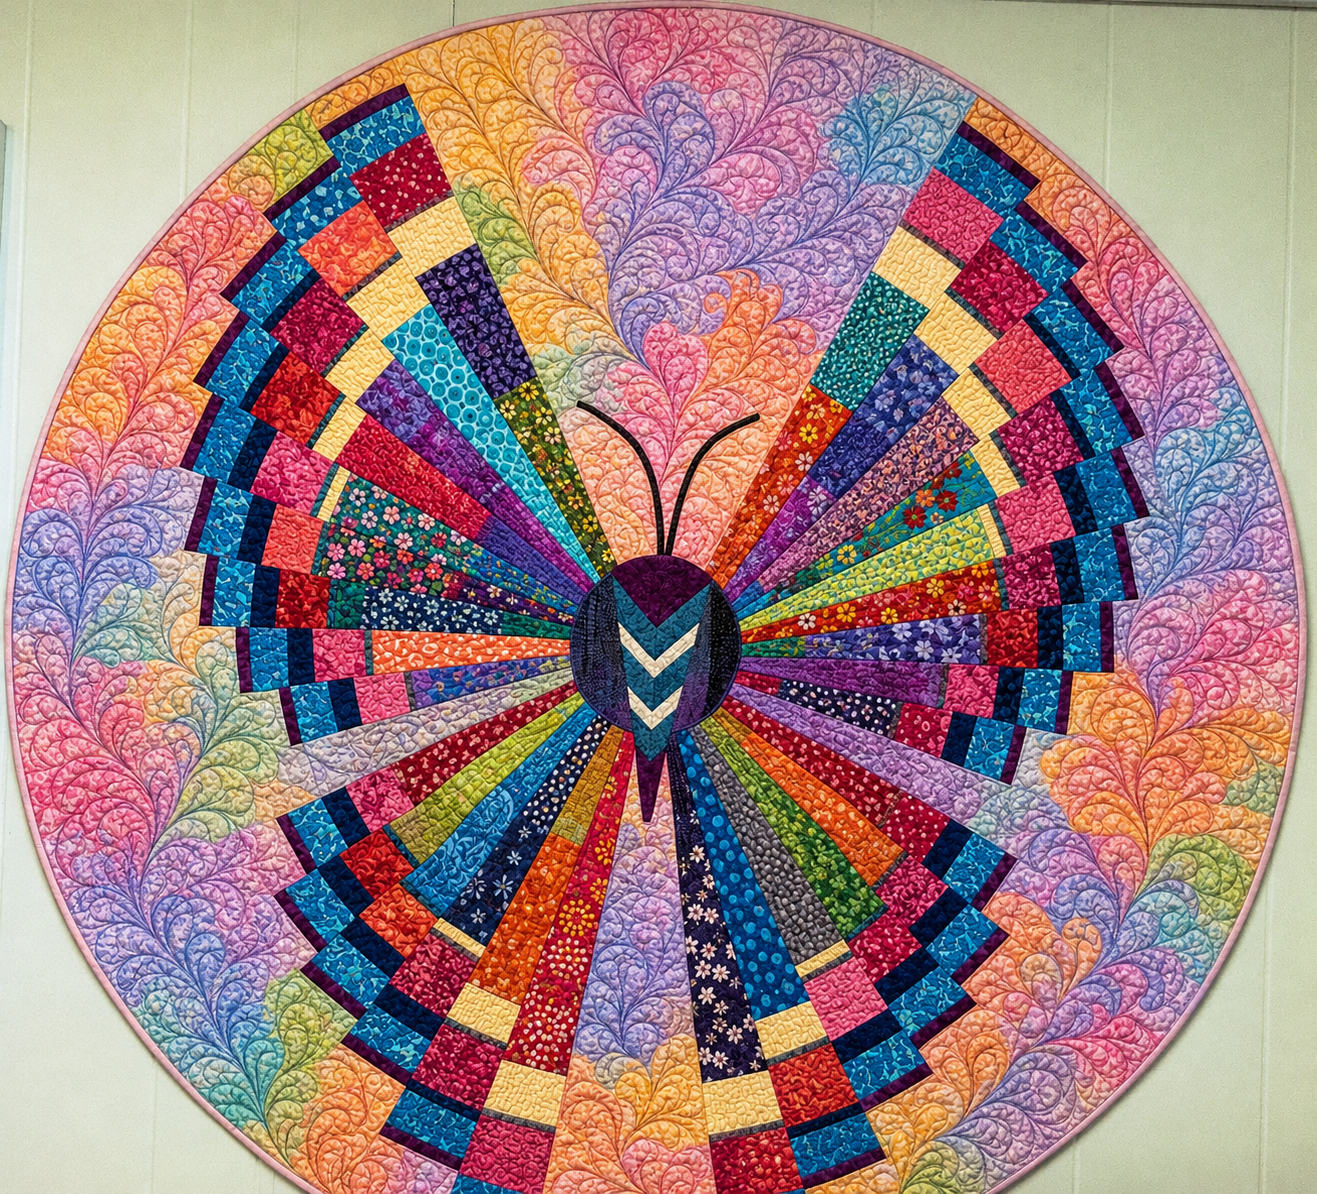
The Colorful Butterfly Bedspread Pattern is a vibrant quilting project that combines the elegance of a butterfly silhouette with the playful energy of colorful patchwork. Inspired by the project shown in the reference image, this design uses radiating fabric strips, small geometric patchwork sections, curved outer areas, and expressive quilting to create the impression of a butterfly spreading its wings. The striking composition is especially attractive because the butterfly appears to emerge from the center while dozens of colors move outward toward the edges. Although the finished piece looks complex, it becomes much easier to understand when the construction is divided into manageable sections. Quilters can work gradually, building the wings from the center outward and checking symmetry throughout the process. The result can become a decorative butterfly quilt, a round bedspread, a statement throw, or a beautiful textile centerpiece for a bedroom.
One of the most interesting characteristics of this Colorful Butterfly Bedspread Pattern is the way traditional patchwork techniques are combined with modern fabric placement. Instead of constructing a butterfly from only a few large appliqué pieces, the wings are visually divided into many narrow fabric rays and rectangular blocks. Prints in blue, turquoise, pink, orange, red, purple, yellow, green, and navy create movement without requiring every fabric to match perfectly. The soft pastel sections surrounding the colorful wings provide visual breathing room and allow the saturated prints to stand out. Decorative quilting fills these calmer spaces with feather-like or leafy curves, adding another layer of texture to the project. Because of this contrast between busy patchwork and softer quilted areas, the finished bedspread feels detailed without becoming visually overwhelming.
Another advantage of making a Colorful Butterfly Bedspread Pattern is the opportunity to use fabric scraps creatively. Many of the narrow wing sections can be cut from relatively small pieces of quilting cotton, making this project ideal for a well-organized scrap collection. The pattern also teaches valuable skills such as foundation piecing, strip construction, curved assembly, appliqué, quilting, binding, and color planning. Beginners may prefer to simplify the number of wing sections, while experienced quilters can create a highly detailed interpretation similar to the reference design. The dimensions can also be customized according to the intended use, whether you want a smaller decorative quilt or a much larger bedspread. What matters most is maintaining the recognizable butterfly proportions, a balanced color distribution, and careful construction around the central body.
Materials, Fabrics, Measurements, and Color Planning
Begin your Colorful Butterfly Bedspread Pattern by deciding the final diameter or overall width of the quilt. A decorative version may measure approximately 120 to 150 cm across, while a functional bedspread can be enlarged considerably to suit the mattress. Because the reference design has an almost circular outline, drawing the full shape on inexpensive paper before cutting fabric is extremely useful. Fold the paper into quarters to establish accurate horizontal and vertical center lines. These guidelines help keep the butterfly symmetrical and provide reliable reference points when the individual sections are assembled.
DISCOVER MORE FREE PATTERNS HERE!
For the fabric selection, gather a generous assortment of quilting cotton scraps in strong and cheerful colors. Turquoise, royal blue, navy, red, coral, pink, purple, orange, yellow, lime green, teal, and burgundy work particularly well together. Include small-scale florals, dots, abstract prints, tone-on-tone designs, and subtle geometric motifs to create the lively patchwork appearance visible in the inspiration image. You do not need to use identical fabrics on both sides of the butterfly. Instead, repeat several key colors across both wings so the overall composition feels balanced rather than perfectly mirrored.
You will also need lighter fabrics for the open spaces surrounding the wings. Soft pink, peach, lavender, pale yellow, light blue, and muted green are excellent choices because they contrast with the saturated wing fabrics. These areas can be constructed from several curved sections instead of one solid background. Using different pastel shades gives the finished butterfly quilt pattern a watercolor-like appearance and makes the decorative quilting more visible. If you prefer a calmer design, use a single pale background color and allow the quilting texture to provide the decorative interest.
Essential supplies include quilting cotton, batting, backing fabric, thread, a rotary cutter, quilting ruler, cutting mat, fabric scissors, pins or clips, a sewing machine, iron, and ironing board. A walking foot is helpful for assembling the quilt sandwich, while a free-motion quilting foot is useful if you want to recreate the flowing feather motifs seen throughout the background. For the edge, prepare enough bias binding to travel around the entire curved perimeter. Bias-cut strips are strongly recommended because they bend around a circular edge more smoothly than straight-grain binding.
Before cutting the final fabrics, create a paper template of one half of the butterfly. Divide each wing into long triangular or wedge-shaped rays radiating from the central body. Near the outer edge, divide some sections into smaller rectangles and squares. These blocks produce the characteristic mosaic effect visible around the ends of the wings. Number every paper section carefully and mark the colors you intend to use. Taking a photograph or making a simple colored sketch of your layout before sewing can prevent confusion later.
The central butterfly body should remain relatively compact so the colorful wings dominate the design. Plan an oval or rounded thorax approximately in proportion to your finished quilt, along with a tapered lower body and two slender antennae. Dark navy, deep purple, teal, burgundy, and black-based prints work particularly well for this section because they create a strong focal point. Small chevron-shaped pieces can also be incorporated into the body to echo the geometric construction of the wings and make the Colorful Butterfly Bedspread Pattern feel visually unified.
Constructing the Butterfly Wings and Central Body
Start the sewing process with the long wing rays. Each ray can be constructed as a tapered strip unit, beginning narrow near the butterfly body and gradually widening toward the exterior of the wing. Foundation paper piecing is especially helpful for maintaining accurate angles, although traditional template piecing can also be used. Sew one fabric section at a time, press the seam carefully, and add the next strip. Alternate light, medium, and dark fabrics so neighboring rays remain visually distinct.
The upper wings should appear larger and broader than the lower wings. Use long strips of turquoise, red, purple, floral green, orange, navy, and pink to establish the dramatic fan shape. Avoid placing all strong colors in one location. Instead, distribute bright and dark fabrics across the entire wing. A dark purple strip beside turquoise, for example, creates strong contrast, while orange beside red produces a warmer transition. These intentional color relationships make the colorful butterfly patchwork appear energetic and dimensional.
Next, create the mosaic sections near the ends of the wings. Sew small rectangles and squares into short rows, using contrasting colors such as blue against pink, yellow against navy, or coral against turquoise. The blocks do not all need to be identical in size, but their finished dimensions must correspond with your paper pattern. Once a row is complete, attach it to the wider end of the appropriate wing ray. Continue building these segments until the upper and lower wing outlines are complete.
After constructing the individual rays, arrange them on a large flat surface before joining them permanently. Begin at the central vertical guideline and work outward. The narrow tips of the rays should converge neatly around the location of the butterfly’s body. Pin neighboring units together and sew with a consistent seam allowance. Press the seam allowances carefully to reduce bulk. If several seams meet at the same location, press alternating seams in opposite directions or carefully grade the allowances to keep the finished quilt smooth.
Construct the central body separately. Piece together small dark fabrics to form an oval thorax, then add decorative chevrons or angular pieces through the center if desired. Create the lower abdomen from two tapered fabric pieces and place it vertically beneath the thorax. The body may be appliquéd over the completed wing intersections, which is often easier than trying to incorporate every curved edge into the initial patchwork construction. Machine appliqué with a narrow satin stitch, blanket stitch, or small straight stitch can secure the edges neatly.
Finally, add the butterfly antennae. They can be made from very narrow bias strips, embroidered lines, or carefully stitched fabric tubes. Position them symmetrically so they curve upward from the head rather than appearing rigid. At this point, step several feet away from your work and examine the whole butterfly. Check whether one wing appears visually heavier than the other and make minor color or placement adjustments before completing the surrounding areas. Good visual balance is more important than making the two halves mathematically identical.
Building the Background, Quilting, and Finishing the Bedspread
Once the butterfly is assembled, begin constructing the pastel areas that complete the circular Colorful Butterfly Bedspread Pattern. Draft curved background sections that fit between the wing edges and the outer perimeter. These pieces can resemble large petals or soft wedges. Alternate pastel pink, lavender, peach, yellow, blue, and green fabrics to create a gentle transition around the bright butterfly. Sew the curved pieces slowly, using plenty of pins or clips and avoiding excessive pulling that could distort the bias edges.
After assembling the entire quilt top, place it on a flat surface and verify the circular outline. Small irregularities can be corrected during trimming, but avoid removing too much fabric at once. Mark the final circle using a large improvised compass, circular template, or measured string method. Leave a little extra fabric outside the line until quilting is complete because the quilting process can slightly change the dimensions. Keeping extra margin provides flexibility when the final edge is trimmed.
Prepare the quilt sandwich by laying the backing fabric wrong side up, positioning the batting on top, and centering the quilt top with the right side facing upward. Smooth every layer carefully from the center outward. Baste using safety pins, temporary basting spray, or hand-basting stitches according to your preferred technique. A project with extensive decorative quilting benefits from close basting because densely stitched sections can shift if the layers are not secured adequately.
The background is an ideal place for free-motion quilting. The reference design features flowing feather-like motifs that follow the curved shape of the quilt and reinforce the feeling of butterfly wings and foliage. Begin by quilting a central curved stem, then add repeated teardrop-shaped feathers on either side. Smaller echoes, swirls, and leaf shapes can fill the remaining spaces. If elaborate free-motion quilting feels intimidating, use gentle loops, meandering lines, or repeated arcs instead. Consistency is more important than complexity.
Inside the patchwork wings, choose a simpler quilting approach so the fabric prints remain visible. Stitching approximately along the seams, commonly called stitching in the ditch, can emphasize the geometric structure. You can also quilt narrow parallel lines along the long wing rays. The body may be outlined several times to make it stand out from the wings. This combination of dense background quilting and controlled geometric quilting creates texture while preserving the clear butterfly silhouette.
After quilting is finished, trim the quilt to its final shape and attach the binding. Because the perimeter is curved, use bias-cut binding rather than regular straight-grain strips. Sew the binding slowly around the first side, stretching it only slightly where necessary to follow the circle. Fold it around the raw edge and finish the reverse side by hand or machine. Give the completed bedspread a final inspection, remove loose threads, and gently press any areas that require attention. Your handmade Colorful Butterfly Bedspread Pattern is then ready to display or use.
FAQ About the Colorful Butterfly Bedspread Pattern
Is the Colorful Butterfly Bedspread Pattern suitable for beginners? Yes, although beginners should consider simplifying the design. Instead of creating dozens of narrow rays and small patchwork rectangles, start with fewer and wider wing sections. The central construction method remains essentially the same. Intermediate and advanced quilters can increase the number of pieces, experiment with foundation paper piecing, and add elaborate free-motion quilting. Working gradually prevents this impressive-looking project from becoming overwhelming.
What fabrics work best for a Colorful Butterfly Bedspread Pattern? Medium-weight 100% quilting cotton is one of the easiest options because it cuts accurately, presses well, and behaves consistently during piecing. Combining small floral prints, dots, tonal fabrics, and geometric designs produces the rich appearance shown in the inspiration. Avoid using too many extremely large prints in narrow wing sections because much of the motif may disappear after cutting. Smaller patterns are particularly effective for scrap-based patchwork.
How many colors should I use in the butterfly wings? There is no strict number, but variety is central to this design. Using approximately eight to fifteen major color families can create a rich rainbow effect, while multiple fabric prints within each color family add even more depth. Repeat turquoise, pink, purple, red, yellow, orange, green, and navy throughout the wings to create rhythm. The secret is not simply using many colors; it is distributing those colors thoughtfully across the composition.
Can I make this pattern into a rectangular bedspread instead of a round quilt? Absolutely. Build the central circular butterfly panel first, then add corner sections or wide borders until the top reaches the required rectangular dimensions. A neutral or pastel extension can preserve the butterfly as the primary focal point. Another option is to enlarge the butterfly itself and allow the wings to fill most of a rectangular quilt. Always calculate the mattress dimensions and desired drop before determining your final measurements.
Do I need a long-arm quilting machine for this project? No. A standard domestic sewing machine can be used, especially for a smaller version of the Colorful Butterfly Bedspread Pattern. Roll or fold the excess quilt so it can move through the machine throat more easily. Work from the center outward whenever practical. Larger bedspread versions can require patience, but dividing the quilting into manageable areas makes the process much more comfortable.
What is the best way to make the butterfly symmetrical? Create one accurately drafted half-pattern and mirror it to form the opposite side. Mark horizontal and vertical center lines before assembling the pieces and continually compare corresponding sections as you work. Exact fabric prints do not have to match on both sides, but the wing outlines and general proportions should remain balanced. A design wall or large floor area is very useful for checking symmetry before the sections are sewn permanently.
Conclusion
The Colorful Butterfly Bedspread Pattern demonstrates how traditional quilting techniques can be transformed into a dramatic textile artwork filled with personality and movement. By combining colorful fabric strips, geometric patchwork blocks, pastel background sections, a strongly defined central butterfly body, and decorative quilting, you can reproduce the visual character of the project while still making it completely your own.
The most important part of the process is good preparation. Draft the butterfly carefully, divide the wings into manageable sections, plan your color distribution, and label the pieces before sewing. Once the pattern has been organized, construction becomes much more straightforward. Building each wing ray separately also allows you to use small fabric scraps that might otherwise remain unused.
Color plays a major role in this project. Bright turquoise, red, pink, purple, green, orange, yellow, and navy fabrics give the wings their energetic personality, while pale lavender, peach, blue, pink, and green surrounding sections create contrast. Repeating selected colors across the design helps connect dozens of different fabrics into one harmonious composition.
The quilting is equally important because it changes a flat patchwork top into a richly textured butterfly bedspread. Feather motifs, curved leaves, swirls, straight lines, and seam-following stitches can all be combined according to your experience level. There is no requirement to reproduce every quilted detail exactly; creating consistent texture that complements the butterfly is the primary goal.
EASILY FIND THE FREE PDF FOR THIS PATTERN HERE!
Whether you make the design as a circular decorative quilt, an oversized throw, or adapt it into a rectangular bedspread, the project offers countless opportunities for customization. Different fabric collections can create completely different moods, from soft romantic pastels to brilliant jewel tones or even a sophisticated monochromatic interpretation. That flexibility is one of the greatest strengths of the Colorful Butterfly Bedspread Pattern. After completing your version, take a moment to appreciate how individual scraps and simple shapes have been transformed into an expressive butterfly composition. I would love to know your sincere opinion about this project: Would you keep the rainbow color palette, or would you create the butterfly using a completely different combination of fabrics? Leave your honest opinion and suggestions about what you would change or add to this Colorful Butterfly Bedspread Pattern.