
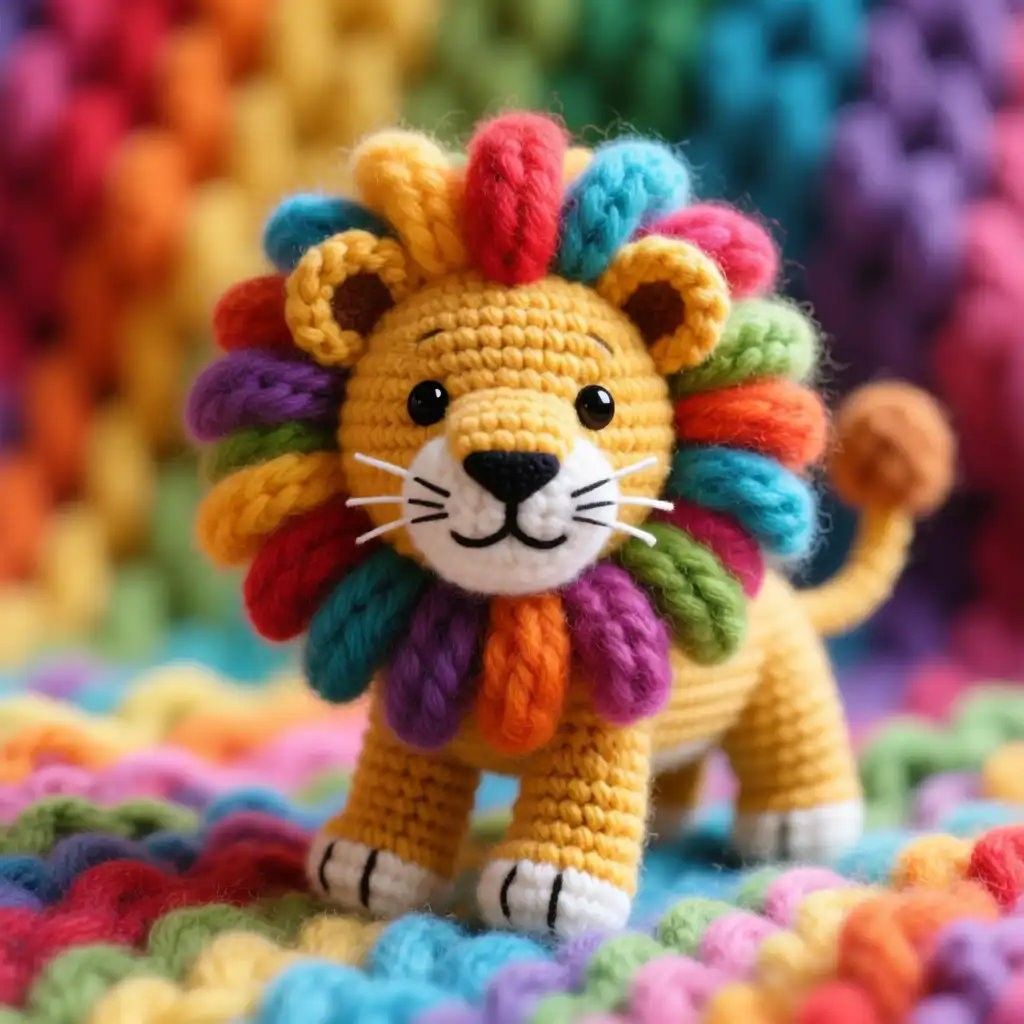
The Rainbow Crochet Lion Pattern is a cheerful amigurumi project that combines the classic shape of a little lion with a bright, multicolored mane. Inspired by the handmade lion shown in the reference image, this design uses a warm golden body, a rounded muzzle, small ears, four sturdy legs, a curved tail, and a dramatic mane made from individual crochet loops or elongated petals. The result is a playful crochet animal that can become nursery décor, a handmade gift, or a colorful addition to an amigurumi collection. One of the best features of this project is that the basic construction relies mainly on single crochet stitches, increases, decreases, and simple shaping techniques, making the design approachable for crocheters who already understand working in continuous rounds. Although the finished appearance looks detailed, each section is created separately and assembled gradually, which makes the process much easier to manage. Throughout this tutorial, the Rainbow Crochet Lion Pattern will be explained using standard U.S. crochet terminology, including an easy crochet key so you can understand every abbreviation while working from the beginning to the final finishing details.
Color is what gives this crochet lion pattern its distinctive personality. Instead of creating a traditional brown mane, this version introduces shades such as red, pink, turquoise, blue, purple, green, orange, and yellow around the lion’s head. You can follow a repeating rainbow sequence or use leftover yarn to create a unique combination of colors. The golden or mustard-colored body provides a neutral foundation that allows the mane to become the visual centerpiece of the project, while the white muzzle and paw details add contrast. When choosing yarn, try to keep approximately the same yarn weight for every part because using dramatically different thicknesses can make the mane uneven or change the proportions of the animal. Cotton yarn creates well-defined stitches and a firm amigurumi texture, while acrylic yarn tends to produce a slightly softer finish. Either option works well for this Rainbow Crochet Lion Pattern, provided you choose a crochet hook slightly smaller than the size normally recommended on the yarn label so the stitches remain tight enough to hold the stuffing securely.
Before beginning, it is helpful to understand that amigurumi construction depends heavily on consistent tension and careful counting. Most pieces in this Rainbow Crochet Lion Pattern are crocheted in a spiral rather than joining each round with a slip stitch. Using a stitch marker in the first stitch of every round prevents losing your place, especially when working increases or decreases. Stuff the pieces gradually instead of waiting until the end, because smaller sections such as the legs, muzzle, and tail can become difficult to fill evenly after they have been completely closed. The final dimensions depend on yarn weight, hook size, tension, and stuffing, but medium-weight yarn can produce a compact decorative lion similar in proportion to the reference image. Remember that handmade toys containing plastic safety eyes or other small components may not be appropriate for children under three years old. For a baby-safe version, embroider the eyes and facial details securely with yarn instead. These small decisions help make the finished crochet amigurumi lion attractive, durable, and appropriate for its intended use.
Materials, Crochet Key, and Starting the Rainbow Crochet Lion Pattern
For this project, prepare medium-weight yarn in golden yellow for the body, white or cream for the muzzle and paws, brown for the inner ears if desired, black for the nose and embroidered details, and several bright colors for the rainbow mane. You will also need an appropriately sized crochet hook, polyester fiberfill, a yarn needle, scissors, stitch markers, and optional safety eyes. A hook around 3.0 to 4.0 mm commonly works well with medium-weight amigurumi yarn, but the best size is the one that creates firm stitches without making your hands uncomfortable.
DISCOVER MORE FREE PATTERNS HERE!
The crochet key used throughout the Rainbow Crochet Lion Pattern follows standard U.S. terminology. The most important abbreviations are: MR = magic ring, ch = chain, sc = single crochet, inc = increase by making 2 sc in one stitch, dec = invisible decrease over two stitches, sl st = slip stitch, hdc = half double crochet, dc = double crochet, st/sts = stitch/stitches, FO = fasten off, and R = round. Parentheses indicate stitches that should be repeated, while a number placed after the round indicates the approximate total stitch count.
Begin the head with golden yarn using R1: 6 sc in MR [6]. For R2, work inc around [12]. Continue with R3: (1 sc, inc) × 6 [18], R4: (2 sc, inc) × 6 [24], R5: (3 sc, inc) × 6 [30], and R6: (4 sc, inc) × 6 [36]. These gradual increases produce a smooth circular shape rather than a pointed top. If you want a slightly larger head, continue with another increase round before beginning the straight sides.
For approximately rounds 7 through 13, work 1 sc in each stitch around, maintaining the same stitch count. This creates the main depth of the lion’s head. Place the eyes between approximately rounds 9 and 11, keeping them centered and evenly spaced. Before permanently attaching safety-eye washers, examine the face from the front because even a difference of one stitch can noticeably change the expression. If you prefer embroidered eyes, wait until the head is stuffed so you can judge their position more accurately.
Begin shaping the bottom of the head by reversing the earlier increases. A practical sequence is (4 sc, dec) × 6, followed by (3 sc, dec) × 6, then (2 sc, dec) × 6. Start adding fiberfill before the opening becomes too narrow. Push small amounts toward the sides and top rather than inserting one large ball of stuffing. Continue with (1 sc, dec) × 6, adding enough filling to keep the head round but not so much that the stitches become visibly stretched.
The muzzle can be made separately with cream or white yarn. Start with a magic ring and crochet six single crochets, then increase around to create a small circle. Work another round using (1 sc, inc) repetitions and one or two straight rounds depending on the desired projection. Lightly stuff the muzzle and sew it onto the lower center of the face. A small black embroidered or crocheted nose can be placed above the center, while a curved mouth and several whisker lines complete the friendly appearance seen in this style of crochet lion amigurumi.
Crocheting the Rainbow Mane, Ears, and Lion Face
The colorful mane is the defining feature of the Rainbow Crochet Lion Pattern. Rather than making one flat circular piece, you can create the mane as a series of elongated crochet petals positioned around the face. Each petal can begin with a short foundation chain, followed by several sc, hdc, or dc stitches that create a rounded capsule shape. A very simple version is to ch 7, work back along the chain using sc and hdc stitches, then crochet around the opposite side before fastening off. The exact stitch count is flexible because the goal is to produce soft oval pieces with similar dimensions.
Make enough colorful mane pieces to form a complete circle. Approximately 18 to 24 pieces generally create a rich appearance, depending on their width and the finished head circumference. Alternate shades rather than placing all similar colors together. Red beside turquoise, orange beside purple, yellow beside blue, and green beside pink can create the lively contrast that defines a rainbow crochet mane. You can also repeat a traditional rainbow order if you prefer a more organized appearance.
Arrange the mane pieces around the finished head before sewing anything permanently. Begin at the top center and work symmetrically toward both sides. This temporary arrangement allows you to redistribute colors and make sure the mane surrounds the face evenly. Sew each piece securely near its base while leaving the rounded end free. Slight overlapping is useful because it hides gaps and creates a fuller, layered texture similar to the plush appearance in the reference design.
Create two ears using golden yarn. Begin each ear with 6 sc in a magic ring, increase to approximately 12 stitches, then work one or two rounds evenly. Flatten each ear instead of stuffing it heavily. For additional detail, make a smaller semicircle or circular insert in brown or a darker golden color and sew it inside the ear. Position both ears toward the upper sides of the head, allowing them to remain visible between the colorful mane pieces.
Facial embroidery has a major influence on the personality of the finished Rainbow Crochet Lion Pattern. After attaching the muzzle, embroider a triangular or rounded black nose at the upper center. Bring the yarn downward from the nose and form two small curves for the smiling mouth. Black embroidery can also create whisker markings, while thin white strands may be used for actual whiskers if the lion is intended primarily as decorative art. Keep all threads securely knotted and hidden inside the crochet fabric.
Before moving to the body, examine the head from several angles. Make sure the ears have similar height, the muzzle sits centrally, and the mane has a balanced circular outline. Do not worry if every rainbow petal is not identical. Slight variations are part of the handmade character of crochet, and they can actually give the lion more visual movement. What matters most is consistent attachment, balanced color distribution, and a face that remains clearly visible inside the dramatic crochet rainbow mane.
Body, Legs, Tail, and Final Assembly
To create the body, begin with golden yarn and 6 sc in MR. Increase to 12 stitches, then follow with (1 sc, inc) × 6 [18], (2 sc, inc) × 6 [24], and additional increase rounds until you reach approximately 30 or 36 stitches, depending on the size of the head. Work several rounds evenly to create the torso. Because the reference lion stands on four legs, the body should be slightly elongated rather than perfectly spherical.
Begin decreasing gradually near the neck section while adding stuffing. Avoid overfilling because an extremely rigid body can make leg placement more difficult. A medium-firm stuffing level usually works best. Leave a long yarn tail when fastening off so the body can be sewn securely to the head. The neck connection should be particularly strong because the colorful mane adds visual and physical weight around the head.
For each leg, start with white yarn to form the paw. Work 6 sc in MR, increase to 12, and crochet one or two even rounds. Change to golden yarn and continue upward with approximately 12 stitches for several rounds. For front legs, keep the pieces relatively straight. Rear legs may be made slightly shorter or shaped differently so the body stands in a natural position. Make four legs while carefully maintaining comparable dimensions.
Stuff the paws and lower legs firmly enough to hold their shape, but place less stuffing close to the top edge so the pieces remain flexible during assembly. Before sewing, pin or temporarily position all four legs beneath the torso. Set the lion on a flat surface to check whether it stands evenly. Adjust the location of one leg at a time until the body appears balanced. This small preparation step can dramatically improve the professional appearance of the finished amigurumi lion pattern.
The tail can be created as a narrow crochet tube. Begin with approximately six single crochets in a magic ring and work continuously until the tail reaches the desired length. You can introduce gentle shaping with an occasional increase or decrease, although a simple straight tube also works because the finished tail can be curved during attachment. Lightly stuff the lower portion and add a small brown, golden, or multicolored tuft to the end for a playful lion detail.
Complete the assembly by sewing the head firmly to the front or upper section of the body, checking that the face points straight ahead. Secure every yarn end inside the stuffed pieces with a yarn needle. Add optional black embroidered lines to the white paws to suggest toes. Smooth the mane with your fingers and reposition individual colored pieces if necessary. At this stage, the essential construction of the Rainbow Crochet Lion Pattern is finished, and the combination of simple crochet shapes creates a surprisingly expressive three-dimensional character.
Finishing Tips, FAQ, and Conclusion
One useful finishing technique is to gently shape the stuffed pieces with your fingers after assembly. Crochet fabric remains somewhat flexible, so the head can be rounded, the legs aligned, and the muzzle adjusted even after sewing. If one side of the mane appears thinner, insert an additional colored petal rather than attempting to stretch existing pieces. These small corrections make the final Rainbow Crochet Lion Pattern look much more balanced.
Yarn choices can completely transform the final style. Smooth cotton highlights every stitch and gives the lion a clean handcrafted appearance, while softer acrylic yarn creates a fluffier finish. You can even combine standard yarn for the body with slightly fuzzy yarn for selected mane pieces, provided the yarn thickness remains reasonably consistent. Beginners may find smooth yarn easier because individual stitches are easier to identify.
The rainbow lion crochet pattern is also excellent for using small yarn remnants. Since each mane piece requires relatively little yarn, leftover colors from other projects can become part of the design. Instead of requiring eight different colors, you could use four colors repeatedly or create a pastel mane, autumn mane, or two-tone version. The underlying construction remains identical.
Correct stuffing is equally important. A loosely stuffed lion may collapse or develop an uneven body, while excessive stuffing can create visible gaps between stitches. Add fiberfill in small portions and distribute it with your fingertips or the blunt end of a crochet hook. Pay special attention to the head, paws, and body because these areas determine the final silhouette.
Secure assembly is especially important when the finished project will be handled rather than simply displayed. Use a strong yarn tail and make several passes through both pieces when attaching legs, ears, muzzle, tail, and head. Hide knots inside the body whenever possible. For projects intended for young children, embroidered facial details are generally a more suitable choice than removable or small plastic components.
Finally, take time to photograph or inspect your finished lion from the front, side, and back. This helps reveal uneven stitching, loose yarn ends, or mane pieces that need repositioning. Handmade crochet does not need machine-like perfection. A carefully assembled project with consistent tension and thoughtful color placement is what gives the Rainbow Crochet Lion Pattern its warm, recognizable handmade character.
FAQ: What skill level is recommended for the Rainbow Crochet Lion Pattern? This pattern is best suited to an adventurous beginner or intermediate crocheter. You should already understand the magic ring, single crochet, increases, decreases, working in continuous rounds, color changes, stuffing, and basic sewing. None of these techniques is particularly complex individually, but assembling several pieces requires patience and careful counting.
FAQ: What is the best yarn for a crochet lion? Cotton and acrylic are both practical choices. Cotton creates firm, clearly defined stitches, while acrylic is soft, affordable, and available in many colors. For the Rainbow Crochet Lion Pattern, using the same general yarn weight throughout the project helps preserve consistent proportions.
FAQ: How many colors should be used for the rainbow mane? There is no strict number. Six to eight bright shades create a traditional rainbow-inspired appearance, but you can use more colors if you have small yarn scraps available. Repeating colors around the head helps create visual rhythm and prevents the mane from appearing random.
FAQ: How can I keep the stuffing from showing through the stitches? Use a crochet hook slightly smaller than the yarn manufacturer’s usual recommendation and maintain firm, consistent tension. The stitches should sit closely together without becoming painfully tight to crochet. Adding stuffing gradually also prevents excessive pressure against the fabric.
FAQ: Can I make the lion larger or smaller? Yes. The easiest method is to change yarn thickness and hook size while following the same basic construction. Thicker yarn and a larger compatible hook create a larger lion, while thinner yarn produces a miniature version. Remember that the safety eyes, mane pieces, and facial features should also be resized proportionally.
FAQ: Can the mane be crocheted directly onto the head? Yes. Instead of making separate petals, you can attach yarn directly around selected head stitches and create loops, chains, or elongated clusters. However, separate pieces provide more control over color placement and allow you to arrange the mane before making permanent attachments.
FAQ: Why does my amigurumi head look pointed instead of round? This usually happens when increases are concentrated in the same positions or the initial rounds are worked too tightly. Staggering increases and maintaining even tension helps produce a smoother shape. Proper stuffing can also correct minor irregularities.
FAQ: How do I make invisible decreases? Insert the hook through the front loop of the next stitch and then through the front loop of the following stitch. Yarn over, pull through the front loops, yarn over again, and complete the single crochet. An invisible decrease is especially useful in amigurumi because it produces a cleaner surface than a conventional decrease.
FAQ: Are safety eyes necessary? No. Embroidered eyes can look equally expressive and are preferable when you want to avoid small removable components. Use black yarn or embroidery thread and carefully create two balanced eye shapes after stuffing the head.
FAQ: How can I make all four legs the same size? Count every round and write down the number of rounds used for the first leg. A stitch marker helps identify each beginning round. It is also useful to crochet matching pieces consecutively instead of leaving long periods between them, because your tension is more likely to remain consistent.
Conclusion
The Rainbow Crochet Lion Pattern turns fundamental amigurumi techniques into a colorful handmade character filled with personality. Throughout this tutorial, you learned how to interpret the essential crochet key, construct a rounded head, create a contrasting muzzle, shape the ears, crochet individual rainbow mane pieces, build the body and four legs, make a tail, stuff each component correctly, and assemble everything securely. The project demonstrates how single crochet, increases, invisible decreases, color changes, embroidery, and amigurumi assembly can transform simple shapes into an impressive finished piece.
EASILY FIND THE FREE PDF FOR THIS PATTERN HERE!
The most enjoyable part of this pattern is the freedom to personalize it. You can change the mane colors, adjust the body size, embroider different expressions, experiment with yarn textures, or create several lions with completely different color themes. Whether you keep the bright rainbow palette or create your own interpretation, careful stitch counting and patient assembly will help produce a beautiful result. If you make this Rainbow Crochet Lion Pattern, leave your sincere opinion about the project and share your suggestions as well. Your ideas about different colors, mane styles, facial details, or construction techniques can inspire even more creative versions of this charming crochet lion.