
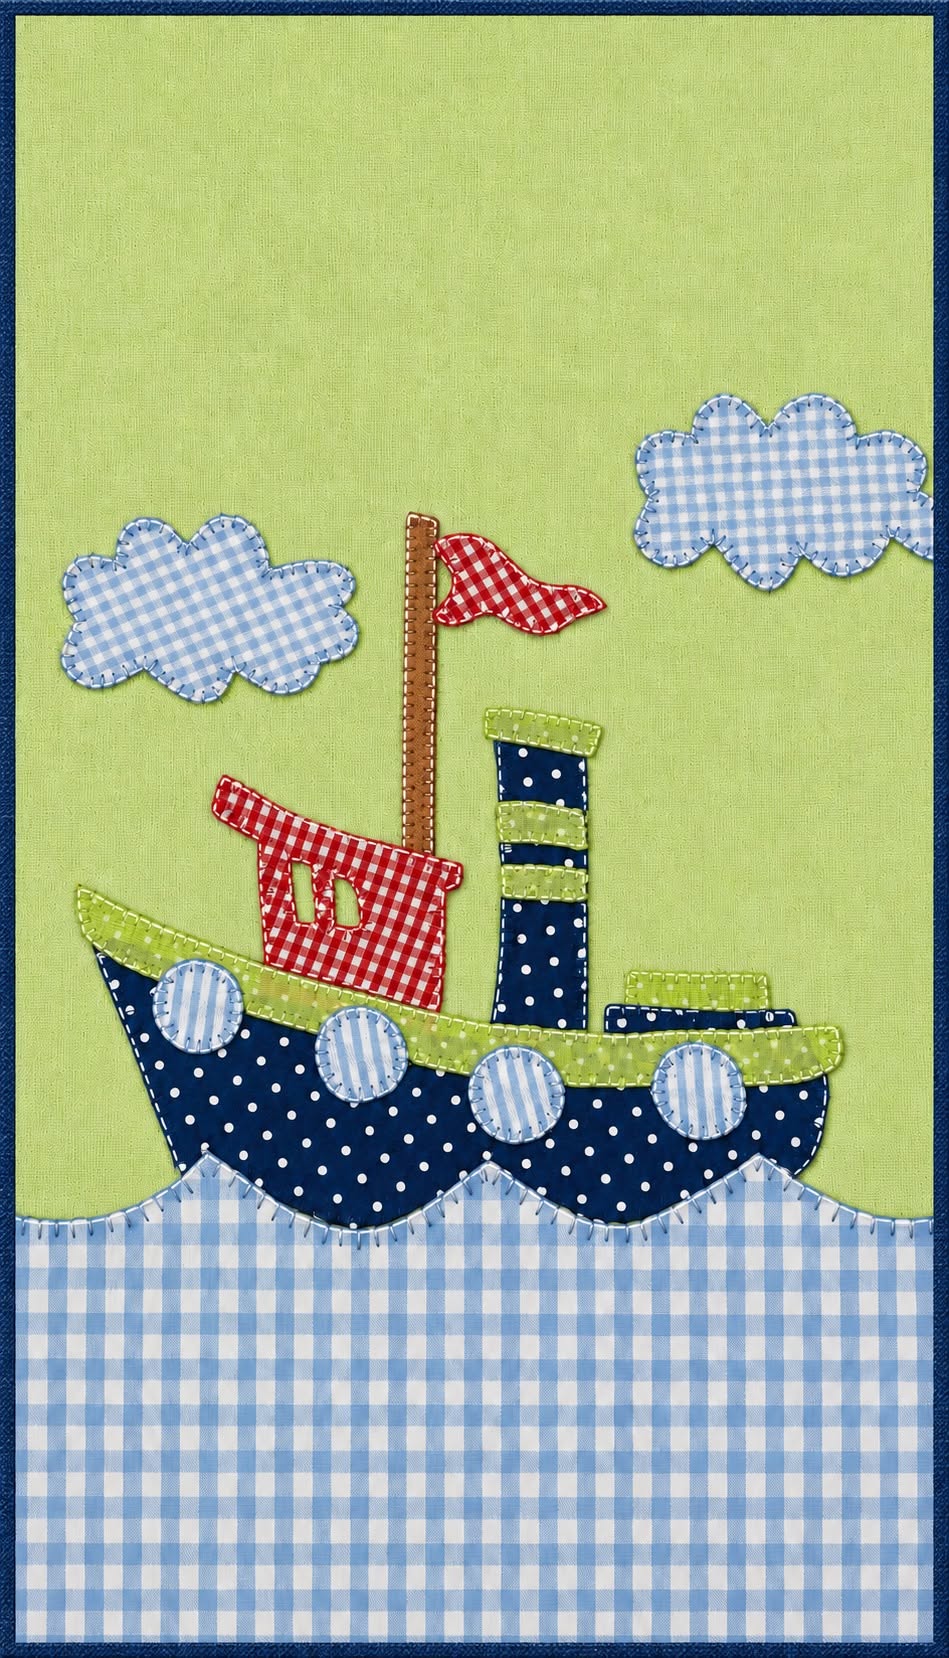
The Boat Applique Tutorial Pattern is a cheerful sewing project that combines traditional appliqué, playful fabric prints, and decorative hand-style stitching to create a charming nautical scene. Inspired by the image above, the design features a little boat sailing over gingham waves, surrounded by soft clouds and finished with a red cabin, a tall chimney, a mast, and a waving flag. The combination of navy polka dots, red gingham, light-blue checks, and fresh green fabric gives the piece a warm handmade personality. This project can work beautifully as a quilt block, nursery wall hanging, cushion front, tote bag panel, baby quilt decoration, or even part of a larger nautical-themed patchwork project. Because most of the shapes are simple and easy to trace, the pattern is approachable for beginners while still offering enough detail to keep experienced sewists interested. The most important idea is to build the scene layer by layer, taking time to position each fabric element before permanently stitching it in place.
Creating your own Boat Applique Tutorial Pattern also gives you plenty of freedom to personalize the finished piece. You can copy the color arrangement shown in the reference image or choose fabrics from your own scrap collection. Small cotton pieces work especially well because the project uses several separate shapes rather than large cuts of fabric. A dark navy cotton can form the hull, green fabric can create the upper trim and smokestack details, red gingham can become the cabin and flag, and light-blue checks or stripes can be used for the clouds, windows, portholes, and waves. Mixing prints creates visual movement without requiring complicated piecing techniques. The project is especially useful for learning fabric appliqué, because it demonstrates how different shapes can overlap naturally to form a complete illustration. Once the basic method is understood, you can reuse the same technique for houses, animals, flowers, vehicles, and countless other decorative sewing designs.
Before beginning the Boat Applique Tutorial Pattern, it is helpful to think of the picture as a collection of individual fabric templates. Instead of trying to sew the entire scene at once, separate it into the background, waves, hull, upper boat trim, cabin, chimney, mast, flag, portholes, and clouds. Each component can be prepared independently and assembled afterward. For a project measuring approximately 30 x 40 cm, lightweight cotton is an excellent choice for both the background and appliqué pieces. You may also use fusible web to stabilize small shapes and keep them from shifting during stitching. Decorative blanket stitch, whip stitch, or a narrow machine zigzag can outline the pieces. The visible stitches are part of the charm of this design, so there is no need to hide them completely. Instead, use the stitching to define the shapes and give your handmade boat a distinctive nautical appliqué appearance.
Materials and Preparation for the Boat Applique Tutorial Pattern
Begin by gathering the fabrics needed for your Boat Applique Tutorial Pattern. For a 30 x 40 cm finished block, prepare one background rectangle measuring approximately 34 x 44 cm so you have extra fabric for trimming later. A soft green background works particularly well because it provides strong contrast with the darker boat while keeping the overall appearance bright. You will also need pieces of navy, red, green, brown, and light-blue fabric. Small scraps are usually sufficient for most of the appliqué shapes.
DISCOVER MORE FREE PATTERNS HERE!
The boat hull can be cut from a navy fabric with small dots or another simple print. For a block of this size, a hull approximately 24 to 26 cm wide and 9 to 10 cm tall creates pleasing proportions. Draw the bottom edge with a gentle curve and slightly raise both ends. The reference design has a whimsical handmade shape rather than perfectly straight geometry, which makes the finished appliqué feel friendly and relaxed.
Next, prepare the cabin using red gingham or another contrasting red print. A cabin approximately 9 x 8 cm works well, with a slightly angled roofline to suggest the playful shape shown in the design. Cut two small openings or create separate appliqué pieces for the windows. Light-blue fabric, cream fabric, or green fabric can be used for these details. Small shapes should be stabilized with fusible web whenever possible because they can easily distort while being stitched.
For the tall chimney, cut a narrow navy rectangle about 4 x 12 cm. Add several narrow green horizontal bands to reproduce the striped appearance of the original project. A second shorter navy section can be added toward the right side of the boat to suggest another structural element. These vertical and horizontal shapes provide balance and help the boat look more detailed without making the construction difficult.
The mast can be created from a narrow brown fabric strip approximately 1.5 to 2 cm wide and 13 to 15 cm tall. A textured print works beautifully because it suggests wood. At the top, add a small red flag approximately 5 x 3 cm. Curve or angle the outside edge slightly instead of making a perfect rectangle. This small detail creates movement and makes the boat appliqué pattern appear as if it is sailing through a gentle breeze.
Finally, prepare four circular portholes measuring approximately 3.5 to 4 cm in diameter. Light-blue striped or checked fabric creates an attractive contrast against the navy hull. Two cloud shapes can also be drawn on light-blue gingham fabric. Make the clouds irregular rather than perfectly symmetrical, using rounded lobes across the top and bottom. Once every shape has been cut, arrange all pieces on the background before beginning any permanent stitching.
Building the Boat and Fabric Appliqué Layers
Start assembling the Boat Applique Tutorial Pattern with the large pieces because they establish the position of everything else. Place the hull in the lower half of the background, leaving enough space underneath for the waves. Position it slightly above the eventual waterline so the wave appliqué can overlap a small portion of its lower edge. Check that the bow and stern have enough surrounding space and that the boat is visually centered.
Place a narrow green strip across the upper edge of the navy hull. This strip can be approximately 2 cm tall and should follow the same slightly curved line as the hull. The green trim creates a strong boundary between the dark body of the boat and the colorful structures above it. Fuse the pieces in place following the instructions for your fusible web, or secure them temporarily with pins or fabric-safe adhesive.
Position the red cabin on the left half of the deck. Allow its lower edge to overlap the green trim slightly so the different components visually connect. Add the two small windows, keeping a few millimeters between them. The contrast between the red gingham appliqué and navy hull is one of the most recognizable features of the design, so choose a red fabric that stands out clearly.
Add the tall chimney toward the center-right section of the boat. Position the green horizontal bands across the navy rectangle before attaching the chimney to the background. Stitching the bands onto the chimney first is often easier than trying to attach them after the entire boat has been assembled. Leave small sections of navy visible between each green band to create the striped appearance seen in the reference image.
The mast should rise beside or slightly behind the cabin. Because it is narrow, stabilizing the strip before stitching will help prevent twisting. Place the red flag near the top, allowing part of it to extend toward the right. A small overlap between the mast and flag makes the construction stronger. This combination of simple shapes is a good example of how appliqué sewing techniques can create recognizable objects without complex pattern pieces.
Before stitching, step back and inspect the complete arrangement. Check the relative heights of the cabin, chimney, mast, and flag. Adjust any pieces that look too crowded. Once satisfied, press the appliqué components carefully according to the fusible product instructions. Do not slide the iron across the pieces, because sliding can shift small shapes. Lift and press instead, working gradually until every section is firmly secured.
Adding Waves, Clouds, Portholes, and Decorative Stitching
The waves are one of the most attractive parts of this Boat Applique Tutorial Pattern because they create the illusion that the vessel is moving across the water. Cut a wide strip of light-blue gingham approximately 12 to 14 cm tall and slightly wider than your background. Draw a repeating curved wave line across its upper edge. The curves do not need to match perfectly; alternating rounded peaks will give the water a handmade look.
Position the wave strip across the lower part of the background so that some of the curved peaks overlap the bottom edge of the boat. This layering creates depth and makes the hull appear to sit naturally in the water instead of floating above it. Once the placement looks balanced, fuse or pin the wave fabric securely. Trim the excess fabric only after all stitching is completed and the block is squared.
Next, add the four circular portholes to the navy hull. Space them evenly, but do not worry about mathematical perfection. Slight variations reinforce the folk-art appearance of the project. Light-blue striped fabric is especially effective for these circles because the vertical lines provide contrast against the small dots of the hull. Secure each circle carefully before beginning the decorative outline.
Place the two clouds in the upper section of the green background. One can sit toward the upper left while the second appears toward the upper right, leaving open space around the mast and flag. The clouds should not dominate the boat; they are supporting design elements. Using the same light-blue gingham as the waves creates repetition and helps unify the overall nautical quilt appliqué composition.
Now begin the decorative stitching. Blanket stitch is an excellent choice because it produces the visible edge treatment seen in many handmade appliqué projects. Work around the hull, cabin, chimney, flag, clouds, portholes, and waves. You can stitch by hand or use a sewing machine with an appliqué or blanket-stitch setting. A contrasting thread will make the outline more noticeable, while matching thread creates a softer finish.
Take extra care around curves and small corners. When machine stitching, stop with the needle down before pivoting the fabric. Around circular portholes, move slowly and make frequent small adjustments rather than forcing the curve. Consistent stitches are useful, but slight variation is perfectly acceptable in this style. The finished stitching should reinforce the edges while adding texture and definition to the fabric boat appliqué.
Finishing the Nautical Applique Project
After all appliqué pieces are attached, examine the block for loose edges. Small corners of the flag, windows, or green chimney bands may require extra stitches. This inspection is important because tiny pieces receive more handling and can lift over time if they are not well secured. Add a few reinforcing stitches where needed, especially at narrow points.
Press the entire Boat Applique Tutorial Pattern from the wrong side using moderate heat suitable for your fabrics. Placing a pressing cloth over delicate appliqué sections provides additional protection. Pressing from the back helps flatten the block without crushing the decorative stitches. Avoid excessive steam if fusible adhesive was used unless the product instructions specifically recommend it.
Square the finished panel after pressing. If you began with a 34 x 44 cm background, you can trim the project to approximately 30 x 40 cm or another convenient dimension. Use a quilting ruler to keep the sides straight. Make sure the boat remains centered before trimming because even a small adjustment can noticeably change the visual balance.
The completed block can now become part of a larger appliqué quilt pattern. For a baby quilt, combine several nautical blocks featuring boats, anchors, fish, stars, or lighthouses. Alternatively, surround this single boat block with fabric borders and turn it into a small wall hanging. Adding lightweight batting and backing fabric allows the panel to be quilted for extra texture.
You can also transform the design into a cushion cover. Add borders until the appliqué panel matches the desired cushion size, layer it with batting, and quilt around the boat shapes. Echo quilting around the clouds and waves can emphasize their outlines without distracting from the appliqué. For children’s room décor, the combination of gingham, polka dots, and bright contrasting colors creates a cheerful handmade effect.
Most importantly, treat the Boat Applique Tutorial Pattern as a flexible creative starting point. Change the flag color, make the hull red or green, replace the gingham waves with striped fabric, or add embroidered seagulls above the clouds. Once you understand how the individual shapes are layered, it becomes easy to create your own variations while preserving the simple, charming character of the original nautical composition.
Frequently Asked Questions About the Boat Applique Tutorial Pattern
What is a Boat Applique Tutorial Pattern?
A Boat Applique Tutorial Pattern is a sewing design in which separate pieces of fabric are cut into boat-related shapes and stitched onto a larger background fabric. Instead of constructing the image through traditional patchwork seams, appliqué allows each decorative shape to sit on top of the background. This technique makes it possible to create detailed pictures with relatively simple pieces.
Is this boat appliqué suitable for beginners?
Yes. The project is beginner-friendly because most shapes consist of rectangles, circles, gentle curves, and simple free-form outlines. Beginners may find fusible appliqué particularly helpful because the adhesive temporarily holds each piece in place while it is stitched.
What is the best fabric for appliqué?
Quilting cotton is one of the easiest materials to use. It is stable, easy to cut, widely available in small prints, and handles decorative stitching well. Cotton gingham, polka dots, stripes, and small geometric prints are especially effective for this nautical appliqué project.
Do I need fusible web to make this pattern?
No, but fusible web can make the process easier. Traditional needle-turn appliqué can also be used, and experienced sewists may prefer that method. Fusible appliqué is often faster and particularly convenient when working with small details such as windows, chimney bands, and portholes.
Can I sew the appliqué by hand instead of using a machine?
Absolutely. Hand blanket stitch works beautifully around the shapes and creates a charming handcrafted appearance. Embroidery floss or strong cotton thread can be used. Machine appliqué is faster, but both approaches can produce attractive results.
What stitch should I use around the boat pieces?
Blanket stitch is a popular option because it combines decoration with edge security. A narrow zigzag, satin stitch, straight stitch, or hand whip stitch can also work. The choice depends on whether you want a rustic handmade appearance or a cleaner machine-finished look.
How can I prevent the fabric edges from fraying?
Fusible web helps stabilize the edges considerably. Closely spaced blanket or zigzag stitches provide additional protection. If the project will be washed frequently, securing the appliqué edges carefully becomes even more important.
Can the Boat Applique Tutorial Pattern be enlarged?
Yes. The proportions can be scaled to create anything from a small decorative block to a large wall hanging. When enlarging the design, increase all elements by approximately the same percentage so the cabin, hull, chimney, portholes, flag, and clouds remain visually balanced.
What can I make with the finished boat appliqué?
The design can be used for baby quilts, wall hangings, cushion covers, tote bags, nursery decorations, fabric panels, table toppers, or larger nautical quilts. Because the image is playful and colorful, it adapts particularly well to children’s sewing projects.
Can I use fabric scraps for this project?
Yes, and this is one of the best reasons to make an appliqué design. The cabin, portholes, flag, windows, and chimney bands require only small pieces of fabric. A coordinated scrap collection can provide nearly everything needed for the decorative elements.
How do I make the appliqué look more professional?
Accurate cutting, careful pressing, balanced placement, and consistent stitching make the biggest difference. Take your time when positioning the pieces before fusing them. It is much easier to move an appliqué shape before pressing than after the adhesive has bonded.
Conclusion
The Boat Applique Tutorial Pattern is a creative way to practice fabric appliqué while producing a colorful nautical project with plenty of handmade character. Throughout this tutorial, you learned how to prepare the background, cut the navy hull, create the red gingham cabin, assemble the chimney and mast, add the waving flag, position the portholes, shape the gingham waves, and complete the scene with soft fabric clouds. You also learned how fusible web and decorative stitching can make small appliqué pieces easier to handle while giving every element a clearly defined finish.
EASILY FIND THE FREE PDF FOR THIS PATTERN HERE!
Once you have completed the basic Boat Applique Tutorial Pattern, experiment with your own fabrics, colors, embroidery details, and finishing ideas. A single boat can become a cushion or wall panel, while several coordinated blocks could form a beautiful nautical quilt. The real appeal of appliqué is that no two handmade projects need to look exactly the same, so small personal changes can make your finished piece completely unique. If you try this project, leave your sincere opinion about the tutorial and share your suggestions or creative ideas for future appliqué patterns. Your experience and personal touches can inspire even more variations of this charming fabric boat design.