
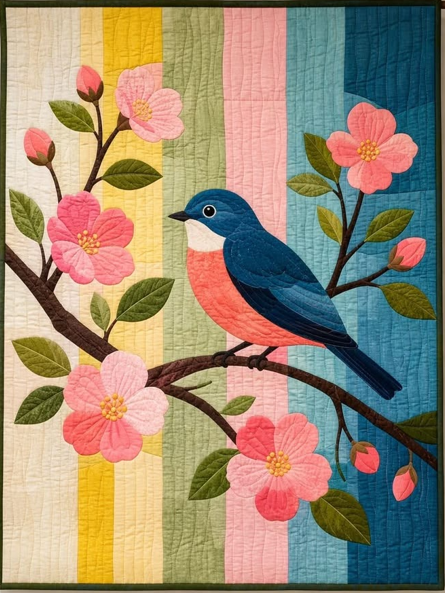
The Bird and Blossom Striped Bedspread Pattern is a beautiful textile project that combines the clean rhythm of vertical fabric strips with the softness of floral appliqué and the charm of a carefully shaped bird. Inspired by the handmade bedspread shown in the reference image, this design balances traditional quilting techniques with a fresh decorative style. The background is formed from long strips in cream, yellow, sage green, blush pink, aqua, and deep teal, while the foreground features flowering branches, textured leaves, and a striking blue-and-coral bird. Because the composition is built in layers, the project can be approached gradually, making it suitable for confident beginners as well as experienced quilters who enjoy appliqué work. The finished piece can be used as a decorative bedspread, wall quilt, throw, or statement textile for a bedroom or craft space.
One of the most appealing characteristics of the Bird and Blossom Striped Bedspread Pattern is the way simple geometric construction supports an organic appliqué scene. Straight vertical strips are relatively easy to measure, cut, and sew, yet they create a professional background that immediately attracts attention. Against these stripes, curved branches and rounded blossoms create visual movement. The large bird becomes the focal point, while smaller buds and leaves guide the eye naturally around the design. This combination of simple piecing and detailed appliqué is also practical because you can complete the background first and then take your time arranging each decorative element before permanently stitching anything in place.
For this project, Bird and Blossom Striped Bedspread Pattern refers to the complete arrangement of striped background fabrics, appliqué flowers, branches, leaves, buds, and the central bird motif. A bedspread pattern is essentially a construction plan that guides the maker through fabric selection, cutting, placement, stitching, quilting, and finishing. A bird appliqué pattern provides the individual shapes needed to build the bird from fabric, while a blossom appliqué pattern defines the flower petals and centers. Finally, striped quilt construction describes the technique of sewing long fabric strips together to create the colorful foundation. Understanding these terms before beginning will make the entire process easier and help you reproduce the layered, handcrafted appearance of the inspiration piece.
Understanding the Bird and Blossom Striped Bedspread Pattern
The first step in understanding the Bird and Blossom Striped Bedspread Pattern is to study its composition as separate layers rather than one complicated picture. The lowest layer is the striped quilt background. Above it sits a network of brown branches. The leaves are placed along those branches, followed by large pink blossoms and smaller flower buds. The bird is positioned prominently near the center-right portion of the design. Thinking in layers helps you determine which pieces should be stitched first and which should overlap later.
DISCOVER MORE FREE PATTERNS HERE!
The striped background works as both structure and decoration. Instead of using a single large piece of fabric, the project uses narrow and medium-width vertical strips. Select several coordinating colors, ideally including light neutrals, warm yellow, muted green, soft pink, turquoise, and darker blue. You do not need to copy every color exactly. The most important principle is maintaining a gradual transition between light, warm, and cool tones so that the detailed appliqué remains clearly visible.
The bird appliqué is the visual centerpiece. In the reference design, the bird has a dark blue head and back, layered blue wings, a pale chest, and a warm coral belly. Breaking the bird into separate fabric pieces is easier than trying to create it from one complicated shape. Prepare individual templates for the body, head, breast, wing sections, tail, beak, eye, legs, and feet. Slightly overlapping these elements gives the bird natural depth without requiring advanced dimensional sewing techniques.
The blossom appliqué adds softness to the strong vertical lines behind it. Each flower can be built from several rounded petals placed around a contrasting center. Pink fabrics in different values work especially well because subtle changes in tone help separate individual petals. Small yellow circles, French knots, embroidery stitches, or tiny fabric pieces can be used to represent the flower centers. Larger blossoms should be distributed across the branches so that one area does not become visually heavier than another.
The leaf appliqué plays an important supporting role in the composition. Leaves can be cut from olive, moss, forest green, and muted yellow-green fabrics. Using several shades creates more realistic foliage and prevents the design from looking flat. For additional texture, sew a simple central vein down each leaf after the appliqué is attached. Quilters who enjoy extra detail may add short diagonal lines extending from the center vein toward the leaf edges.
The final design principle is balance. The Bird and Blossom Striped Bedspread Pattern should feel lively without becoming crowded. Leave some visible striped background between branches, leaves, and flowers. These open areas give the eye somewhere to rest and allow the main bird motif to remain dominant. Before sewing the appliqué pieces permanently, photograph your arrangement and view it from a distance. Small placement changes at this stage can dramatically improve the final composition.
Materials, Fabric Selection, and Preparation
Begin by selecting good-quality quilting cotton for the striped background. Cotton is a practical option because it presses well, holds its shape, and is easy to sew. Choose approximately six to ten coordinating colors. Depending on the desired bedspread size, you may need several lengths of each fabric. Since this tutorial focuses on construction rather than one fixed mattress dimension, measure the bed first and add the amount of drop you want on the sides before calculating your fabric requirements.
For the appliqué, gather smaller pieces or scraps of pink fabric, blue fabric, green fabric, brown fabric, cream, coral, yellow, and black. Scraps are especially useful for petals, leaves, the bird’s wing, and tiny details. Try mixing fabrics that are slightly lighter and darker within each color family. This variation creates depth while keeping the palette harmonious. Avoid extremely busy prints for the smallest shapes because the outline of the appliqué should remain easy to recognize.
You will also need batting, backing fabric, thread, an iron, sewing machine, fabric scissors or a rotary cutter, cutting mat, quilting ruler, pins or clips, and your preferred appliqué stabilizer. Fusible web is useful for this design because it allows many irregular shapes to be temporarily bonded to the background before stitching. Always follow the manufacturer’s instructions for the adhesive product you select, particularly regarding iron temperature and pressing time.
Prepare the appliqué templates before cutting your decorative fabrics. You can sketch the flower petals, leaves, bird sections, and branches on paper first. Keep the shapes simple and smooth because gentle curves are easier to cut and sew than extremely intricate outlines. Label every bird component so that you remember its position. If you are using fusible appliqué, remember that traced templates may need to be reversed before transferring them to the adhesive material.
Next, pre-press all fabrics. Removing wrinkles before measuring and cutting improves accuracy significantly. Cut the background fabrics into long vertical strips, varying the widths slightly to reproduce the relaxed handmade appearance seen in the project. For example, some strips can be approximately 5 to 7 cm wide while others can measure 8 to 12 cm. Consistency is helpful, but perfect uniformity is not necessary for this particular artistic design.
Finally, arrange the cut strips on a large table, clean floor, or design wall before sewing. Move the colors until the sequence feels balanced. Place lighter shades toward one side, introduce yellow and green through the center, and transition toward pink, turquoise, and deep blue. This color progression helps recreate the distinctive atmosphere of the Bird and Blossom Striped Bedspread Pattern while still allowing room for personal interpretation.
Step-by-Step Construction of the Striped Bedspread and Appliqué
Start by sewing the vertical strips together using a consistent seam allowance of approximately 0.6 cm. Place two strips right sides together, sew along the long edge, open them, and press the seam carefully. Continue adding strips one at a time until the entire background panel reaches the required width. Press each seam as you work rather than waiting until the end. This simple habit keeps the striped quilt background flat and prevents distortion.
Once the striped panel is complete, square the edges using a large ruler whenever possible. Then prepare the brown branches. Cut several gently curved branch shapes from brown fabric. The main branch should travel diagonally across the lower portion of the composition, while smaller branches can extend upward toward the blossoms. Position the branches first because most leaves, flowers, buds, and the bird will overlap them. Fuse or pin them in place and stitch around their edges using your chosen appliqué method.
Now arrange the green leaf appliqués along the branches. Alternate the direction of the leaves so that the design feels natural rather than repetitive. Some leaves should angle upward, while others can point downward or outward. Use different green fabrics throughout the composition. After positioning them, secure each leaf with a narrow zigzag, blanket stitch, raw-edge appliqué stitch, or turned-edge technique. Add stitched veins if you want greater texture and botanical detail.
Next, construct the pink blossom appliqués. Build each flower one petal at a time, allowing the petals to overlap slightly near the center. Some flowers may contain five petals, while others can use additional layered pieces to create a fuller appearance. Position the largest blossoms around the main branch and upper branches. Add small yellow circles or embroidery to the centers. Flower buds can be formed from teardrop-shaped pink pieces combined with small green bases.
The bird should be assembled only after much of the surrounding foliage has been positioned. Begin with the main body shape, then layer the cream breast and coral belly over it. Add the dark blue head and back, followed by the wing sections in several shades of blue. Place the long tail feathers at an angle that follows the general direction of the branch. Add a small dark beak, a circular eye, and thin legs. Carefully stitched feet wrapped around the branch make the bird appliqué feel naturally integrated into the scene.
After all appliqué pieces are attached, prepare the quilt sandwich by placing the backing fabric wrong side up, batting in the middle, and decorated quilt top facing upward. Smooth all three layers and baste them securely. Quilt the background with vertical or gently irregular stitched lines to emphasize the strips. Inside the bird, petals, branches, and leaves, follow the shapes with subtle quilting lines. Trim the finished quilt, add binding around all four sides, and press carefully. Your Bird and Blossom Striped Bedspread Pattern is now transformed from individual pieces of fabric into a complete textile composition.
Frequently Asked Questions About the Bird and Blossom Striped Bedspread Pattern
Is the Bird and Blossom Striped Bedspread Pattern suitable for beginners? Yes, especially for makers who already understand basic straight stitching. The striped background is straightforward to piece, while the appliqué can be completed gradually. Beginners may find fusible raw-edge appliqué easier than traditional needle-turn appliqué. Practicing a few leaves and petals on scrap fabric before working on the main quilt can help build confidence.
What fabric is best for this bird and flower quilt design? Quilting cotton is usually the easiest choice because it is stable, widely available, and comfortable to cut and sew. Cotton also works well with fusible web and responds reliably to pressing. You can incorporate linen-look cotton or subtle textured fabrics for visual interest, but extremely stretchy fabrics may make accurate appliqué more difficult.
How can I enlarge or reduce the Bird and Blossom Striped Bedspread Pattern? The easiest approach is to adjust the background dimensions while keeping the decorative motifs proportional. For a larger bedspread, increase the number or width of vertical strips and enlarge the bird, flowers, and branches using the same percentage. For a smaller wall quilt, reduce every appliqué component evenly so the visual relationship between the elements remains balanced.
Do I have to use the same colors shown in the inspiration image? No. The color arrangement is one of the easiest parts to personalize. You could create a neutral version using beige, cream, sage, and dusty blue, or a brighter version using yellow, turquoise, coral, and green. However, maintaining contrast between the bird appliqué, flower appliqué, and background will keep the motifs easy to see.
Should the appliqué be stitched before or after quilting? In most cases, attach the appliqué to the quilt top before assembling the quilt sandwich. This allows you to secure the decorative pieces comfortably without handling the bulk of the batting and backing. Afterward, quilting stitches can be added around and inside the motifs, creating additional texture while helping unify the entire bedspread pattern.
How can I make the finished quilt look more professional? Accurate pressing, consistent seam allowances, careful appliqué placement, and balanced quilting make the greatest difference. Take extra time when shaping curved pieces such as petals, leaves, and the bird’s body. Keep the background flat, check your layout from a distance, and avoid rushing the binding. Small finishing details often have a bigger visual impact than complicated techniques.
Conclusion
The Bird and Blossom Striped Bedspread Pattern combines several enjoyable quilting techniques in one distinctive project. You begin with a colorful background made from vertical fabric strips, creating the foundation for the entire composition. From there, curved brown branches establish the structure of the appliqué scene and provide natural places for flowers, leaves, buds, and the bird to rest.
The project also demonstrates how fabric appliqué can turn relatively simple shapes into an expressive picture. Individual petals become full blossoms when layered together, several green shapes become realistic foliage, and carefully arranged blue, cream, coral, and dark fabric pieces form a detailed bird. None of these components needs to be overly complicated on its own.
Another important lesson is the value of planning. Arranging the strips before sewing, testing the branch placement, and positioning the flowers before permanently attaching them can prevent unnecessary corrections later. A temporary layout gives you freedom to experiment with proportion, color balance, and spacing until the composition looks harmonious.
Quilting brings all of those layers together. Vertical stitching can highlight the colorful stripes, while contour quilting around the blossoms, leaves, branches, and bird adds dimension. Once the quilt is trimmed and bound, these subtle stitched textures reinforce the handmade character that makes the Bird and Blossom Striped Bedspread Pattern so appealing.
EASILY FIND THE PDF FOR THIS PATTERN HERE!
You can also adapt this project to your own style. Change the bird species, experiment with different flowers, create a seasonal palette, or resize the design for a wall hanging, throw, or full bedspread. The construction method remains essentially the same, which makes this pattern a useful starting point for many personalized textile projects. Most importantly, enjoy the process of turning individual fabrics into a complete garden-inspired scene. If you make your own Bird and Blossom Striped Bedspread Pattern, leave your sincere opinion about the project and share your suggestions. Your ideas about colors, fabrics, appliqué techniques, or creative variations can inspire even more beautiful interpretations of this charming quilt design.