
Sewing Machine Organizer Fabric Pattern is a practical sewing project designed to keep tools, notions, and everyday accessories organized beside your sewing machine.
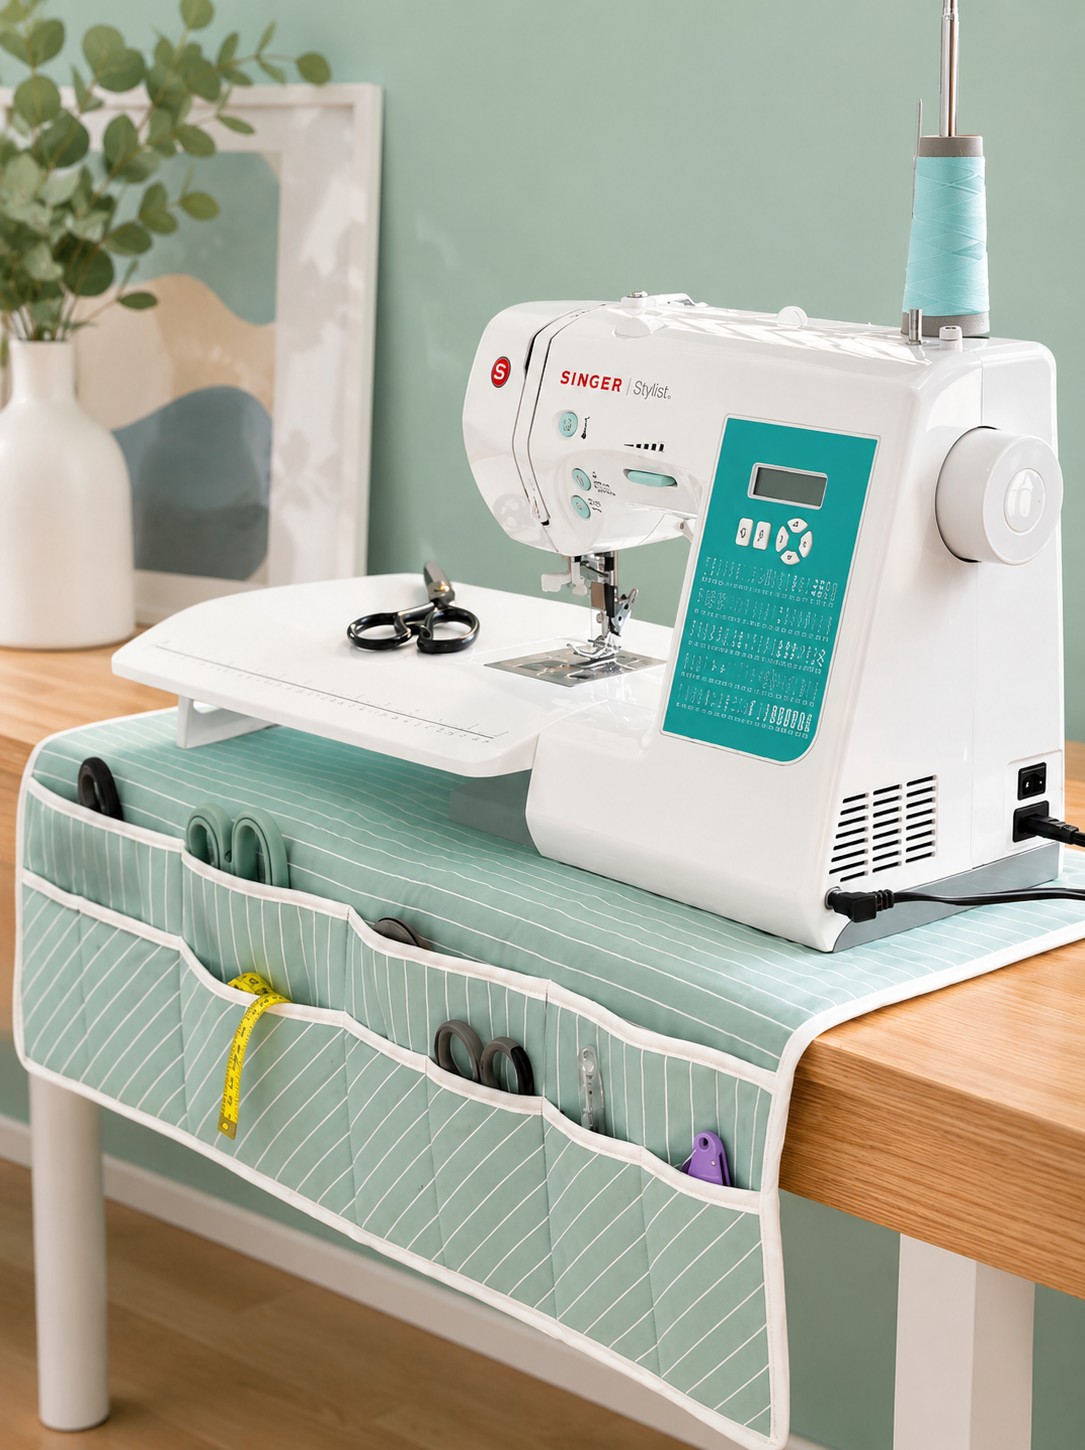
The organizer shown in the photo combines a padded machine mat with several front pockets that hang over the edge of the table.
Its layout creates convenient storage for scissors, measuring tapes, marking tools, seam rippers, clips, and other frequently used supplies.
Besides improving organization, the mat helps protect the work surface from scratches, vibration, dust, and minor marks caused by the sewing machine.
The soft green striped fabric, white binding, and structured pockets give the project a clean and attractive handmade appearance.
This tutorial explains how to plan, measure, cut, assemble, quilt, and finish a similar sewing machine organizer at home.
Creating a fabric sewing machine mat is also an excellent opportunity to use coordinated cotton fabrics, leftover batting, binding strips, and small pieces from previous projects.
The design can be adjusted for compact mechanical machines, larger computerized models, embroidery machines, or sergers.
Instead of following one universal measurement, you will build the project according to the width and depth of your own machine and sewing table.
This personalized approach helps the finished mat sit flat while allowing the pocket section to hang comfortably in front of the work area.
Beginners can complete the project using straight seams, basic quilting, and simple binding techniques.
More experienced sewists can add decorative stitching, divided compartments, reinforced pockets, labels, or removable accessories.
A well-planned Sewing Machine Organizer Fabric Pattern makes the sewing process more comfortable because essential tools remain visible and easy to reach.
You no longer need to interrupt a seam to search inside drawers or move fabric piles to find a pair of scissors.
The organizer also gives each tool a defined place, which can help keep sharp items safely separated from delicate fabrics and machine cords.
Although the project in the image uses narrow stripes and a calm mint color, the pattern works beautifully with florals, patchwork prints, solids, denim, canvas, or quilted fabric.
Choose materials that complement your sewing room while providing enough stability to support the weight of the items stored in the pockets.
With careful measuring and patient construction, you can create an organizer that is functional, durable, washable, and visually coordinated.
Materials and Measurements for the Sewing Machine Organizer
The first step is selecting the fabric for the main sewing machine organizer mat. Medium-weight quilting cotton is easy to handle, but lightweight canvas or home décor cotton can provide additional structure. Avoid extremely thin fabric unless you plan to reinforce it with firm interfacing. Prewash cotton materials when possible so that shrinkage does not distort the organizer after it is completed.
DISCOVER MORE FREE PATTERNS HERE!
You will need fabric for the front, backing, pockets, and binding. A typical organizer may require approximately one yard of main fabric and half a yard of coordinating fabric, although the exact amount depends on the machine size and number of pockets. You will also need cotton batting, fusible fleece, or another padded layer. The padding helps the mat maintain its shape and reduces movement beneath the machine.
Measure the width of your sewing machine at its widest point. Add approximately 4 to 8 inches so that the mat extends beyond both sides of the machine. Next, measure the machine from front to back and add enough length for the section that will hang over the front of the table. For many tables, an extra 12 to 18 inches creates a useful pocket panel.
For example, a finished organizer could measure 28 inches wide and 36 inches long. About 20 inches may remain on top of the table, while the remaining 16 inches hangs over the front edge. These numbers are only an example, so confirm the dimensions of your workspace before cutting. Your custom sewing machine organizer pattern should not cover controls, ventilation openings, or table mechanisms.
The pocket panel should be slightly narrower than the organizer or equal to its finished width. Decide whether you want one long pocket row or several pocket sections arranged at different heights. The organizer in the photo includes a large lower panel and a shallower upper pocket row. This layered design creates storage for both short and tall sewing tools.
Gather basic sewing supplies, including a rotary cutter or fabric scissors, cutting mat, acrylic ruler, pins or clips, thread, marking pen, iron, and sewing machine. A walking foot is helpful when quilting the layered mat, but it is not essential. You may also need fusible interfacing for the pockets and bias binding or straight-grain binding strips for the outer edge.
Cutting, Layering, and Quilting the Main Mat
Begin by creating the main fabric rectangle according to your measurements. Cut one rectangle from the main fabric, one from the backing fabric, and one from the batting. The batting can be cut slightly larger than the fabric layers and trimmed later. Keeping a little extra material around the edges makes it easier to manage shifting during quilting.
Place the backing fabric wrong side up on a clean surface. Position the batting over it, followed by the main fabric with the right side facing upward. Smooth every layer from the center toward the edges. Secure the quilt sandwich using safety pins, basting spray, or long hand-basting stitches so that the layers remain aligned.
Quilt the mat using straight lines, diagonal lines, a grid, or another simple design. If the fabric has stripes like the project in the photo, you can follow the printed lines as a quilting guide. Begin quilting near the center and gradually work outward. This approach distributes the fabric evenly and reduces puckering.
Keep the quilting lines reasonably close together according to the recommendations for your chosen batting. Lines spaced between 1 and 3 inches apart usually provide good stability for a small organizer. The quilting should hold all layers together without making the mat excessively stiff. Use a longer stitch length, such as 3.0 millimeters, for smooth and attractive quilting.
After quilting, place the mat on the cutting surface and trim all edges evenly. Use a large ruler to confirm that the corners are square. Do not rely only on the original fabric edges because the layers may shift slightly while quilting. Accurate trimming will make the final binding easier to attach.
Test the quilted mat beneath your machine before adding the pockets. Confirm that the machine rests securely and that the front section hangs at the correct length. The organizer should reach far enough down the table to provide storage without touching the floor or interfering with your chair. Make any necessary adjustments before continuing with the fabric pocket construction.
Creating and Attaching the Organizer Pockets
To make the large lower pocket panel, cut a fabric rectangle wider than the finished pocket height. Fold it in half with wrong sides together so the folded edge becomes the top of the pocket. Insert lightweight interfacing or a thin layer of batting between the folded layers if additional support is needed. Press carefully to create a crisp upper edge.
Topstitch along the folded edge approximately one-eighth to one-quarter inch from the fold. A second row of stitching can add strength and decoration. If you prefer a contrasting finish, bind the top edge with the same fabric that will be used around the organizer. Reinforcing this area is important because it will receive frequent handling.
Position the large pocket panel on the hanging portion of the mat. Align its side and lower raw edges with the main organizer. Pin or clip the panel securely, keeping the fabric smooth. Baste around the sides and bottom using a seam allowance slightly narrower than the final binding seam.
Divide the large pocket into individual compartments using vertical stitching lines. Before sewing, place your tools on the panel to estimate the ideal width for each section. Create wider compartments for rotary cutters or large scissors and narrower sections for marking pens, seam gauges, and seam rippers. Backstitch securely at the upper edge of every dividing line.
For the shallow upper pocket row, prepare another folded and reinforced fabric strip. Position it above the lower panel or overlap it slightly, depending on the desired arrangement. Sew the bottom edge of this pocket strip directly to the quilted mat, then divide it into compartments. This upper row is useful for small scissors, clips, bobbins, and other compact supplies.
Check that all pockets open smoothly and that the vertical seams are straight. Avoid making compartments too narrow because bulky tools may stretch the fabric or become difficult to remove. At the same time, very wide pockets may allow items to fall sideways. Balanced pocket dimensions are an important feature of a successful Sewing Machine Organizer Fabric Pattern.
Binding, Finishing, and Customizing the Organizer
Once the pockets are attached, prepare the binding for the entire outer edge. Cut fabric strips on the straight grain or bias, depending on your preferred method. Join the strips with diagonal seams to reduce bulk. Press the long binding strip in half lengthwise with the wrong sides together.
Sew the binding to the front of the organizer, aligning the raw edges. Use a quarter-inch or three-eighths-inch seam allowance according to the binding width. When approaching each corner, stop before the edge, fold the binding to create a miter, and continue along the next side. Work slowly around the pocket layers because these sections will be thicker.
Fold the binding over the raw edge toward the back. Secure it with clips and stitch it by hand for a nearly invisible finish or machine-stitch it for speed and durability. If machine stitching, stitch close to the folded binding edge while checking that the back is consistently caught in the seam. Press the completed organizer without flattening the batting too aggressively.
You can personalize the organizer by adding decorative labels, appliqué, embroidery, patchwork blocks, or contrasting pocket fabrics. Another option is to add elastic loops for pens, hooks for small scissors, or a detachable thread catcher. Keep embellishments away from the area beneath the sewing machine so the machine remains stable.
For additional safety, avoid storing heavy objects in the hanging pockets. Large metal tools may pull the organizer forward or place unnecessary pressure on the binding. Keep the machine centered on the upper mat and distribute pocket contents evenly. Make sure the machine’s electrical cord remains clear and that ventilation openings are never covered.
To maintain your quilted sewing machine organizer, remove all tools and shake away loose threads regularly. Spot-clean minor marks with a damp cloth. If the fabrics and batting are washable, clean the organizer gently in cold water and allow it to air-dry flat. Press it with moderate heat after washing to restore its shape.
Frequently Asked Questions About the Sewing Machine Organizer Fabric Pattern
What is a Sewing Machine Organizer Fabric Pattern?
A Sewing Machine Organizer Fabric Pattern is a sewing plan for creating a padded mat with attached storage pockets. The upper portion rests beneath the sewing machine, while the lower section hangs over the table. The pockets hold frequently used sewing supplies within easy reach.
What fabric is best for a sewing machine organizer?
Quilting cotton, canvas, denim, and home décor fabric are all suitable choices. Quilting cotton is easier for beginners to sew and quilt. Canvas and denim provide more structure but can become bulky when several pocket layers and binding are combined.
Does the organizer need batting?
Batting is strongly recommended because it adds padding, stability, and a professional quilted appearance. Cotton batting creates a soft but structured mat. Fusible fleece can also be used when a slightly firmer result is desired.
How do I determine the correct organizer size?
Measure the width and depth of the sewing machine, then add extra space around it. Include enough additional length for the pocket panel to hang over the front of the table. Always test the paper measurements on the actual workspace before cutting the fabric.
Can I make the organizer without quilting?
Yes, but quilting helps hold the layers together and prevents shifting. A non-quilted version should use heavier fabric and firm interfacing. Even a few widely spaced straight quilting lines can noticeably improve the durability of the finished organizer.
How many pockets should I include?
The number of pockets depends on the tools you regularly use. A practical design may include four to eight compartments in different widths. It is helpful to place your tools over the unfinished pocket panel before deciding where to sew the dividing lines.
Can this pattern be adapted for a serger?
Yes. Measure the serger carefully because it may be wider, deeper, or heavier than a standard machine. Use sturdy batting, strong fabric, and reinforced pocket seams. Make certain the organizer does not cover the serger’s ventilation areas or interfere with its waste collection system.
How can I prevent the organizer from sliding?
Use a cotton or textured backing instead of a slippery fabric. You may also add a removable nonslip shelf-liner piece beneath the mat. Avoid permanently attaching rubber materials unless you know they are safe for the table surface and can tolerate the machine’s vibration.
Should the pocket panel be attached before the binding?
Yes. Attach and divide all pocket panels before applying the outer binding. The binding will cover the raw side and bottom edges of the pockets, creating a neat and reinforced finish.
Can leftover fabric be used for this project?
Absolutely. The organizer is suitable for fabric scraps, coordinated fat quarters, or patchwork sections. Scraps can be joined to create pocket panels or binding. Make sure all pieced sections are pressed well and reinforced when necessary.
How do I keep scissors from damaging the pockets?
Place scissors with the closed points facing downward and use a pocket that fits them securely. For extra protection, reinforce the pocket with interfacing or add a separate fabric sleeve. Never place open scissors or exposed rotary cutter blades inside the organizer.
Is this project suitable for beginners?
Yes. The project primarily uses straight cutting, layering, quilting, topstitching, pocket division, and binding. Beginners may simplify the design by making one pocket row and using ready-made bias binding. Careful measuring and pressing are more important than advanced sewing techniques.
Conclusion
The Sewing Machine Organizer Fabric Pattern offers a practical way to combine sewing-room storage with a protective machine mat. Throughout this tutorial, you learned how to measure the machine and table, select durable materials, prepare a quilt sandwich, create layered pockets, divide compartments, attach binding, and customize the finished organizer. The result is a useful handmade accessory that keeps scissors, measuring tapes, marking tools, and small notions close to the sewing area.
EASILY FIND THE PDF FOR THIS PATTERN HERE!
This project can be adapted to different machine sizes, table shapes, fabric styles, and storage needs. By choosing stable materials and reinforcing the pocket openings, you can create an organizer that remains attractive and functional through regular use. Please leave your sincere opinion about this Sewing Machine Organizer Fabric Pattern, and share any suggestions or creative features you would add to your own version.