
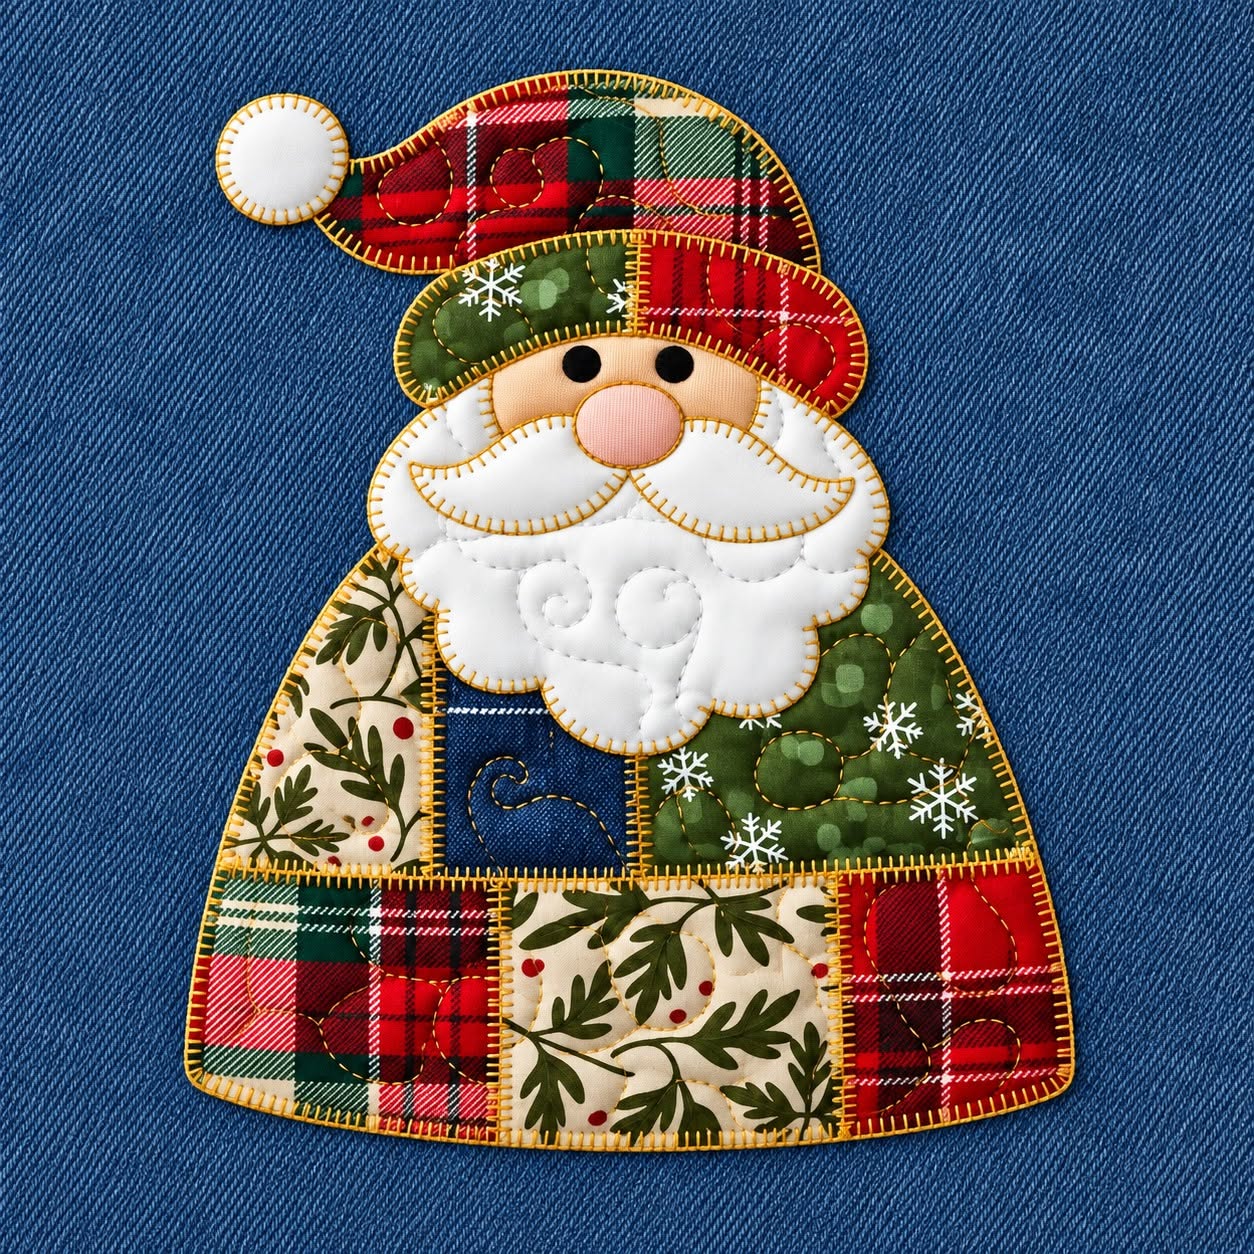
The Santa Claus in Patchwork Appliqué Tutorial Pattern is a charming Christmas sewing project that combines traditional appliqué, colorful fabric scraps, decorative stitching, and a warm handmade appearance. Inspired by the Santa design shown in the reference image, this project is especially attractive because each section of the character can be created from a different fabric, allowing you to transform small pieces of Christmas prints, plaid fabrics, denim, and neutral cotton into a coordinated holiday decoration. The finished design can be used as a wall hanging, fabric panel, pillow front, table decoration, gift-bag appliqué, or even as the centerpiece of a larger Christmas quilt.
One of the most appealing features of the Santa Claus in Patchwork Appliqué Tutorial Pattern is that it does not require every fabric to match perfectly. In fact, the mixture of prints is what gives the project its personality. Plaid reds and greens can create the traditional Christmas feeling, leafy fabrics can add contrast, and a small piece of denim or dark blue cotton can become a decorative pocket. The white beard and mustache provide visual balance and make Santa immediately recognizable. Because the design is assembled from separate fabric shapes, it is also a practical project for learning the basic principles of patchwork appliqué, especially fabric placement, layering, edge finishing, and decorative stitching.
This tutorial explains how to recreate a similar project step by step while still leaving room for personal creativity. You do not need to reproduce every print exactly as shown in the photo. Instead, focus on the structure: a rounded Santa body, a patchwork coat, an expressive face, a layered white beard, and a curved Christmas hat. Throughout the project, accurate cutting and careful placement are more important than complicated sewing techniques. The Santa Claus in Patchwork Appliqué Tutorial Pattern works beautifully as a beginner-friendly seasonal project, while experienced sewists can make it more detailed by adding quilting, embroidery, hand stitching, buttons, or additional fabric textures.
Materials, Fabric Selection, and Preparing the Santa Appliqué Pieces
Before cutting anything, choose a strong background or foundation fabric for the project. Medium-weight cotton is a dependable choice because it is easy to sew and supports several layers of appliqué. A neutral beige, cream, soft gray, or natural linen-look cotton can help the colorful Santa stand out. Cut your foundation fabric several centimeters larger than the final design so you have extra space for trimming and finishing later.
DISCOVER MORE FREE PATTERNS HERE!
For the patchwork coat, prepare a selection of Christmas fabric scraps in red, green, cream, plaid, botanical, or holiday prints. The reference design uses several contrasting sections, which creates the characteristic patchwork appearance. Try to combine large prints with smaller prints so that the design does not become visually crowded. A small piece of dark blue or denim-style fabric can also be included as an accent panel or pocket.
You will also need white or off-white fabric for the beard, mustache, hair, and hat pom-pom. Cotton, felt, low-pile fleece, or lightly padded fabric can work well depending on the texture you prefer. If you want the beard to appear slightly dimensional, place a thin layer of batting behind the white fabric. This creates soft raised areas when decorative stitching is added.
For Santa’s face and nose, select peach, beige, blush, or light tan fabric. The face should contrast gently with the white beard while remaining soft in appearance. The nose can be cut from pink or peach fabric and made slightly dimensional with a small piece of batting underneath. Two small black fabric circles, buttons, or embroidered circles can be used for the eyes.
Create paper templates for the main sections before cutting your fabrics. You will typically need templates for the body silhouette, coat sections, face, nose, beard, mustache, hat, hat brim, pom-pom, and optional pocket. If you are enlarging the design for a wall hanging, keep all pieces proportional. A finished Santa around 35 to 45 cm tall is a practical size for a decorative panel, although you can enlarge or reduce the pattern depending on your project.
To simplify construction, apply fusible web to the wrong side of the fabrics before cutting the shapes. Follow the manufacturer’s temperature recommendations and allow the fabric to cool before cutting. Fusible appliqué stabilizes each piece and prevents shifting during stitching. If you prefer traditional needle-turn appliqué, leave an additional seam allowance around every template piece instead of using fusible web.
Building the Patchwork Body and Creating the Santa Coat
Begin the assembly by placing the largest Santa body shape on the foundation fabric. Do not fuse it immediately. First arrange all of the coat sections to see how the colors interact. This planning stage is important because moving one red or green fabric can dramatically change the visual balance of the entire patchwork Santa appliqué.
Divide the coat into several irregular but clean geometric sections. The reference image combines rectangular and slightly curved patches, creating the look of a miniature patchwork quilt. You can create five to eight coat sections depending on the size of your Santa. Keep the lower edge gently rounded so the character maintains the traditional bell-shaped silhouette.
When you are satisfied with the arrangement, fuse the coat pieces in place one section at a time. Slightly overlap neighboring pieces or align the edges very carefully so no background fabric appears between them. Press rather than sliding the iron across the fabric. Sliding can stretch the pieces and cause them to move away from the intended position.
Next, stitch around every patchwork section using a blanket stitch, zigzag stitch, or narrow satin stitch. Blanket stitching is especially suitable for this style because it creates a visible handcrafted border around each fabric piece. Choose thread that coordinates with the overall design. Gold, cream, brown, dark green, or neutral thread can make the edges look decorative without overpowering the Christmas prints.
Add the small accent pocket after the main coat has been assembled. Cut a rectangular or slightly curved pocket from denim, navy cotton, or another contrasting fabric. Fuse it over one section of the coat and stitch around three sides, leaving the upper edge visually open. Decorative stitching inside the pocket can imitate embroidery or create a subtle swirl similar to the detail seen in the reference design.
Once the coat is complete, inspect all edges carefully. Loose threads should be trimmed before the face and beard are attached because these upper layers may cover some seams. If you want more quilting texture, add a few curved or straight stitching lines inside selected coat panels. Keep the quilting simple so the fabric prints remain easy to see.
Creating Santa’s Face, Beard, Mustache, and Christmas Hat
Place the face section above the patchwork coat, allowing the lower portion to overlap slightly behind the beard. Fuse the face in position and stitch around the visible edges. A blanket stitch in light brown, beige, or gold creates a defined outline without making Santa’s face look too harsh. Keep the face simple because the beard, eyes, and nose provide most of the expression.
Attach the eyes next. Small black fabric circles can be fused and stitched, while embroidery is another excellent option. Position both eyes at the same height and leave enough space between them for the nose. Before permanently attaching the eyes, place the nose temporarily to check the proportions. Small changes of only a few millimeters can affect Santa’s expression.
Create the nose from a rounded oval of pink or peach fabric. For a flat appliqué, simply fuse and stitch it in place. For a dimensional nose, add a small circle of batting underneath before stitching around the edge. Use matching thread so the stitching blends with the fabric. A soft pink nose provides a warm focal point against the white mustache.
The beard can be built from several overlapping white pieces rather than one large shape. This layered construction gives it the full, fluffy appearance seen in the project. Place the largest beard section first, then position the mustache and smaller curls above it. Optional batting underneath the beard can create extra volume. Stitch slowly around the curves so the rounded sections remain smooth.
Add decorative curved stitching inside the beard to suggest curls. These details do not have to be perfectly symmetrical. Gentle spirals and curved lines create a more handmade appearance. You can use white thread for subtle quilting or gold and beige thread for more visible decorative stitching. Avoid using too many lines because the beard should remain soft and uncluttered.
Finish the upper section by creating the curved Santa hat from red and green plaid fabrics. The hat can be divided into two or three patchwork sections, repeating the fabrics used in the coat. Add a curved brim that overlaps the top of Santa’s head and finish the tip with a round white pom-pom. Stitch around every section using the same blanket stitch used throughout the Santa Claus in Patchwork Appliqué Tutorial Pattern so the complete design looks consistent.
Finishing, Quilting, Display Ideas, and Personalizing the Pattern
After all appliqué pieces have been attached, give the entire project a careful inspection. Look for edges that may not be fully secured, especially around the beard curves, hat tip, and lower coat. Reinforce these areas with additional stitching if necessary. This final check is especially important if the finished piece will be washed or handled frequently.
If you are making a quilted wall hanging, place a layer of batting and backing fabric behind the completed appliqué panel. Baste the three layers together and quilt around the outline of Santa. Echo quilting approximately 0.5 to 1 cm away from the appliqué edge can make the character stand out beautifully from the background.
Additional quilting can be added to the background if desired. Simple loops, stars, snowflake-inspired motifs, or gentle waves complement a Christmas project without competing with the main design. Beginners can use straight-line quilting or widely spaced curves. The objective is to secure the layers while preserving the handmade character of the piece.
Trim the finished panel to the desired dimensions and add binding if you are creating a wall hanging or mini quilt. A red plaid, dark green, cream, or gold-toned binding coordinates well with the fabrics used in the Santa design. For a decorative pillow, use the finished appliqué panel as the front and sew it to an envelope-style or zippered backing.
The Santa Claus in Patchwork Appliqué Tutorial Pattern can also be personalized with names, dates, embroidered greetings, small bells, decorative buttons, or hand-stitched stars. If the project is intended as a family Christmas decoration, adding the year can turn it into a meaningful keepsake. Small fabric labels can also be sewn to the back with the maker’s name and date.
Do not be afraid to change the colors. Although traditional red, green, cream, and white create a classic Christmas look, the same Santa can be made in burgundy, navy, dusty blue, gold, Scandinavian neutrals, or pastel Christmas fabrics. The important elements are the recognizable hat, rounded beard, warm face, and layered patchwork appliqué coat.
When the project is finished, press it carefully from the back using the temperature appropriate for your fabrics. Avoid pressing dimensional areas such as a padded nose or thick beard directly from the front. A final gentle press will help flatten the background while keeping the appliqué crisp and attractive.
Frequently Asked Questions About the Santa Claus in Patchwork Appliqué Tutorial Pattern
Is the Santa Claus in Patchwork Appliqué Tutorial Pattern suitable for beginners?
Yes. The project can be adapted for beginners by using fusible web and a simple machine blanket stitch. The shapes are relatively large, and the patchwork construction allows small imperfections to blend naturally into the handmade style.
What is the best fabric for patchwork appliqué?
Quilting cotton is one of the easiest fabrics to use because it is stable, widely available, and easy to press. Cotton scraps are especially practical for creating the different sections of Santa’s coat and hat.
Do I need fusible web for this project?
Fusible web is not mandatory, but it makes the process much easier. It temporarily bonds the appliqué pieces to the foundation fabric, helping prevent movement while you stitch around the edges.
Which stitch works best around the appliqué pieces?
A blanket stitch is an excellent choice because it creates a decorative handcrafted outline. A narrow zigzag or satin stitch also works well. Hand stitching can be used if you prefer a traditional folk-art appearance.
Can I sew this Santa appliqué by hand?
Absolutely. Every section can be hand appliquéd. Use small, even stitches and consider using lightweight fusible web or fabric glue sparingly to keep the pieces positioned while you sew.
How large should the finished Santa be?
There is no required size. A height of approximately 35 to 45 cm works nicely for a wall panel or pillow front. Smaller versions can be used for ornaments and table decorations, while larger versions can become the centerpiece of a Christmas quilt.
Can I use fabric scraps for the whole project?
Yes, and this is actually one of the best uses for the Santa Claus in Patchwork Appliqué Tutorial Pattern. Small pieces of plaid, floral, botanical, denim, red, green, and cream fabrics can be combined to create a completely unique Santa.
How can I make the beard look more dimensional?
Place thin batting behind the white beard pieces before stitching. Light quilting and a few spiral lines can also create the impression of soft curls without making the project overly bulky.
Can the pattern be used for a pillow cover?
Yes. Complete the appliqué on a square fabric panel, add batting if desired, quilt the front, and then attach a pillow backing. A Santa appliqué pillow can be a colorful addition to seasonal living-room or bedroom décor.
Can I turn this project into a wall hanging?
Yes. After completing the appliqué, layer the panel with batting and backing, quilt the layers, trim the edges, and finish with binding. Add a hanging sleeve to the back if you want to display it on a wall.
Should the edges of the fabric be turned under?
If you are using fusible raw-edge appliqué, the edges can remain exposed and be secured with decorative stitching. Traditional appliqué methods may require turning the seam allowance under before hand stitching.
How do I prevent the appliqué from puckering?
Use a stabilizer behind the foundation fabric when necessary, avoid stretching the pieces while fusing, and keep the sewing-machine tension balanced. Stitch slowly around tight curves and do not pull the fabric while sewing.
Can I wash the finished project?
A washable project is possible when washable cotton fabrics, permanent fusible web, and secure stitching are used. Always consider the care requirements of specialty materials such as felt, decorative buttons, or dimensional embellishments.
What other projects can be made with the same Santa pattern?
The same design can be adapted into table runners, tote bags, quilt blocks, Christmas stockings, cushion covers, fabric banners, door decorations, placemats, or gift bags. Reducing the pattern can also create charming fabric ornaments.
Conclusion
The Santa Claus in Patchwork Appliqué Tutorial Pattern is a creative way to combine Christmas sewing, scrap fabrics, appliqué, quilting, and decorative stitching in a single handmade project. Starting with a simple foundation fabric, you learned how to organize contrasting fabric scraps, construct the patchwork coat, build Santa’s face, create the layered beard and mustache, assemble the curved Christmas hat, and finish the edges with decorative stitches.
The most important lesson is that this project does not depend on having exactly the same fabrics as the original design. The beauty of patchwork appliqué comes from creating your own combinations. Plaids, botanical prints, denim, traditional Christmas colors, or even modern neutral fabrics can all produce beautiful results when the shapes and proportions remain balanced.
EASILY FIND THE PDF FOR THIS PATTERN HERE!
With careful cutting, accurate placement, secure stitching, and a little patience around the curved sections, the pattern can become a wall hanging, pillow, quilt block, table decoration, or handmade Christmas gift. Details such as batting, beard quilting, decorative pockets, embroidery, and personalized labels can make each version completely unique. If you create your own version of this Santa Claus in Patchwork Appliqué Tutorial Pattern, leave your sincere opinion about the project and share your suggestions. It would also be wonderful to hear which colors, fabrics, appliqué techniques, or Christmas sewing ideas you would like to see explored in future projects.