
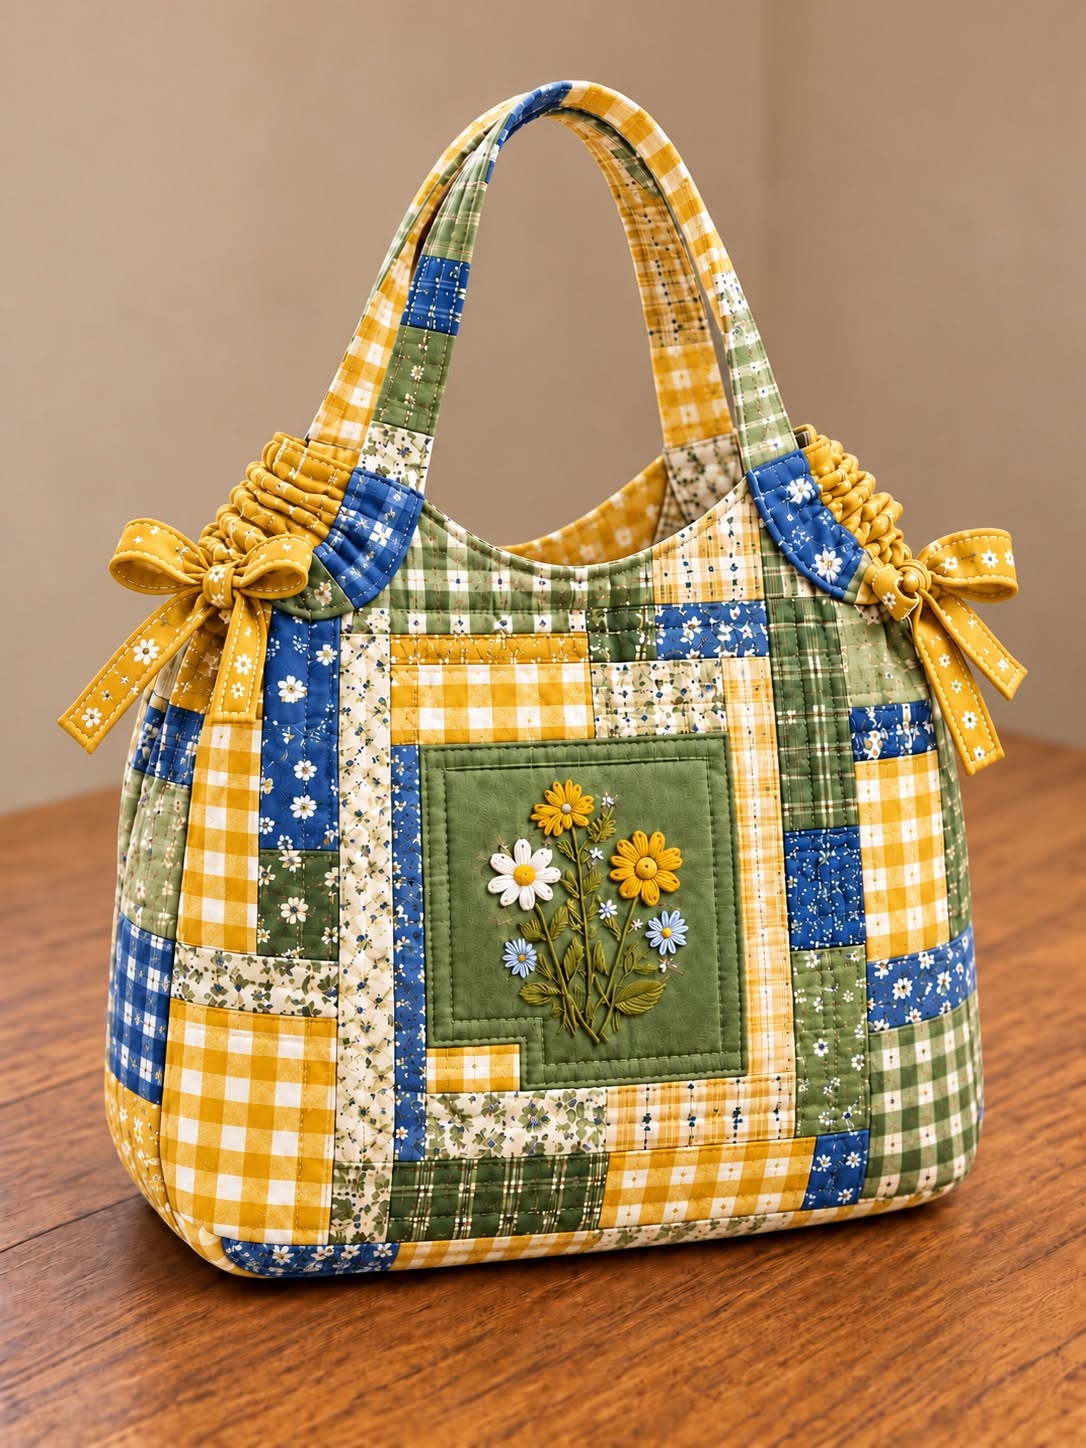
The Patchwork Floral Bag Pattern is a charming sewing project that combines traditional patchwork, delicate floral embroidery, practical bag construction, and a warm cottage-inspired appearance. The finished bag shown in the reference image has a softly structured body, two comfortable handles, decorative fabric ties at the sides, and a beautiful embroidered floral panel positioned at the center. Small fabric pieces in sage green, lavender, cream, mustard, dusty blue, and floral prints give the project its distinctive handmade personality. This combination makes the bag especially attractive for sewists who enjoy patchwork sewing, quilting, embroidery, and creative fabric coordination. Although the finished piece looks detailed, the construction becomes much easier when it is divided into manageable stages. By preparing the patchwork panels first and assembling the bag afterward, even an adventurous beginner can create a similar result.
Another appealing feature of this Patchwork Floral Bag Pattern is its flexibility. You do not need to find exactly the same fabrics shown in the photograph because the beauty of patchwork comes from combining complementary scraps, fat quarters, and leftover quilting cotton. Soft checks, tiny flowers, subtle stripes, dots, and vintage-inspired prints can all work beautifully together. The important idea is to create balance by distributing light, medium, and darker fabrics throughout the bag rather than placing similar colors together. The central embroidered flower panel acts as the visual focal point, while the surrounding fabric strips create a decorative frame. This design approach also provides an excellent opportunity to use precious scraps that may be too small for larger sewing projects.
Making a patchwork floral bag is also a useful way to practice several important sewing skills in one project. You will learn how to accurately piece fabric sections, press seams, add lightweight structure, make curved bag panels, prepare comfortable handles, install lining, and finish decorative details. You can also practice basic free-motion quilting, straight-line quilting, hand embroidery, or machine embroidery depending on the equipment and techniques you prefer. The dimensions suggested in this tutorial can be adjusted, but keeping the proportions similar will help reproduce the soft handbag shape visible in the inspiration photo. Take your time during cutting and pressing, because accurate preparation is one of the biggest secrets behind neat patchwork. Once the individual components are prepared carefully, the final assembly becomes surprisingly straightforward.
Choosing Fabrics, Supplies, and Preparing the Patchwork Pieces
Begin your Patchwork Floral Bag Pattern by choosing approximately eight to twelve coordinating fabrics. Quilting cotton is ideal because it is easy to cut, sew, press, and quilt. Look for small-scale prints such as gingham, tiny florals, soft geometric motifs, and subtle stripes. For a look similar to the reference project, combine muted green, lavender, cream, soft yellow, dusty blue, beige, and small floral prints. You can use fabric scraps, charm-square leftovers, or pieces from several fat quarters. Try laying all the fabrics beside one another before cutting so you can see whether the colors feel balanced.
DISCOVER MORE FREE PATTERNS HERE!
For the main bag body, prepare enough patchwork pieces to create two panels approximately 38 cm wide by 42 cm high before shaping. Cut a mixture of squares and rectangles instead of making every piece identical. Useful sizes include pieces around 5 × 5 cm, 5 × 10 cm, 7 × 10 cm, and longer strips approximately 5 × 20 cm. Slight variations will create the informal patchwork effect visible in the bag. Remember to include a 0.7 cm seam allowance when joining the sections. It is better to make each patchwork panel slightly larger than necessary and trim it to the final shape afterward.
The central floral feature is an important characteristic of this Patchwork Floral Bag Pattern. Cut a piece of plain or lightly textured fabric approximately 17 × 19 cm for the embroidered area. Sage green, linen beige, dusty blue, or another medium-value fabric works especially well because colorful flowers will remain clearly visible against it. Embroider several simple flowers with stems and leaves, using hand embroidery or a sewing machine with decorative embroidery capabilities. Daisy-style flowers can be created with lazy-daisy stitches, while stems may be sewn with stem stitch or backstitch. Keep the design delicate and leave enough empty fabric around the flowers so the embroidery does not appear crowded.
Once the flower panel is complete, frame it with narrow patchwork strips. Start with strips approximately 3 to 4 cm wide, adding them around all four sides in the same way you would build a log-cabin quilt block. Sew one strip to the top, press the seam, then continue around the remaining edges. Additional strips can be added until the central block measures approximately 25 × 28 cm. This framed floral section should then be positioned near the center of the larger front patchwork panel. Surround it with additional squares and rectangles until the complete front panel is large enough for the bag template.
Create the back panel using the same patchwork sewing technique, but the embroidered centerpiece is optional. You may repeat the floral block for a symmetrical bag or create a simpler all-over patchwork arrangement for the back. Sew smaller sections together first, press the seams carefully, and then combine those sections into larger units. Alternating the direction in which you press neighboring seams can reduce bulk where several seams intersect. Check the panel periodically with a ruler to make sure it remains reasonably square. If the edges become uneven during sewing, do not worry because the final panel will be trimmed before assembly.
Before moving to construction, press both finished patchwork panels from the wrong side and check every seam. Avoid pulling the iron back and forth aggressively because this can distort small patchwork pieces. Instead, lower and lift the iron while applying gentle pressure. At this stage, the colorful fabric arrangement should already resemble the visual character of the finished Patchwork Floral Bag Pattern. Photographing or viewing the panel from a distance can help identify areas where one color appears too dominant. Small adjustments can still be made before quilting and cutting the final bag shape.
Quilting the Panels and Creating the Main Bag Shape
To give the Patchwork Floral Bag Pattern its softly padded structure, create a quilt sandwich for both exterior panels. Place lightweight batting or fusible fleece behind the patchwork fabric and add a thin backing fabric if your chosen interfacing requires one. Cut the batting approximately 2 cm larger than the patchwork panel on every side. Smooth the layers carefully to remove wrinkles, then secure them with quilting pins, safety pins, temporary basting spray, or long hand-basting stitches. A lightweight batting works best because very thick padding can make the curved seams difficult to sew later.
Quilt the patchwork using simple straight lines approximately 2 to 4 cm apart. You can stitch beside the patchwork seams, a method often called stitching in the ditch, or sew gentle parallel lines across the entire surface. Around the embroidered floral block, quilt close to the frame rather than sewing directly through the flowers. This helps the embroidery remain slightly raised and visually prominent. If you prefer a handmade appearance, small sections can also be quilted by hand. The goal is not heavy quilting but enough stitching to hold the layers securely together.
After quilting, prepare a paper template for the bag body. Draw a rectangle approximately 34 cm wide by 38 cm high, then gently round both lower corners. Near the upper section, curve the sides slightly inward so the finished silhouette resembles the softly tapered bag in the photograph. Fold the paper template in half vertically before cutting to ensure both sides are symmetrical. Place the template over the quilted front panel, centering the embroidered flowers carefully, and trace around it. Repeat the process for the back panel before cutting both pieces.
For a roomy bag, create boxed depth along the bottom. On the lower corners of both exterior panels, mark a square approximately 5 × 5 cm and cut it away. These openings will later be joined to form the bottom corners. Alternatively, the body can be shaped with a curved gusset, but boxed corners are easier for most home sewists. Keep the front and back panels exactly the same size so their edges align cleanly. Stay-stitch approximately 0.5 cm from the raw edges if your patchwork contains many small seams that might loosen during handling.
Place the two quilted exterior panels right sides together and pin along the sides and bottom. Sew using approximately a 1 cm seam allowance, leaving the top completely open. Reinforce the beginning and end of each seam with backstitching. To form each boxed corner, open the cut square and bring the side seam toward the bottom seam until they meet. Align the seams carefully and sew straight across the opening. When the bag is turned right side out, these corners create depth and allow the handbag to stand more naturally.
Inspect the outside of the bag before continuing. The front embroidery should sit approximately in the central area, the patchwork seams should appear balanced, and the bottom should have a soft three-dimensional shape. Trim excessive seam bulk where necessary without cutting too close to the stitching. If desired, add a narrow line of topstitching near selected patchwork seams to emphasize the handmade character. This stage transforms a flat patchwork quilt panel into the recognizable body of the Patchwork Floral Bag Pattern, making the project begin to look much more like the inspiration photo.
Making the Handles, Side Details, and Interior Lining
The long patchwork handles are another distinctive element of this Patchwork Floral Bag Pattern. For each handle, piece several fabric rectangles together until you have a strip approximately 55 to 60 cm long and 8 cm wide. You will need two matching handle strips. Press the patchwork seams flat, then reinforce each strip with lightweight fusible interfacing. Fold the strip lengthwise with right sides together, sew along the long edge, and turn it right side out. Press carefully so the seam sits along one side rather than directly in the center.
Topstitch approximately 0.3 cm from each long edge of both handles. This topstitching strengthens the straps and creates a polished finish. If you want softer padded handles, insert a narrow strip of thin batting before topstitching. Position the ends of each handle approximately 8 to 10 cm apart near the upper edge of the corresponding bag panel. Check that neither handle is twisted. Baste the handle ends securely within the seam allowance, sewing over them several times because the handles will carry the weight of the finished bag.
The photograph also shows decorative gathered sections and bows near the upper sides. To create a similar feature, cut four strips approximately 8 × 35 cm. Fold the long edges inward, fold each strip in half lengthwise, and topstitch. These strips become fabric ties that can be knotted or tied into soft bows. For an even more decorative appearance, a short fabric channel can be gathered slightly before the ties are attached. These details are optional, but they strongly reinforce the romantic cottage style associated with the Patchwork Floral Bag Pattern.
Next, prepare the lining. Cut two lining pieces using the same body template as the exterior bag. Cotton, cotton-linen blend, or a durable lightweight fabric works well. If you would like interior pockets, cut an additional rectangle approximately 20 × 18 cm, fold it in half, sew around the edges while leaving a turning opening, and turn it right side out. Topstitch the pocket onto one lining panel before joining the lining pieces. You can divide it vertically with an additional line of stitching to create two smaller compartments.
Place the lining pieces right sides together and sew the sides and bottom using the same seam allowance as the exterior. Leave an opening approximately 12 cm long along the bottom seam so the bag can later be turned right side out. Form the boxed corners exactly as you did on the exterior. Press the lining seams carefully. Test the lining inside the outer bag to confirm that the dimensions match before completing the upper edge. If the lining seems slightly larger, take in the side seams by a few millimeters.
With the exterior bag right side out and the lining wrong side out, place the exterior inside the lining so their right sides are touching. Match the side seams and upper raw edges, making sure the handles and decorative ties remain tucked between the layers. Pin around the entire opening and sew with approximately a 1 cm seam allowance. Carefully pull the complete bag through the opening left in the lining. Once everything is turned correctly, close the lining opening with machine stitching or an invisible hand stitch.
Frequently Asked Questions About the Patchwork Floral Bag Pattern
Is the Patchwork Floral Bag Pattern suitable for beginners? Yes, especially for someone who already understands basic straight stitching and seam allowances. The patchwork may appear complicated, but it is simply created by joining small fabric squares, strips, and rectangles in stages. Beginners can simplify the project by using larger patchwork pieces and straight-line quilting. The embroidery can also be replaced with floral appliqué or a printed floral fabric panel. Taking time to measure, press, and pin accurately is more important than using advanced sewing techniques.
What is the best fabric for making a patchwork bag? Medium-weight quilting cotton is one of the easiest choices because it is stable, available in many coordinated prints, and comfortable to sew. Cotton-linen blends can also provide a beautiful rustic texture. Avoid very stretchy fabrics unless they are stabilized with interfacing. If you want to reuse clothing or fabric scraps, lightweight denim can be combined with cotton for extra durability. Whatever fabric you choose, try to keep the weights relatively similar so the patchwork panel remains balanced.
Does a patchwork bag need batting or interfacing? Some type of stabilization is highly recommended. Batting creates the softly quilted appearance visible in the inspiration photograph, while interfacing helps maintain the bag’s shape. Lightweight fusible fleece offers both structure and gentle padding and is therefore an excellent option for this Patchwork Floral Bag Pattern. If you prefer a firmer handbag, you can combine quilting batting with lightweight woven interfacing. Avoid excessively stiff products around curved areas because they can make turning and finishing the bag more difficult.
Can I make the floral centerpiece without embroidery? Absolutely. The flower panel can be customized according to your skills and available materials. Instead of embroidery, you can create fabric appliqué flowers, use a small floral quilt block, sew dimensional fabric flowers, or select a beautiful printed fabric featuring botanical motifs. If using appliqué, apply fusible web to the flower shapes, position them on the central panel, and stitch around their edges. The purpose of this section is simply to create a strong visual focal point that contrasts gently with the surrounding patchwork.
How can I make the Patchwork Floral Bag Pattern more durable? Reinforce areas that receive the most stress. Add interfacing inside the handles, stitch across each handle attachment several times, and use a strong polyester sewing thread for structural seams. A second row of stitching along the side and bottom seams can provide additional strength. For a bag that will carry heavier items, you may add a removable plastic or fabric-covered stabilizer to the bottom. Choosing a durable lining will also help protect the patchwork exterior from stretching over time.
Can I change the size of the bag? Yes. One of the advantages of a handmade Patchwork Floral Bag Pattern is that the dimensions can be adapted. For a smaller handbag, reduce the body template proportionally and shorten the handles. For a larger tote, increase both the height and width while making the boxed corners slightly deeper. Remember that enlarging the bag may require heavier interfacing and stronger handles. Before cutting precious patchwork fabric, create a simple paper template and hold it against your body to check whether the finished proportions suit your needs.
Conclusion
Creating the Patchwork Floral Bag Pattern is a rewarding way to combine patchwork, quilting, embroidery, bag construction, and thoughtful fabric coordination in one beautiful sewing project. Beginning with small fabric scraps, you learned how to build coordinated patchwork panels, prepare a decorative embroidered centerpiece, quilt the exterior layers, shape the bag, create boxed corners, make patchwork handles, add romantic fabric ties, and construct a neat interior lining. Each technique contributes something different to the finished piece, from the soft texture of the quilting to the practical strength provided by interfacing and reinforced handles.
EASILY FIND THE PDF FOR THIS PATTERN HERE!
The most enjoyable part of this project is that no two bags need to look exactly alike. Changing the fabrics, flower colors, embroidery style, patchwork arrangement, handle length, or decorative bows can completely transform the design while keeping the same basic Patchwork Floral Bag Pattern. Use the tutorial as a foundation and allow your own fabric collection and creativity to influence the final result. If you make a version of this bag, leave your sincere opinion about the project and share your suggestions as well. Your ideas about different color combinations, embroidery details, sizes, or finishing techniques can inspire even more creative interpretations of this charming patchwork design.