
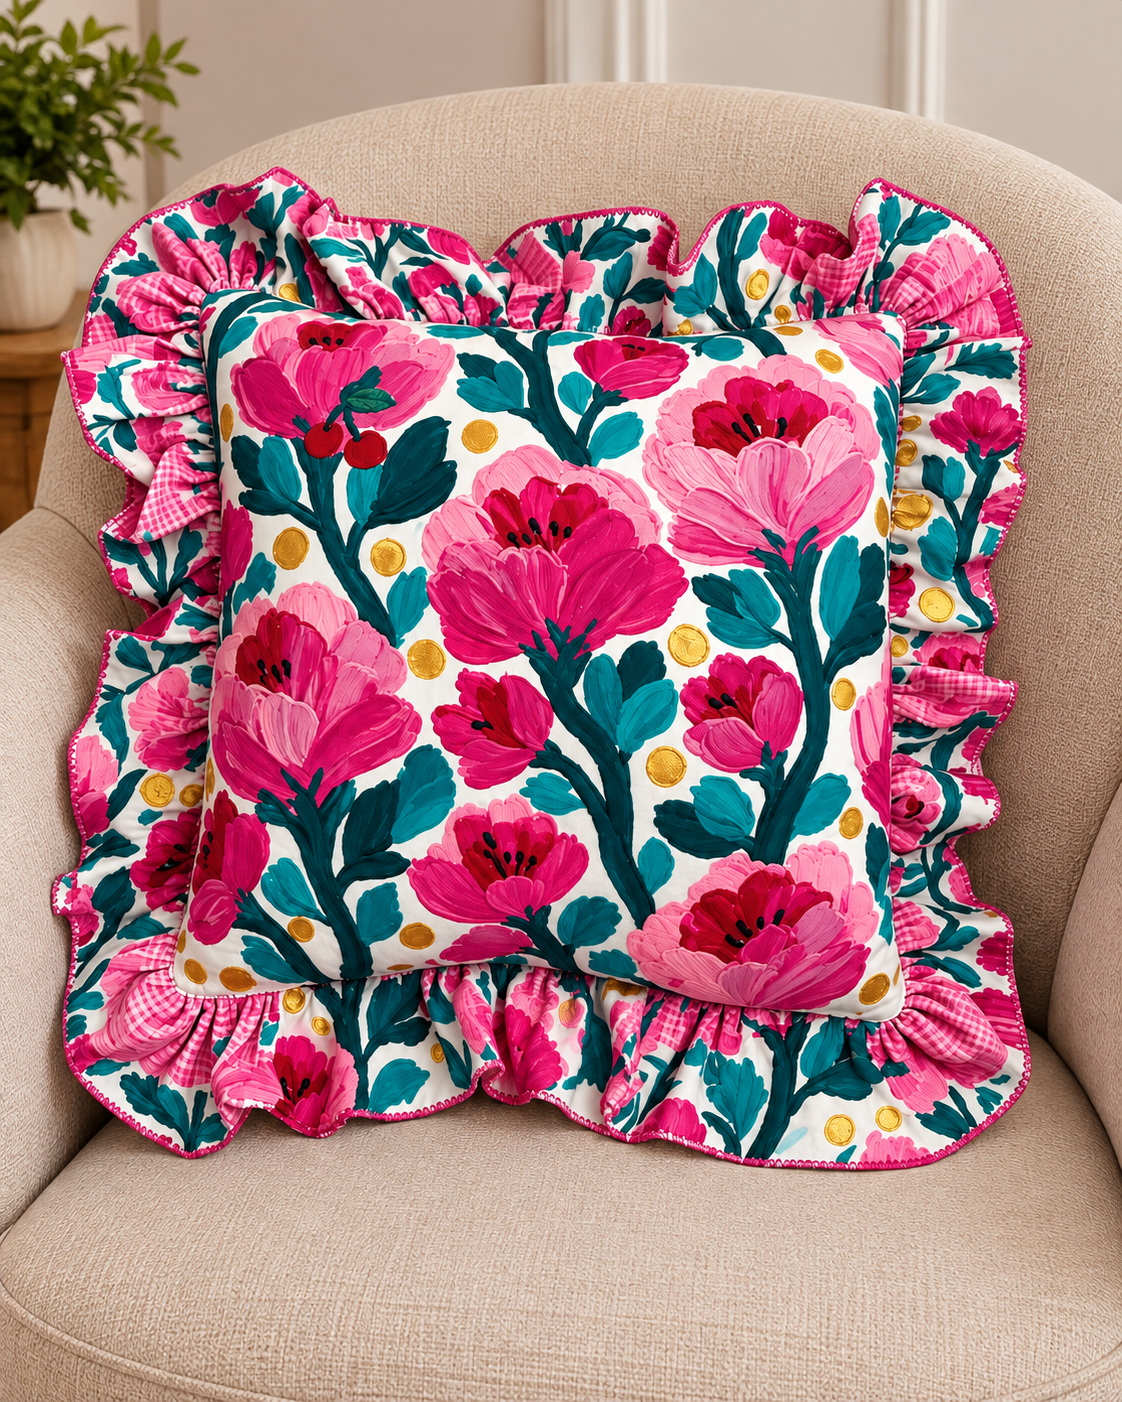
The Ruffled Cushion Pattern is a beautiful sewing project for anyone who wants to bring softness, color, and handcrafted charm into a living room, bedroom, reading corner, or cozy chair. Inspired by the cushion shown in the photo, this design combines a square floral pillow front with a generous gathered ruffle around the edges, creating a decorative finish that feels both cheerful and elegant. The strong pink flowers, deep teal leaves, light background, and contrasting trim make the cushion especially eye-catching. Even though the finished piece looks detailed, the construction is based on straightforward sewing techniques that can be learned step by step. With careful measuring, neat cutting, controlled gathering, and patient stitching, you can create a similar result at home without needing advanced equipment.
One of the most attractive features of this Ruffled Cushion Pattern is the way the ruffle adds dimension without making the project overly complicated. A standard cushion cover can already transform a chair or sofa, but the gathered fabric border gives the finished piece extra movement and personality. The ruffle can be made from the same floral fabric as the cushion front, as seen in the inspiration image, or from a coordinated gingham, solid cotton, or small-scale print. This flexibility makes the project ideal for using favorite fabrics while still keeping the overall design balanced. You can create a romantic look with florals, a country-style cushion with checks, or a more modern version with simple geometric fabric.
Another reason the Ruffled Cushion Pattern works so well for home sewing is that it can be customized in many ways. You can change the cushion size, ruffle width, fabric colors, seam finish, and closure method without changing the basic construction process. The project is also a good opportunity to practice essential sewing skills such as making accurate seams, joining long fabric strips, gathering fabric evenly, clipping corners, pressing carefully, and finishing raw edges. In this guide, you will learn how to plan the cushion, select suitable materials, calculate the ruffle, sew the individual parts, assemble the cover, and give the finished piece the polished appearance seen in the photo.
Materials, Measurements, and Fabric Planning for the Ruffled Cushion Pattern
Before beginning your Ruffled Cushion Pattern, decide on the finished cushion size. A useful decorative size is approximately 45 cm x 45 cm, which is large enough to display a bold floral print while still fitting comfortably on an armchair or sofa. For a fuller appearance, you can use a cushion insert slightly larger than the finished cover, but the insert should not be so large that it puts excessive strain on the seams.
DISCOVER MORE FREE PATTERNS HERE!
For the main cushion panels, cut one front square and the necessary back pieces according to your preferred closure. If you are making an envelope-style back, two overlapping rectangles are convenient because they eliminate the need for a zipper. If you prefer a cleaner, tailored finish, an invisible zipper or standard zipper can be added along the lower edge. Always include the appropriate seam allowance, commonly around 1 to 1.5 cm, when cutting your pieces.
The floral fabric is the visual focus of the project, so take time to position the print before cutting. Large flowers look best when the main motifs are centered and not accidentally cut through at important points. For a result similar to the inspiration image, choose a fabric with a light background, bold pink or red flowers, rich green or teal foliage, and a few smaller contrasting details. Cotton quilting fabric, cotton poplin, or lightweight home-decor fabric are excellent choices because they are easy to sew and press.
The ruffle requires more fabric than many beginners expect because the strip needs to be gathered. A good rule is to prepare a ruffle strip approximately 1.8 to 2.5 times the total perimeter of the cushion, depending on how full you want the ruffle to look. For a 45 cm square cushion, the perimeter is approximately 180 cm. A lightly gathered ruffle may require around 325 to 360 cm of fabric strip, while a fuller ruffle may require approximately 400 to 450 cm.
Choose the width of the ruffle according to the final appearance you want. A strip around 12 to 16 cm wide before folding or hemming can create a generous decorative border. If you prefer a more delicate cushion, make the ruffle narrower. The photo shows a substantial, soft ruffle that extends beyond the main cushion body, so using a wider strip will help reproduce that look.
You will also need matching thread, fabric scissors or a rotary cutter, pins or sewing clips, a ruler, an iron, an ironing board, and a sewing machine. A seam ripper is useful for corrections, while a zigzag stitch or overlocker can help finish raw edges. If you want the decorative edge to stand out, choose a thread color that coordinates with the floral print. In the inspiration image, the bright pink edging creates a beautiful outline around the ruffle and helps define every curve.
How to Sew and Gather the Ruffle Evenly
The ruffle is the defining element of this Ruffled Cushion Pattern, so careful preparation will make a noticeable difference in the final result. Begin by cutting several long fabric strips to the selected width. If the fabric width is not long enough to create one continuous strip, join multiple strips together. Sew the short ends right sides together, using the same seam allowance throughout the project.
After joining the strips, press each connecting seam open or to one side. Pressing is important because bulky seam intersections can prevent the ruffle from gathering smoothly. If you are using patterned fabric, try to distribute the joins around the cushion instead of placing several seams close together. This makes the finished ruffle look more professional and visually balanced.
Finish the outer edge of the ruffle before gathering it. You can create a narrow double-fold hem, use a rolled hem, apply bias binding, or sew a decorative overcast edge. To imitate the photo more closely, use a narrow finish in a strong coordinating color such as bright pink, raspberry, burgundy, or red. The contrast gives the ruffle a clean outline and emphasizes its scalloped appearance after gathering.
To create the gathers, sew two parallel rows of long machine stitches along the raw edge of the ruffle strip. Do not backstitch at the beginning or end because you need the thread tails to remain free. Two gathering rows are more reliable than one because they help keep the gathers controlled and reduce twisting. Use a longer stitch length, usually around 4 to 5 mm, depending on your machine.
Divide both the cushion front and the ruffle into four equal sections. Mark the center of each side of the cushion, then divide the ruffle into four corresponding sections. Pin or clip these quarter points together. This simple technique makes it much easier to distribute the fullness evenly instead of ending up with heavy gathers on one side and sparse gathers on another.
Gently pull the bobbin threads to gather the fabric. Continue adjusting the gathers until each ruffle section matches the corresponding side of the cushion. Spread the fullness with your fingers instead of pulling aggressively. The goal is to create soft, regular folds. Once the ruffle fits the perimeter, secure the thread ends temporarily and baste the ruffle to the cushion front, keeping the gathered fabric directed toward the center of the square.
Assembling the Main Cushion Cover Step by Step
Place the prepared cushion front right side up on your work surface. The ruffle should already be basted around the entire perimeter, with the decorative outer edge facing inward. Check that the gathering is consistent around all four sides. The corners can contain slightly more fullness because this allows the ruffle to curve naturally when the cushion is turned right side out.
If you are using an envelope closure, prepare the two back panels before attaching them to the cushion. Hem the overlapping edges by folding the fabric toward the wrong side, pressing, folding again, and stitching neatly. The overlap should be generous enough to prevent the cushion insert from showing through the opening. Around 12 to 18 cm of overlap is often practical for a medium cushion.
Place the back panels right sides down over the prepared front. The floral front, ruffle, and back pieces should now be layered together. Pin or clip around the entire outer edge, taking extra care at the corners and wherever the ruffle seams occur. Make sure no part of the ruffle’s decorative edge becomes trapped in the outer seam.
Sew around the entire cushion using a consistent seam allowance. Work slowly over thick sections because gathered fabric can create extra bulk. If the ruffle begins to shift, stop with the needle down, raise the presser foot, reposition the fabric, and continue. Avoid stretching the cushion panels while sewing because this can distort the finished square.
After stitching, inspect the seam before turning the cushion. Trim excessive bulk at the corners without cutting through the stitches. If the fabric frays easily, finish the raw seam with a zigzag stitch, overcasting stitch, or overlocker. Reinforcing the corners is also helpful because these areas receive extra pressure when the cushion insert is added.
Turn the cover right side out through the back opening and gently shape the corners. Pull the ruffle outward and arrange the gathers with your fingers. Press the cushion carefully, but avoid flattening the ruffle excessively. Insert the cushion form and massage the corners until the pillow looks full and balanced. The finished Ruffled Cushion Pattern should have a smooth central panel surrounded by a soft, flowing decorative border.
Finishing Details, Styling Ideas, Care, and Common Adjustments
Once the cushion is assembled, examine the entire ruffle and make small adjustments where necessary. If one section appears more gathered than another, gently redistribute the folds by hand. The ruffle should feel relaxed rather than tightly compressed. A natural, slightly irregular wave often looks more attractive than perfectly identical pleats.
For an especially polished Ruffled Cushion Pattern, topstitch close to the main cushion seam if desired. This optional step can help keep the ruffle turned outward and give the center panel more definition. Use a thread color that blends with the main fabric if you want subtle stitching, or choose a contrasting thread if decorative sewing is part of the design.
You can also add piping between the main cushion and the ruffle. Piping provides a structured outline and can make the square center appear even more defined. If you use piping, select a solid fabric color that appears in the main print. Deep teal, hot pink, gold, or cream could all work beautifully with a floral design similar to the one shown.
Fabric choice can completely change the personality of the project. Floral cotton creates a cheerful cottage-inspired cushion, while linen produces a softer and more understated result. Gingham can create a farmhouse effect, velvet can make the cushion feel luxurious, and lightweight denim can give the design a casual character. Whatever fabric you choose, avoid combining extremely heavy material with a very lightweight ruffle because the two layers may behave differently during sewing.
For regular care, follow the fabric manufacturer’s washing recommendations. If the fabric is washable, prewashing it before cutting can help prevent shrinkage later. Remove the cushion insert before laundering the cover. A gentle wash cycle and air drying can protect the shape of the ruffle better than high heat. Press the ruffle lightly after washing if necessary.
The same construction method can be adapted to many decorative projects. You can make matching cushions in different sizes, create a long rectangular ruffled pillow, use coordinated fabrics for seasonal décor, or make a pair for matching chairs. Once you understand the basic Ruffled Cushion Pattern, the technique becomes a versatile foundation for many creative sewing ideas.
FAQ About the Ruffled Cushion Pattern
What is a Ruffled Cushion Pattern?
A Ruffled Cushion Pattern is a sewing design for creating a cushion cover with a gathered fabric border around the outside. The main cushion may be square, rectangular, round, or another shape, but the gathered edge is the feature that gives the project its soft decorative appearance.
How much fabric do I need for a ruffled cushion?
The amount depends on the cushion size, fabric width, and ruffle fullness. For a 45 cm square cushion, you will need fabric for the front and back plus several meters of strip for the ruffle. Because the ruffle is gathered, its original length should be significantly longer than the cushion perimeter.
How full should the ruffle be?
A moderate ruffle is usually made from a strip approximately 1.8 to 2 times the cushion perimeter. For a fuller, more dramatic ruffle, use approximately 2.25 to 2.5 times the perimeter. More fabric creates more gathers and a stronger decorative effect.
What fabric is best for a Ruffled Cushion Pattern?
Quilting cotton is one of the easiest choices because it cuts cleanly, presses well, and gathers predictably. Cotton poplin, linen blends, lightweight canvas, and some home-decor fabrics can also work. Extremely thick fabric may make the ruffle difficult to gather.
Can a beginner make this cushion?
Yes. The Ruffled Cushion Pattern is suitable for confident beginners because the project uses basic straight sewing, hemming, gathering, and assembly. The gathering stage requires patience, but dividing the ruffle and cushion into equal sections makes the process much easier.
How do I keep the gathers even?
Mark quarter points on both the ruffle and cushion. Match these marks before pulling the gathering threads. Adjust one section at a time and spread the gathers evenly with your fingers. Using two parallel rows of gathering stitches provides more control.
Can I make the cushion without a zipper?
Yes. An envelope-style back is a simple alternative to a zipper. Two overlapping fabric panels form an opening through which the cushion insert can be added or removed. This is one of the easiest closure methods for beginners.
Can I add a zipper instead?
Absolutely. A zipper can be installed along the bottom edge or back panel. It creates a more tailored appearance and keeps the opening securely closed. An invisible zipper is especially suitable when you want the closure to be discreet.
Should I prewash the fabric?
Prewashing is recommended when the fabric is washable and may shrink. Washing and pressing the fabric before cutting helps ensure that the finished cushion keeps its intended size after later laundering.
How wide should the ruffle be?
There is no single correct width. A narrow ruffle may begin at approximately 6 to 8 cm before finishing, while a fuller decorative ruffle can be approximately 12 to 16 cm or more. The wider the strip, the more prominent the ruffle will appear.
How can I make the ruffle look like the one in the photo?
Use a generous ruffle width, gather the fabric moderately rather than extremely tightly, and select the same or a coordinated floral fabric. Finish the outer edge with a contrasting pink or red seam treatment to create the clearly defined decorative border visible in the inspiration piece.
Can I use contrasting fabric for the ruffle?
Yes. Contrasting fabric is an excellent way to personalize the Ruffled Cushion Pattern. Gingham, stripes, solids, small florals, and coordinating prints can all create attractive combinations. Choose colors that already appear in the main cushion fabric for a cohesive design.
Why does my ruffle twist while sewing?
Twisting usually happens when the gathered strip is not pinned securely or when too much fabric is pushed under the presser foot at once. Use plenty of pins or clips, keep the ruffle directed toward the center, and sew slowly around the corners.
How do I prevent bulky corners?
Reduce excess fabric after stitching by trimming the corner seam allowance carefully. Do not cut too close to the stitches. You can also distribute slightly more of the ruffle gathers around the corner area before sewing so the fabric curves instead of folding into one thick lump.
Can I make matching ruffled cushions in different sizes?
Yes. Simply recalculate the perimeter for each cushion size and multiply that measurement by your chosen gathering ratio. This makes it easy to create a coordinated collection of large, medium, and small cushions using the same Ruffled Cushion Pattern technique.
Conclusion
The Ruffled Cushion Pattern combines simple sewing techniques with a highly decorative finished appearance. By choosing an attractive fabric, cutting accurate cushion panels, preparing a sufficiently long ruffle strip, finishing its outer edge, gathering it evenly, and assembling the layers carefully, you can reproduce the soft floral look inspired by the photo. The most important parts of the process are accurate measuring, patient gathering, controlled sewing, and careful pressing.
You also learned how to calculate ruffle fullness, choose suitable fabric for cushion making, create an envelope closure, finish raw seams, handle corners, and customize the design with piping, contrasting trim, or different fabric combinations. Once you master this technique, you can adapt it to many sizes, colors, prints, and decorating styles while keeping the same basic construction method.
EASILY FIND THE FREE PDF FOR THIS PATTERN HERE!
A handmade ruffled cushion can add warmth and personality to a room while giving you an enjoyable project for practicing practical sewing skills. Whether you choose bold florals like the inspiration image or create your own color combination, this Ruffled Cushion Pattern offers plenty of room for creativity. If you make your own version, leave your sincere opinion about the project and share your suggestions. It is always interesting to hear which fabrics, colors, ruffle widths, and finishing details other sewing enthusiasts would choose for their own Ruffled Cushion Pattern.