
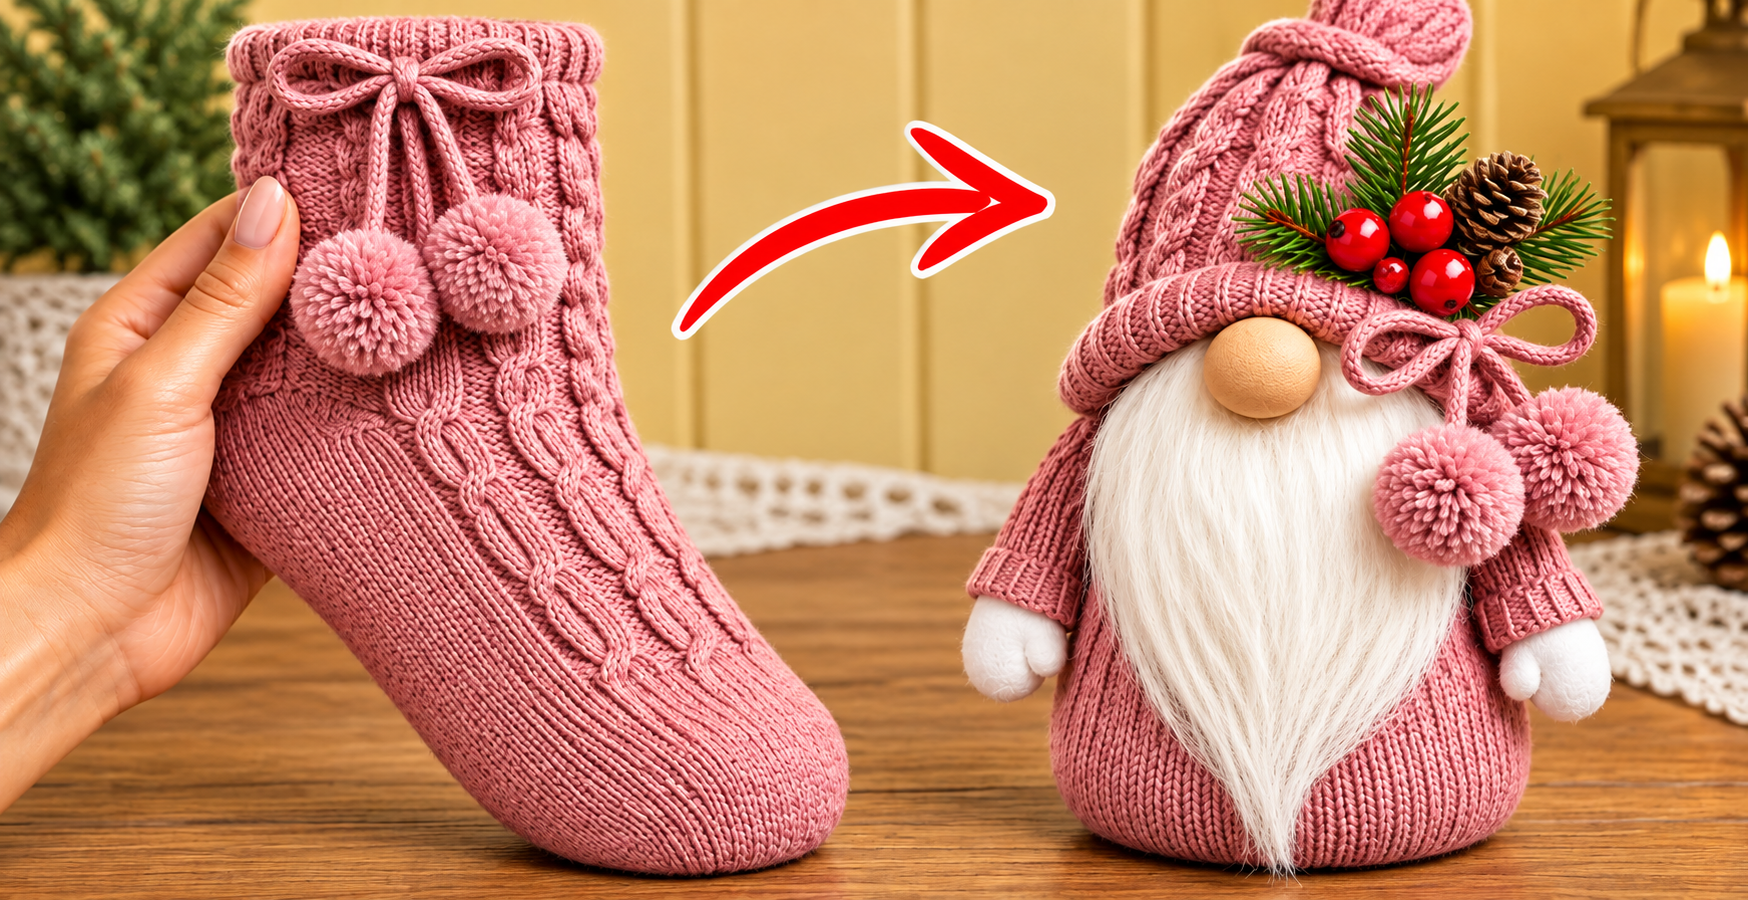
The Simple Christmas gnomes using only socks Pattern is a charming holiday craft for anyone who enjoys turning ordinary materials into warm, handmade Christmas decorations. Instead of relying on complicated sewing techniques or advanced crochet skills, this project transforms a soft sock into a decorative Scandinavian-style gnome with a cozy hat, fluffy beard, rounded nose, and festive details. The finished piece can be displayed on a shelf, fireplace mantel, Christmas table, entryway console, or beside a decorated tree. Because the design is flexible, makers can experiment with different sock textures, colors, beard lengths, and seasonal embellishments. Grey knitted socks create a traditional winter appearance, while red, green, cream, burgundy, or patterned socks can make the decoration brighter and more playful. Most importantly, the Christmas sock gnome pattern can be adapted without expensive equipment, making it an approachable handmade project for the holiday season.
What makes the Simple Christmas gnomes using only socks Pattern especially appealing is the combination of simplicity and customization. A cable-knit sock already provides beautiful texture, so much of the decorative work is built directly into the material before you even begin assembling the gnome. The body can be filled until it becomes pleasantly rounded, while another section of sock can form the tall traditional hat. Faux fur, soft yarn strands, or another fluffy textile can create the characteristic long beard, and a wooden bead or fabric-covered ball can become the nose. Small pom-poms, bows, artificial evergreen branches, and red berries can then transform a basic sock figure into an unmistakably festive DIY Christmas gnome. Since every sock stretches and drapes differently, each finished character naturally develops its own personality, which is one of the nicest qualities of handmade seasonal decorations.
Although some people search for crochet Christmas gnome patterns, this particular project is designed around socks and simple assembly rather than traditional crochet stitches. That makes it useful for beginners who enjoy the appearance of knitted or crocheted holiday decorations but are not ready to complete a large crochet project. Throughout this tutorial, the construction is explained in an easy pattern-style sequence, similar to following a craft or crochet pattern: prepare the body, secure the filling, position the beard, create the nose, shape the hat, and finish the decorative details. Measurements can also be adjusted rather than treated as rigid requirements because different sock sizes produce different gnome proportions. By following the Simple Christmas gnomes using only socks Pattern from beginning to end, you can create a soft Christmas ornament that looks detailed while remaining surprisingly straightforward to assemble.
Materials and Preparation for the Simple Christmas Gnome
Start by selecting a clean, thick sock with an attractive knitted texture. A medium or large adult sock generally gives you enough fabric to form a comfortably sized decorative gnome. Cable-knit socks are particularly effective because their raised stitches resemble the texture found in many crochet Christmas decorations. Grey is excellent for a Scandinavian winter look, but cream, beige, red, forest green, or even striped socks can work equally well. Before cutting anything, stretch the sock gently and examine how the pattern will appear on the front of your finished figure. Choosing the best-looking section at this stage helps create a more polished result.
DISCOVER MORE FREE PATTERNS HERE!
For the body, prepare a soft filling such as polyester fiberfill, clean fabric scraps, or another lightweight craft stuffing. If you want the sock Christmas gnome to stand more securely, a small weighted pouch can be placed inside the bottom before adding the remaining filling. Rice is sometimes used in decorative crafts, but a sealed craft-safe weighted filling is generally easier to keep clean and protected from moisture. Fill the sock gradually instead of pushing a large amount inside at once. This gives you more control over the shape and allows the base to remain wider than the upper body.
You will also need material for the beard. Faux fur gives the most traditional appearance because it produces the long, flowing beard associated with Nordic Christmas gnomes. Thick white yarn can be another attractive choice if you want the decoration to look more like a handmade crochet gnome pattern. Cut the beard material carefully so the fibers remain long rather than becoming blunt across the bottom. A beard approximately 12 to 18 cm long usually works well for a medium-sized gnome, although you can adjust that measurement according to your sock.
The nose is another important feature because Christmas gnomes traditionally show little or no face other than a rounded nose beneath the hat. A wooden bead approximately 2.5 to 4 cm wide works beautifully. You can also create a soft nose using a small piece of nude or beige fabric wrapped around a ball of stuffing. Keep the color natural and slightly warm so it contrasts gently with the white beard and knitted hat. The nose should look noticeable without becoming disproportionately large compared with the gnome’s body.
Gather additional supplies before assembly so the process remains organized. Useful items include scissors, strong thread, a hand-sewing needle, fabric-safe adhesive if desired, elastic bands, ribbon, small pom-poms, artificial greenery, and decorative berries. Not every item is required. One advantage of this easy Christmas gnome craft is that the basic design can remain minimalist. A sock, stuffing, beard material, nose, and securing thread are enough to create a recognizable Christmas gnome.
Think of the preparation stage as the equivalent of reading the pattern key before beginning a crochet project. In crochet, makers identify abbreviations and stitch sequences before working the first row. Here, the construction key is simpler: BODY = stuffed sock section, BEARD = faux fur or yarn, NOSE = bead or stuffed fabric ball, HAT = remaining sock section, and DEC = optional decorations. Understanding these basic components makes the remainder of the Simple Christmas gnomes using only socks Pattern much easier to follow.
Step-by-Step Simple Christmas Gnomes Using Only Socks Pattern
Begin with the body. Place your chosen weight at the bottom if you are using one, then gradually insert stuffing until the sock forms a rounded shape. Aim for a body approximately 15 to 20 cm tall for a medium tabletop gnome, but allow the dimensions of your sock to guide you. Massage the stuffing through the fabric with your fingers to smooth uneven areas. Keep the bottom fairly flat so the gnome can stand. Once you are satisfied with the shape, tightly gather the sock opening and secure it with strong thread or a sturdy elastic.
Next, prepare and attach the beard. Position the beard on the upper front section of the stuffed body, with its widest portion near where the nose will eventually sit. The beard should cover a significant portion of the front without extending far beneath the base. If you are using faux fur, gently brush the fibers downward before securing it. If you are using yarn, arrange several equal lengths together to create a thick bundle. Secure the beard firmly with stitching or fabric-safe adhesive while keeping the attachment area hidden.
Now position the nose approximately at the upper center of the beard. The top edge of the beard should sit slightly behind the nose so it appears as though the facial hair naturally begins beneath it. Sew the bead securely through the knitted sock if your bead allows it, or attach your fabric-covered nose with several concealed stitches. The Christmas gnome nose placement strongly affects the character of the finished decoration. A nose positioned slightly lower creates a softer, sleepier appearance, while one positioned directly beneath the hat creates the classic faceless Scandinavian gnome style.
The hat is one of the easiest ways to give your gnome personality. Use another section of the sock or a second matching sock and slide it down over the top of the body. Allow the front edge to sit close to the nose, almost covering the area where the eyes would normally appear. Stretch the knitted fabric gently around the body so it looks comfortable rather than tight. Leave enough material above the head to create a tall, slightly folded hat. This relaxed shape is an important detail in the DIY Scandinavian Christmas gnome style.
Shape the top of the hat by gathering it, folding it to one side, or adding a small pom-pom. If the sock already has pom-poms or decorative cords, incorporate them into the finished hat instead of removing them. You can also tie a piece of matching yarn around the top and leave a short tassel. Makers familiar with crochet may recognize this as similar to finishing a crochet gnome hat, except the knitted sock eliminates the need to work increasing and decreasing rounds. Adjust the fold until the hat rests naturally beside the beard.
Complete the basic construction by checking every attachment point. Gently lift the gnome to make sure the body remains securely closed, the beard does not pull away, and the nose stays firmly positioned. Trim only loose fibers that genuinely interfere with the finished shape because an overly neat beard can lose its cozy handmade appearance. At this point, your basic Simple Christmas gnomes using only socks Pattern is complete. Everything that follows can be considered optional decoration and personalization.
Decorating, Customizing, and Improving Your Christmas Sock Gnome
For a traditional Christmas appearance, decorate the hat with small artificial evergreen branches and red berries. Position the greenery toward one side instead of covering the entire hat. This creates visual balance and allows the texture of the sock to remain visible. A cluster of three or four red berries provides a strong festive accent against grey knitted fabric. Secure each element carefully so it will not fall away when the handmade Christmas gnome is moved or stored.
You can also create small arms using narrow pieces of matching sock fabric. Roll or lightly stuff each piece, secure the ends, and position one arm on either side of the gnome’s body. Small white mittens can be made from felt or soft fabric. The arms are optional, but they give the character additional dimension and make the decoration look more elaborate. Pom-poms hanging near the arms can also imitate the cozy details often seen in winter gnome ornament patterns.
Color selection can completely change the personality of the project. Grey and white create an elegant winter-neutral design, while red and green immediately emphasize traditional Christmas colors. Burgundy socks combined with cream beards produce a rustic farmhouse effect, and pale blue socks can create a snowy winter theme. For a modern minimalist decoration, consider beige, off-white, taupe, and natural wood tones. The flexibility of the Simple Christmas gnomes using only socks Pattern allows you to coordinate the gnome with almost any Christmas decorating style.
Texture matters just as much as color. Cable-knit socks create depth, ribbed socks provide a cleaner appearance, and fuzzy winter socks give the gnome an especially soft look. When using a heavily textured sock, keep the remaining decorations relatively simple. When using a plain sock, you can add more visual interest through bows, pom-poms, embroidery, or festive greenery. This balance prevents the design from looking overcrowded and helps the handcrafted details stand out.
If you normally work with crochet, you can combine this sock method with small crocheted accessories. A tiny crochet flower, star, snowflake, scarf, or miniature wreath can be attached to the finished gnome. However, these elements remain optional, and the main Christmas sock gnome pattern does not require crochet. This makes the project accessible while still leaving plenty of room for experienced crocheters to personalize their decorations with leftover yarn.
Before displaying your gnome, gently arrange the beard, reposition the hat, and make sure the base sits evenly on the surface. Avoid pulling strongly on the knitted material because this can distort the sock. When Christmas is over, store the gnome in a clean, dry container where the beard will not become compressed. With careful storage, your DIY sock gnome Christmas decoration can be used for multiple holiday seasons and may even become part of a growing handmade collection.
FAQ About Simple Christmas Gnomes Using Only Socks Pattern
Can beginners make the Simple Christmas gnomes using only socks Pattern? Yes. This project is particularly suitable for beginners because the knitted sock provides both the fabric and much of the finished texture. You do not need to construct a complicated fabric body or understand advanced crochet stitches. Take your time shaping the filling, positioning the beard, and securing the decorations. Those basic steps have the greatest influence on the final appearance.
What type of sock works best for a Christmas gnome? Thick adult winter socks generally work best because they stretch around the stuffing while still maintaining their texture. Cable-knit and ribbed socks are especially attractive for a Christmas gnome craft. Very thin socks can still be used, but the stuffing may show through the fabric more easily. Choose a sock with enough length to create the proportions you prefer.
Do I need to know how to crochet to make this gnome? No. Although the knitted texture may resemble a crochet Christmas gnome, the primary version of this project requires no crochet technique. The sock replaces the crocheted body and hat. Crochet skills are useful only if you decide to add optional handmade accessories such as flowers, snowflakes, scarves, or decorative edging.
How can I make my sock gnome stand upright? The most important detail is creating a stable, slightly weighted base. Place a securely sealed craft weight in the bottom of the sock, distribute it evenly, and then add lightweight stuffing above it. Keep the bottom wider than the shoulders. After filling the body, gently press it against a flat surface so the base settles naturally before you secure the top.
How large should the beard be? There is no single required beard size because sock dimensions vary. For an average tabletop gnome, a beard measuring approximately 12 to 18 cm from top to bottom is usually proportional. A longer beard creates a dramatic Nordic appearance, while a shorter beard makes the body more visible. Always position the beard temporarily before permanently attaching it so you can evaluate the proportions.
Can I make several gnomes from the same pattern? Absolutely. Creating a group is one of the best ways to use the Simple Christmas gnomes using only socks Pattern. Try making different heights while repeating the same color palette so the characters look like a coordinated collection. You can change the hat decorations, beard lengths, pom-pom sizes, and sock textures while keeping the fundamental construction method identical.
Conclusion
The Simple Christmas gnomes using only socks Pattern demonstrates how an ordinary winter sock can become a warm and attractive handmade Christmas decoration with only a few additional materials. You learned how to choose the right sock, create a stable stuffed body, prepare and attach the beard, position the characteristic rounded nose, shape the soft knitted hat, and add seasonal details such as pom-poms, evergreen branches, bows, and berries. You also saw how the project can imitate the cozy texture of a crochet Christmas gnome pattern without requiring traditional crochet skills.
One of the greatest advantages of this project is its flexibility. You can create a neutral Scandinavian gnome, a colorful traditional Christmas character, or an entire coordinated family simply by changing the socks and decorative details. Whether you make one for your own holiday décor or create several as handmade seasonal gifts, the pattern offers plenty of opportunities to experiment while keeping the construction manageable. If you try this Simple Christmas gnomes using only socks Pattern, leave your sincere opinion about the project and share any suggestions or creative changes you would make. Your ideas about colors, materials, beard styles, hats, and Christmas embellishments can inspire even more variations of this cozy holiday craft.