
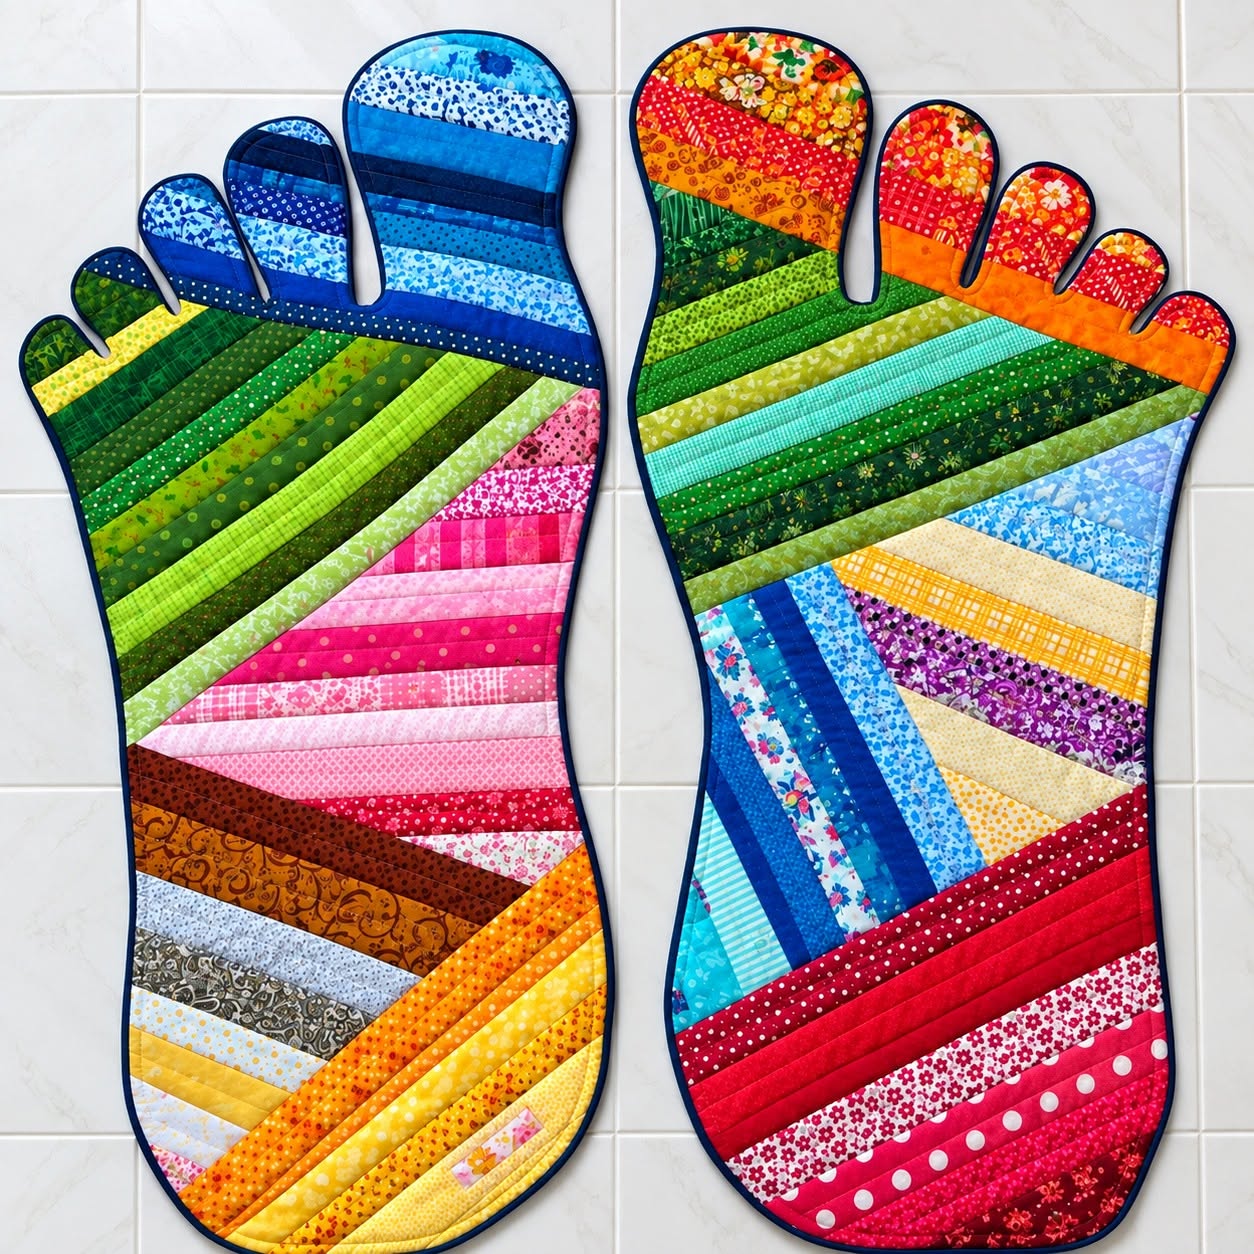
The Quilted Patchwork Rug Pattern is a joyful way to transform small pieces of fabric into a practical, colorful, and highly decorative textile project. Inspired by the pair of oversized footprint-shaped quilted rugs shown in the image, this design combines traditional patchwork techniques with playful shaping and a rainbow arrangement of fabric strips. The project is especially appealing because it gives leftover cotton fabrics, precut strips, and small scraps a new purpose instead of letting them accumulate in a sewing room. From the toes to the heel, every section can feature a different combination of prints, colors, and textures while still looking harmonious when the fabrics are arranged intentionally. Although the finished piece looks detailed, the construction can be approached one section at a time, making it accessible to confident beginners as well as experienced quilters. Most importantly, this Quilted Patchwork Rug Pattern can be personalized almost endlessly, so no two finished rugs need to look exactly alike.
Looking closely at the inspiration, the design is built around long fabric strips that travel diagonally or horizontally across different areas of each footprint. Instead of following one rigid color order, the fabrics are grouped into families such as blue, green, pink, yellow, orange, red, and purple, which creates a smooth visual movement across the entire project. The separate toes offer another opportunity to experiment with color, and their smaller size makes them excellent places to use tiny scraps that might otherwise be discarded. A dark narrow binding around the outer edge defines the silhouette and gives the finished rug a clean, professional appearance. Under the decorative patchwork layer, batting provides body and cushioning, while a sturdy backing fabric helps stabilize the project during quilting and everyday use. The result is a piece that brings together patchwork quilting, fabric strip piecing, careful cutting, machine stitching, quilting, and binding in one creative sewing project.
Before beginning this Quilted Patchwork Rug Pattern, it is helpful to understand that the footprint shape can be adjusted to suit the intended use. A larger version can become a playful bedside mat, sewing-room decoration, or accent rug, while a smaller version could work as a wall hanging or decorative quilted mat. Because handmade textile rugs may slide on smooth flooring, a completed piece intended for floor use should be paired with an appropriate non-slip rug underlay rather than relying on ordinary cotton backing alone. Washable quilting cotton is an excellent choice for the upper surface because it is easy to sew, widely available, and available in countless coordinating prints. Cotton or cotton-blend batting can provide moderate thickness without making the curves around the toes unnecessarily difficult to bind. By planning the foundation, color placement, quilting, and finishing method before cutting, you can create a durable project that maintains the playful appearance seen in the original inspiration.
Choosing Fabrics and Preparing the Footprint Template
The first step in making a successful Quilted Patchwork Rug Pattern is gathering fabrics that provide enough contrast while still belonging to a recognizable color story. The photographed project demonstrates an effective rainbow approach: dark and light blues appear toward some toes, greens move across the upper foot, warm pinks and reds occupy other sections, and yellows and oranges brighten the heel area. You do not have to duplicate this arrangement exactly. The goal is to create movement by placing related colors beside one another while occasionally introducing contrasting prints.
DISCOVER MORE FREE PATTERNS HERE!
Quilting cotton is particularly suitable for the patchwork surface. Small-scale florals, dots, checks, leaves, geometric prints, tone-on-tone fabrics, and subtle novelty prints can all work together beautifully. When combining many fabrics, try to include light, medium, and dark values. This difference in value helps individual strips remain visible after they are sewn together. The term patchwork fabric selection simply refers to choosing fabrics that work together as individual pieces while contributing to the overall design.
For the strip-pieced sections, cut assorted fabric strips approximately 4 to 6 cm wide. Exact widths are not essential because a slightly irregular assortment creates much of the handmade character of this design. Some strips can be narrower and others wider. Prepare longer strips for the central foot area and shorter pieces for the toes, sides, and heel. Press all fabrics before cutting so that wrinkles do not distort the measurements.
Next, create the footprint template. One practical method is to draw a large foot silhouette on paper, beginning with an elongated rounded heel and gradually widening toward the ball of the foot. Add five rounded toes at the upper edge, leaving clearly defined spaces between them. For a large decorative mat, an approximate finished length of 90 to 110 cm can create a dramatic footprint similar to the inspiration, although the dimensions can be reduced or enlarged according to your needs.
Make the curves generous rather than extremely tight because smooth curves are easier to quilt and bind. The spaces between the toes require particular attention. Very narrow gaps can make machine binding frustrating, so leave enough room to guide the fabric comfortably around each indentation. When the paper template looks balanced, cut it out and place it on the floor to judge the proportions from a distance. Adjust the toes or sides before cutting any expensive materials.
You will also need batting and backing. Cut both pieces several centimeters larger than the complete footprint template. The extra material gives you room to quilt without worrying about shifting layers. A firm cotton backing works well for a decorative project, while a floor mat should ultimately be used with a proper anti-slip layer underneath. Preparing these structural layers at the beginning makes the later assembly of the Quilted Patchwork Rug Pattern much easier.
Building the Colorful Patchwork Surface Step by Step
Begin the patchwork surface by deciding whether you want to construct several color blocks separately or sew the strips directly onto a foundation. For this particular design, a foundation strip-piecing approach is very convenient. Place a piece of lightweight foundation fabric over your working surface and position the first two strips right sides together. Stitch along the long edge using a consistent seam allowance, open the second strip, and press it flat.
Add the next strip by placing it right sides together with the exposed edge of the previous piece. Stitch, open, and press again. Continue this process until an entire section of foundation is covered. This method is called strip piecing, a quilting technique in which narrow lengths of fabric are joined to produce a larger patchwork panel. It is efficient, beginner-friendly, and perfect for using fabric scraps of different colors.
Change the direction of the strips as you create different sections. In the inspiration, some strips run diagonally upward while others form strong horizontal or angled bands. Altering the strip direction is an easy way to make the design appear more complicated without introducing difficult piecing. Create separate blue, green, pink, orange, yellow, red, and multicolored panels, allowing each group to overlap the approximate area where it will eventually appear on the footprint.
The toes can be pieced individually. Because they are smaller, use shorter strips and narrow scraps. You might make one toe predominantly blue, another turquoise, another orange, and another red. However, maintaining a small amount of color repetition between neighboring toes creates visual unity. Press each seam carefully as you work because good pressing is one of the secrets to producing smooth patchwork quilting without bulky or distorted intersections.
Once enough strip-pieced fabric has been prepared, arrange the sections beneath the footprint template. Move them around until the transitions between colors feel balanced. One section might travel from green into pink, another from pink into brown, and another from yellow into orange. Do not worry about creating perfectly symmetrical color placement. The slightly improvisational appearance is part of what gives a Quilted Patchwork Rug Pattern its personality.
Join neighboring patchwork panels until you have one oversized surface large enough to cover the entire footprint. Press the joining seams carefully. At this point, resist the temptation to cut the final shape immediately. Keeping the patchwork panel oversized while quilting gives you additional stability and makes it easier to correct small shifts caused by stitching. Your colorful upper layer is now ready to become a complete quilt sandwich.
Quilting, Shaping, and Creating the Five Toes
Lay the backing fabric on a large flat surface with the wrong side facing upward. Smooth it carefully and place the batting on top. Add the patchwork panel with the right side facing upward. These three components form what quilters call the quilt sandwich: backing, batting, and quilt top. Smooth all three layers from the center outward before securing them with quilting pins, clips, or temporary basting.
Quilt through all three layers before cutting out the final footprint. Straight-line quilting is particularly appropriate for this pattern because it complements the long fabric strips. You can quilt approximately parallel to the patchwork seams, adding lines every few centimeters. Another attractive option is stitch-in-the-ditch quilting, where stitches are sewn close to or directly along selected seam lines. The objective is to secure all layers evenly while adding subtle texture.
Work from the central area toward the edges so that excess fabric has somewhere to move. Avoid pulling or stretching the quilt sandwich as it passes through the sewing machine. Large footprint rugs can be rolled loosely on one side so they fit more comfortably through the machine throat. Quilting gloves can also help with grip, although they are optional. Take your time, especially around areas containing several seam intersections.
After quilting is complete, place the footprint template over the quilted panel and trace around it. Check the toe spacing one final time before cutting. Use sharp fabric scissors for the outer curves and smaller scissors around the narrow valleys between the toes. Smooth, deliberate cutting is important because uneven edges become much more noticeable after binding is applied.
The five toe shapes are one of the most recognizable features of this Quilted Patchwork Rug Pattern. Round the top of each toe instead of creating sharp points. In the spaces between toes, make smooth U-shaped curves whenever possible. Gentle curves allow bias binding to turn naturally, whereas abrupt angles can cause puckering. If you are designing your own template, simplifying these areas slightly can make the finishing process much easier.
After trimming, machine-baste around the entire perimeter approximately 0.5 cm from the raw edge. This simple line of stitching secures the three layers and prevents the batting from separating while you attach the binding. Examine the footprint from both sides and trim away any loose batting fibers. At this stage, the project should already strongly resemble the colorful quilted foot rugs in the inspiration.
Finishing the Rug with Binding and Professional Details
Binding provides the final frame around your Quilted Patchwork Rug Pattern. Because the footprint contains many curves, bias binding is generally more flexible than ordinary straight-grain binding. Bias strips are cut diagonally across the fabric grain, allowing them to stretch gently around rounded edges. A dark navy, deep blue, charcoal, or another strong contrasting color can outline the bright patchwork beautifully.
Join enough bias strips to travel around the entire perimeter, including every toe. Press the strip according to your preferred binding technique. Begin attaching it along a relatively straight section rather than directly at a toe indentation. Sew slowly around curves, gently shaping the bias strip instead of stretching it aggressively. Too much stretching can cause the outer edge of the rug to curl.
When you reach the valleys between toes, reduce your sewing speed. Keep the needle down while making small adjustments, and smooth the binding into each curve. The rounded toe tips may require slightly more easing. Clips can be more convenient than pins in these areas. If necessary, hand finishing the reverse side of the binding can provide greater control and create a particularly neat appearance.
Once the binding is attached to the front, wrap it around the raw edge toward the backing. Secure it evenly and stitch it down either by hand with small invisible stitches or by machine close to the folded edge. Machine finishing is faster and may be preferable for a rug that will receive frequent use. Hand stitching provides a cleaner traditional finish for a project designed primarily for display.
Give the finished rug a gentle final press using settings appropriate for the fabrics and batting you selected. Do not flatten the batting excessively. Check every seam, especially along the toes and binding. Remove loose threads and reinforce any areas where stitches look insecure. If the piece will be placed on a smooth floor, use a properly sized non-slip rug pad beneath it to help prevent movement.
You can also make a coordinating second footprint facing the opposite direction, as shown in the inspiration image. Repeat the same construction process while reversing the template. The second rug does not need to use exactly the same fabrics. In fact, varying the color placement while keeping the same strip-piecing technique can make the pair more interesting. Together, the two pieces create a cheerful statement while demonstrating how versatile the Quilted Patchwork Rug Pattern can be.
FAQ About the Quilted Patchwork Rug Pattern
What is a Quilted Patchwork Rug Pattern?
A Quilted Patchwork Rug Pattern is a sewing design that combines smaller fabric pieces into a larger decorative surface and then adds batting, backing, quilting, shaping, and edge finishing. In this project, the patchwork surface is cut into a playful oversized footprint shape. The result combines the appearance of a quilt with the format of a decorative textile mat.
Can beginners make this quilted footprint rug?
Yes. A beginner who already understands basic machine sewing, straight seams, pressing, and simple quilting can successfully complete the project. The most challenging area is usually the binding around the five toes. Making the toe curves slightly wider and less dramatic can simplify the process for a first attempt.
What fabrics are best for this patchwork pattern?
Quilting cotton is one of the easiest choices because it cuts accurately, presses well, and comes in many colors and prints. Fabric scraps, jelly-roll-style strips, and leftover quilting pieces can all be incorporated. Using fabrics of similar weight usually produces a smoother finished surface than mixing very lightweight and very heavy materials.
How wide should the patchwork strips be?
There is no mandatory width. Strips measuring approximately 4 to 6 cm are easy to sew and create a colorful striped appearance. Mixing several widths can make the project look more improvisational. Smaller scraps can be reserved for the toes and narrow sections near the sides of the footprint.
Do I need batting inside the rug?
Batting is recommended because it gives the project the quilted texture visible in the finished design. It also helps stabilize the patchwork seams and provides body. Avoid extremely thick batting around complex curves because bulky layers can make the toe sections more difficult to bind neatly.
How do I prevent the rug from sliding?
A cotton quilted backing alone is not designed to provide reliable slip resistance on smooth floors. When using the project as a floor mat, place a suitable non-slip rug pad underneath it and ensure that the pad is compatible with your flooring. For purely decorative wall or furniture use, an anti-slip layer is unnecessary.
Can I wash a Quilted Patchwork Rug Pattern?
Washability depends on the fabrics, batting, thread, backing, and other materials used. Prewashing fabrics can help reduce unexpected shrinkage or color bleeding. If all components are washable, gentle washing and careful drying can help maintain the shape. Always consider the care requirements of your specific materials before laundering the finished project.
Can I use leftover fabric scraps?
Absolutely. Scrap usage is one of the biggest advantages of this pattern. Narrow leftovers can become colorful stripes, while tiny pieces can be incorporated into the toes. Organizing scraps by color before sewing makes it much easier to recreate the rainbow transitions seen in the inspiration.
Why is bias binding recommended?
Bias binding has greater flexibility around curved shapes because it is cut diagonally to the fabric grain. A footprint contains rounded sides, toe tips, and narrow curved spaces between toes, so this flexibility can produce a smoother edge with fewer wrinkles than rigid straight-grain strips.
Can I change the footprint into another shape?
Yes. Once you understand the construction method, the same combination of strip piecing, batting, quilting, trimming, and binding can be adapted to many decorative silhouettes. Hearts, flowers, leaves, animals, geometric shapes, or ordinary rectangular mats can all be constructed using similar principles.
How can I make the finished patchwork look more professional?
Consistent seam allowances, careful pressing, thorough basting, evenly spaced quilting, accurate trimming, and patient binding make a significant difference. Color planning is also important. Repeating a few colors in multiple parts of the rug helps connect the many different prints and prevents the patchwork from feeling visually disconnected.
How much fabric is required?
The amount depends greatly on the footprint dimensions and the width of your strips. Because this is a scrap-friendly project, you do not necessarily need large pieces of any single print. Create the footprint template first, then prepare a patchwork panel several centimeters larger than the template on every side so you have enough material for quilting and final trimming.
Conclusion
The Quilted Patchwork Rug Pattern turns simple fabric strips into an eye-catching project full of color, texture, and handmade personality. The process begins with selecting coordinated scraps and creating a properly proportioned footprint template, followed by strip piecing the fabrics into colorful sections. By changing strip directions and grouping prints into different color families, you can reproduce the energetic patchwork effect seen in the inspiration while still creating an entirely individual design.
After constructing the patchwork top, the project becomes a traditional quilt sandwich made from backing, batting, and the pieced surface. Straight-line quilting holds those layers together while enhancing the direction of the fabric strips. The quilted panel is then trimmed into the footprint silhouette, including the characteristic five rounded toes, and finished with flexible bias binding for a clean and durable outline.
The greatest advantage of this project is its flexibility. You can change the scale, colors, fabric prints, strip widths, quilting density, and even the direction of each patchwork section. A second reversed footprint can create a coordinating pair, while a single rug can become a cheerful accent beside a bed, in a sewing room, or in another creative space. When used on the floor, combining the handmade textile with an appropriate non-slip underlay adds an important practical finishing detail.
EASILY FIND THE FREE PDF FOR THIS PATTERN HERE!
More than anything, this Quilted Patchwork Rug Pattern demonstrates how ordinary fabric remnants can become something distinctive instead of being forgotten in a scrap basket. Careful pressing, patient quilting, smooth curves, and neat binding are the details that transform a collection of colorful strips into a polished finished project. If you make your own version, leave your sincere opinion about the pattern and share your suggestions too. Which colors, fabrics, or patchwork arrangement would you choose for your own quilted footprint rug?