
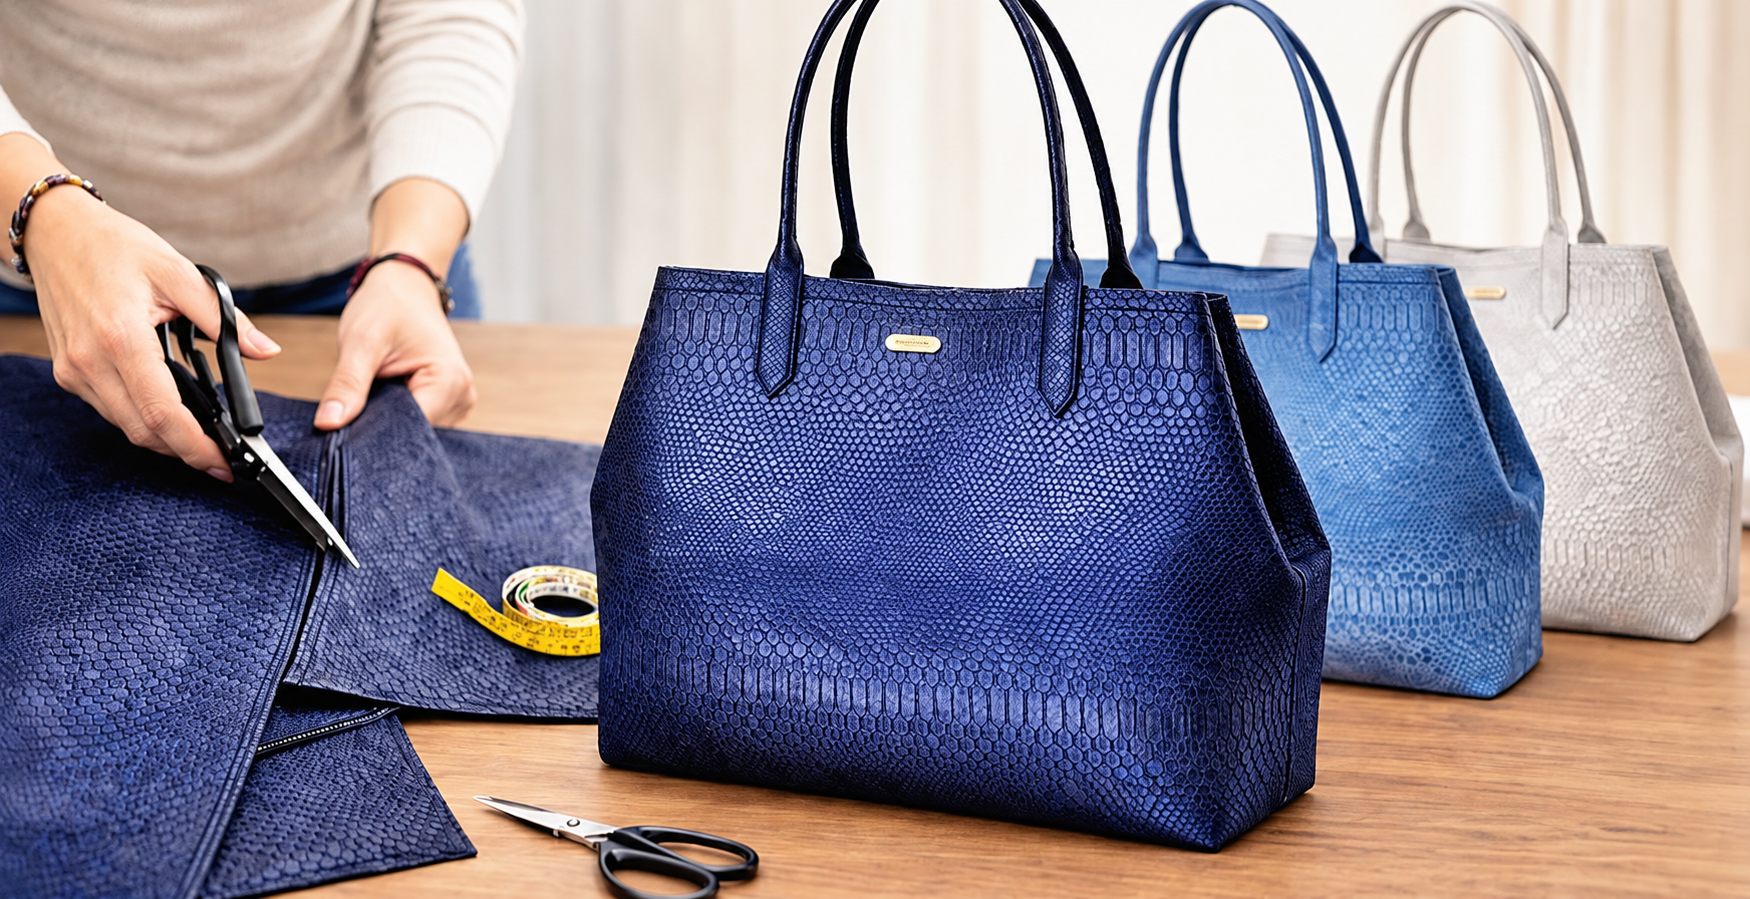
The Fabric scrap bag Pattern is a practical and creative sewing project that turns leftover fabric, textured remnants, upholstery pieces, faux leather, denim, and other sturdy materials into an elegant handmade bag. Inspired by the structured tote shown in the image, this project combines a roomy body, reinforced handles, a stable base, and carefully finished seams. One of the best things about a fabric scrap bag is that it allows you to use materials already available in your sewing room instead of leaving small cuts unused. The result can look surprisingly polished when the colors, textures, and proportions are coordinated carefully. Although the finished bag has a professional appearance, the construction can be broken into manageable stages, making it approachable for confident beginners as well as experienced sewists. Throughout this tutorial, the focus will be on creating a durable, attractive bag while making the most of fabric remnants.
The expression Fabric scrap bag Pattern refers to a sewing template or construction plan designed specifically for creating a bag from leftover pieces of fabric. The scraps do not necessarily need to be tiny patchwork pieces; they can include medium-size remnants left from garments, upholstery, quilting projects, curtains, or previous bag-making projects. For the structured style shown in the photo, heavier fabrics are especially useful because they help the bag maintain its shape. However, lighter cotton scraps can still be used when reinforced with interfacing or stabilizer. The pattern can also be adapted creatively by joining several coordinating pieces before cutting the main panels. This means every finished bag can be completely unique. Choosing scraps within the same color family is an easy way to create a sophisticated result similar to the coordinated blue tones seen in the inspiration image.
Before starting your Fabric scrap bag Pattern, organize the materials and decide how large you want the finished bag to be. A practical everyday tote can measure approximately 38 cm wide across the upper section, 30 cm high, and 14 cm deep, although these dimensions can be adjusted. You will need enough fabric for two main exterior panels, two side panels or gussets, a base, lining pieces, and handles. Gather fabric scraps, medium- or heavyweight interfacing, lining fabric, matching thread, fabric scissors, sewing clips or pins, a measuring tape, ruler, marking tool, and a sewing machine. Optional materials include a magnetic snap, internal pockets, a zipper, decorative hardware, and a small label. Preparing every piece before sewing makes construction smoother and reduces the chance of cutting errors later.
Choosing Fabric Scraps and Preparing the Bag Pattern
Start by sorting your fabric scraps according to weight, color, texture, and size. For a structured handbag, upholstery fabric, canvas, denim, faux suede, textured synthetic fabric, and medium-heavy cotton work particularly well. If your scraps are very different in thickness, try grouping similar materials together so the finished bag does not become uneven. You can also use lighter scraps decoratively over a more stable backing fabric.
DISCOVER MORE FREE PATTERNS HERE!
Create the basic Fabric scrap bag Pattern on paper before cutting your material. For the main front and back pieces, draw two rectangles approximately 40 cm wide by 32 cm high. Add a 1 cm seam allowance around every edge if it is not already included in your measurements. For a slightly tapered handbag silhouette, reduce the lower corners by approximately 2 cm on each side, allowing the top of the bag to remain wider.
Next, prepare the side pieces. Cut two rectangles approximately 16 cm wide by 30 cm high. These pieces create the depth of the bag and make it much roomier than a simple flat tote. The bottom piece can measure approximately 38 cm long by 16 cm wide. Always compare the measurements of the side panels and bottom panel with the main bag pieces before cutting the final fabric.
If your scraps are smaller than the required pattern pieces, join them first. Place two scraps right sides together, sew a 1 cm seam, press the seam open, and continue joining pieces until you have a panel large enough for your pattern. This method turns small remnants into a completely new piece of scrap fabric. Pressing every seam carefully is important because it keeps the final exterior smooth.
Once your exterior sections are assembled, apply interfacing to the wrong side of each piece. A medium-weight fusible interfacing works well for fabrics that already have body, while softer cotton scraps may require a firmer stabilizer. Follow the appropriate pressing method for the material you are using, especially when working with synthetic or textured surfaces that could be sensitive to heat.
Finally, cut matching lining pieces using the same basic bag pattern. The lining can be slightly lighter in weight because it does not need to provide the primary structure. Cotton is an excellent option because it is easy to sew and clean. At this stage, label each piece—front, back, sides, base, and lining—so everything remains organized during assembly.
Sewing the Exterior and Creating a Structured Shape
Begin constructing the Fabric scrap bag Pattern by placing the front exterior panel right sides together with one side panel. Align the edges carefully and secure them with clips or pins. Sew using approximately a 1 cm seam allowance. When working with thick material, sew slowly and keep the fabric supported so the weight does not pull it away from the needle.
Attach the same side panel to the back exterior piece. Repeat the process with the second side panel until the bag begins to form an open rectangular shape. Press or finger-press the seams carefully. If your material permits ironing, use a pressing cloth to protect textured fabric and avoid flattening decorative surfaces.
The next step is attaching the base. Pin or clip the bottom panel around the lower opening of the bag. Start by aligning the center points and corners before securing the remaining edges. Accurate alignment helps keep the base symmetrical. Sew slowly around each corner and stop with the needle down when changing direction.
For extra durability, reinforce the lower seams with a second line of stitching approximately 3 to 4 mm inside the seam allowance. This is especially useful for a handmade tote bag designed to carry books, sewing supplies, groceries, or everyday personal items. A reinforced base also helps protect the original seam from excessive tension.
Turn the exterior right side out and examine the structure. The corners should appear balanced, and the bottom should sit reasonably flat on a table. If one side looks uneven, correct it before continuing. Minor differences can usually be fixed by adjusting the seam allowance rather than taking the entire bag apart.
To create the refined appearance seen in structured handbags, gently shape the side panels inward near the upper edges. This small detail gives the bag a more elegant silhouette. Depending on your fabric, the interfacing may naturally hold this shape. If additional support is needed, narrow strips of stabilizer can be inserted near the upper side seams.
Making the Handles, Lining, and Interior Pockets
For the handles, cut two strips approximately 55 cm long and 6 cm wide. If your fabric scraps are not long enough, handles can also be made from coordinating webbing or joined strips of fabric. Reinforce fabric handles with interfacing because they will carry much of the bag’s weight. Fold the long edges toward the center and then fold the strip in half.
Topstitch along both long edges of each handle. This stitching creates a neat finish while also strengthening the straps. The handles in the inspiration image are relatively narrow and structured, so keeping the finished width around 2 to 2.5 cm creates a similar appearance. Make sure both handles finish at exactly the same length.
Position one handle on the front panel and the other on the back panel. Place each handle end approximately 10 to 12 cm away from the side seam. Check that the handles are not twisted before sewing. Stitch each end securely using a square with an additional diagonal line if the design allows the attachment stitching to remain hidden or decorative.
Before assembling the lining, create an optional interior pocket. Cut a rectangle approximately 22 cm wide by 18 cm high, fold the upper edge twice, and topstitch it. Turn the remaining edges toward the wrong side and sew the pocket onto one lining panel. Divide it with vertical stitching if you would like separate compartments for a phone, keys, or small sewing tools.
Sew the lining together using the same order used for the exterior: attach the sides, join the back panel, and then add the bottom. Leave an opening of approximately 12 to 15 cm along the bottom seam. This opening will later allow you to turn the entire bag right side out after joining the lining to the exterior.
At this point, you can add a magnetic snap or another simple closure near the upper center of the lining. Reinforce the area behind the closure with a small square of interfacing. This prevents repeated opening and closing from weakening the fabric. If you prefer an open tote style, the closure can be omitted entirely.
Finishing the Fabric Scrap Bag for a Professional Result
Place the finished exterior inside the lining with right sides facing each other. The handles should be tucked completely between the two layers. Match the side seams and upper edges, then secure everything with clips. Sew around the complete upper opening using a consistent seam allowance, taking extra care where the handle ends create additional thickness.
Pull the bag gently through the opening that was left in the lining. Work slowly, especially if your Fabric scrap bag Pattern uses stiff stabilizer. Once the entire exterior is visible, shape the corners carefully with your fingers. Avoid using sharp tools because they may puncture the fabric or weaken the seams.
Close the opening in the lining by folding the raw edges inward and stitching very close to the fold. A machine stitch is quick and durable, although the opening can also be closed by hand when you want an almost invisible finish. Push the lining into the exterior and smooth it evenly around the base and side panels.
Topstitch around the upper edge of the bag approximately 3 to 5 mm from the seam. Topstitching is both decorative and functional because it keeps the lining from rolling toward the outside. Use a slightly longer stitch length for heavy or textured fabrics. Sew slowly over the handle attachment areas because these sections may contain several layers.
Give your completed fabric scrap bag a final inspection. Trim any loose threads, check the handle stitching, straighten the lining, and make sure the bag sits evenly. If the bottom feels too flexible, a removable base insert can be made from firm stabilizer covered with matching fabric. This addition is especially helpful for larger bags.
The finished Fabric scrap bag Pattern can be customized in countless ways. Try contrasting handles, patchwork panels, decorative topstitching, appliqué, quilted scraps, exterior pockets, or different color combinations. The most important goal is to create a bag that is practical, durable, and visually balanced while giving leftover materials a useful new purpose.
FAQ – Frequently Asked Questions About the Fabric scrap bag Pattern
What is the best fabric for a Fabric scrap bag Pattern?
Medium- and heavyweight materials are usually the easiest to use for this style of bag. Canvas, denim, upholstery fabric, textured cotton, and faux leather can provide good structure. Lightweight cotton can also work when reinforced with suitable interfacing.
Can very small fabric scraps be used to make the bag?
Yes. Small scraps can be sewn together to create larger patchwork panels. Join the scraps with consistent seam allowances, press the seams carefully, and then place the paper pattern over the completed patchwork section before cutting the final bag pieces.
Does the bag need interfacing?
Interfacing is strongly recommended when you want the structured look shown in the inspiration photo. Bag interfacing helps stabilize the fabric, prevents excessive stretching, and gives the sides and base more definition. The exact weight depends on the thickness of your exterior fabric.
What size should I make the bag?
A useful medium-size version can finish around 38 cm wide, 30 cm high, and 14 cm deep. These dimensions are only a guide. The Fabric scrap bag Pattern can easily be enlarged or reduced according to your needs.
Can I add a zipper to this pattern?
Yes. A recessed zipper panel can be installed between the lining and exterior before the upper edge is closed. Beginners may find a magnetic snap easier, while more experienced sewists can adapt the pattern with a full zipper closure.
How can I make the bottom of the bag stronger?
Use firm interfacing or bag stabilizer on the bottom panel. You can also insert a removable base made from a firm sheet covered in fabric. Reinforcing the seams around the bottom with a second row of stitching adds even more strength.
Can quilting cotton be used for this bag?
Yes, especially if you want to use leftover quilting fabric. Because quilting cotton is lighter, fuse it to medium- or heavyweight interfacing before assembly. You can also quilt the cotton onto batting before cutting the pattern pieces.
How long should the handles be?
Handles measuring approximately 50 to 60 cm work well for a handheld or short shoulder bag. If you prefer longer shoulder straps, increase the length before cutting. Test the length with a temporary fabric strip before making the final handles.
Is this project suitable for beginners?
A beginner who understands straight seams, seam allowances, and basic bag assembly can complete this project with patience. The main challenge is sewing through thicker layers. Using the correct needle and sewing slowly can make the process much easier.
How can I make my handmade bag look more professional?
Accurate cutting, even seam allowances, strong interfacing, careful pressing, reinforced handles, and neat topstitching make a major difference. Taking time to align the seams and corners will also give your handmade bag a cleaner, more polished appearance.
Conclusion
Creating a Fabric scrap bag Pattern is an excellent way to transform leftover materials into something attractive, practical, and long-lasting. Throughout this project, you learned how to select suitable fabric scraps, prepare the main pattern pieces, combine smaller remnants, add interfacing, sew the exterior structure, construct a reinforced bottom, prepare durable handles, make the lining, add pockets, and complete the final topstitching.
The process also demonstrates that leftover fabric does not need to limit your creativity. Different textures and colors can become an intentional design feature when they are combined thoughtfully. By using the basic measurements as a starting point, you can create smaller handbags, spacious totes, patchwork versions, quilted bags, or coordinated sets in several colors.
Most importantly, the Fabric scrap bag Pattern gives you a flexible foundation that can be adapted according to the materials you already have and the style you want to create. Careful preparation, strong seams, appropriate interfacing, and attention to finishing details will help produce a bag that looks polished while remaining practical for everyday use. If you decide to make this project, leave your sincere opinion about the pattern and the techniques explained here. I would also love to hear your suggestions for different fabrics, colors, handles, pockets, closures, or other creative details you would add to your own Fabric scrap bag Pattern.