
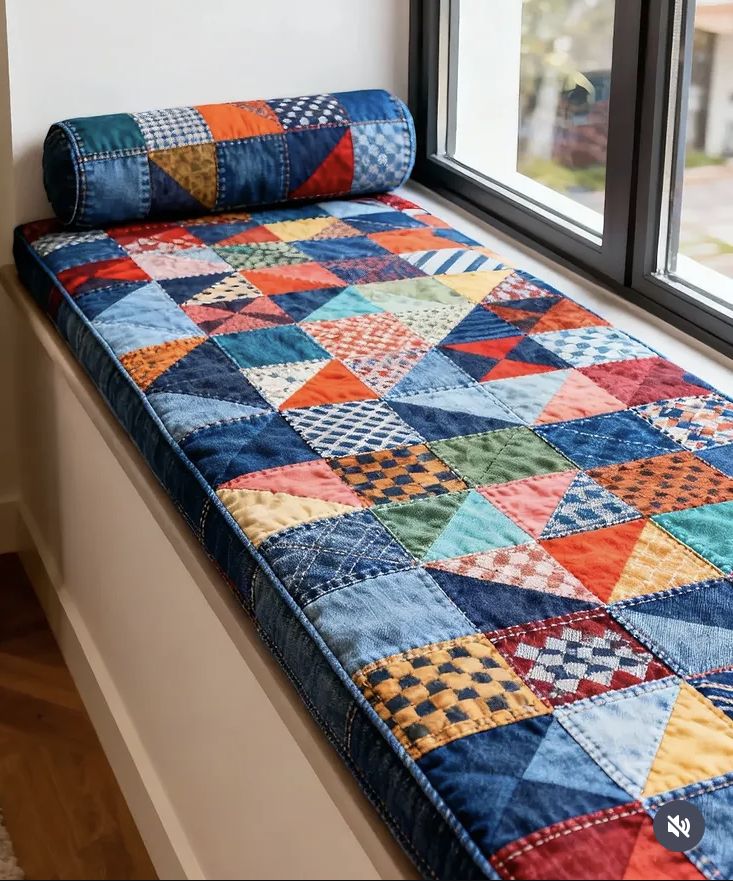
Patchwork Window Seat Cushion Fabric Pattern is a creative sewing project that transforms leftover fabric, denim scraps, and colorful cotton pieces into a comfortable and decorative cushion for a window bench. Inspired by the project shown in the image, this design combines squares, half-square triangles, irregular patchwork blocks, and visible quilting lines. The result is a practical seat cushion with a warm handmade personality that can brighten a reading corner, bedroom, craft room, or living area. Because the design is based on small fabric sections, it is also an excellent way to reuse materials that might otherwise remain forgotten in a sewing basket.
Creating a Patchwork Window Seat Cushion Fabric Pattern requires careful measuring, balanced color placement, secure seams, and suitable cushioning material. Although the finished piece looks complex, the process becomes manageable when it is divided into simple stages. You will first measure the window seat, prepare the fabric pieces, assemble small patchwork units, join those units into a complete cushion top, and finally add batting, backing, piping, and a closure. The cylindrical bolster shown in the photograph can also be made with coordinating scraps, giving the entire window seat a polished and harmonious appearance.
This project is suitable for confident beginners as well as experienced quilters who enjoy improvisational designs. You do not need to reproduce every patch in the reference image exactly. The charm of this fabric pattern comes from combining different textures, prints, and geometric shapes in a way that feels spontaneous while still looking balanced. Denim provides strength and structure, while printed cotton introduces color and movement. By following the measurements and sewing instructions below, you can adapt the pattern to almost any rectangular window seat and create a durable cushion that reflects your personal style.
Planning the Patchwork Window Seat Cushion Fabric Pattern
Begin by measuring the complete length and depth of your window seat. Use a firm measuring tape and record the dimensions in both inches and centimeters if that helps you work more accurately. Measure the space in at least three places because some window seats are not perfectly square. Use the smallest measurement so the finished cushion will fit without being forced against the wall or window frame. For a comfortable fit, subtract approximately 1/4 inch, or 0.6 cm, from the final length and depth.
DISCOVER MORE FREE PATTERNS HERE!
Next, decide how thick you want the cushion to be. A thickness between 2 and 4 inches, or approximately 5 to 10 cm, usually works well for a window bench. A thicker insert offers more comfort, while a thinner insert creates a streamlined appearance. High-density upholstery foam is a practical choice because it supports the body and returns to its original shape after use. Add a thin layer of polyester batting around the foam if you prefer softer, slightly rounded edges.
For the cushion top, collect a variety of sturdy fabrics. Denim from old jeans, cotton canvas, quilting cotton, chambray, and medium-weight home décor fabric can all be included. Avoid mixing extremely delicate fabric with very heavy denim unless the delicate material is reinforced with lightweight interfacing. Prewash all washable fabric before cutting so that the finished cover does not shrink unevenly. Press every piece to remove wrinkles and make accurate cutting easier.
The patchwork window seat cushion in the photograph features a strong blue foundation with accents of red, orange, turquoise, green, yellow, pink, and cream. You can follow this color direction or create your own palette. Select one dominant color that appears throughout the design, two or three supporting colors, and several small accent colors. Repeating the dominant shade in different areas helps connect the many patches and prevents the top from looking disorganized.
Choose a basic finished block size before cutting. A 4-inch or 10-cm finished block is easy to arrange and works well for medium and large cushions. To make a 4-inch finished square with a 1/4-inch seam allowance, cut each square at 4 1/2 inches. For half-square triangle units, begin with slightly larger squares, sew them together diagonally, and trim each finished unit to 4 1/2 inches. Consistent block sizes will make the final rows much easier to assemble.
Create a simple paper diagram of the seat cushion before sewing. Divide the final dimensions by the chosen block size and determine how many blocks are needed across the length and depth. The dimensions may not divide evenly, so you may need narrower blocks or a border along one or more sides. Label the diagram with colors or fabric types. This planning stage is an important part of the Patchwork Window Seat Cushion Fabric Pattern because it allows you to check the visual balance before permanently joining the pieces.
Cutting and Sewing the Colorful Patchwork Top
Cut enough plain squares, printed squares, and geometric units to cover the cushion top. For a scrap-friendly result, use several fabric patterns rather than repeating only one print. Include checks, stripes, floral designs, small dots, abstract patterns, and solid colors. Denim can be cut from different parts of old jeans, but avoid thick pocket seams and heavily worn areas. Use a rotary cutter, acrylic ruler, and cutting mat whenever possible to achieve clean edges.
To make the half-square triangles visible throughout the design, place two fabric squares right sides together. Draw a diagonal line from one corner to the opposite corner on the back of the lighter square. Sew one line 1/4 inch away from each side of the marked diagonal. Cut directly along the drawn line, open the two units, and press the seam allowances. Trim each unit carefully so it matches the size of the plain patchwork squares.
Pressing direction affects how easily the blocks fit together. When joining two lightweight cotton fabrics, press the seam allowance toward the darker material. When working with bulky denim, press the seam open to reduce thickness. A pressing cloth can protect decorative fabrics from excessive heat. Do not stretch the diagonal edges of the triangle units while pressing because bias edges can distort and create uneven blocks.
Arrange all prepared squares on a large table, clean floor, or design wall. Follow your paper diagram, but remain open to small changes. Distribute the brightest colors across the entire surface rather than placing them all in one corner. Turn striped and directional prints in different directions to create energy. Separate similar prints with solid denim squares whenever the design begins to look too busy. Take a photograph of the final arrangement before moving the blocks to the sewing machine.
Sew the blocks into horizontal rows using a consistent 1/4-inch seam allowance. Place the first two pieces right sides together, align the raw edges, and stitch from top to bottom. Add the remaining blocks in the same manner until the row is complete. Repeat this process for every row. Press the seam allowances of the first row in one direction and those of the next row in the opposite direction. This alternating method helps the seams nest neatly when the rows are joined.
Join the completed rows to form the full patchwork cushion top. Pin or clip at every intersection so the corners remain aligned. Sew slowly over thick denim seams and use a denim needle if necessary. Once all rows are attached, check the dimensions against your original window seat measurements. Trim the top only when needed, keeping all corners square. If the panel is slightly too small, add a narrow denim border around the outside rather than stretching the patchwork.
Quilting and Assembling the Window Seat Cushion Cover
Cut a piece of batting and a backing fabric slightly larger than the patchwork top. Place the backing with the wrong side facing upward, position the batting over it, and place the patchwork top right side facing upward. Smooth the layers carefully from the center toward the edges. Secure them with curved safety pins, temporary fabric adhesive, or long hand-basting stitches. This three-layer combination gives the top more stability and helps protect the seams during regular use.
Quilt along both sides of the main patchwork seams to create the appearance shown in the reference image. Straight-line quilting is practical for this project because it reinforces the geometric structure. You can sew directly in the ditch, approximately 1/8 inch beside each seam, or use a combination of both methods. A walking foot will help the denim, cotton, batting, and backing move evenly through the machine without shifting.
After quilting, trim the backing and batting so they are even with the patchwork top. Measure the perimeter again and calculate the dimensions for the boxing strip, which forms the sides of the cushion. The strip width should equal the foam thickness plus two seam allowances. For example, a 3-inch foam cushion with 1/2-inch seam allowances requires a strip approximately 4 inches wide. Join several fabric lengths together when one continuous strip is not available.
A piped edge gives the Patchwork Window Seat Cushion Fabric Pattern a professional finish. To make piping, cut bias strips wide enough to wrap around the chosen cord. Join the strips diagonally, wrap them around the piping cord, and sew close to the cord using a zipper foot. Pin the finished piping around the right side of the quilted top with the raw edges aligned. Clip the piping seam allowance at each corner so it can turn smoothly without pulling.
Attach the boxing strip around the cushion top, sewing over the previous piping stitches. Keep the corners neat and check that the side panel is not twisted. For the lower edge, prepare a solid or patchwork backing panel matching the dimensions of the top. Add a long zipper to the back or along one boxing strip so the foam insert can be removed. A zipper is especially useful when the cover needs occasional cleaning or when the foam may need replacement.
Sew the backing to the boxing strip with right sides together, leaving the zipper partially open before completing the final seam. Turn the cover right side out and gently shape the corners. Wrap the upholstery foam with batting and insert it through the zipper opening. Work slowly, pushing the foam into each corner without pulling excessively on the seams. Close the zipper and place the finished window seat cushion on the bench to evaluate the fit.
Frequently Asked Questions About Patchwork Window Seat Cushions
What is the best fabric for a Patchwork Window Seat Cushion Fabric Pattern? Medium-weight cotton, denim, canvas, and upholstery fabric are excellent choices because they can tolerate frequent use. Quilting cotton can also be included, especially when supported by batting and backing. When combining fabric weights, reinforce lighter pieces with interfacing and avoid extremely thin or slippery materials.
Can I make the cushion with only recycled denim? Yes, recycled denim creates a strong and attractive cushion. To prevent the design from becoming visually flat, combine several denim shades, including dark indigo, medium blue, faded blue, and gray-blue. You can also place the fabric grain in different directions. Remove bulky seams, rivets, belt loops, and damaged areas before cutting the patchwork pieces.
How much fabric is needed for a window seat cushion? The amount depends on the bench dimensions, cushion thickness, block size, and number of fabric varieties. Measure the top surface, bottom panel, and side boxing separately. Add at least 10 to 15 percent for seam allowances, trimming, matching prints, and possible cutting mistakes. Scrap-based projects may require less purchased fabric because many small pieces can be taken from existing materials.
Should a patchwork cushion be quilted before assembly? Quilting is highly recommended because it connects the patchwork layer to the batting and backing. It also strengthens the many small seams and reduces fabric movement during use. A cushion cover can be made without quilting, but the surface may wrinkle more easily, and lightweight patches may experience greater stress over time.
How can I wash a patchwork window seat cushion cover? Always consider the most delicate fabric included in the project. If all materials were prewashed and are machine washable, use a gentle cycle with cool water and mild detergent. Close the zipper before washing and avoid strong bleach. Air-drying the cover flat is usually safer than high-heat drying, which can shrink cotton or alter the shape of the quilted layers.
How do I prevent the cushion from sliding on the bench? Add a nonslip fabric panel to the underside or place a separate nonslip mat between the cushion and the seat. Fabric ties can also be sewn into the back seam and secured to discreet hooks or structural supports. For a fitted window bench, making the cushion only slightly smaller than the available area can also reduce unwanted movement.
Can I add the cylindrical bolster shown in the photo? Yes. Cut a rectangular patchwork panel long enough to wrap around a cylindrical foam insert, adding seam allowances and space for a zipper. Cut two circles for the ends and add piping around each circle before attaching them to the main panel. The bolster can repeat fabrics from the main cushion, helping the two pieces look like a coordinated set.
What seam allowance should I use for this fabric pattern? A 1/4-inch seam allowance is standard for patchwork blocks because it allows accurate piecing without unnecessary bulk. For the final cushion construction, a 1/2-inch seam allowance provides additional strength. Mark the appropriate guide on the sewing machine or use a specialized presser foot to maintain consistent seams throughout the project.
How can beginners simplify the design? Beginners can use only squares instead of mixing squares and triangles. Choose one block size, cut all pieces accurately, and assemble them in straight rows. The project will still have an authentic patchwork appearance. Once comfortable with basic construction, add half-square triangles, diagonal quilting, piping, and a matching bolster.
How long does this project usually take? The time depends on the cushion size, design complexity, and sewing experience. Preparing recycled denim may take several hours because the garments need to be opened, pressed, and inspected. Cutting and arranging the patches can take one day, while sewing, quilting, and final assembly may require another one or two days. Working carefully is more important than finishing quickly.
Conclusion
The Patchwork Window Seat Cushion Fabric Pattern combines practical sewing, creative fabric reuse, geometric patchwork, and comfortable home decoration in one rewarding project. You learned how to measure the window seat, choose suitable fabrics, plan the block arrangement, sew squares and half-square triangles, quilt the finished panel, create piping, prepare the boxing strip, install a zipper, and insert upholstery foam. These techniques can also be adapted for bench cushions, floor cushions, reading-nook seats, and coordinating bolsters.
EASILY FIND THE PDF FOR THIS PATTERN HERE!
The most appealing feature of this project is the freedom to personalize every detail. You can reproduce the colorful denim-inspired appearance of the photograph or create a completely different palette using fabrics from your own collection. Accurate cutting, patient pressing, secure quilting, and a properly fitted foam insert will help your handmade cushion remain beautiful and comfortable. Please leave your sincere opinion about this Patchwork Window Seat Cushion Fabric Pattern and share any suggestions, color combinations, or creative details you would add to the design.