
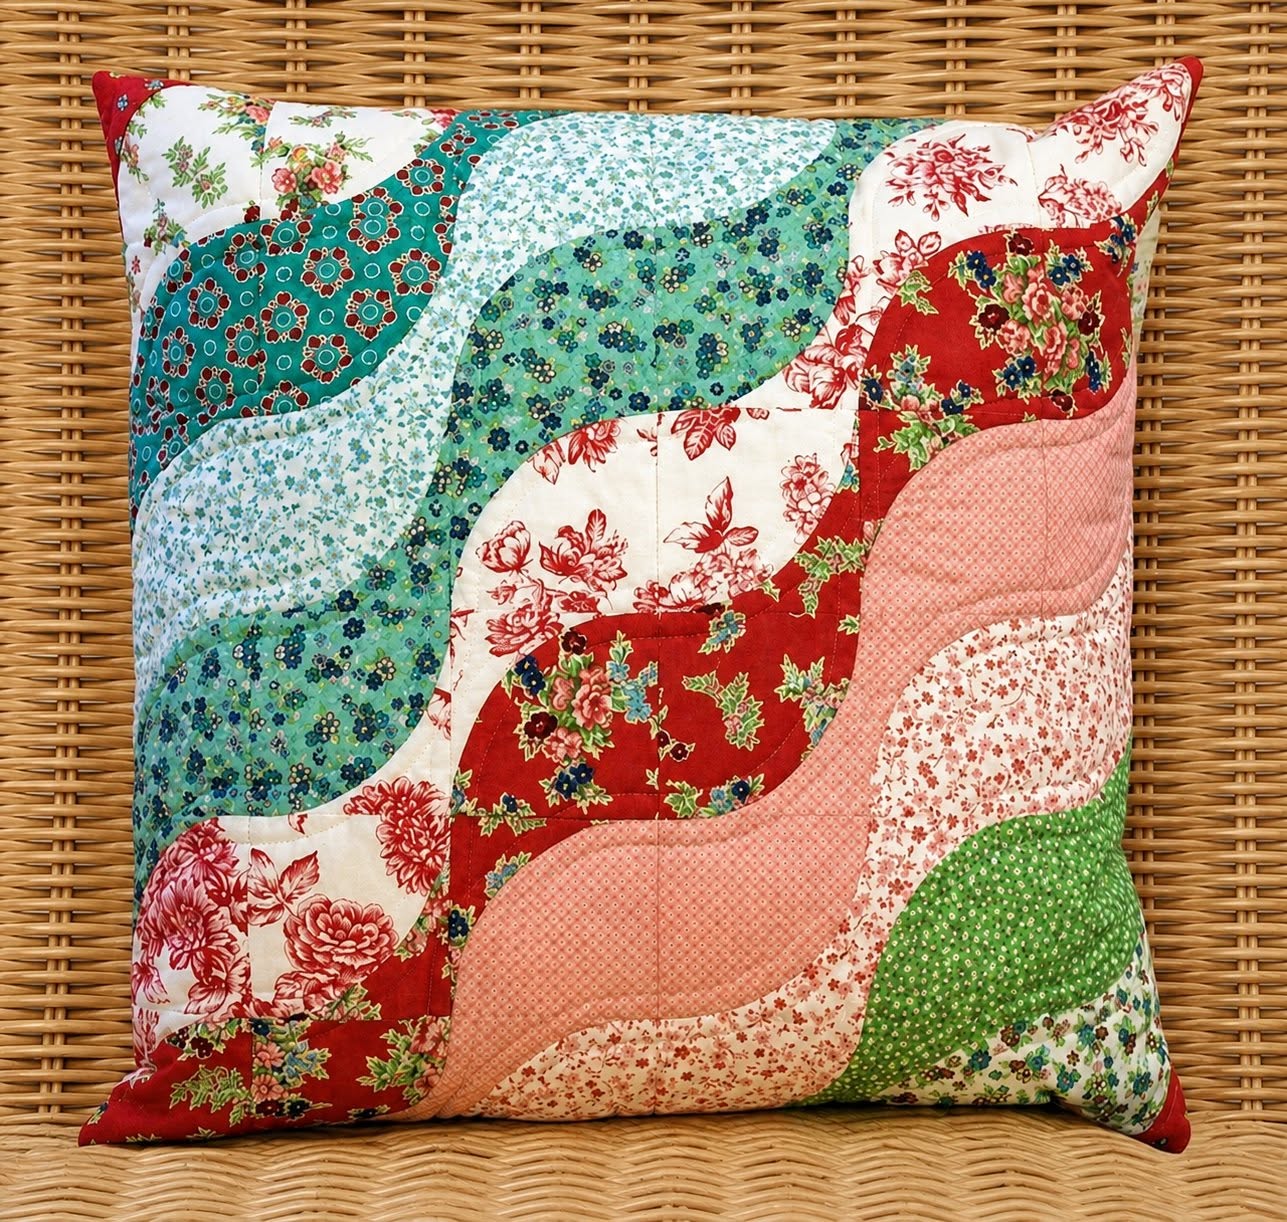
The Patchwork Wave Print Cushion Pattern is a beautiful sewing project that combines traditional patchwork techniques with soft, flowing curves to create a cushion full of movement and personality. Unlike geometric quilt blocks made only from squares and triangles, this design uses rounded wave-shaped sections that travel across the cushion surface and connect fabrics with different prints, colors, and visual weights. The result is especially attractive when floral cottons, small-scale prints, and contrasting solids are mixed together. The cushion shown in the inspiration image demonstrates how red, teal, green, pink, cream, and floral fabrics can coexist without making the composition feel chaotic. Careful fabric placement allows every curved section to remain visible while still creating an intentionally handmade appearance. For sewists who enjoy experimenting with color while developing curved-piecing skills, this project offers an enjoyable balance between creativity and technique.
A major advantage of the Patchwork Wave Print Cushion Pattern is its flexibility. You do not need to reproduce the exact fabrics shown in the reference project, because the beauty of patchwork comes from developing your own arrangement from materials you already enjoy. Cotton quilting fabric is generally the easiest material for this type of cushion because it holds its shape well, presses neatly, and is comfortable to sew through multiple layers. Small floral motifs can create delicate areas, while larger floral prints become visual focal points and tiny geometric patterns provide a quieter transition between them. Colors can also be organized into groups, such as warm reds and pinks on one side and cooler greens and blues on another. By planning those relationships before cutting, you can produce a cushion that looks spontaneous while actually following a thoughtfully balanced composition.
Making this Patchwork Wave Print Cushion Pattern is also a useful opportunity to learn how curved seams behave differently from straight patchwork seams. The flowing pieces must be cut accurately and joined slowly so the fabric does not stretch or develop unwanted puckers. Fortunately, the curves in a decorative wave cushion can be made fairly gentle, making the technique approachable for confident beginners as well as experienced quilters. The project can be adapted to several finished cushion sizes, although a square cover around 45 x 45 cm is a practical starting point for home décor. Accurate templates, a consistent seam allowance, careful pressing, and optional quilting are the main ingredients for a professional-looking result. Once the front panel is completed, it can be finished with an envelope back or zipper closure depending on your preferred sewing method.
Choosing Fabrics and Planning the Wave Layout
The first stage of the Patchwork Wave Print Cushion Pattern is selecting fabrics that create enough contrast to define every curved section. For a design similar to the photographed cushion, choose approximately six to ten coordinating quilting cottons. A combination of floral patterns, tiny repeated motifs, and medium-scale prints works particularly well because the different scales prevent neighboring pieces from blending together. You can include several fabrics from the same color family as long as their values, or levels of lightness and darkness, are noticeably different.
DISCOVER MORE FREE PATTERNS HERE!
Understanding fabric contrast will make the wave arrangement more effective. Contrast does not mean that every piece needs a dramatically different color; instead, neighboring sections should remain distinguishable when viewed from a short distance. For example, a pale cream floral print can sit beside a deep red print, while a soft pink fabric can transition into green or cream. Alternating stronger and quieter prints helps the eye travel naturally across the cushion.
Before cutting fabric, sketch a square representing the finished cushion and draw several large curved wave shapes crossing from one edge to another. The curves should be smooth rather than extremely tight, especially if this is your first curved-piecing project. One practical design uses elongated, leaf-like sections formed where two opposing curves meet. Each section can then become an individual fabric piece that is joined to the neighboring piece through curved seams.
For a cushion front measuring approximately 45 x 45 cm, create your patchwork panel slightly larger, around 48 x 48 cm. That extra fabric provides room for trimming after quilting. If you intend to make a different cushion size, simply enlarge or reduce the wave templates proportionally. The essential goal is to preserve broad, gentle curves so the sections remain comfortable to sew.
Create paper templates from your sketch before cutting the final fabrics. Transfer each wave section separately and label the pieces with letters or numbers so you remember their position. Add a consistent seam allowance of approximately 0.7 cm around every section unless your template already includes it. Directional floral designs should be checked carefully before cutting so important flowers or motifs do not accidentally appear upside down.
Lay all cut pieces on a flat surface before sewing anything together. This step, commonly called design planning, gives you a chance to move colors until the composition feels balanced. Distribute the strongest colors around the panel instead of concentrating all bold fabrics in one corner. Taking a quick photograph of the final layout can also help you remember the intended arrangement once the pieces begin moving to the sewing machine.
Cutting and Sewing the Curved Patchwork Pieces
Accurate cutting is extremely important when constructing a Patchwork Wave Print Cushion Pattern because small errors can become noticeable when curved pieces are joined. Press every fabric before tracing your templates so wrinkles do not distort the shapes. Place the template on the wrong side of the fabric, trace carefully with a removable fabric marker, and cut directly on the outer seam-allowance line. A rotary cutter works well on gentle curves, but sharp fabric scissors are equally suitable.
When joining two curved pieces, place them with right sides together. Depending on the shape, one curve may appear slightly longer than its partner even though their seam lines match. This is normal in curved piecing. Align the beginning and end of the seams first, then match the center points before distributing the remaining fabric evenly between those positions.
Pins or sewing clips can make curved piecing considerably easier. Place several pins perpendicular to the seam, particularly around the strongest part of the curve. Avoid stretching either fabric while positioning the pieces. Patchwork cotton can distort along curved edges, so gentle handling will help preserve the original template shape and produce smoother finished seams.
Sew the seam slowly using approximately a 0.7 cm seam allowance. A shorter stitch length can provide additional control around the curves. Instead of trying to force the entire seam underneath the presser foot at once, stop periodically with the needle down, lift the presser foot slightly, reposition the fabric, and continue sewing. This technique allows you to follow the curved edge gradually.
After sewing each seam, inspect the front before pressing. If the curve appears smooth and there are no obvious folds, press the seam carefully. Depending on the thickness of the fabrics and the construction sequence, you can press the seam allowance toward the darker fabric or gently open it. A pressing cloth and moderate heat can help prevent accidental stretching while shaping curved seams.
Continue assembling sections in manageable groups rather than trying to construct the whole cushion from one end immediately. For example, join two or three pieces into a small curved unit and create several units before connecting them together. This approach reduces fabric distortion and makes the project easier to control. Once all curved sections are joined, press the completed patchwork front and check that it lies reasonably flat.
Quilting and Finishing the Cushion Front
After the patchwork layer has been assembled, the next step in the Patchwork Wave Print Cushion Pattern is turning it into a lightly quilted cushion front. Cut a piece of thin batting slightly larger than the patchwork panel. You may also add a lightweight backing fabric behind the batting, creating the same three-layer structure used for traditional quilting. This backing will remain hidden inside the finished cushion.
Smooth the layers carefully and secure them using safety pins, temporary basting methods, or your preferred quilt basting technique. Begin from the center and work toward the outside edges so wrinkles are not trapped underneath the patchwork. Because a cushion front is relatively small, only a moderate amount of basting is normally necessary.
The photographed style works beautifully with subtle quilting rather than extremely dense stitching. One simple option is stitching in the ditch, where quilting lines follow the seams between the colored wave sections. Another method is quilting approximately 3 to 6 mm beside the curved seams. This second approach emphasizes the flowing shapes and makes the wave pattern more visible.
You may also add gentle free-motion quilting inside some of the larger fabric areas. However, avoid combining too many quilting motifs unless you deliberately want a heavily textured surface. The printed fabrics already provide significant visual information, so understated quilting often produces a balanced result. The purpose is to stabilize the cushion front while allowing the wave patchwork design to remain the main attraction.
After quilting, place the panel on a cutting mat and square it carefully. Trim it to the intended cushion measurement, such as 45 x 45 cm. Use a quilting ruler to check that the corners form approximately 90-degree angles. Accurate trimming at this stage makes assembling the front and back much easier and creates cleaner corners after the cushion is turned.
Examine the outer edge before attaching the back. Because curved seams may finish close to the perimeter, you can sew a narrow stabilizing line approximately 3 to 5 mm from the outer edge. This technique, often called stay stitching, helps prevent patchwork seams from opening while the cushion cover is assembled. Your finished front should now be flat, secure, quilted, and ready for the final construction.
Making the Back and Assembling the Patchwork Cushion
There are several ways to complete a Patchwork Wave Print Cushion Pattern, but an envelope closure is one of the simplest choices. For a 45 cm cushion, prepare two rectangular backing pieces wide enough to cover the full cushion width while overlapping generously in the center. The overlap allows the cushion insert to remain hidden without requiring a zipper.
Finish one long edge of each backing section by folding approximately 1 cm toward the wrong side and pressing it. Fold again by another 1 to 1.5 cm, press, and stitch close to the inner folded edge. These double-folded hems create neat openings that are comfortable to handle whenever you need to remove the cushion insert for cleaning.
Place the completed patchwork front right side up on your work surface. Position the first backing panel on top with its right side facing the patchwork. Add the second backing piece from the opposite side so the two finished hems overlap around the center. Pin or clip around all four outer edges, making sure every layer remains aligned.
Sew completely around the cushion using an approximately 1 cm seam allowance. Reinforce the corners and the areas where the envelope panels overlap because these points receive additional stress during use. After sewing, trim excess bulk from the corners without cutting through the stitches. You can also finish the raw internal edges with a zigzag stitch or serger if you want additional durability.
Turn the cushion cover right side out through the envelope opening. Push each corner outward carefully using a blunt turning tool, avoiding anything sharp that might damage the fabric. Press around the perimeter so the seams sit neatly. At this stage, the curved colors and printed fabrics should create the distinctive flowing appearance associated with the Patchwork Wave Print Cushion Pattern.
Insert a cushion form that matches the finished dimensions. If you prefer a fuller decorative cushion, a slightly plumper insert may emphasize the quilting and give the patchwork more dimension. Arrange the filling evenly, straighten the corners, and smooth the wave panel with your hands. Your handmade cushion is now ready to add color, texture, and traditional patchwork character to a chair, sofa, bedroom, or reading area.
Frequently Asked Questions About the Patchwork Wave Print Cushion Pattern
What is a Patchwork Wave Print Cushion Pattern?
A Patchwork Wave Print Cushion Pattern is a sewing design that creates a cushion front from multiple fabric sections joined along curved or flowing seams. Instead of relying exclusively on straight blocks, the pattern creates wave-like movement across the surface. Different prints and colors emphasize the curves and give every finished cushion a unique appearance.
Is this cushion pattern suitable for beginners?
A confident beginner can successfully complete this project, especially when using broad, gentle curves. Curved seams require slightly more patience than straight patchwork, but careful pinning and slow stitching make them manageable. Practicing on scrap fabric before cutting your favorite prints can help you understand how two curved pieces fit together.
What fabric works best for a patchwork cushion?
Medium-weight quilting cotton is an excellent option because it cuts accurately, presses easily, and remains stable during sewing. Similar-weight cotton fabrics can also be combined. Very stretchy fabrics are more difficult to control around curved seams, so they are generally less convenient for someone learning this technique.
How much fabric do I need?
The exact amount depends on the cushion size and the number of different prints. Because the individual wave pieces are relatively small, this design is ideal for using fabric scraps, fat quarters, and leftover quilting cotton. Having several coordinating prints allows you to experiment more freely with the final composition.
How do I prevent puckers when sewing curved seams?
Match the ends and center of each curved seam before distributing the remaining fabric evenly. Use several pins, avoid pulling the fabric, and sew slowly. Keeping the needle down when repositioning the fabric helps maintain accuracy. Careful pressing after each seam also improves the smoothness of the final curved patchwork.
Should curved seams be clipped?
Some curved seams may benefit from small clips in the seam allowance, particularly when the curve does not relax naturally after sewing. Clips should stop well before the stitching line. Gentle curves often require little or no clipping, so inspect the seam before making additional cuts.
Do I need batting inside the cushion front?
Batting is optional, but it gives the patchwork cushion more body and emphasizes the quilted texture. A thin batting is usually sufficient for decorative cushions. If you prefer a lighter cover without quilting, you can add a lightweight interfacing or simply use the patchwork panel on its own.
What quilting style works best with a wave pattern?
Following the curves is one of the most effective approaches because it reinforces the movement of the design. Stitch-in-the-ditch quilting, echo quilting beside the seams, and simple free-motion lines are all suitable. The best choice depends on whether you want subtle texture or more visible decorative stitching.
Can I resize the Patchwork Wave Print Cushion Pattern?
Yes. The design can be adapted to many square or rectangular cushion dimensions. Enlarging the entire template proportionally is generally easier than adding random sections after construction begins. Remember to include seam allowances and a small amount of extra fabric for final trimming.
Can I use solid fabrics instead of floral prints?
Absolutely. Although floral and vintage-style prints create a charming traditional appearance, solid fabrics can produce a more contemporary version. You can also combine solids with prints to increase contrast. The flowing shapes remain effective as long as adjacent pieces are sufficiently different from one another.
Can I make the cushion using leftover fabric scraps?
Yes, and this is one of the project’s greatest advantages. The Patchwork Wave Print Cushion Pattern can transform relatively small pieces of leftover cotton into a coordinated decorative object. Scrap-based construction can also produce more interesting color combinations because every section does not need to come from the same fabric collection.
How can I keep the cushion front square after curved piecing?
Start with a patchwork panel slightly larger than your required finished measurement. Once the curved piecing and quilting are complete, use a ruler and cutting mat to trim the panel accurately. This method is more reliable than trying to maintain an exact final measurement throughout every stage of construction.
Conclusion
The Patchwork Wave Print Cushion Pattern is an engaging way to combine curved piecing, fabric coordination, quilting, and practical cushion construction in one handmade project. Beginning with a carefully planned selection of contrasting quilting cottons makes it easier to create the flowing appearance seen in the inspiration piece. By transferring smooth wave templates accurately, adding consistent seam allowances, and arranging the fabrics before sewing, you can establish a strong foundation for the entire project.
The most important technique covered in this tutorial is curved patchwork piecing. Matching key points, pinning carefully, sewing slowly, and pressing without stretching the fabric can dramatically improve the finished result. Once these curved units are assembled, adding lightweight batting and simple quilting gives the cushion stability while emphasizing its distinctive wave shapes.
You also learned how to square the completed panel, stabilize its edges, prepare an envelope-style backing, and assemble everything into a functional cushion cover. These methods can be reused in many future patchwork sewing projects, from quilted pillows to wall panels and decorative textile pieces. Changing the color palette, print scale, quilting style, or cushion dimensions can make every version completely different.
EASILY FIND THE FREE PDF FOR THIS PATTERN HERE!
Most importantly, a Patchwork Wave Print Cushion Pattern leaves plenty of room for personal creativity. There is no requirement for every fabric to match perfectly; thoughtful contrast and repetition are usually enough to bring the design together. If you create your own version, leave your sincere opinion about this project and share your suggestions. Your ideas about colors, fabrics, quilting techniques, and possible variations can inspire even more creative interpretations of this beautiful patchwork cushion pattern.