
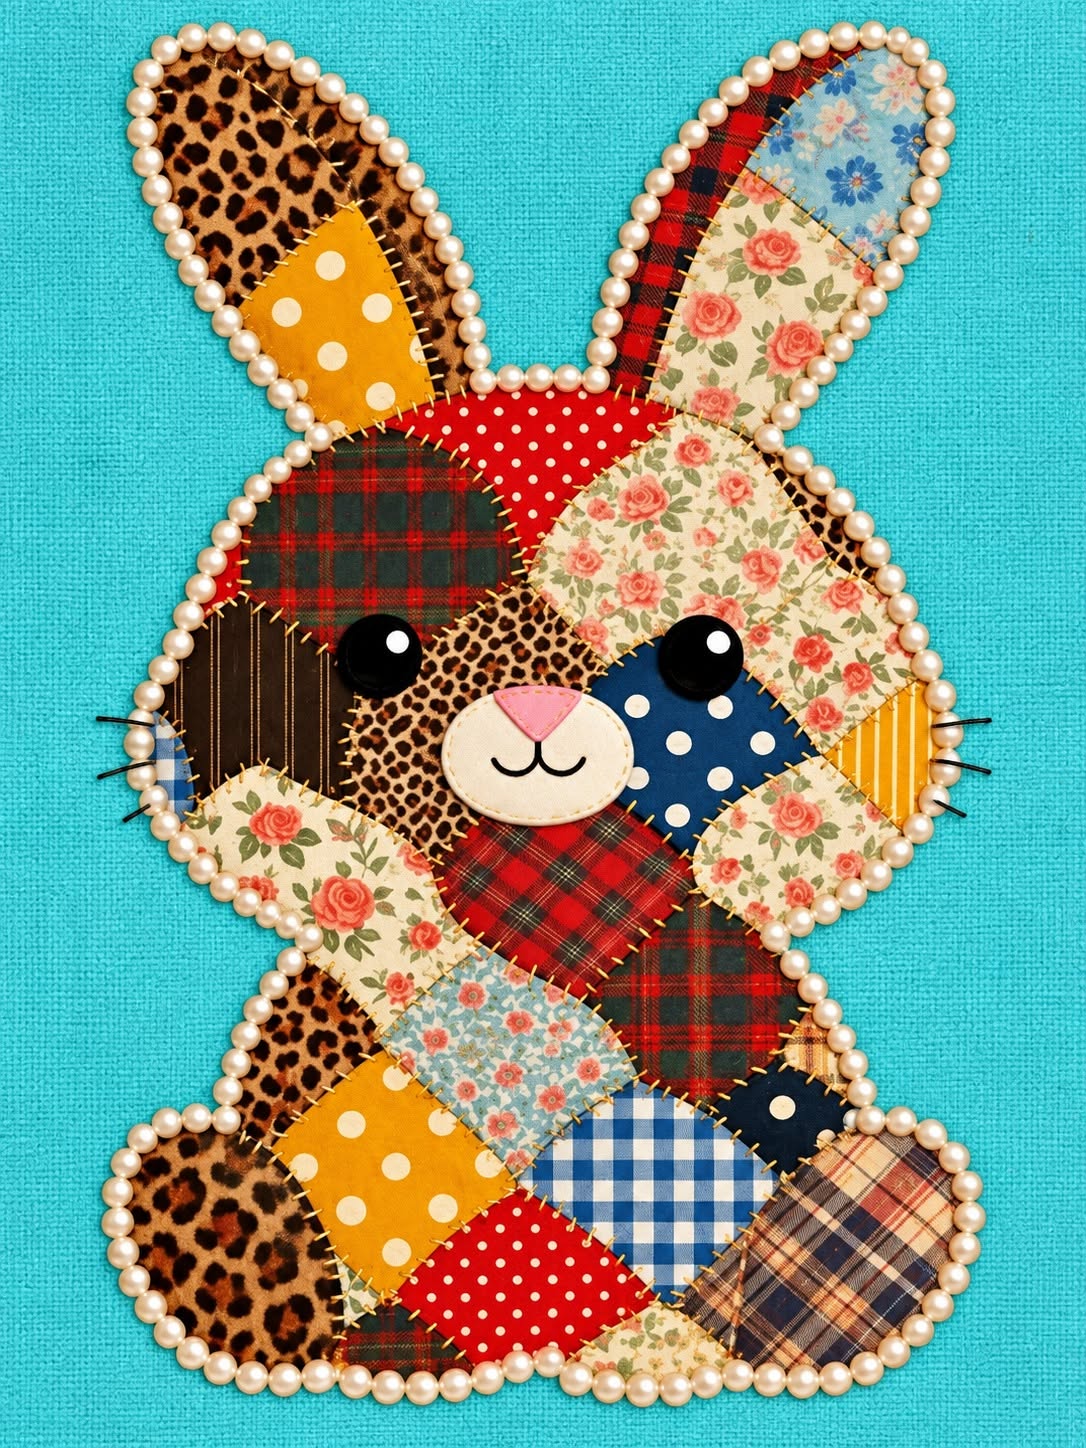
The Patchwork Bunny Fabric Applique Pattern is a charming sewing project that turns small pieces of fabric into a decorative bunny filled with color, texture, and personality. Inspired by the handmade design shown in the reference image, this project combines traditional patchwork, fabric appliqué, decorative stitching, and simple layering techniques. The bunny is especially attractive because no single fabric dominates the design. Floral cottons, checks, polka dots, plaid, animal prints, stripes, and tiny geometric patterns work together to create the warm appearance associated with handmade country-style sewing. It is also a practical project for using treasured fabric remnants that may be too small for larger quilts but are still too beautiful to discard.
One of the most interesting characteristics of this Patchwork Bunny Fabric Applique Pattern is the irregular arrangement of the fabric pieces. Instead of constructing the entire rabbit from identical quilt blocks, the design can be approached as a large bunny silhouette divided into smaller sections. Each section becomes an opportunity to introduce another print or color. The ears can combine several fabrics, the face can feature contrasting patches, and the body can gradually transition through floral, plaid, dotted, and checked materials. A carefully selected assortment creates a design that looks spontaneous while remaining visually balanced. Beginners can simplify the number of pieces, while experienced sewists can create additional divisions for an even richer patchwork effect.
Another appealing feature is the combination of sewing techniques within one manageable craft. You can practice tracing templates, cutting fabric accurately, arranging prints, applying fusible interfacing or fusible web, sewing appliqué edges, adding facial details, and finishing the outer silhouette. The decorative edging visible around the bunny can be recreated with small pearl-style beads for a display piece, or replaced with stitching, piping, tiny pom-pom trim, or another washable textile finish if the project will be handled frequently. The result can become a wall decoration, nursery accent, seasonal Easter project, framed textile artwork, or the centerpiece of a larger quilted panel.
Materials, Fabric Selection, and Preparing the Bunny Pattern
Begin your Patchwork Bunny Fabric Applique Pattern by choosing the finished dimensions. A convenient decorative size is approximately 30 cm wide by 42 cm high, although the template can be enlarged or reduced. Draw or print a bunny silhouette consisting of two long ears, a rounded head, a compact body, front paws, and two lower feet. Keep the outline smooth because complicated curves are more difficult to finish neatly.
DISCOVER MORE FREE PATTERNS HERE!
For the patchwork sections, gather approximately 15 to 25 small pieces of cotton quilting fabric. The reference style works particularly well with red plaid, blue checks, mustard polka dots, cream florals, darker stripes, brown animal-inspired prints, and muted vintage patterns. You do not need identical fabrics. In fact, variety is what gives this bunny its handcrafted personality. Try to repeat several colors throughout the design so the finished appliqué still feels coordinated.
You will also need a background fabric if you intend to mount the bunny on a panel, along with lightweight fusible web, matching or contrasting sewing thread, fabric scissors, paper scissors, pins or fabric clips, an iron, an ironing surface, a fabric marking pencil, and your preferred hand-sewing or machine-sewing equipment. Small scraps of black, cream, pink, and white fabric or felt are useful for constructing the eyes, muzzle, nose, and other facial features.
Before cutting your favorite fabric, make a complete paper template. Divide the bunny silhouette into individual patchwork regions using gently curved or diagonal lines. Number every section so you know where it belongs. Mark important orientation information such as “left ear,” “right cheek,” “center body,” and “left foot.” This simple preparation prevents confusion after dozens of small pieces have been cut.
Trace each numbered section onto separate paper to create individual templates. When the pieces will overlap using appliqué construction, add approximately 0.5 to 0.7 cm beyond the hidden edges. If you plan to join sections with traditional patchwork seams instead, use a consistent seam allowance, such as 0.7 cm. Do not combine the two construction methods accidentally, because they require different cutting dimensions.
Finally, pre-press all your fabric scraps before tracing the shapes. Wrinkled fabric can distort small templates and create inaccurate pieces. Place your templates strategically so attractive flowers, dots, checks, or motifs appear in visible areas. This technique, often called fussy cutting, is particularly effective on the ears, cheeks, paws, and feet, where individual prints are easy to notice.
Cutting and Assembling the Patchwork Bunny Fabric Appliqué
Arrange all your cut pieces on top of the full-size bunny template before sewing anything. Treat this stage like assembling a puzzle. Start with the larger sections around the head and body, then position the smaller patches around them. Keep highly similar prints separated whenever possible. For example, a dark plaid section usually looks more distinctive beside a cream floral than beside another dark geometric print.
Pay special attention to color balance. The reference-inspired bunny combines warm reds, mustard yellow, brown, cream, blue, green, and muted floral tones. If you place every dark fabric on one side, the rabbit may look visually uneven. Instead, distribute dark, medium, and light values throughout the ears, face, torso, paws, and feet. Take a photo of the arrangement before moving the pieces so you have a visual guide during assembly.
If you are using fusible appliqué, trace the reversed shapes onto the paper side of fusible web. Rough-cut them, fuse each shape to the wrong side of the appropriate fabric, and then cut precisely on the traced line. Follow the temperature instructions supplied with your fusible material. Excessive heat can scorch delicate cotton, while insufficient heat may cause the appliqué pieces to lift during sewing.
Build the bunny gradually rather than trying to fuse everything simultaneously. Start with sections that sit visually underneath neighboring pieces. Add the larger body patches, then work toward overlapping foreground pieces such as the paws and facial components. Press each stage carefully. A pressing cloth is helpful when repeatedly applying heat to previously fused sections.
Once the main fabric bunny appliqué has been arranged, secure the raw edges with stitching. A narrow machine zigzag or blanket stitch is beginner-friendly and helps protect the fabric from fraying. Straight stitching just inside the raw edge creates a more rustic appearance, especially if a little natural fraying is acceptable. Hand blanket stitch is another beautiful option when you want the project to have a traditional handmade finish.
Continue around every patch until the individual fabrics form one recognizable bunny silhouette. Check frequently for loose corners, particularly around curved areas and narrow sections of the ears. Small appliqué pieces receive more stress at sharp points, so slowing down and shortening the stitch length slightly around tight curves can produce cleaner results. Press the assembled bunny once more from the back whenever the materials permit.
Creating the Bunny Face, Paws, Ears, and Decorative Details
The face transforms a collection of patchwork fabric scraps into a recognizable bunny. Begin with the muzzle. Cut a small rounded or oval shape from cream or beige fabric and position it near the lower center of the face. Secure it using fusible web and edge stitching. Keep the muzzle relatively simple because excessive detail can compete with the many surrounding fabric prints.
Create a small pink nose and position it immediately above the muzzle. A soft triangular or gently rounded shape works nicely. Below the nose, embroider a short vertical line and two small curves to suggest the bunny’s mouth. These details can be worked with embroidery floss or machine stitching. Keep the expression simple and friendly so it remains clearly visible against the busy patchwork background.
For the eyes, use two black circles with smaller white highlights. Fabric, felt, or embroidery can all work well. If the bunny will decorate a child’s room, stitched or securely appliquéd details are generally more practical than loose embellishments. Position both eyes temporarily before sewing and view the bunny from a distance. Even a few millimeters of movement can noticeably change the expression.
The ears are another focal point of the Patchwork Bunny Fabric Applique Pattern. Divide each long ear into two or three fabric sections and select prints that contrast with the fabrics surrounding the head. Florals can create a soft vintage feeling, while leopard-inspired prints, checks, and plaid add playful visual energy. Reinforcing the back of the ears with lightweight interfacing can help them maintain their shape.
Arrange the front paws diagonally across the bunny’s body to recreate the cuddly pose suggested by the reference project. Each paw can contain several small fabric sections. Make sure the paw outlines remain recognizable even though they are constructed from different prints. A continuous line of decorative stitching around each completed paw helps visually separate it from the patchwork torso underneath.
Complete the decorative character with whiskers and an optional outer trim. Whiskers can be embroidered with dark thread using long straight stitches. For a display-only textile piece, pearl-style beads can create the dimensional border seen in the inspiration image. For a softer, more washable project, substitute decorative blanket stitching, narrow piping, fabric-covered cord, or another securely sewn textile trim.
Finishing, Pressing, Displaying, and Caring for the Completed Bunny
After finishing the appliqué, inspect the entire project carefully. Look for lifted fabric edges, skipped stitches, loose threads, and areas where several layers have created unnecessary bulk. Reinforce vulnerable corners with a few additional stitches. Trim thread tails neatly instead of cutting extremely close to unsecured stitches, as this can sometimes cause stitching to loosen later.
If you are making a wall panel, center the completed patchwork bunny on a background rectangle with enough space around the silhouette to frame the design. A neutral cream, white, beige, pale blue, or soft pastel background allows the colorful fabrics to remain the focus. You can then add batting and backing fabric if you want the finished project to have the dimensional appearance of a small quilt.
For a quilted version, baste the three layers together and add restrained quilting around the bunny. Echo quilting approximately 1 to 2 cm outside the silhouette is an attractive choice because it emphasizes the rabbit without covering the patterned fabrics with excessive stitching. You can also quilt the open background with simple lines, gentle curves, or a loose meandering design.
Binding provides a polished finish for a rectangular panel. Cut binding strips, join them, press them in half lengthwise, and attach them around the outer edge. Miter the corners carefully for a traditional quilted appearance. If you plan to frame the bunny instead, finish the background according to the dimensions of the frame and avoid excessively bulky embellishments near areas that will sit beneath glass.
Cleaning depends on the materials used. A completely fabric-based bunny with washable trims may tolerate gentle washing, but projects containing beads or dimensional decorations should usually be handled more carefully. Dusting, careful spot cleaning, or gentle hand cleaning may be preferable. Always consider the least washable component when deciding how to care for the completed fabric appliqué pattern.
Most importantly, allow small variations to remain visible. Handmade patchwork does not need to resemble a factory-produced object. Slight differences in stitching, fabric placement, and decorative details give each Patchwork Bunny Fabric Applique Pattern its own personality. Once you understand the basic construction, you can make additional bunnies using completely different fabric collections for spring, Easter, nursery décor, farmhouse decorating, or thoughtful handmade gifts.
FAQ About the Patchwork Bunny Fabric Applique Pattern
What is a Patchwork Bunny Fabric Applique Pattern?
A Patchwork Bunny Fabric Applique Pattern is a sewing design in which a bunny silhouette is created from multiple pieces of patterned fabric. The smaller fabric sections are arranged to form the rabbit and are then secured using appliqué or patchwork sewing techniques.
Is this project suitable for beginners?
Yes. Beginners can simplify the design by using fewer and larger fabric sections. The most important beginner skills are accurate tracing, careful cutting, pressing, basic appliqué stitching, and taking enough time when sewing around curved edges.
What fabric works best for this bunny appliqué?
Medium-light quilting cotton is one of the easiest materials to use because it presses well, cuts accurately, and is available in countless prints. Floral, plaid, gingham, striped, dotted, and small-scale novelty fabrics are especially effective for this style.
Can I make the bunny from fabric scraps?
Absolutely. This project is particularly suitable for a fabric scrap collection. Even small remnants can become cheeks, ear sections, feet, paws, or body patches. Using scraps also makes every finished bunny unique.
Do I need a sewing machine?
No. Although a sewing machine makes edge finishing faster, the project can be completed with hand sewing. Blanket stitch is an attractive traditional choice for hand appliqué and can become part of the decorative character of the bunny.
Should I use fusible web?
Fusible web is very useful because it holds small appliqué pieces in position while you sew around them. It is especially convenient for beginners and for designs containing numerous small patches. However, experienced sewists may prefer traditional needle-turn or raw-edge appliqué methods.
How can I stop the appliqué edges from fraying?
Secure raw edges using a narrow zigzag, satin stitch, blanket stitch, or another appropriate appliqué stitch. Fusible web also stabilizes the fabric. If you intentionally want a rustic raw-edge appearance, minor controlled fraying can become part of the design.
How large should the finished bunny be?
A bunny around 30 cm wide and 42 cm high works nicely for a decorative panel, but there is no required size. You can scale the pattern to create a smaller ornament or enlarge it for a substantial wall hanging.
Can I replace the pearl-style edging?
Yes. Pearl-style embellishment is optional. You can use blanket stitching, piping, tiny pom-pom trim, fabric-covered cord, decorative machine stitching, or simply leave the outer edge clean. The best choice depends on whether the bunny is intended for display or regular handling.
How do I choose colors that look good together?
Start with three or four repeating colors and then add complementary prints. For example, red, blue, mustard, cream, and brown can create a cozy vintage palette. Repeat those colors in several locations so the patchwork appears intentionally coordinated rather than random.
Can this pattern be used for an Easter decoration?
Yes. A patchwork rabbit naturally works well as Easter sewing décor, but the project does not have to be seasonal. Changing the fabric selection can make it suitable for a nursery, sewing room, farmhouse wall display, spring decoration, or handmade gift.
What other projects can use the same bunny design?
The silhouette can be adapted for quilt blocks, wall hangings, decorative cushions, fabric banners, framed appliqué artwork, tote bag panels, and other textile crafts. When adapting the design, choose finishing techniques appropriate to how frequently the finished item will be washed or handled.
Conclusion
The Patchwork Bunny Fabric Applique Pattern brings several enjoyable sewing techniques together in one colorful project. Throughout this tutorial, we covered how to create the bunny template, divide the silhouette into patchwork sections, select coordinated fabric scraps, prepare the pieces, assemble them with fusible appliqué, secure the raw edges, and construct important features such as the eyes, muzzle, nose, whiskers, ears, paws, and decorative outer finish.
The most important lesson is that successful patchwork appliqué comes from balancing creativity with careful preparation. Accurate templates provide the structure, while varied prints provide personality. Florals, plaids, checks, polka dots, stripes, and novelty fabrics can all live comfortably in the same project when light, medium, and dark values are distributed thoughtfully throughout the bunny.
This project is also a wonderful opportunity to turn leftover fabric into something meaningful instead of allowing beautiful scraps to remain forgotten in a sewing basket. Whether you create a vintage-inspired rabbit similar to the reference design or develop an entirely new color palette, the same basic Patchwork Bunny Fabric Applique Pattern techniques can be used again and again.
EASILY FIND THE FREE PDF FOR THIS PATTERN HERE!
Once your bunny is finished, take a moment to look at the individual fabrics and how they work together as one design. That combination of small pieces becoming a complete character is what makes patchwork so satisfying. I would love to know your sincere opinion about this project and the techniques explained here. Share your thoughts, creative ideas, and suggestions for other patchwork designs you would like to make next.