
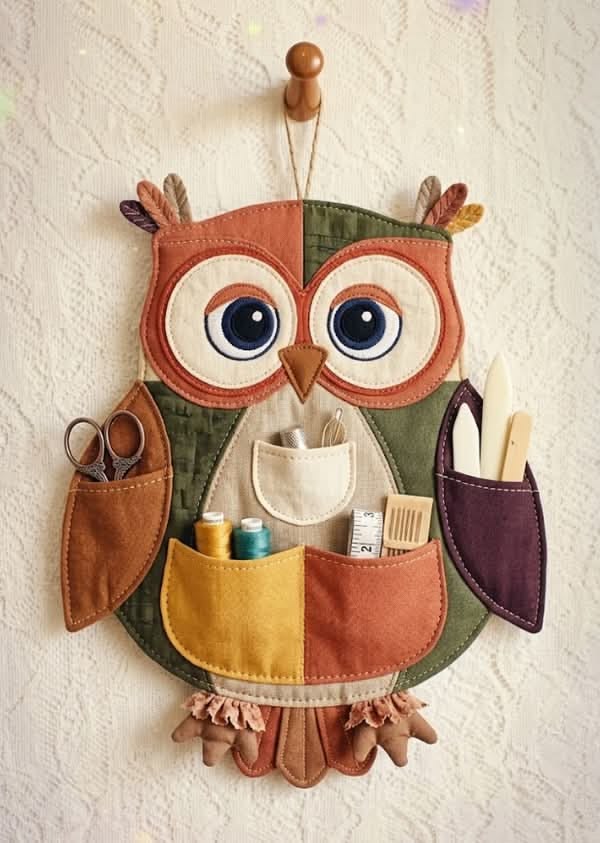
The Owl Shaped Wall Organizer Tutorial Pattern is a delightful sewing project that combines creativity, organization, and charming handmade decoration. Inspired by the adorable owl-shaped fabric organizer shown in the reference image, this project transforms ordinary pieces of fabric into a practical hanging accessory with colorful pockets, expressive eyes, decorative wings, and beautiful stitched details. Whether you enjoy patchwork sewing, fabric appliqué, or making useful accessories for your home, this tutorial offers an enjoyable opportunity to explore several techniques while creating something truly special. The finished owl can hold sewing scissors, thread spools, measuring tapes, crochet hooks, small crafting tools, and other lightweight essentials. Its playful appearance also makes it suitable for decorating a sewing room, craft corner, bedroom, or creative workspace.
One of the most appealing features of this DIY owl wall organizer is the combination of different fabric colors, textures, and shapes. The reference design features earthy shades of olive green, burnt orange, mustard yellow, cream, and deep plum, creating a warm, welcoming appearance. Large circular eyes give the owl its distinctive personality, while the carefully arranged storage pockets provide practical functionality. The decorative wings serve as additional pockets, and the small central pocket adds another convenient storage area. Although the finished piece looks intricate, it can be assembled through a series of manageable steps. With careful cutting, accurate measurements, and basic machine-sewing skills, even someone with limited experience can create a beautiful version of this handmade fabric organizer.
This comprehensive Owl Shaped Wall Organizer Tutorial Pattern explains how to plan, cut, assemble, decorate, and finish an owl-inspired hanging organizer using accessible sewing techniques. The instructions use centimeters for measurements and describe a finished organizer approximately 35 cm wide and 43 cm tall, excluding the hanging cord and decorative feathers. Because the photograph does not provide exact dimensions or an original printable template, the measurements below form an original, practical pattern inspired by its visible features. You will learn how to prepare the owl’s body, construct layered fabric eyes, create functional storage pockets, attach decorative wings, and finish the project with a secure hanging loop. Along the way, you will discover useful techniques for working with cotton fabric, fusible interfacing, machine appliqué, and decorative topstitching, making this project both educational and rewarding.
1. Materials, Fabric Selection, and Preparing the Owl Wall Organizer Pattern
Before beginning your Owl Shaped Wall Organizer Tutorial Pattern, gather the necessary materials and organize your sewing area. Choosing suitable fabrics is especially important because the organizer needs enough structure to support its decorative details and lightweight contents. Quilting cotton is an excellent choice for the outer layers because it is easy to cut, press, and sew. You can combine solid-colored fabrics with subtle prints to achieve a patchwork appearance similar to the reference image. Medium-weight cotton canvas is another useful option for the backing, particularly if you prefer a firmer organizer. Avoid overly stretchy fabrics because they can distort the owl’s shape and make pocket placement more difficult. Prewash washable cotton fabrics when appropriate, allow them to dry completely, and press them before cutting to reduce unexpected shrinkage.
DISCOVER MORE FREE PATTERNS HERE!
For this fabric owl organizer sewing project, prepare approximately 50 cm of olive-green cotton fabric, 35 cm of rust-orange fabric, 25 cm of mustard-yellow fabric, 25 cm of cream-colored cotton, and 20 cm of dark plum or brown fabric. You will also need small scraps of black, navy blue, white, and additional orange fabric for the owl’s eyes, beak, feathers, and decorative accents. Prepare approximately 50 cm of lightweight fusible interfacing, a piece of low-loft quilt batting measuring 45 × 55 cm, and a backing fabric of similar size. Additional supplies include matching sewing threads, fabric scissors, a rotary cutter if available, sewing pins or clips, a measuring tape, an iron, a fabric-marking pencil, and a sewing machine. For the hanging loop, use approximately 30 cm of sturdy cotton cord or narrow fabric tape. A 1 cm seam allowance is included in the main construction measurements unless otherwise specified.
The first step in drafting the owl wall organizer pattern is creating the body shape. On a large sheet of pattern paper, draw a vertical centerline measuring 43 cm. Mark the top edge approximately 30 cm wide, with gently raised corners that suggest the owl’s head and small ear tufts. Shape the sides so they curve outward to a maximum width of approximately 35 cm around the middle of the body. Continue the curves downward, narrowing slightly toward a softly rounded bottom. The resulting silhouette should resemble a plump owl with a broad upper head and rounded belly. Make sure both sides are symmetrical by drawing one half of the pattern, folding the paper along the centerline, and cutting both halves together. This body template will guide the cutting of the front fabric, batting, interfacing, and backing.
Next, prepare the templates for the owl appliqué details. For the large eyes, draw two outer circular shapes approximately 13 cm in diameter, two cream-colored inner circles approximately 10.5 cm in diameter, and smaller iris and pupil shapes. The irises can measure approximately 5 cm across, while the black pupils can measure about 3.5 cm. Add tiny white circles or oval highlights to create the owl’s bright expression. Draw a small triangular or rounded diamond-shaped beak approximately 5 cm tall and 4 cm wide. For the wings, create two elongated curved templates approximately 18 cm tall and 9 cm wide, adjusting their outer edges to fit the sides of the body. These measurements are starting points and can be modified to suit your preferred proportions.
The storage pockets are essential components of this DIY sewing organizer pattern, so their templates should be prepared carefully. For the two lower front pockets, create finished shapes approximately 11 cm wide and 13 cm tall, with rounded lower corners. Cut them slightly larger to accommodate their folded or sewn edges. The small central pocket can measure approximately 8 cm wide and 9 cm tall, with a curved bottom and straight opening. The side wings will also function as pockets, so their templates must allow enough space to hold narrow items such as scissors, rulers, or crochet hooks. If you prefer deeper storage areas, increase the width of the pocket pieces slightly before cutting. Remember that the visible finished pocket dimensions will be smaller than the original cut pieces after seam allowances are folded or stitched.
Finally, organize the fabric pieces according to their placement on the owl. Cut the body front from olive-green fabric, adding cream or rust-colored fabric sections if you want to recreate the patchwork appearance. Cut the eye backgrounds from rust-orange fabric, the inner eye circles from cream fabric, and the pupils from dark fabrics. Prepare the beak, feathers, wings, and pockets using the remaining colors. Apply fusible interfacing to the wrong side of lightweight pieces that need additional support, following the manufacturer’s pressing instructions. Label each piece with a removable fabric marker or small paper tag. This preparation will make the next stages easier and help you maintain consistent proportions throughout your owl-shaped fabric wall hanging.
2. Sewing the Owl Body and Creating the Decorative Fabric Appliqué
Begin constructing the Owl Shaped Wall Organizer Tutorial Pattern by assembling the main body front. If you are using a single olive-green fabric, place it flat on your work surface and press away any wrinkles. For a more decorative appearance, combine two or three fabric sections before cutting the final silhouette. For example, sew a cream-colored central panel between two olive-green sections, or create a vertical division using contrasting green fabrics. Press the seam allowances open or toward the darker fabric, depending on the thickness of your materials. Place the completed front panel over the paper body template and cut the owl shape accurately. This approach allows the patchwork design to become part of the body rather than relying entirely on surface decoration.
To give the quilted owl organizer additional strength and a softly padded appearance, prepare a quilt sandwich using the front fabric, batting, and a temporary backing layer. Position the batting beneath the front fabric and secure the layers with quilting pins or temporary basting stitches. Sew gentle vertical or curved quilting lines approximately 2.5 to 3 cm apart, avoiding the areas where thick appliqué pieces will later be attached. Use a medium stitch length and guide the fabric slowly to prevent puckering. Decorative quilting adds texture and helps stabilize the organizer, especially around the storage pockets. If you prefer a smoother appearance, use fusible fleece instead of traditional batting. Once the quilting is complete, trim the excess batting carefully without cutting into the fabric.
The owl’s large eyes are the most recognizable feature of this fabric owl appliqué tutorial. Start by placing the rust-orange outer eye shapes on the upper front section of the body, arranging them symmetrically around the centerline. Position the cream-colored circles inside the orange shapes, leaving an even border visible. Add the blue or navy irises, followed by the black pupils and small white highlights. Use a washable fabric marker to check the placement before stitching. When you are satisfied with the arrangement, secure each layer with fusible appliqué web or temporary fabric adhesive suitable for sewing. Stitch around the edges using a narrow zigzag stitch, blanket stitch, or straight stitch positioned close to the edge. Work from the lower layers toward the upper layers to keep the appliqué neat and prevent shifting.
After completing the eyes, create the owl beak appliqué using the small triangular or diamond-shaped fabric piece. Fold the edges inward or use a lined appliqué technique to achieve a clean finish. Position the beak between the eyes, slightly overlapping the lower inner edges of the orange eye backgrounds. Stitch around the beak using matching orange or brown thread. For extra dimension, you may add a small amount of lightweight batting behind the beak before attaching it, but keep the padding minimal to avoid excessive bulk. The beak should remain soft and flexible so that the finished organizer hangs naturally against the wall. At this stage, the owl’s face should already have a cheerful and expressive appearance.
The decorative feathers add another distinctive feature to this handmade owl wall hanging. Cut several narrow leaf-shaped pieces from small fabric scraps in brown, orange, mustard, and plum. Each feather can measure approximately 5 to 7 cm long and 2 to 3 cm wide. Pair two pieces with their right sides together, sew around the edges while leaving a small opening, and turn them right side out. Press gently and add a line of topstitching down the center to imitate the feather shaft. Prepare approximately three feathers for each upper corner and several smaller pieces for the bottom tail. The upper feathers can be positioned behind the top edge of the owl, while the lower feathers will be attached near the bottom during final assembly. Their different colors create a charming layered effect without requiring complicated sewing techniques.
Before moving on to the pockets, examine the owl’s facial details and overall balance. The eyes should sit at approximately the same height, the beak should align with the centerline, and the decorative stitching should remain smooth. If desired, add a second line of topstitching around the outer eye shapes to emphasize the layered fabric design. A warm brown thread works particularly well with orange and olive-green fabrics. You may also stitch subtle curved lines along the owl’s forehead or body to create additional texture. Avoid placing bulky decorative elements directly beneath the planned pocket openings. Careful attention to these finishing details will give your owl organizer sewing pattern a polished appearance while keeping the functional areas easy to use.
3. Making the Functional Storage Pockets and Decorative Owl Wings
The next stage of the Owl Shaped Wall Organizer Tutorial Pattern focuses on constructing the practical storage compartments. Begin with the two large lower pockets, which are designed to hold thread spools, small measuring tapes, fabric clips, and other lightweight sewing accessories. Cut two matching pocket fronts from mustard-yellow and burnt-orange fabric, using the templates prepared earlier. For each pocket, cut a corresponding lining piece from cotton fabric. Place the front and lining right sides together, stitch around the edges while leaving a turning opening, and carefully clip the curved seam allowances. Turn each pocket right side out, press the edges smooth, and close the opening with a narrow line of topstitching. This lined construction creates a durable pocket with a clean upper edge.
Position the two lower pockets across the owl’s belly, leaving a small amount of space between the outer pocket edges and the body outline. The reference design shows the pockets sitting side by side, with their upper openings aligned near the middle of the owl. Pin the pockets securely and sew along their sides and bottom curves, leaving the upper edges completely open. Use a reinforced straight stitch near the upper corners because these points receive the most stress when items are inserted or removed. For additional strength, sew a small triangular reinforcement at each upper corner. The fabric storage pockets should lie flat against the owl but still provide enough room for small objects. Test the openings with thread spools before continuing.
The small central pocket provides another useful compartment in this sewing room wall organizer. Cut the pocket front from cream-colored cotton and prepare a matching lining piece. Sew the pieces together using the same lined-pocket method, then turn, press, and topstitch. Position the pocket between the owl’s eyes and the larger lower pockets, making sure it does not overlap the beak. In the reference image, this smaller compartment resembles a rounded shield and adds visual interest to the center of the design. Stitch along the sides and curved bottom, leaving the straight upper edge open. This pocket is ideal for holding sewing needles in a protective case, fabric markers, small measuring tools, or other lightweight accessories.
The decorative wings are especially important because they give the owl-shaped wall organizer its distinctive silhouette while providing additional storage space. Prepare one wing from rust-orange fabric and the other from dark plum or brown fabric. Cut a lining for each wing and apply interfacing if the material feels too soft. Place the wing pieces right sides together and stitch around the edges, leaving an opening for turning. Clip the curved seam allowances carefully, turn the wings right side out, and press them into shape. Add decorative topstitching approximately 0.3 cm from the outer edges. For a more textured appearance, stitch a second curved line near the center of each wing to suggest natural feather details.
To transform the wings into functional pockets, position them along the left and right sides of the owl’s body. The wider rounded portions should sit near the lower sides, while the narrow upper sections should angle toward the owl’s face. Adjust the placement so that the wing pockets remain accessible without covering the large eyes or lower storage compartments. Stitch the wings along their outer sides and lower curves, leaving the upper openings free. Reinforce the upper corners with several backstitches. The finished wing pockets should be suitable for narrow tools such as small scissors, crochet hooks, wooden rulers, or fabric-marking pencils. Avoid placing heavy or sharp objects in the organizer unless the pockets have been reinforced appropriately and the tools are stored safely.
Once all the pockets are attached, perform a simple functionality test before assembling the back of the organizer. Insert a few lightweight sewing accessories into each compartment and check whether the fabric supports them comfortably. If a pocket pulls away from the body, reinforce its stitching or reduce the amount of material stored inside. If an opening feels too narrow, adjust the placement before the final backing is attached. This is also a good opportunity to add decorative stitching along the pocket edges using contrasting thread. The combination of mustard, orange, cream, and plum fabrics gives the patchwork owl wall organizer a colorful appearance while allowing each compartment to remain visually distinct and easy to identify.
4. Assembling, Finishing, and Hanging Your Handmade Owl Organizer
With the appliqué and pockets completed, you can begin the final assembly of the Owl Shaped Wall Organizer Tutorial Pattern. Place the decorated owl front on a flat surface with the right side facing upward. Arrange the prepared upper feathers behind the head corners, allowing their decorative tips to extend beyond the body outline. Position the lower tail feathers beneath the rounded bottom edge in a similar manner. Baste these pieces securely so they remain in place during construction. If you want to add the small decorative feet shown in the reference image, create two or three rounded fabric shapes for each foot using brown cotton scraps. Sew, turn, and lightly stuff them with polyester filling, then baste them along the bottom edge. Keep the stuffing minimal so the finished piece does not become unnecessarily heavy.
Next, prepare the hanging loop for your DIY owl wall hanging organizer. Fold the 30 cm cotton cord in half to form a loop and position its two ends at the top center of the owl. The loop should extend upward beyond the head, while approximately 3 cm of each cord end remains inside the seam allowance area. Baste the ends securely, making sure the loop itself stays away from the stitching line during assembly. For additional strength, place a small rectangle of sturdy cotton fabric behind the cord ends and stitch through the reinforcement. This step is important because the hanging loop will support the weight of the organizer and its contents. A strong cotton tape or woven strap can also be used if you prefer a flatter hanging attachment.
To complete the body, cut the final backing fabric using the original owl template. Place the backing and decorated front right sides together, carefully tucking the feathers, feet, and hanging loop between the layers. Make sure the pockets are empty and lying flat. Pin or clip around the entire perimeter, paying special attention to the curved sections and thicker areas. Sew around the owl using the 1 cm seam allowance, leaving a turning opening approximately 10 to 12 cm wide along a relatively straight section of the lower side. Stitch slowly around the curves and reinforce the top center where the hanging loop is attached. Trim bulky seam allowances and clip inward curves without cutting through the stitching.
Turn the fabric owl wall organizer right side out through the opening, working carefully around the decorative feathers and feet. Use a blunt turning tool to gently push out the upper corners and smooth the rounded body edges. Avoid pulling sharply on the hanging loop or appliqué pieces. Once the entire organizer is turned, press the outer edges using an iron set to the appropriate temperature for your fabric. Fold the seam allowances of the turning opening inward and close it with an invisible hand stitch or a neat machine stitch. Add a final line of topstitching around the body perimeter, approximately 0.3 to 0.5 cm from the edge. This finishing stitch helps maintain the owl’s shape and gives the project a professional appearance.
The final decorative touches can make your handmade sewing organizer even more attractive. Consider adding a few embroidered feather lines, small fabric accents, or subtle quilting stitches to enhance the owl’s personality. If you want a softer country-style appearance, use muted fabrics with visible stitching and natural cotton textures. For a more modern version, choose coordinated solid fabrics and simplify the decorative elements. You can also customize the pocket arrangement according to your needs. Someone who enjoys crochet might prefer taller wing pockets for hooks, while a quilter may want wider lower compartments for fabric clips and measuring tools. The basic owl shape remains the same, but the storage layout can be adapted to different creative activities.
When the organizer is finished, choose a secure location for hanging it. A sturdy wall hook, wooden peg, or properly installed hanger is suitable for supporting the lightweight fabric construction. Avoid placing the organizer where children or pets could pull on the hanging cord, and keep sharp sewing tools out of their reach. Fill the pockets gradually, checking that the owl hangs evenly and that the body does not bend excessively. For routine maintenance, remove all stored items and gently brush away dust. If the fabrics are washable, follow the care requirements of the batting, interfacing, and decorative materials. With proper care, your Owl Shaped Wall Organizer Tutorial Pattern can become a long-lasting decorative accessory that brings both organization and handmade charm to your creative space.
Frequently Asked Questions About the Owl Shaped Wall Organizer Tutorial Pattern
1. Is the Owl Shaped Wall Organizer Tutorial Pattern suitable for beginners?
Yes, this project is suitable for confident beginners who already understand basic sewing machine operation. The most important techniques include cutting fabric accurately, sewing curved seams, attaching appliqué pieces, and constructing lined pockets. Beginners may find the layered eyes and decorative feathers slightly challenging, but these elements can be completed slowly and individually. Practicing on scrap fabric before assembling the main organizer can improve accuracy and confidence.
2. What is the best fabric for making an owl wall organizer?
Medium-weight quilting cotton is one of the best choices for this project because it is easy to handle, available in many colors, and suitable for decorative stitching. Cotton canvas can also be used for additional durability. Lightweight fabrics should be reinforced with fusible interfacing, particularly around the pockets and hanging loop. Avoid very stretchy or slippery materials unless you have experience working with them.
3. How large should a handmade owl wall organizer be?
The organizer described in this tutorial measures approximately 35 cm wide and 43 cm tall, excluding decorative feathers and the hanging cord. This size provides enough space for several small storage compartments while remaining suitable for most craft rooms. You can enlarge or reduce the pattern, but remember to adjust the eye shapes, pockets, wings, and seam allowances proportionally.
4. Can I make this owl organizer without a sewing machine?
Yes, it is possible to sew the entire organizer by hand, although the process will take considerably longer. Use a strong backstitch for structural seams and a neat blanket stitch or small running stitch for decorative appliqué. Pocket corners and the hanging loop should receive additional reinforcement. Hand sewing can also create a charming rustic appearance that complements the owl design.
5. What can I store inside the owl-shaped organizer?
The organizer is ideal for lightweight sewing and crafting supplies, including thread spools, fabric clips, measuring tapes, crochet hooks, small rulers, and pencils. You can also use it for lightweight stationery or decorative accessories. Avoid heavy objects, liquids, and unprotected sharp tools because they may damage the pockets or place excessive stress on the hanging loop.
6. Do I need fusible interfacing for this sewing project?
Fusible interfacing is highly recommended, especially when using lightweight cotton fabrics. It helps the body maintain its shape and prevents pocket openings from becoming stretched or distorted. If you use a sturdy canvas backing and low-loft batting, you may need less interfacing. Always test a small fabric sample before applying heat to the main pieces.
7. How can I make the owl’s eyes look symmetrical?
The easiest method is to prepare paper templates for every eye component and mark a vertical centerline on the owl’s body. Position the outer eye shapes first, measuring their distance from the centerline and top edge. Then arrange the smaller circles inside them. Pin or temporarily fuse the pieces before sewing, and compare both sides carefully to maintain symmetry.
8. Can I customize the colors of the owl wall organizer?
Absolutely. The reference design uses warm autumn-inspired colors, but the project works beautifully with many combinations. Pastel pink, cream, and light gray create a soft nursery-inspired appearance, while navy blue, mustard, and white produce a more contemporary style. Christmas fabrics, floral prints, and traditional patchwork scraps can also be used to create seasonal or personalized versions.
9. How do I prevent the organizer from sagging when it is hanging?
Use a stable backing fabric, reinforce the main body with interfacing or batting, and attach the hanging loop securely. Distribute the stored items evenly between the pockets instead of placing everything on one side. If you plan to use the organizer frequently, consider adding a concealed lightweight support strip near the upper edge. The organizer should remain flexible but firm enough to hold its shape.
10. Can I wash a handmade fabric owl organizer?
Washing depends on the materials used. If all fabrics, batting, interfacing, and decorative components are washable, gentle hand washing may be appropriate. Remove all stored items before cleaning and avoid aggressive scrubbing around the appliqué details. Allow the organizer to air-dry completely and reshape it while slightly damp. When in doubt, spot cleaning is the safer option.
11. How long does it take to complete this owl organizer sewing project?
Most sewists can complete the project in approximately four to seven hours, depending on their experience and the number of decorative details included. Cutting and preparing the appliqué pieces usually require the most patience. Beginners may prefer to divide the project into two sessions, completing the body and facial details first and assembling the pockets and backing later.
12. Can I use leftover fabric scraps to make this owl organizer?
Yes, this project is an excellent way to use leftover quilting cotton and small fabric scraps. The eyes, beak, feathers, and decorative accents require relatively small pieces of fabric. You can even construct the body from several patchwork sections if your scraps are large enough. Just make sure the assembled fabric panel is pressed flat and reinforced before cutting the owl silhouette.
Conclusion: Create a Beautiful and Functional Owl Wall Organizer
The Owl Shaped Wall Organizer Tutorial Pattern brings together the best qualities of handmade sewing: creativity, practicality, and personal expression. Throughout this tutorial, you learned how to select appropriate fabrics, draft an owl-shaped body, prepare decorative appliqué templates, construct expressive eyes, sew functional storage pockets, create padded wings, and finish the organizer with a secure hanging loop. Each stage contributes to a finished project that is both useful and visually appealing.
By combining patchwork techniques, fabric appliqué, decorative topstitching, and thoughtful pocket placement, you can transform simple materials into a charming accessory for your sewing room or creative workspace. The design is also highly customizable, allowing you to experiment with colors, fabric textures, pocket sizes, and decorative details while maintaining the recognizable owl shape.
EASILY FIND THE FREE PDF FOR THIS PATTERN HERE!
Whether you are making this DIY owl fabric organizer for yourself, as a handmade gift, or as part of a larger collection of sewing projects, the finished piece offers a satisfying balance of beauty and everyday usefulness. What do you think about this Owl Shaped Wall Organizer Tutorial Pattern? Share your sincere opinion, tell us which fabric colors you would choose, and leave your suggestions for improving or personalizing the design. Your experiences and creative ideas can inspire other sewing enthusiasts to try this delightful handmade project!