
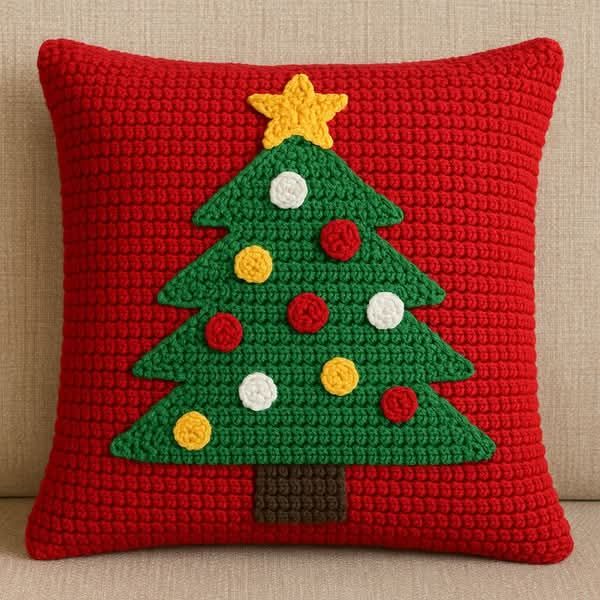
The Crochet Christmas Tree Shaped Cushion Pattern is a beautiful holiday decorating project that combines traditional crochet techniques with the warmth and charm of handmade Christmas decorations. Featuring a vibrant red cushion, a layered green Christmas tree, a bright yellow star, and colorful crocheted ornaments, this festive design brings a cheerful seasonal atmosphere into any living room, bedroom, or cozy reading corner. The project is especially appealing to crochet enthusiasts who enjoy creating practical home accessories with decorative details. Although the finished piece looks elaborate, its construction involves familiar stitches, simple shaping techniques, and carefully assembled appliqués. With patience and attention to detail, even crocheters who are relatively new to decorative projects can create an attractive Christmas cushion. This tutorial explains how to reproduce the design using US crochet terminology, including the cushion panels, Christmas tree appliqué, ornaments, star, and finishing techniques.
One of the most interesting characteristics of this Crochet Christmas tree shaped cushion is the combination of texture and dimensional decoration. The red cushion provides a textured background that highlights the green tree, while the individual crocheted ornaments create a playful three-dimensional appearance. The Christmas tree itself is formed from overlapping triangular sections that gradually increase in width toward the bottom, producing the familiar silhouette of a decorated evergreen tree. A small brown trunk supports the design visually, and a five-pointed yellow star completes the holiday composition. This arrangement offers an excellent opportunity to practice basic crochet stitches, increases, decreases, color changes, and appliqué assembly. The finished cushion can become part of a coordinated Christmas decorating collection or serve as a thoughtful handmade gift for family members and friends.
Creating a Crochet Christmas tree shaped cushion Pattern also allows plenty of flexibility when choosing materials, colors, and finished dimensions. The sample project described here produces a square cushion measuring approximately 40 × 40 cm, although the final size will depend on yarn thickness, crochet tension, and the amount of stuffing used. Worsted-weight yarn is a practical choice because it provides a sturdy fabric while remaining comfortable for decorative cushions. Cotton blends, acrylic yarn, and other washable yarns can work well when they have consistent thickness and suitable care instructions. The instructions below are an original, photo-inspired construction method rather than an exact transcription of an existing stitch chart. They provide a complete approach for recreating the visual features shown in the reference image while allowing adjustments for different crochet preferences and skill levels.
Materials, Crochet Stitches, and Preparation for the Christmas Cushion
Before beginning the Crochet Christmas Tree Shaped Cushion Pattern, gather all the necessary materials and organize the yarn colors. You will need approximately 450–600 yards of red worsted-weight yarn for the cushion panels, 100–150 yards of green yarn for the Christmas tree, and smaller quantities of yellow, white, brown, and red yarn for the decorative elements. These amounts are estimates, so keep additional yarn available if your gauge differs. Use a 4.5 mm crochet hook for the main cushion and appliqués, adjusting the hook size if your stitches are unusually tight or loose. You will also need a yarn needle, scissors, stitch markers, measuring tape, removable pins, and a 40 × 40 cm cushion insert. A separate fabric liner can help prevent stuffing from showing through the crochet stitches if you prefer loose fiberfill instead of a premade insert.
DISCOVER MORE FREE PATTERNS HERE!
Understanding the basic US crochet abbreviations is essential for following the instructions accurately. The principal stitches used throughout this project are chain (ch), slip stitch (sl st), single crochet (sc), half double crochet (hdc), double crochet (dc), and single crochet two together (sc2tog). The abbreviation st means stitch, sts means stitches, RS means right side, and WS means wrong side. An increase, written as inc, means working two stitches into the same stitch. The sc2tog decrease combines two adjacent stitches into one. A magic ring, abbreviated MR, is used to begin circular motifs without leaving a large opening in the center. Unless otherwise stated, the turning chain does not count as a stitch.
For crocheters who are unfamiliar with these techniques, the single crochet stitch (sc) is made by inserting the hook into the indicated stitch, pulling up a loop, and drawing the yarn through both loops on the hook. The half double crochet stitch (hdc) begins with a yarn over before inserting the hook, followed by pulling up a loop and drawing the yarn through all three loops. The double crochet stitch (dc) uses a yarn over, insertion into the stitch, and two separate pull-through movements. To make an sc2tog, insert the hook into the next stitch and pull up a loop, repeat in the following stitch, then yarn over and draw through all three loops. Practicing these movements on a small sample will make the larger project easier to complete.
The cushion in the reference image features a dense, raised surface that resembles rows of small rounded stitches. To achieve a similar appearance, this tutorial uses single crochet worked through the back loop only (BLO) for the main panels. When making a BLO stitch, insert the hook beneath the back strand of the stitch rather than beneath both top strands. This creates subtle horizontal ridges that add texture and structure to the cushion. For a more pronounced surface, experienced crocheters can substitute a textured stitch pattern after checking their gauge carefully. However, the BLO single crochet method is especially suitable for beginners because it produces an even, durable fabric that supports the decorative Christmas tree.
Before crocheting the full cushion, make a gauge swatch measuring at least 12 × 12 cm. Crochet a small rectangle using the red yarn and the stitch pattern intended for the cushion. Measure the center 10 cm without stretching the fabric, counting both stitches and rows. The sample calculations in this tutorial assume approximately 16 single crochet stitches and 18 rows per 10 cm. If your stitch count is higher, use a larger crochet hook; if it is lower, try a smaller hook. Gauge is particularly important when making cushions because the crocheted panels should fit the insert comfortably without excessive stretching or loose corners. The appliqués are more flexible, but their proportions should remain balanced with the cushion.
Prepare a simple project plan before starting the individual components. The cushion consists of two red square panels, one green Christmas tree made from layered triangular sections, one brown trunk, one yellow star, and several small circular ornaments. The tree is centered on the front panel, with its star positioned near the upper portion of the cushion and its trunk extending toward the lower edge. The colorful ornaments are distributed across the green branches to create visual balance. In the photographed design, red, yellow, and white ornaments stand out against the green yarn. Keeping the decorative pieces separate until the main cushion is finished makes it easier to adjust their positions before sewing everything permanently.
Step-by-Step Crochet Instructions for the Red Cushion Base
Begin the main construction of the Crochet Christmas Tree Shaped Cushion Pattern by making the front red panel. With the red yarn and a 4.5 mm hook, chain 65. Starting in the second chain from the hook, work one single crochet into each chain across, producing 64 stitches. Chain one and turn the work. For the second row, work one single crochet through the back loop of each stitch across. Continue repeating this row, maintaining exactly 64 stitches and checking the width periodically. At the sample gauge of 16 stitches per 10 cm, the panel should measure approximately 40 cm across. Avoid pulling the turning chains too tightly, since this can cause the sides of the cushion to curve inward.
Continue crocheting the red front panel until its height reaches approximately 40 cm. At the sample gauge, this may require around 72 rows, but measuring the actual fabric is more reliable than relying exclusively on row numbers. The crochet cushion base should form a neat square with relatively straight sides and consistent texture. If you notice uneven edges, count the stitches at the end of each row and make sure you are not accidentally working into the turning chain. Once the desired height is reached, fasten off the yarn, leaving a tail long enough to weave securely into the fabric. Lay the panel flat and gently smooth the corners into their natural shape.
Create the back panel using the same stitch pattern and measurements as the front. Chain 65, work 64 single crochet stitches into the foundation chain, and continue in back-loop single crochet until the second square matches the first. Using identical yarn, hook size, and tension helps ensure that the two panels align during assembly. The back can remain completely red, allowing the decorative Christmas tree on the front to become the focal point. If you prefer a removable cover, you can replace the solid back with two overlapping envelope-style panels, but this version uses a fully closed cushion for a straightforward beginner-friendly construction. The final opening will be closed after the cushion insert has been placed inside.
Check both panels carefully before proceeding to the decorative appliqués. Place the two squares on top of each other and compare their dimensions, especially around the corners and edges. Slight differences can usually be corrected by gently blocking the pieces according to the yarn manufacturer’s care recommendations. Blocking crochet fabric means shaping the finished pieces to the intended dimensions and allowing them to settle before assembly. For washable fibers, a light mist of water may be sufficient, while other yarns may require a different method. Never apply direct high heat without confirming that the yarn can tolerate it. Allow the panels to dry completely before attaching the Christmas tree decorations.
Although the reference cushion has a bold red background, the same construction method can accommodate other Christmas-inspired color combinations. Deep burgundy produces a traditional holiday appearance, while cream, ivory, or soft beige can create a more understated winter decoration. A dark green cushion with a lighter green tree is another possibility, although the appliqué should contrast sufficiently with the background. For the closest resemblance to the photograph, choose a saturated Christmas red and maintain a dense stitch pattern. The strong color contrast between the red base and green tree is one of the defining features of this handmade crochet Christmas cushion.
Once both red panels are completed, set the back panel aside and keep the front panel facing upward on a clean work surface. The next stage involves crocheting the individual pieces that form the Christmas tree decoration. Do not join the cushion panels yet, because the appliqués are easier to sew onto a flat surface. Attaching the decorations before inserting the cushion also prevents the sewing needle from catching the stuffing or passing through the back panel accidentally. If necessary, mark the vertical center of the front panel using a removable stitch marker or a contrasting thread. This centerline will help position the tree symmetrically and keep the star aligned with the trunk.
How to Crochet the Christmas Tree, Star, Trunk, and Ornaments
The central feature of the Crochet Christmas Tree Shaped Cushion Pattern is the layered green tree. To recreate its triangular silhouette, crochet four separate triangles using green worsted-weight yarn. For the smallest top triangle, begin with chain 2 and work 3 single crochet stitches into the second chain from the hook. Chain one and turn. On the next row, work two single crochet stitches into the first stitch, one single crochet into each middle stitch, and two single crochet stitches into the last stitch. This increases the stitch count by two. Repeat the same increase method on every row until the triangle contains 23 stitches across its base. The growing width creates a pointed triangular shape suitable for the upper branches.
Make three additional green triangles using the same construction method, but continue increasing until their final row contains 31, 39, and 47 stitches respectively. These graduated sizes create the stepped outline visible in the reference image. At the sample gauge, the largest triangle measures approximately 29 cm across, leaving a comfortable red border around the finished tree. For each triangle, maintain one single crochet increase at the beginning and end of every row, with ordinary single crochet stitches between them. Fasten off each piece after reaching the required width. Arrange the triangles vertically from smallest to largest, overlapping the lower portion of each upper triangle over the next one. This produces a fuller Christmas tree with distinct layers of branches.
To make the crochet Christmas tree appliqué look more unified, adjust the overlap until the entire tree measures approximately 27–30 cm tall, excluding the star and trunk. The smallest triangle should sit at the top, followed by the medium-sized sections and finally the widest bottom triangle. Use green yarn and a yarn needle to sew the overlapping areas together with small, discreet stitches. Keep the outer points of each triangle visible so the tree has the characteristic tiered silhouette. If you prefer a more continuous appearance, add a single crochet edging around selected outer sections, taking care not to flatten the branch points. Once the pieces are joined, place the completed tree on the red cushion front to check its proportions.
Next, crochet the brown tree trunk. Chain 13 with brown yarn, work one single crochet into the second chain from the hook, and continue across for 12 stitches. Chain one, turn, and work one single crochet into each stitch. Repeat until the rectangle measures approximately 6 cm tall, or until its proportions suit the tree. Fasten off, leaving a sewing tail. Position the trunk beneath the center of the lowest green triangle, allowing approximately 3–4 cm to remain visible. Sew the upper portion of the trunk behind the green tree so that the branches overlap it naturally. The dark brown color provides contrast against the red cushion and gives the decorative tree a recognizable base.
The yellow crochet Christmas star can be made as a five-pointed appliqué. With yellow yarn, create a magic ring and work 10 single crochet stitches into the ring. Join with a slip stitch to the first stitch. For each of the five points, work the following sequence: slip stitch into the next stitch, chain 5, slip stitch into the second chain from the hook, single crochet into the next chain, half double crochet into the next chain, double crochet into the last chain, and slip stitch into the next unused stitch of the original ring. Repeat this sequence five times, using two base stitches per point. Fasten off and shape the points gently with your fingers. Position the star at the top of the green tree, allowing the lower points to overlap the upper branches slightly.
Finally, crochet the colorful circular ornaments that decorate the tree. For each small ornament, create a magic ring and work 6 single crochet stitches into it. In the next round, work two single crochet stitches into each stitch, producing 12 stitches. For slightly larger ornaments, work a third round using the sequence of one single crochet followed by an increase, repeated six times for 18 stitches. Join neatly and fasten off, leaving a long tail for sewing. Make approximately nine ornaments using red, yellow, and white yarn, as shown in the reference design. Arrange them across the branches, spacing the colors evenly and avoiding overly symmetrical placement. These crochet Christmas ornaments add dimension, texture, and a cheerful handmade appearance to the completed cushion.
Assembling, Finishing, and Decorating the Crochet Christmas Cushion
Begin the final assembly of the Crochet Christmas Tree Shaped Cushion Pattern by arranging all the decorative pieces on the front red panel. Place the green tree in the center, leaving approximately 5–6 cm of visible red background along the sides. Position the yellow star near the upper portion of the cushion and the brown trunk near the bottom. Before sewing, step back and look at the overall composition to confirm that the tree appears balanced. Use removable pins or stitch markers to hold the pieces in position. Because the tree is made from overlapping triangles, check that the branch layers remain flat and that the pointed edges are clearly visible. Small adjustments at this stage can make a noticeable difference in the finished appearance.
Sew the green Christmas tree onto the front panel using a yarn needle threaded with matching green yarn. Work small, even stitches around the outer edges of the tree, catching the surface stitches of the red cushion without pulling them too tightly. The goal is to secure the appliqué while preserving the natural texture of the crochet fabric. Sew the trunk in place beneath the lower branches and attach the star at the top using yellow yarn. If you want the appliqué to have a slightly raised appearance, avoid stitching through every interior stitch. Instead, secure the outer edges and selected overlapping areas. This technique creates a gentle dimensional effect without requiring additional stuffing beneath the decorative tree.
Attach the crocheted Christmas ornaments individually after the tree is securely positioned. Use the yarn tails left during construction to sew each circular motif onto the green branches. The reference design uses a playful arrangement of red, yellow, and white circles, with larger ornaments placed near the middle and lower sections. Distribute the colors so that no single area looks overly crowded. For additional texture, stitch only around the center portion of each ornament, allowing the outer edges to remain slightly raised. However, if the cushion will be handled frequently, secure the entire circumference to prevent the ornaments from curling or catching on clothing. Always weave the yarn ends securely into the back of the appliqué.
Once the decorations are attached, place the two red cushion panels together with their wrong sides facing inward. Align all four corners and use stitch markers to hold the edges in place. Join the panels using red yarn and single crochet stitches worked evenly around the outer perimeter. Insert the hook through corresponding edge stitches of both panels and work one single crochet to connect them. Along the sides, distribute the joining stitches evenly so the fabric does not pucker. At each corner, work three single crochet stitches into the corner space to create a neat turn. Continue around three sides, leaving the fourth side partially open for inserting the cushion form. This method produces a visible crocheted seam that complements the textured surface.
Insert the 40 × 40 cm cushion form carefully through the remaining opening. Push the insert gently into each corner, making sure the filling is evenly distributed and the cushion maintains its square shape. If the insert feels excessively tight, remove it and check whether the crochet panels have stretched or whether the insert is larger than expected. A properly fitted cushion should look full without causing the stitches to separate significantly. Once the insert is positioned, continue joining the final opening with single crochet stitches. Finish with a slip stitch into the first joining stitch, fasten off, and weave the remaining yarn tail securely into the seam. The result should be a comfortable, decorative Christmas crochet pillow with a neatly enclosed insert.
The completed Crochet Christmas tree shaped cushion can be displayed on a sofa, accent chair, bed, or upholstered bench as part of a festive decorating arrangement. Pair it with neutral blankets, knitted throws, or other handmade Christmas accessories to highlight its bright colors and detailed texture. For cleaning, follow the yarn manufacturer’s instructions and consider the requirements of the cushion insert. Gentle handwashing or a delicate machine cycle may be appropriate for some washable yarns, but the appliqués should be protected from excessive friction. Allow the cushion to dry thoroughly while maintaining its shape. When the holiday season ends, store it in a clean, dry location away from direct sunlight to preserve the colors and prevent unnecessary wear.
Frequently Asked Questions About the Crochet Christmas Tree Shaped Cushion Pattern
Is this Crochet Christmas Tree Shaped Cushion Pattern suitable for beginners?
Yes. This project is suitable for confident beginners who already understand basic crochet stitches such as chain, single crochet, half double crochet, and slip stitch. The cushion panels are straightforward, while the Christmas tree triangles introduce simple increases. The star and circular ornaments require a little more attention, but they are small enough to practice individually. Beginners can complete the project successfully by working slowly, checking stitch counts, and assembling the decorations one piece at a time.
How long does it take to crochet a Christmas tree cushion?
The time required depends on experience, stitch tension, and the complexity of the decorative details. A crocheter who works regularly may complete the project in approximately 12–20 hours, while a beginner may need additional time. The red cushion panels generally require the most repetitive stitching, whereas the tree, star, and ornaments are smaller components. Dividing the project into several sessions can make the process more enjoyable and manageable.
What is the best yarn for a crochet Christmas cushion?
Worsted-weight acrylic yarn, cotton yarn, or a durable cotton-acrylic blend are practical options. Acrylic is often lightweight and easy to care for, while cotton provides good stitch definition and structure. A blended yarn may offer a balance between softness and durability. Choose yarns with similar thicknesses for the cushion and appliqués so the decorations maintain consistent proportions.
Can I make this crochet cushion in a different size?
Absolutely. To make a larger cushion, increase the number of foundation chains and continue crocheting until the panels reach the desired dimensions. For a smaller cushion, reduce the foundation chain and row count accordingly. The tree appliqué should also be resized to maintain a balanced appearance. A useful guideline is to keep the tree approximately 70–75% of the cushion’s width, leaving a visible border around the design.
How do I keep the Christmas tree appliqué from curling?
Curling can occur when stitch tension is too tight, the edges are uneven, or the appliqué is sewn onto the cushion with excessive tension. Use a hook size that produces a flexible fabric, maintain consistent increases, and gently block the pieces before assembly when appropriate for the yarn. When attaching the tree, avoid pulling the sewing yarn so tightly that the green sections become distorted.
Can I use different colors for the Christmas tree ornaments?
Yes. The ornaments can be customized using gold, silver, pink, blue, purple, or other festive colors. Metallic-look yarn can create an elegant holiday effect, although it may require additional care during crocheting. You can also create a monochromatic cushion by using different shades of the same color. The important consideration is maintaining enough contrast between the ornaments and the green branches.
Is it possible to make the cushion cover removable?
Yes. Instead of creating a completely closed back panel, crochet two overlapping back sections that form an envelope opening. This allows the cushion insert to be removed for cleaning or storage. Another option is to incorporate a zipper into one seam, although this requires additional sewing skills. A removable cover is especially practical when the cushion is used frequently.
How can I make the cushion more textured?
For additional texture, you can experiment with bobble stitches, puff stitches, or front-post crochet techniques on a separate gauge swatch. These stitches create raised surfaces that resemble the dimensional texture in the reference photograph. Keep in mind that textured stitches may change the number of stitches required to achieve the correct measurements. Always check your gauge before replacing the main stitch pattern.
Can I use leftover yarn for this Christmas cushion project?
Small leftover yarn quantities are ideal for the ornaments, star, and trunk. The larger cushion panels and green tree generally require more yarn, so using complete skeins or carefully matched leftovers can help maintain consistent color and texture. Make sure the yarn scraps have similar thicknesses and compatible washing instructions.
How do I prevent the cushion from losing its shape?
Use a suitable cushion insert, maintain even crochet tension, and avoid overstuffing. A dense stitch pattern provides additional structure and helps the cover retain its shape. When washing, reshape the cushion carefully and allow it to dry according to the yarn and insert care instructions. Proper storage also helps protect the decorative appliqués from becoming flattened or distorted.
Can this crochet pattern be used to create Christmas gifts?
Yes. A handmade Christmas cushion makes a thoughtful seasonal gift because it combines decorative appeal with practical use. You can personalize the colors to match the recipient’s home décor or create a coordinated pair of cushions. For households with small children or pets, securely sewn yarn ornaments are preferable to detachable beads, buttons, or other small embellishments.
Why does my finished cushion look different from the reference photograph?
Differences in yarn thickness, crochet tension, hook size, stitch choice, and appliqué placement can change the final appearance. The photographed cushion has a pronounced raised texture, while the back-loop single crochet method used here creates a subtler ridged surface. The tree is also recreated through an original layered-triangle construction. To achieve a closer visual match, focus on the overall proportions, rich red background, green branch silhouette, yellow star, and colorful circular ornaments.
Conclusion: Create a Beautiful Handmade Christmas Crochet Cushion
The Crochet Christmas Tree Shaped Cushion Pattern is a rewarding holiday project that combines simple crochet techniques with colorful seasonal decorations. Throughout this tutorial, we explored the materials and US crochet stitch abbreviations, created the textured red cushion panels, constructed the layered green Christmas tree, and crocheted the star, trunk, and decorative ornaments. We also covered essential finishing techniques, including attaching appliqués, joining the cushion panels, inserting the cushion form, and caring for the finished piece.
One of the greatest advantages of this crochet Christmas cushion pattern is its versatility. You can follow the traditional red, green, yellow, and white color combination or experiment with alternative palettes that complement your Christmas decorations. The same appliqué techniques can also be adapted for festive wall hangings, decorative panels, and other handmade seasonal accessories. By understanding how the individual components are constructed and assembled, you gain useful crochet skills that can be applied to future projects. Handmade Christmas decorations bring personality, warmth, and creativity into the home, and this cushion is a wonderful example of how simple stitches can become an eye-catching holiday accessory. Whether you make it for your own living room or as a special gift, the finished project reflects the time and care invested in every stitch.
EASILY FIND THE FREE PDF FOR THIS PATTERN HERE!
We would love to hear your sincere opinion about this Crochet Christmas Tree Shaped Cushion Pattern! Which part of the project did you enjoy most? Would you choose the traditional Christmas colors or create your own combination? Share your honest feedback, creative ideas, and suggestions for improving the tutorial. Your experiences and recommendations can inspire other crochet enthusiasts to explore new techniques and create beautiful handmade Christmas decorations.