
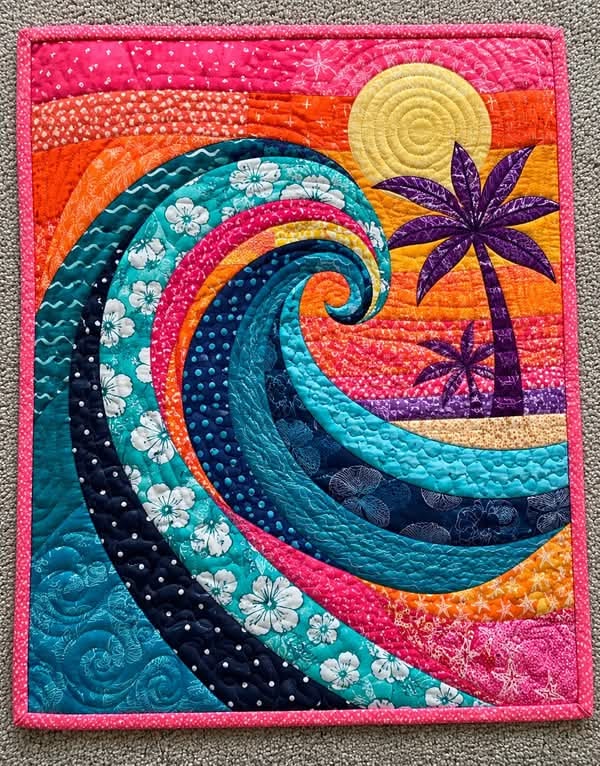
The “Ocean Wave” Patchwork Panel Pattern is a colorful fabric-art project that combines the movement of the sea with the warm atmosphere of a tropical sunset. Inspired by the panel shown in the reference image, this design uses curved strips of turquoise, navy, teal, coral, pink, and orange fabrics to create a dramatic curling wave. In the background, horizontal strips suggest a glowing evening sky, while a large golden sun and two stylized palm trees complete the coastal scene. The project is especially attractive because every fabric can contribute a different print, texture, or shade without making the composition feel disconnected. Instead, the variety becomes part of the artistic effect. For quilters who enjoy scrap quilting, curved appliqué, decorative stitching, and small wall-hanging projects, this pattern offers a creative way to practice several techniques in one manageable piece.
One of the most interesting features of the “Ocean Wave” Patchwork Panel Pattern is the illusion of movement. The wave is not created with a single piece of fabric. Instead, several curved fabric sections overlap and gradually spiral toward the center, producing the appearance of water curling before it breaks. Floral fabrics can represent sea foam, dark blue fabrics add depth, turquoise creates the recognizable ocean color, and narrow orange or pink sections provide contrast. Behind the wave, warm sunset patchwork fabrics create a beautiful balance between cool and warm colors. The result can look complex, but the construction becomes much easier when the design is divided into layers and assembled in a logical order. You do not need to reproduce every fabric from the reference image exactly; choosing fabrics with similar color relationships will preserve the overall visual character.
Another advantage of this patchwork wall panel pattern is its flexibility. A finished panel of approximately 45 cm x 55 cm works well as a starting size, although the design can easily be enlarged or reduced depending on where you plan to display it. Cotton quilting fabric is ideal because it is stable, easy to press, and available in countless prints. You will also need batting, backing fabric, coordinating thread, appliqué supplies, pins or fabric clips, and basic sewing tools. A sewing machine makes the quilting faster, but much of the decorative work can also be completed by hand. Before cutting anything, study the direction of the wave and notice how every curved section follows the same spiral movement. Understanding that structure is the key to successfully recreating the “Ocean Wave” Patchwork Panel Pattern.
Choosing Fabrics and Preparing the “Ocean Wave” Patchwork Panel Pattern
Begin by planning your color palette before cutting the main pieces. For the ocean, gather fabrics in turquoise, aqua, teal, navy blue, dark blue, and blue-green. Mixing solids, tiny prints, dots, florals, and subtle textured fabrics will create the layered appearance visible in the reference project. Try to include both light and dark values because contrast is what allows each curved section of the wave to remain visible after quilting.
DISCOVER MORE FREE PATTERNS HERE!
For the sunset, select several warm fabrics in orange, coral, bright pink, red-orange, and golden yellow. These fabrics will form horizontal sections behind the wave. They do not need to be perfectly straight strips. Slight curves or irregular edges can make the background feel more organic and artistic. A few small prints scattered throughout the sky can also add visual interest without distracting from the main wave.
The large sun should provide a strong focal point near the upper-right area of the panel. A golden yellow fabric with a subtle texture works especially well. Cut a circle approximately 12 to 14 cm in diameter for a panel around 45 x 55 cm. The sun can be attached with raw-edge appliqué, turned-edge appliqué, or fusible appliqué. Concentric quilting lines stitched later will make the sun appear dimensional.
For the palm trees, choose fabrics that clearly contrast with the sunset background. The reference image uses rich purple and violet fabrics, which is an excellent choice because purple stands out beautifully against orange and yellow. You can also use deep navy, dark plum, or even very dark teal. Prepare separate shapes for the trunks and leaves rather than trying to cut each tree from one piece. This allows you to adjust the position of individual leaves during assembly.
Before making the final pieces, create paper templates for the major components of the “Ocean Wave” Patchwork Panel Pattern. Draw a rectangle representing the finished panel and sketch a large spiral wave beginning near the lower-left side, sweeping upward, and curling inward near the center-right. Divide this spiral into several parallel curved bands. Number each section so you remember the correct layering order when transferring the shapes to fabric.
Prewash fabrics only if that is part of your usual quilting routine, but always press them carefully before cutting. Wrinkles can distort large curved pieces. Prepare a background rectangle slightly larger than the desired finished size, leaving at least 2 to 3 cm of extra fabric around every side. That additional fabric makes final trimming much easier after the quilting process has slightly compressed or shifted the layers.
Building the Sunset, Sun, and Tropical Background
Start the actual construction with the background because every other component will be placed on top of it. Cut horizontal or gently curved strips from your pink, orange, coral, and red fabrics. Arrange them from top to bottom until you achieve a sunset gradient that you like. In the reference-inspired arrangement, brighter pink appears near the top, followed by orange, coral, and deeper warm shades.
Sew the background strips together using a consistent seam allowance, such as 0.6 cm, which is close to the standard quarter-inch quilting seam. Press the seams carefully to reduce bulk. Depending on the direction of the seam, you can press them to one side or open them. Once all the strips are joined, square the background while still keeping it slightly larger than the final dimensions.
Place the golden sun in the upper-right portion of the panel. Avoid positioning it too close to the outer edge because part of the design will eventually be visually framed by the binding. Secure the circle using your preferred appliqué technique. If using fusible web, follow the manufacturer’s instructions and use a pressing cloth when necessary to protect the fabric.
Now prepare the larger palm tree. Position the trunk beneath the sun but slightly offset so the two elements do not completely overlap. A gently curved trunk often looks more natural than a perfectly straight one. Attach the trunk first and then arrange approximately five to seven pointed palm leaves at the top. Varying the angle and length of the leaves creates the energetic tropical silhouette seen in the inspiration image.
The smaller palm tree can be positioned closer to the horizon line and partly surrounded by the wave. Scaling it down creates perspective, making the larger tree appear closer to the viewer. This simple difference in size adds surprising depth to the tropical quilt wall hanging. Use the same fabric family for both trees so they remain visually connected.
Once the sun and palm trees are positioned, step away from the project and look at the entire composition before permanently stitching everything. The large wave will occupy most of the left and lower portions of the panel, so the tropical elements should remain concentrated toward the upper and middle-right areas. Good spacing prevents the finished “Ocean Wave” Patchwork Panel Pattern from feeling crowded.
Creating the Layered Ocean Wave Step by Step
The wave is the centerpiece of the project, so work slowly and build it from the largest outer curve toward the smaller inner spiral. Start with a broad turquoise or teal section that rises from the bottom-left corner and curves toward the center. Use your paper template to transfer the shape. If you are using raw-edge appliqué, fusible web can help stabilize these large curved pieces before sewing.
Add a dark navy or nearly black-blue curve beside the first section. The darker value immediately creates depth. Continue alternating light turquoise, medium teal, dark blue, floral aqua, and contrasting coral or pink fabrics. The sections should follow one another like nested crescents. Allowing each color to remain visible is important, so avoid covering too much of the previous layer.
A floral turquoise fabric is particularly effective for one of the outer wave sections because pale flowers resemble foam. If you do not have floral fabric, use dots, small geometric prints, or white-on-aqua designs. The objective is not to reproduce the reference fabric exactly but to create enough variation for viewers to distinguish one flowing layer from another.
As the curves approach the center, gradually narrow each fabric strip. This creates the spiral effect. The innermost section can use a bright contrasting fabric such as orange, coral, or golden yellow. That unexpected warm color inside the cool wave attracts the eye directly toward the curl and connects the ocean visually to the sunset behind it.
Secure every curved piece before final stitching. Pins can work, but fusible web or temporary fabric adhesive may make the process easier because long curves can shift. Stitch close to the raw edges using a small straight stitch, zigzag stitch, blanket stitch, or decorative appliqué stitch. Coordinating thread gives a subtle finish, while contrasting thread emphasizes the individual shapes.
Continue checking the spiral as you work. The most important characteristic of the “Ocean Wave” Patchwork Panel Pattern is continuous movement. Every fabric section should guide the viewer’s eye toward the curling center of the wave. If one section appears too wide or interrupts the flow, trim or reposition it before completing the stitching. Small adjustments at this stage can greatly improve the finished composition.
Quilting, Finishing, and Displaying the Patchwork Panel
After all appliqué pieces are attached, prepare the quilt sandwich. Place the backing fabric wrong side up, add a layer of quilting batting, and position the completed patchwork top right side up. Smooth all three layers carefully to remove wrinkles. The backing and batting should extend several centimeters beyond the quilt top on every side.
Baste the layers together with safety pins, temporary spray, or hand-basting stitches. Begin quilting near the center and gradually work outward. On the wave sections, follow the natural curves with flowing lines. Echo quilting works particularly well because repeated curved stitching strengthens the impression of moving water while securing the appliqué shapes.
The sun can be quilted using concentric circles, beginning near the center and gradually working outward. This technique creates the spiral-like texture visible in the inspiration. The sunset sections can receive gentle horizontal quilting, while the palm trees can be outlined with stitching. Changing quilting directions between elements helps each part of the scene feel distinct.
Do not worry about making every quilting line mathematically perfect. The beauty of an art quilt panel often comes from slight variations in stitching. Organic lines feel appropriate for ocean waves, clouds, sand, and tropical scenery. If free-motion quilting is unfamiliar, practice on a small fabric sandwich first. You can also use a walking foot and slowly follow the curved shapes.
After quilting, trim the panel to the final rectangular dimensions. Check all four corners with a quilting ruler if available. Prepare binding strips approximately 6 to 7 cm wide, join them end to end, fold the strip in half lengthwise, and press. A bright pink or coral binding similar to the one in the reference image creates a strong frame around the composition.
Attach the binding around all four sides, carefully forming neat corners. Finish the binding by machine or hand according to your preferred method. Add a hanging sleeve to the back if the project will be displayed as quilted wall art. After a final light pressing, the “Ocean Wave” Patchwork Panel Pattern is ready to bring a colorful coastal atmosphere to a sewing room, living space, craft area, or handmade décor collection.
FAQ About the “Ocean Wave” Patchwork Panel Pattern
What is the “Ocean Wave” Patchwork Panel Pattern?
The “Ocean Wave” Patchwork Panel Pattern is a decorative quilted fabric panel featuring a large spiral ocean wave combined with sunset colors, a golden sun, and tropical palm trees. The design combines traditional patchwork ideas with appliqué and art-quilting techniques, creating a project that works especially well as a wall hanging.
Is this ocean wave quilt suitable for beginners?
An adventurous beginner can complete it, especially if the wave pieces are attached using fusible appliqué. The main challenge is working with the large curved shapes. Beginners can simplify the pattern by using fewer wave sections and basic machine quilting, while experienced quilters may add intricate free-motion stitching.
What type of fabric works best for the project?
High-quality quilting cotton is the easiest choice because it is stable, presses well, and is simple to appliqué. Batiks can also work beautifully because their rich color variations resemble water and sunsets. Small prints are especially useful for maintaining visual texture without overwhelming the shapes.
How large should the finished patchwork panel be?
There is no required size. Approximately 45 x 55 cm provides enough space to show the layered wave clearly while keeping the project manageable. You can enlarge the templates proportionally if you want a dramatic wall hanging or reduce them for a smaller decorative panel.
How many colors are needed for the ocean wave?
Using at least five or six different fabrics creates good depth. Combine turquoise, teal, aqua, navy, dark blue, and a contrasting warm color. Several prints within the same color family can make the wave look more detailed without requiring completely different colors.
Can I make the wave with fabric scraps?
Yes. This is an excellent scrap fabric project because many sections do not require large pieces of fabric. Coordinating scraps from previous quilting projects can add even more personality to the finished panel. Organize the scraps by color value before cutting so the wave still has visible light and dark layers.
Do I need a special sewing machine for the quilting?
No. A standard domestic sewing machine is enough. A walking foot is helpful for quilting through the layered sandwich, while a free-motion quilting foot provides more freedom for curved designs. However, simple straight or gently curved quilting lines can also create a beautiful result.
How can I prevent the appliqué pieces from shifting?
Fusible web is one of the easiest options. It temporarily bonds the fabric shapes to the background so they remain stable while you stitch around their edges. Pins, glue designed for fabric, or hand basting can also be used depending on your preferred appliqué method.
What batting should I use for a wall panel?
A thin or medium-weight batting usually works best. Excessively thick batting can make a small wall hanging difficult to keep flat. Cotton, cotton-blend, or lightweight polyester batting are all practical choices for decorative patchwork wall art.
Can the colors in the original inspiration be changed?
Absolutely. The same “Ocean Wave” Patchwork Panel Pattern could be created with blue and green water against a purple sunset, neutral sand tones with navy waves, or even a dramatic monochromatic palette. Maintaining enough contrast between neighboring sections is more important than copying specific colors.
Conclusion
The “Ocean Wave” Patchwork Panel Pattern brings together several enjoyable quilting techniques in one expressive project. By first constructing a warm patchwork sunset, adding the golden sun and contrasting palm-tree appliqués, and then carefully layering curved ocean fabrics, you can create the dramatic spiral movement that defines the design. The final quilting adds texture and reinforces the direction of the wave, while a colorful fabric binding gives the panel a clean and professional-looking finish.
The most important lesson is to approach the design one layer at a time. What initially appears to be a complicated ocean scene is actually a combination of manageable fabric shapes arranged in the correct order. Thoughtful fabric selection, strong color contrast, careful appliqué placement, smooth curved stitching, and consistent finishing techniques will help transform simple pieces of cotton into distinctive quilted coastal wall art.
EASILY FIND THE FREE PDF FOR THIS PATTERN HERE!
You can also personalize the project by changing the sunset colors, adding different printed fabrics, altering the palm trees, enlarging the sun, or experimenting with your own quilting patterns. Each variation will give the “Ocean Wave” Patchwork Panel Pattern a different personality while preserving its beautiful sense of movement and tropical warmth. If you make your own version, leave your sincere opinion about the project and share your suggestions. Which colors would you choose for your ocean and sunset? Your ideas and creative variations can inspire new ways to interpret this colorful patchwork design.