
Gift Box patchwork block for cushions Pattern is a cheerful quilting project that transforms small pieces of colorful fabric into a decorative block that looks like a beautifully wrapped present. Inspired by the image, this design combines bright red and green Christmas prints, narrow contrasting strips that imitate ribbon, a geometric bow at the top, and a generous white background that makes the gift shape stand out clearly. Although the finished block has several sections, the construction is approachable because most of the project is based on rectangles, squares, strips, and simple triangular units. That makes this patchwork cushion pattern suitable for confident beginners while still being enjoyable for experienced quilters who want a quick seasonal project. The block can become the front of a cushion, but it can also be adapted for table runners, wall hangings, quilted placemats, tote bags, or an entire Christmas quilt. Choosing fabrics with different scales and prints is one of the best ways to recreate the lively appearance shown in the reference project.
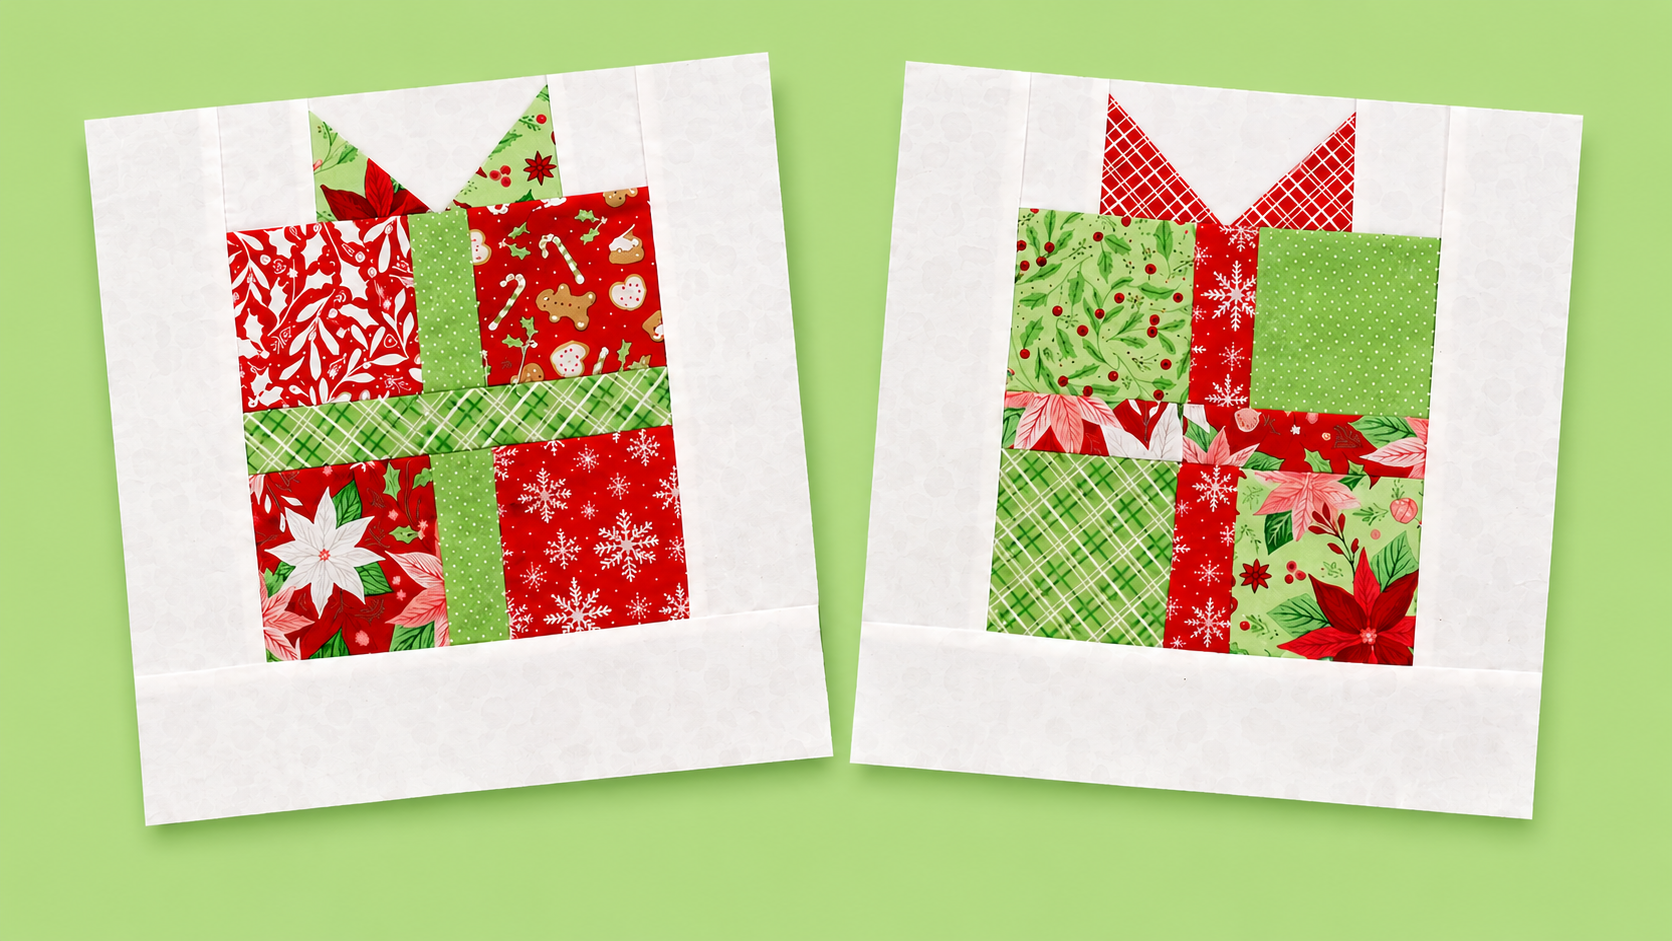
The name Gift Box patchwork block for cushions Pattern describes the three main ideas behind the project. A gift box block is a pieced quilt design arranged to visually resemble a wrapped present; patchwork is the technique of joining separate pieces of fabric with seams to create a larger decorative surface; and a cushion pattern provides a practical way to turn the completed quilt block into home décor. The photograph shows two variations of the same general concept, demonstrating that the arrangement does not need to be identical every time. One block uses larger red printed areas with green ribbon details, while the other balances green sections with a vertical red ribbon. This variation is useful because it allows you to work from your own fabric collection instead of searching for perfectly matching prints. Scraps from previous Christmas projects can work especially well, giving the finished cushion a handmade appearance filled with different textures, motifs, and colors.
Another attractive feature of the Gift Box patchwork block for cushions Pattern is how easily it can be personalized. Traditional Christmas colors create the festive result shown in the image, but the same construction could be made in blues and silver for a winter theme, pastel fabrics for a birthday gift design, or warm earth tones for everyday decorating. For the tutorial below, the construction follows the visual logic of the photographed blocks rather than claiming to reproduce a commercial pattern. A ¼-inch seam allowance is recommended because it is standard for patchwork quilting and makes it easier to keep the sections aligned. Accurate cutting, consistent seams, and pressing after every important step are more important than advanced sewing skills. By building the gift body first, adding the ribbon, creating the upper bow section, and finally surrounding everything with light background fabric, you can gradually reproduce the clean framed appearance that makes this Christmas patchwork block so appealing.
Materials and Fabric Planning for the Gift Box Patchwork Block
Start by collecting several coordinating quilting cotton fabrics. For a look close to the photograph, choose approximately four to six red and green prints, including florals, snowflakes, plaid, dots, leaves, or small Christmas motifs. You will also need a light neutral fabric for the background. White or cream quilting cotton works especially well because it creates strong contrast around the colorful gift box patchwork block.
DISCOVER MORE FREE PATTERNS HERE!
The colorful fabrics represent the wrapping paper and ribbons of the present. Instead of using one fabric for the entire gift, divide the box into several sections. This is an important characteristic of the Gift Box patchwork block for cushions Pattern, because the changing prints create the lively scrap-quilt effect visible in the reference image. Try placing large motifs beside smaller prints so that neighboring sections remain easy to distinguish.
For one approximately 16-inch cushion front, prepare enough fabric to create a central gift motif around 10 to 12 inches wide before adding the final background strips. These measurements are flexible, so you can enlarge or reduce them depending on your desired cushion size. Always include a ¼-inch seam allowance when cutting pieces unless you are calculating from already-finished dimensions.
A useful starting arrangement is to divide the gift body into four large rectangular areas. For example, you might cut four rectangles measuring approximately 4½ x 5½ inches. Add narrow ribbon strips measuring around 1½ to 2 inches wide between the larger rectangles. These dimensions do not need to match the photograph exactly; their purpose is to reproduce the balanced proportions of the patchwork gift box.
The bow at the top is created from contrasting triangular shapes. Two rectangles or squares can be paired with white background pieces and sewn diagonally to form angled fabric sections. Red prints work beautifully for the bow, while green fabric can also be used if you want the ribbon and bow to coordinate. Pressing these triangular units carefully helps preserve sharp points.
Before sewing, arrange every piece on a table or design board. This simple preparation step can dramatically improve the finished composition. Move similar prints apart, alternate red and green areas, and confirm that your vertical and horizontal ribbon strips remain clearly visible. Photographing the arrangement before sewing can also help you remember where each fabric belongs.
Cutting and Sewing the Main Patchwork Gift Box
Begin with the lower half of the present. Place two different fabric rectangles side by side and insert a narrow vertical ribbon strip between them. Sew the first rectangle to one edge of the ribbon using a consistent ¼-inch seam allowance, press the seam, and then sew the second rectangle to the opposite side. You now have the beginning of the Gift Box patchwork block for cushions Pattern.
Repeat the process for the upper half of the gift body. The photograph demonstrates that the upper and lower sections do not need identical fabric arrangements. In fact, alternating your prints makes the block more interesting. Use one or two additional Christmas fabrics in this section while continuing the same ribbon color or introducing another coordinating strip.
Next, create the horizontal ribbon that crosses the center of the gift. Cut a strip equal to the width of your assembled sections. Depending on the proportions of your block, a strip approximately 1½ to 2 inches wide usually creates a strong visual line. Sew the strip between the upper and lower patchwork sections, keeping the edges carefully aligned.
After joining the upper section, horizontal ribbon, and lower section, inspect the central vertical ribbon. Ideally, the ribbon strips above and below the horizontal band should appear visually connected. Perfect alignment is attractive but not absolutely necessary in a scrappy design. Pinning the center intersection before sewing can help prevent the pieces from shifting.
Press the completed gift body from the wrong side. Use an up-and-down pressing motion rather than dragging the iron across the fabric, because aggressive movement can stretch the patchwork. Proper pressing is particularly important when working with the Christmas quilt block because straight rectangular sections should remain square before the bow and background are added.
Measure the assembled gift body before continuing. If one side is slightly uneven, trim only the minimum amount required to square the unit. Avoid repeatedly trimming the block, because removing too much fabric can change the proportions. Accurate squaring at this stage makes the later background borders much easier to attach and gives the cushion a polished appearance.
Creating the Bow, Background, and Finished Cushion Front
To construct the bow, cut two contrasting rectangles or squares for the colored portions and two matching pieces from the white background fabric. Draw a diagonal guideline on the wrong side of each white piece. Position a background square over a colored piece, sew along the diagonal line, trim away the excess fabric approximately ¼ inch beyond the seam, and press the triangle open.
Create a mirrored unit for the opposite side of the bow. When the two pieces are positioned beside each other, the colored triangles should point outward while the white area forms an inverted triangular shape in the center. This simple patchwork bow technique creates the recognizable wrapped-present appearance seen at the top of the photographed blocks.
Add small background rectangles to the left and right sides of the bow if necessary so that the bow section matches the width of the gift body. Sew the completed bow section to the top of the present. Match the center carefully, pin the layers, and stitch slowly. After pressing, you should have one complete gift silhouette ready to be surrounded by background fabric.
Now add white background strips to both sides of the gift. The wide neutral areas visible in the photograph provide visual breathing room and emphasize the colorful patchwork. Cut each side strip slightly longer than necessary, sew it to the gift unit, press it outward, and trim the top and bottom evenly. Repeat on the opposite side.
Add the bottom white strip and, if needed, additional fabric above the bow until the block reaches your planned cushion-front size. For example, you can square the finished block to approximately 16½ inches if you want a 16-inch finished cushion cover. The extra half inch provides the seam allowance needed when assembling the cushion.
To transform the Gift Box patchwork block for cushions Pattern into a complete cushion, you may add batting and backing fabric behind the patchwork front and quilt the layers before assembling the cover. Straight-line quilting around the gift, ribbons, or individual patchwork pieces is easy and attractive. Finish with an envelope backing or zipper closure according to your preferred cushion-making method.
Frequently Asked Questions About the Gift Box Patchwork Block for Cushions Pattern
Is the Gift Box patchwork block for cushions Pattern suitable for beginners? Yes. The project is especially approachable because most pieces are rectangles and strips, with only a few simple diagonal seams needed for the bow. Beginners should focus on accurate cutting, a consistent ¼-inch seam allowance, and pressing each section before joining the next one.
What fabrics work best for this patchwork block? Quilting cotton is usually the easiest choice because it is stable, easy to cut, and available in countless prints. Red, green, and white fabrics produce the traditional Christmas appearance shown in the photo, but any coordinated color palette can be used. Small scraps are particularly useful for creating the varied scrappy patchwork effect.
How large should the finished gift box block be? There is no single required size. For a standard decorative cushion, a finished front between approximately 16 and 18 inches is practical. Make the colorful gift slightly smaller than the complete block so that you have enough neutral background around it to emphasize the present shape.
Can I make several different gift blocks for one quilt? Absolutely. One of the best features of this design is its flexibility. You can reverse ribbon colors, rotate prints, change the proportions of individual rectangles, or create gifts in different sizes. Multiple blocks can then be joined with sashing to create a festive Christmas patchwork quilt.
Do I need to quilt the cushion front? Quilting is optional, but it can improve both appearance and durability. A thin layer of batting behind the patchwork gives the cushion more structure and makes the seams feel softer. Simple straight quilting around the gift box, along the ribbon lines, or inside the white background is enough to create a finished handmade look.
How can I keep the ribbon sections aligned correctly? Measure the center of each section before sewing and use pins at important intersections. When joining a horizontal ribbon to sections containing a vertical ribbon, match the center points first and then pin toward the edges. Sewing slowly over intersections also helps preserve the clean geometry that defines the Gift Box patchwork block for cushions Pattern.
Conclusion
The Gift Box patchwork block for cushions Pattern is a creative way to combine traditional patchwork techniques with a bright, recognizable gift-box design. Throughout this tutorial, you learned how to select coordinated red and green fabrics, organize contrasting prints, cut the main gift sections, add vertical and horizontal ribbon strips, construct a simple geometric bow, and surround the motif with a clean white background. These steps reproduce the main visual features of the project shown in the reference image while still allowing plenty of freedom to adapt the measurements, colors, and fabric combinations.
The most important part of this project is not making every block identical. The two examples in the photograph demonstrate how changing the position of prints and ribbon colors can produce completely different results while maintaining the same basic patchwork gift box pattern. This makes the design especially useful for fabric scraps, seasonal collections, or coordinated remnants left from previous quilting projects.
Once the block is completed, it can be quilted and transformed into a decorative cushion that adds a handmade seasonal detail to a sofa, chair, bedroom, or holiday display. The same construction can also become the foundation for larger quilting projects, allowing you to create several presents and combine them into a unique festive quilt. If you make your own Gift Box patchwork block for cushions Pattern, leave your sincere opinion about the project and share your suggestions. It is always interesting to know which fabric combinations, ribbon colors, or creative variations you would choose for your own version.